
Popularne kategorie
Szukasz włóczki?


Komentarze / Pytania (9)
![]() Maria napisała::
Maria napisała::
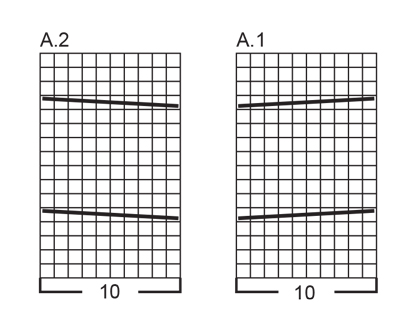
Dear DD, can you please provide correct instructions? Reply to the lady from France is completely different to my reply, please see following:(Each diagram is read starting at the bottom right on the right side, from right to left on the right side and from left to right on the wrong side (= the first 4 rows are knitted in stocking stitch) and we will cross the stitches (= cable) on the 5th row then every 8 rows.) I have already purchased your yarn and will not be able to use it without clarity.
10.12.2024 - 09:47Odpowiedź DROPS Design :
Dear Maria, the start of the row is the upper edge of the wrist warmer, and you work downwards, towards the lower edge of the wrist warmer, which is the end of the row. So, when you start the cables, you work the first row of A.1 once, at the beginning of the row (so the upper edge of the wrist warmer), then the rest of the row downwards is worked in garter stitch. You work back, garter stitch over garter stitch and , at the end of the row, the 2nd row of A.1/A.2, worked from left to right, to work each stitch of the chart over the correct stitch in the previous row. You can count the number of stocking stitch rows in the chart and calculate how often you work the cable. Happy knitting!
15.12.2024 - 14:08
![]() Matia napisała::
Matia napisała::
Thank you and just so I understand correctly, I work Row1: K 6 Stitches, slip 5 sts on cable needle behind piece, K 5, K 5 from cable needle, K remaining stitches? I looked but I could not see where it says to flip the diagram clockwise, start in top right. It only states: Worked back and forth on needle.
09.12.2024 - 08:03
![]() Maria napisała::
Maria napisała::
Thank you for your prompt reply. I understand that the cable pattern is the same on all three patterns but the confusion is where to knit the cable edge because the diagram states to knit the edge in two places instead of one. Can you please confirm if it is the first or second place on the diagram the cable should be knitted?
08.12.2024 - 15:30Odpowiedź DROPS Design :
Dear Maria, you work the piece sideways. So the first 10 stitches are the upper part, where the cable will be worked, while the rest of the row in garter stitch is the part starting from the cable down to after the wrist. So you would work as if rotating the chart clockwise and working it one row from the top down and the following row from the bottom up. The cable is always in that upper edge, as stated in the text. When working the second wrist warmer you will use A.2 instead of A.1 but the position is the same as before, the upper edge of the wrist warmer. Happy knitting!
08.12.2024 - 17:48
![]() Maria napisała::
Maria napisała::
Can you please check the Diagram? It's seems to be incorrect. It is the same as diagram Head Band using the same yarn in the same design using cable edge. Please can you correct the design?
08.12.2024 - 11:04Odpowiedź DROPS Design :
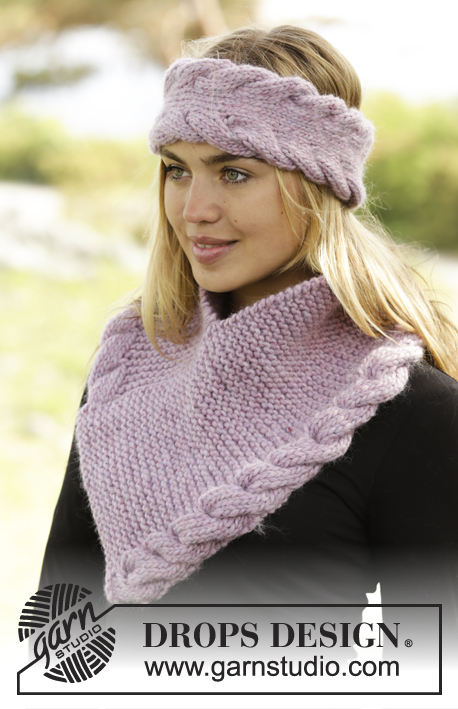
Dear Maria, the charts are identical since all three pieces (the wrist warmers, the head band and the neck warmer) use the same cable pattern. You can look at the neck warmer and see that the cable in the neck warmer and theone in the wrist warmers is exactly the same. The head band also has the same cables but because of working in stocking stitch in between the cables, instead of garter stitch as in the neck warmer and the wrist warmers, the cables look slightly different but the stitches worked in the cable are the same. Happy knitting!
08.12.2024 - 12:15
![]() Bene Elfriede napisała::
Bene Elfriede napisała::
Je voulais juste savoir pour les torsades vous les faites combien de fois au 1 er rang jute une fois ou tout le tour c est dire 2 ou 3 fois merci de votre reponse?
16.03.2018 - 11:19Odpowiedź DROPS Design :
Bonjour Mme Elfriede, on tricote le diagramme tous les rangs ainsi: A.1 (ou A.2) et les mailles restantes au point mousse. Chaque diagramme se lit en commençant en bas à droite sur l'endroit, de droite à gauche sur l'endroit et de gauche à droite sur l'envers (= les 4 premiers rangs se tricotent en jersey) et on va croiser les mailles (= torsade) au 5ème rang puis tous les 8 rangs. Bon tricot!
16.03.2018 - 11:30
![]() Viktoria napisała::
Viktoria napisała::
Hallo liebes Drops-Team, bei der Grafik ist wohl ein kleiner Fehler unterlaufen. A1 oder A2 - einmal müssen die M vor der Arbeit liegen, oder? Ein schönes Modell und sehr einfach zu stricken! Viele Grüße, Viktoria
12.10.2017 - 12:44Odpowiedź DROPS Design :
Liebe Viktoria, danke für die Rückmeldung, bei dem Zopf in A.2 müssen die Maschen vor der Arbeit gelegen werden, es wird korrigiert. Viel Spaß beim stricken!
12.10.2017 - 13:23
![]() Paola napisała::
Paola napisała::
Meno male che ho chiesto.......avevo iniziato con punti legaccio.....grazie come sempre veramente veloci nel risolvere i miei dubbi un saluto
15.09.2016 - 15:42
![]() Paola napisała::
Paola napisała::
Salve, molto semplice e di grande effetto questo modello, chiedo solo una precisazione, nella spiegazione dei punti date anche quella relativa alle coste a legaggio e nella spiegazione del lavoro dite di misurare lungo le coste a legaccio; intendete con ciò la semplice lavorazione a legaccio? Non mi sembra che ci siano parti con coste a legaccio. grazie 1000!!!
15.09.2016 - 15:04Odpowiedź DROPS Design :
Buongiorno Paola. Per 1 costa a legaccio, si intendono 2 ferri a dir. La parte dove non c'è la treccia, è lavorata a coste a legaccio. Il lavoro viene misurato nella parte lavorata a legaccio, nella direzione del lavoro, quindi a partire dal ferro di avvio del lavoro, fino alle m sul ferro. Buon lavoro!
15.09.2016 - 15:16
![]() Mam'Kramby napisała::
Mam'Kramby napisała::
Très jolies et originales mitaines
04.06.2016 - 15:38
|
||||||||||
Cable Embrace#cableembracewristwarmers |
||||||||||
|
|
||||||||||
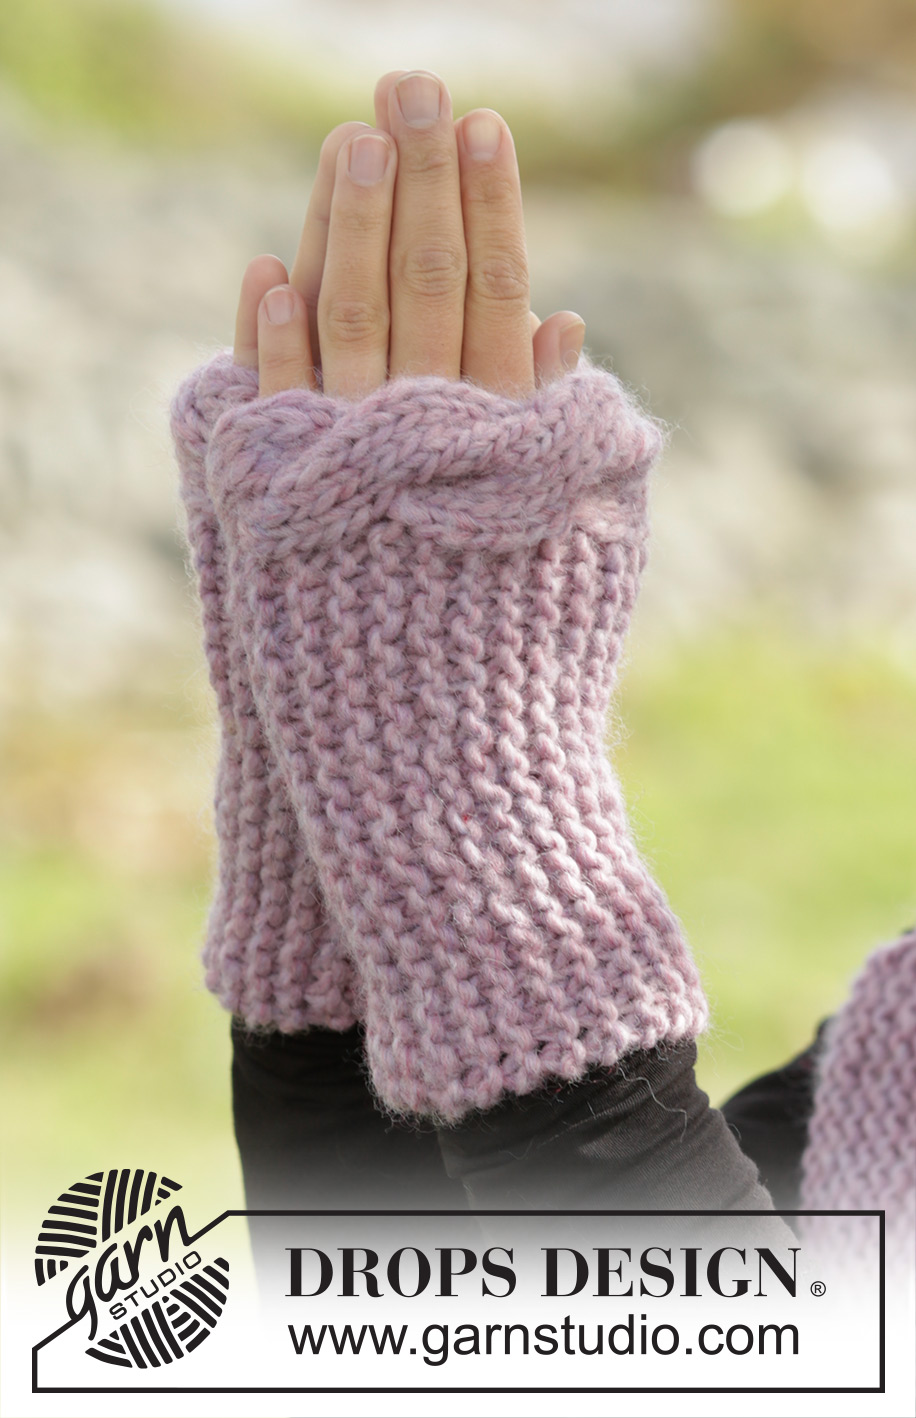
Ocieplacze na nadgarstki DROPS przerabiane w poprzek robótki ściegiem francuskim z brzegiem warkoczem, z włóczki „Andes”.
DROPS 171-57 |
||||||||||
|
ŚCIEG FRANCUSKI (w tę i z powrotem): Przer. wszystkie rzędy na prawo. 1 „ściągacz” francuski = 2 rz. na prawo. ŚCIEG FANTAZYJNY: Patrz schematy A.1 i A.2. Schematy przedstawiają wszystkie rzędy ściegu fantazyjnego, widok na prawej stronie robótki. ---------------------------------------------------------- OCIEPLACZE: Przerabiane w tę i z powrotem. Na drutach nr 7 nabrać 29-31 o. włóczką Andes. Przer. 1-szy rz. na prawej stronie robótki następująco: schemat A.1 (= 10 o. - UWAGA: nie ma oczek brzeg., tzn. przer. 1-sze o. zgodnie ze schematem), dalej przer. pozostałe o. ściegiem francuskim - patrz powyżej. Dalej przer. tak samo w tę i z powrotem. ZACHOWAĆ TAKIE SAME NAPRĘŻENIE NICI JAK W PRZYPADKU PRÓBKI! Na wys. ok. 18-20 cm od dołu robótki (lub dopasować do swoich potrzeb – mierzyć wzdłuż ściągaczy francuskich od rzędu nabierania oczek), zamknąć wszystkie oczka. WYKOŃCZENIE; Zszyć pierwszy rząd z ostatnim. Drugi ocieplacz wykonać tak samo, ale przer. schemat A.2 (zamiast A.1). |
||||||||||
Objaśnienia do schematu |
||||||||||
|
||||||||||
 |
||||||||||
Skończyłaś ten wzór?Otaguj swoje zdjęcia #dropspattern #cableembracewristwarmers lub prześlij je do #dropsfan gallery. Potrzebujesz pomocy w związku z tym wzorem?Zobacz 12 instrukcje video, sekcję Komentarze/Pytania i jeszcze więcej, wchodząc na stronę wzoru na garnstudio.com © 1982-2026 DROPS Design A/S. Wszelkie prawa zastrzeżone. Ten dokument, w całości, jest chroniony prawem. Zobacz co możesz robić z naszymi wzorami na dole każdego wzoru na naszej stronie. |
||||||||||


Posiadając 40 lat doświadczenia w projektowaniu wzorów na druty i szydełko, DROPS Design oferuje jedną z największych kolekcji bezpłatnych wzorów w internecie – przetłumaczonych na 17 języków. Obecnie jest dostępnych 324 katalogów i 12290 wzorów w języku polskim.
Dokładamy wszelkich starań, aby oferować Wam druty i szydełka, inspiracje, fachowe porady oraz doskonałej jakości włóczki w najlepszych cenach! Zamierzasz wykorzystać nasze wzory inaczej niż tylko do osobistego użytku? Przeczytaj jakie masz prawa w Copyright, który znajdziesz na końcu każdego wzoru. Miłej pracy!
Dodaj komentarz do modelu DROPS 171-57
Chcielibyśmy się dowiedzieć co masz do powiedzenia o tym wzorze!
Jeśli chcesz zadać pytanie i szybko uzyskać odpowiedź, upewnij się, że została wybrana właściwa kategoria w formularzu poniżej. Pola obowiązkowe są oznaczone *.