
Populära kategorier
Letar du efter ett garn?


Kommentarer / Frågor (9)
![]() Maria skrev:
Maria skrev:
Dear DD, can you please provide correct instructions? Reply to the lady from France is completely different to my reply, please see following:(Each diagram is read starting at the bottom right on the right side, from right to left on the right side and from left to right on the wrong side (= the first 4 rows are knitted in stocking stitch) and we will cross the stitches (= cable) on the 5th row then every 8 rows.) I have already purchased your yarn and will not be able to use it without clarity.
10.12.2024 - 09:47DROPS Design svarede:
Dear Maria, the start of the row is the upper edge of the wrist warmer, and you work downwards, towards the lower edge of the wrist warmer, which is the end of the row. So, when you start the cables, you work the first row of A.1 once, at the beginning of the row (so the upper edge of the wrist warmer), then the rest of the row downwards is worked in garter stitch. You work back, garter stitch over garter stitch and , at the end of the row, the 2nd row of A.1/A.2, worked from left to right, to work each stitch of the chart over the correct stitch in the previous row. You can count the number of stocking stitch rows in the chart and calculate how often you work the cable. Happy knitting!
15.12.2024 - 14:08
![]() Matia skrev:
Matia skrev:
Thank you and just so I understand correctly, I work Row1: K 6 Stitches, slip 5 sts on cable needle behind piece, K 5, K 5 from cable needle, K remaining stitches? I looked but I could not see where it says to flip the diagram clockwise, start in top right. It only states: Worked back and forth on needle.
09.12.2024 - 08:03
![]() Maria skrev:
Maria skrev:
Thank you for your prompt reply. I understand that the cable pattern is the same on all three patterns but the confusion is where to knit the cable edge because the diagram states to knit the edge in two places instead of one. Can you please confirm if it is the first or second place on the diagram the cable should be knitted?
08.12.2024 - 15:30DROPS Design svarede:
Dear Maria, you work the piece sideways. So the first 10 stitches are the upper part, where the cable will be worked, while the rest of the row in garter stitch is the part starting from the cable down to after the wrist. So you would work as if rotating the chart clockwise and working it one row from the top down and the following row from the bottom up. The cable is always in that upper edge, as stated in the text. When working the second wrist warmer you will use A.2 instead of A.1 but the position is the same as before, the upper edge of the wrist warmer. Happy knitting!
08.12.2024 - 17:48
![]() Maria skrev:
Maria skrev:
Can you please check the Diagram? It's seems to be incorrect. It is the same as diagram Head Band using the same yarn in the same design using cable edge. Please can you correct the design?
08.12.2024 - 11:04DROPS Design svarede:
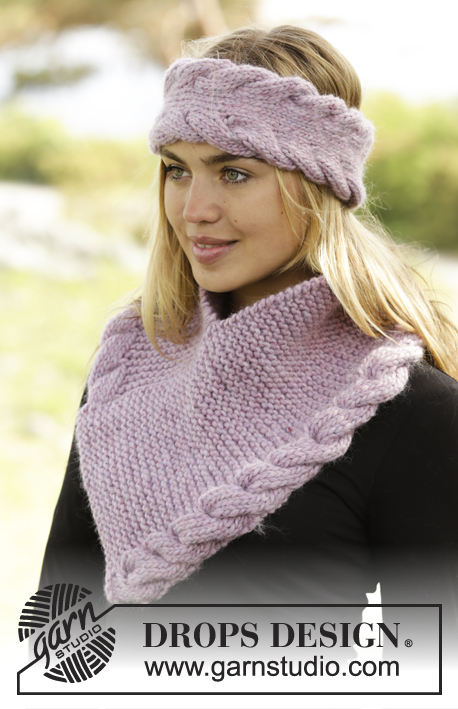
Dear Maria, the charts are identical since all three pieces (the wrist warmers, the head band and the neck warmer) use the same cable pattern. You can look at the neck warmer and see that the cable in the neck warmer and theone in the wrist warmers is exactly the same. The head band also has the same cables but because of working in stocking stitch in between the cables, instead of garter stitch as in the neck warmer and the wrist warmers, the cables look slightly different but the stitches worked in the cable are the same. Happy knitting!
08.12.2024 - 12:15
![]() Bene Elfriede skrev:
Bene Elfriede skrev:
Je voulais juste savoir pour les torsades vous les faites combien de fois au 1 er rang jute une fois ou tout le tour c est dire 2 ou 3 fois merci de votre reponse?
16.03.2018 - 11:19DROPS Design svarede:
Bonjour Mme Elfriede, on tricote le diagramme tous les rangs ainsi: A.1 (ou A.2) et les mailles restantes au point mousse. Chaque diagramme se lit en commençant en bas à droite sur l'endroit, de droite à gauche sur l'endroit et de gauche à droite sur l'envers (= les 4 premiers rangs se tricotent en jersey) et on va croiser les mailles (= torsade) au 5ème rang puis tous les 8 rangs. Bon tricot!
16.03.2018 - 11:30
![]() Viktoria skrev:
Viktoria skrev:
Hallo liebes Drops-Team, bei der Grafik ist wohl ein kleiner Fehler unterlaufen. A1 oder A2 - einmal müssen die M vor der Arbeit liegen, oder? Ein schönes Modell und sehr einfach zu stricken! Viele Grüße, Viktoria
12.10.2017 - 12:44DROPS Design svarede:
Liebe Viktoria, danke für die Rückmeldung, bei dem Zopf in A.2 müssen die Maschen vor der Arbeit gelegen werden, es wird korrigiert. Viel Spaß beim stricken!
12.10.2017 - 13:23
![]() Paola skrev:
Paola skrev:
Meno male che ho chiesto.......avevo iniziato con punti legaccio.....grazie come sempre veramente veloci nel risolvere i miei dubbi un saluto
15.09.2016 - 15:42
![]() Paola skrev:
Paola skrev:
Salve, molto semplice e di grande effetto questo modello, chiedo solo una precisazione, nella spiegazione dei punti date anche quella relativa alle coste a legaggio e nella spiegazione del lavoro dite di misurare lungo le coste a legaccio; intendete con ciò la semplice lavorazione a legaccio? Non mi sembra che ci siano parti con coste a legaccio. grazie 1000!!!
15.09.2016 - 15:04DROPS Design svarede:
Buongiorno Paola. Per 1 costa a legaccio, si intendono 2 ferri a dir. La parte dove non c'è la treccia, è lavorata a coste a legaccio. Il lavoro viene misurato nella parte lavorata a legaccio, nella direzione del lavoro, quindi a partire dal ferro di avvio del lavoro, fino alle m sul ferro. Buon lavoro!
15.09.2016 - 15:16
![]() Mam'Kramby skrev:
Mam'Kramby skrev:
Très jolies et originales mitaines
04.06.2016 - 15:38
|
||||||||||
Cable Embrace#cableembracewristwarmers |
||||||||||
|
|
||||||||||
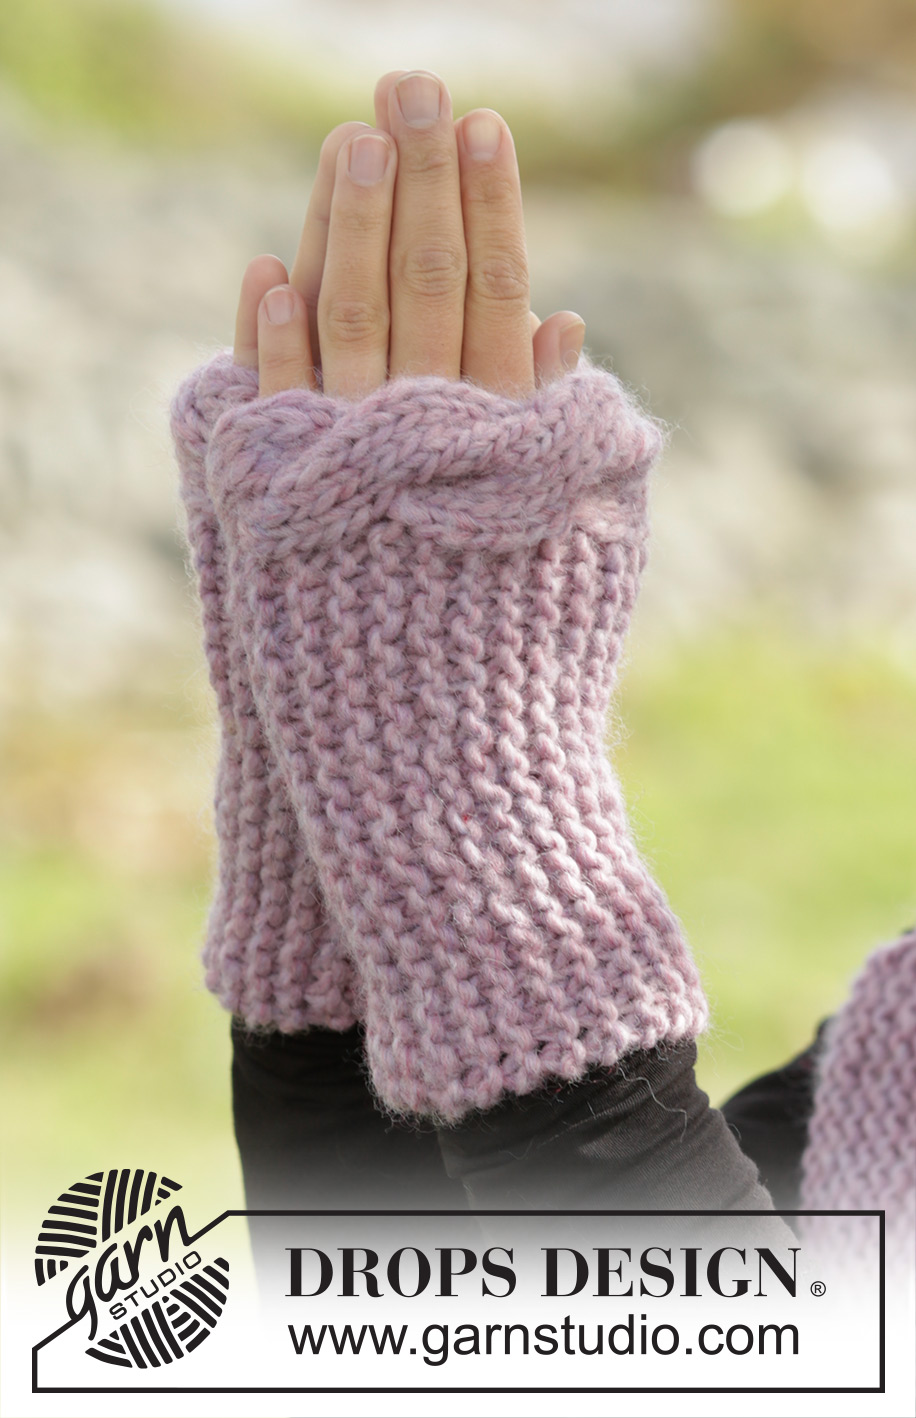
DROPS pulsvärmare i ”Andes” stickade sidledes med rätstickning och flätkant
DROPS 171-57 |
||||||||||
|
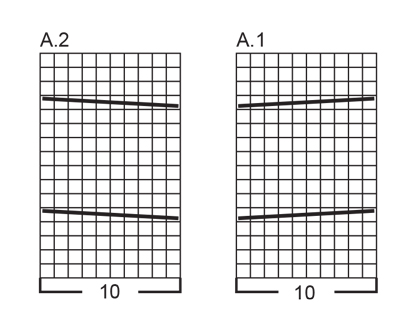
RÄTST (stickas fram och tillbaka): Maskorna stickas räta på alla varv. MÖNSTER: Se diag A.1 och A.2. Diag visar alla v i mönstret sett från rätsidan. ---------------------------------------------------------- PULSVÄRMARE: Arb stickas fram och tillbaka på st. Lägg upp 29-31 m på st 7 med Andes. Första v stickas så här från rätsidan: Sticka A.1 (= 10 m – OBS: Det stickas inte kantm, dvs första m stickas som diag visar), sedan stickas det RÄTST över de resterande m - se förkl ovan. Fortsätt så fram och tillbaka. KONTROLLERA STICKFASTHETEN! När arb mäter ca 18-20 cm (ev vid önskat mått - mätt längs rätst från uppläggningskanten), maskas alla m av. MONTERING: Sy uppläggningskanten till avmaskningskanten. Sticka en pulsvärmare till på samma sätt, men sticka mönster efter diag A.2 (i stället för A.1). |
||||||||||
Diagram förklaring |
||||||||||
|
||||||||||
|
||||||||||
Har du gjort detta mönster?Tagga då dina bilder med #dropspattern #cableembracewristwarmers eller skicka in de till #dropsfan galleriet. Behöver du hjälp med mönstret?Du hittar 12 instruktionsvideoer, kommentarer/frågor och mer i mönstret på www.garnstudio.com © 1982-2025 DROPS Design A/S. Alla rättigheter är reserverade. Detta dokument med tillhörande underdokument har copyright. Läs mer om vad du kan göra med våra mönster längst ner på vår hemsida. |
||||||||||


Med över 40 år i stick- och virkbranschen erbjuder DROPS Design en av de mest omfattande samlingarna av gratis mönster på internet - översatt till 17 språk. Per idag har vi 314 kataloger och 11822 mönster på och alla är översatta till Svenska.
Vi arbetar hårt för att kunna erbjuda det bästa inom stickning och virkning, inspiration och goda råd, men också kvalitetsgarn till fantastiska priser! Vill du använda våra mönster till annat än personligt användande? Du kan läsa om vilka regler som gäller i texten Copyright längst ner på sidan på alla våra mönster. Lycka till!
Kommentera mönster DROPS 171-57
Vi vill gärna ha din åsikt om denna modell!
Om du har en fråga kring den, kom ihåg att välja rätt kategori i menyn under, så får du snabbare svar! Obligatoriska fält är markerade med *.