
Popularne kategorie
Szukasz włóczki?


Komentarze / Pytania (68)
![]() Stacey Meyer napisała::
Stacey Meyer napisała::
Hello! This is a lovely detailed pattern and I so appreciate all the assistance you've provided. I'm sorry if I've overlooked it but I can't for the gauge guide for this pattern. I just want to be sure I'm not crocheting too loosely or too tight. Thank you!
15.08.2016 - 06:17Odpowiedź DROPS Design :
Dear Mrs Meyer, tension may differ with every crocheter, so remember to adjust the crochet hook size to that you get the stated gauge ie 18 dc x 9 rows = 4'' x 4'' (10 x 10 cm). Happy crocheting!
15.08.2016 - 11:21
![]() Sara Otero napisała::
Sara Otero napisała::
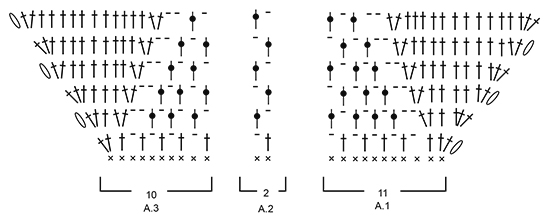
Buenas tardes, después de la primera ronda de puntos bajos, manda a trabajar los diagramas del 1 al 3 el 2 diagrama no lo entiendo pk solo pone dos puntos bajos, ¿entonces hay que disminuir? ¿Que significa 6 t veces? Muchas gracias
12.08.2016 - 16:08Odpowiedź DROPS Design :
Hola Sara, el diagrama A2 se trabaja sobre un total de 12 pts, es decir, A2 (=2p.b) se repite un total de 6 veces a lo largo de la fila para la talla S.
14.08.2016 - 12:02
![]() Karen A. Hillman napisała::
Karen A. Hillman napisała::
How do you even out the rows on the side panels, there's always one extra row on one side panel ???????
16.07.2016 - 20:27Odpowiedź DROPS Design :
Dear Mrs Hillmann, this will not be visible at the end - if you rather like to get both sides the same, cut the yarn and chain number of sts required for one side, work next row on the middle panel and chain number of sts required for the other side and continue as stated. Happy crocheting!
18.07.2016 - 09:15
![]() Sandy napisała::
Sandy napisała::
I am wondering about the purpose of the 5 chains at the beginning of each DC row. I can see they may be a decorative bit on the main part of the top, but why are they along the back strap since it will be folded over for the tube casing?
25.06.2016 - 01:04Odpowiedź DROPS Design :
Dear Sandy, you can choose to not crochet the 5 ch at the beg of dc rows when working the last rows for tube casing if your chains are long enough to not tighten piece on the sides. Happy crocheting!
27.06.2016 - 08:33
![]() Iris napisała::
Iris napisała::
Hey Drops, I would like to use your recycled cotton, either #6 of #5 to make this top. Is it a problem as they aren't in the yarn category B? Thanks in advance
30.04.2016 - 13:47Odpowiedź DROPS Design :
Dear Iris, DROPS loves you #6 belongs to group A and DROPS loves you #5 to group C so that they may be not the best alternative to a yarn group B - read more here, and contact your DROPS store for any further individual assistance choosing a yarn/a pattern. Happy crocheting!
02.05.2016 - 09:25Leona napisała::
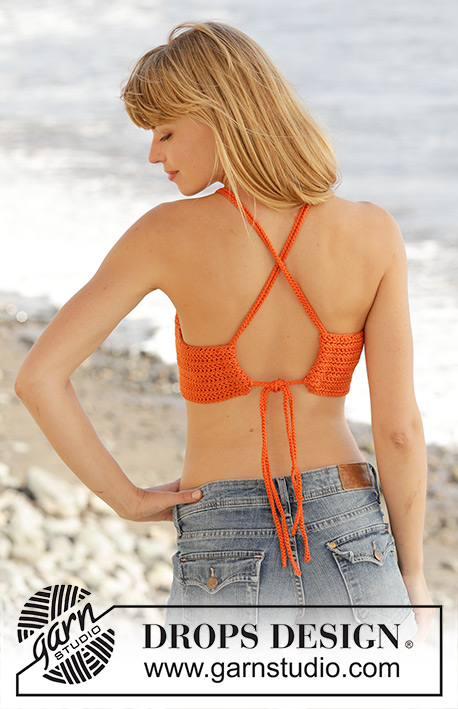
Hi! I don't understand the last part on how to thread the ties through the top at all. Is there a video for this, or a clearer explanation? I have no idea which holes and dc:s and loops the text is talking about. Please help!
24.04.2016 - 21:44Odpowiedź DROPS Design :
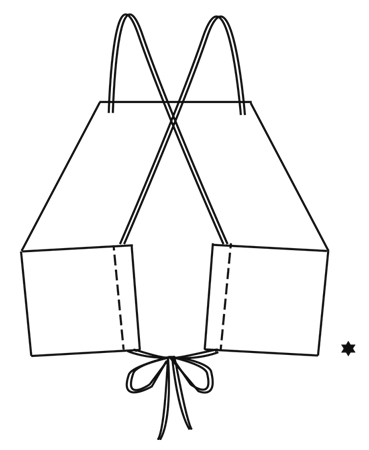
Dear Leona, you will find at the very bottom of the page when scrolling down a chart showing top from back side and how to thread the ties. Happy assembly!
25.04.2016 - 10:18
![]() KC napisała::
KC napisała::
Hello...I'm sorry, I'm not understanding where youre getting the measurements. or how you are measuring them. I just would like to know how to had the flaps that fold to the back side? am i supposed to add more chains or do i keep dc until it reaches a a certain length? Is there a way I could send a picture of my progress?
21.04.2016 - 20:08Odpowiedź DROPS Design :
Dear KC, you measure total width from the fundation chain towards last row worked. On each side of piece along fold from WS the outermost 3/4" on each side to make like a hem where you will thread tie through - see charts at the bottom of the page. For any further personnal assistance you are welcome to contact the store where you bought your yarn and then show your picture. Happy crocheting!
22.04.2016 - 08:43
![]() KC napisała::
KC napisała::
Hi! I actually don't understand what those numbers mean and where to measure then. I've completed a.1-a.4 by the diagram. I'm not sure how to read those numbers in crochet terms
21.04.2016 - 17:02Odpowiedź DROPS Design :
Dear KC, you will find a measurement chart at the bottom of the written patter below the diagrams - the finished measurements are the one from the very top of the piece (fundation chains) - measurements are in cm in chart and given in inches in written pattern. Happy crocheting!
21.04.2016 - 17:05
![]() KC napisała::
KC napisała::
After I've completed A.1 to A.4 What do i do next? How do i make the rest? all i have is the chest piece done..
21.04.2016 - 01:36Odpowiedź DROPS Design :
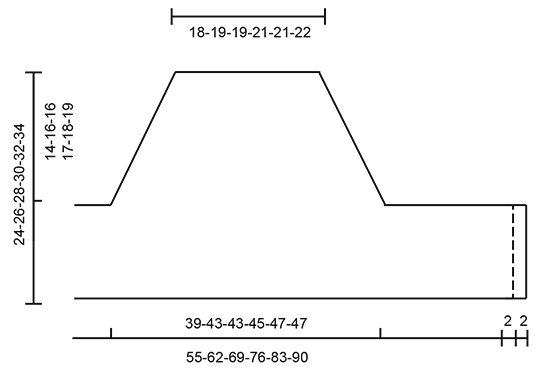
Dear Kc, After A.1-A.4 have been worked, work 1 dc in every dc until piece measures 24-26-28-30-32-34 cm / 9½"-10 1/4"-11"-11 3/4"-12½"-13½" from cast-on edge mid front. Fasten off. Happy crocheting!
21.04.2016 - 09:10
![]() Claudia Jakrlin napisała::
Claudia Jakrlin napisała::
Hallo Drops, warum muss ich eigentlich jede Reihe mit 5 Maschen beginnen? Das gibt derzeit ziemlich hässliche Bögen am Rand. Oder zeigt sich das später beim Tragen straff?
19.04.2016 - 15:03Odpowiedź DROPS Design :
Liebe Claudia, normalerweise wird eine Stb-Reihe mit 3 Luftmaschen gewendet, wenn allerdings die Kante schräg ist (z.B. zurch Zunahmen), braucht man mehr Lm um die Diagonale auszugleichen. Wenn Sie sehr lockere Lm häkeln, reichen vielleicht 4 - aber die Kante darf auf keinen Fall spannen.
20.04.2016 - 07:57
|
|||||||||||||||||||
Mandarina#mandarinatop |
|||||||||||||||||||
 |
 |
||||||||||||||||||
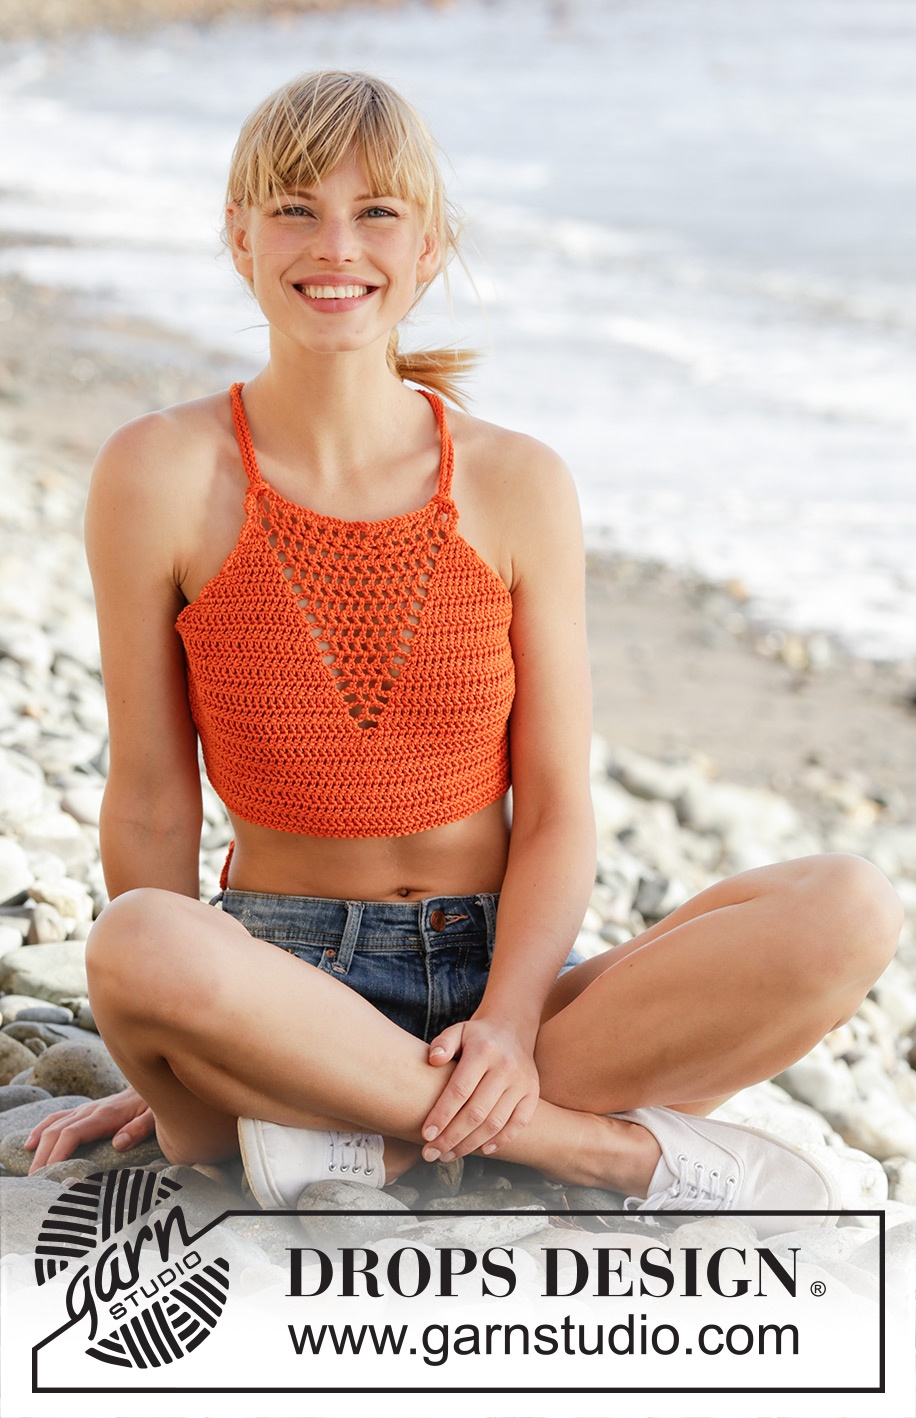
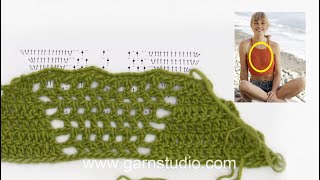
Top DROPS na szydełku, słupkami, ściegiem ażurowym, wiązany z tyłu, przerabiany z góry na dół, włóczką DROPS Muskat. ROZMIARY S-XXXL.
DROPS 170-16 |
|||||||||||||||||||
|
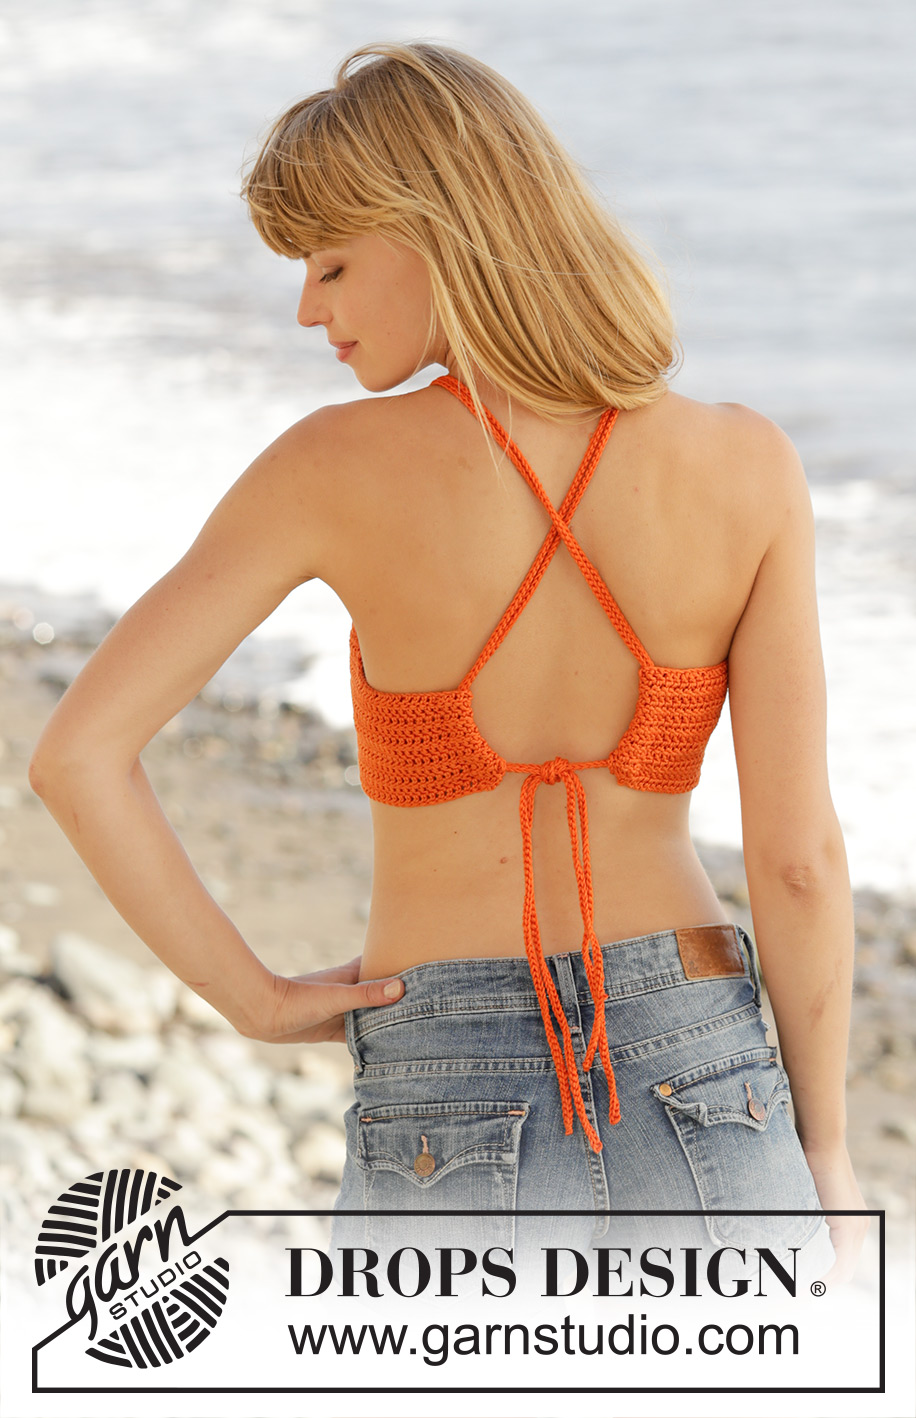
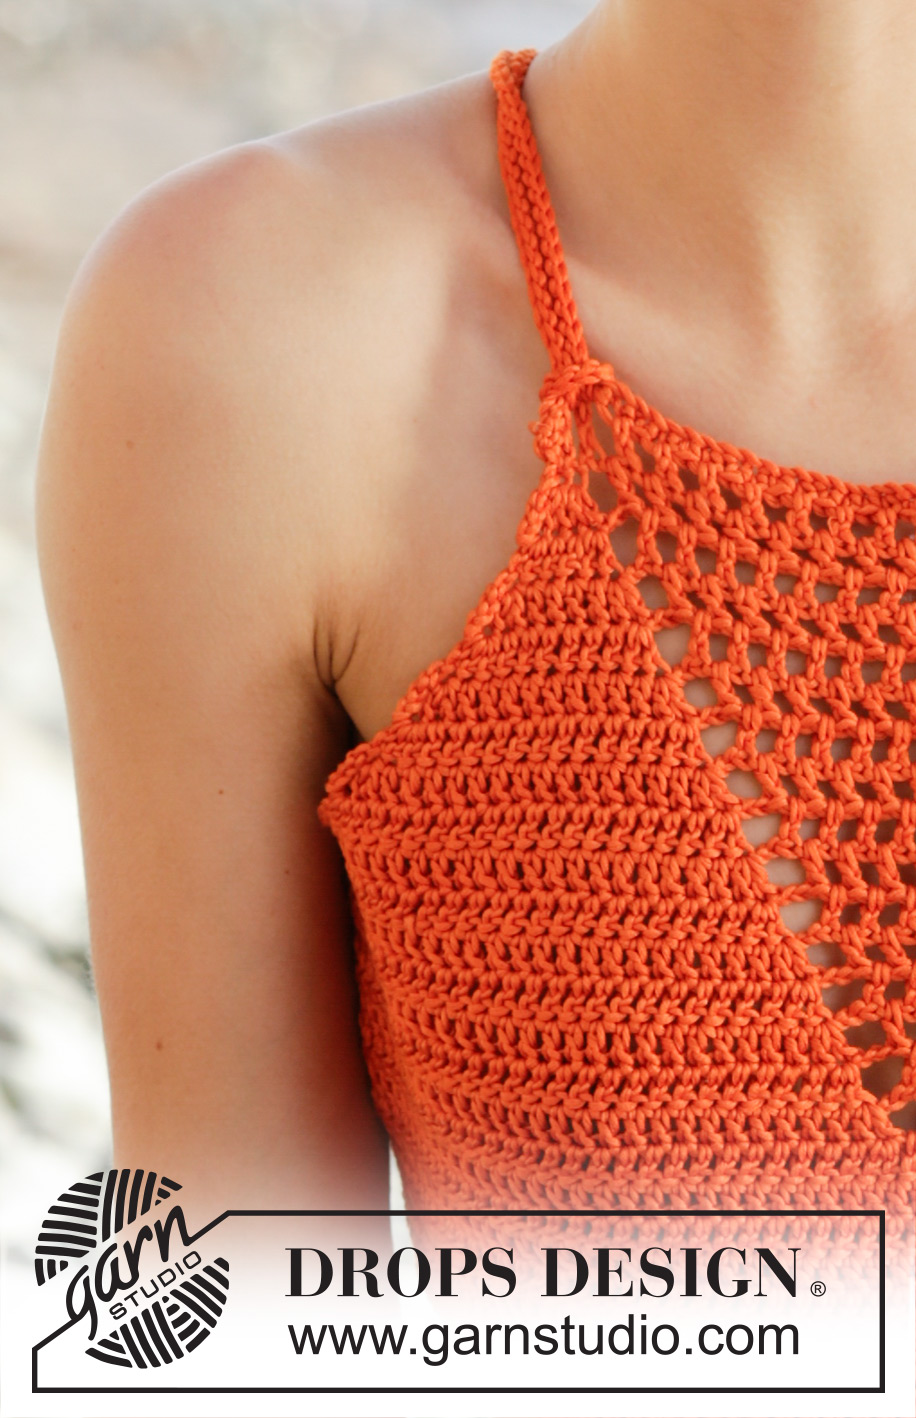
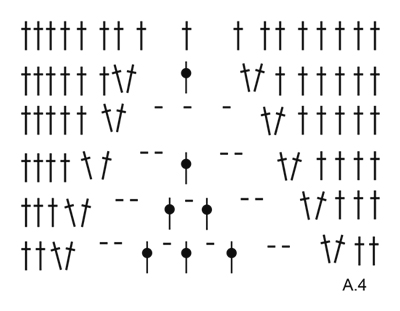
WSKAZÓWKA: Na początku każdego rzędu sł przer. 5 zwrotnych oł. Te 5 oł nie zastępują 1-szego sł. ŚCIEG FANTAZYJNY: Patrz schematy A.1-A.4. ---------------------------------------------------------- TOP: Przerabiany w tę i z powrotem, z góry na dół. Na szydełku nr 4 luźno wykonać 42-44-44-47-47-49 oł (w tym 1 zwrotne oł) włóczką Muskat. Obrócić i przer. następująco: 1 psł w 2-gie oł od szydełka (= 1 psł + 1 zwrotne oł), 1 psł w każde z 2-4-4-2-2-4 nast. oł, *ominąć 1 oł, 1 psł w każde z 4 nast. oł*, powt. od *-* jeszcze 6-6-6-7-7-7 razy, 1 psł w każde z 2 ost. oł = 33-35-35-37-37-39 psł. Obrócić i przer. następująco: A.1 ponad 11 pierwszymi psł, 6-7-7-8-8-9 razy A.2 (= 2 psł) na szerokość, A.3 ponad 10 ost. psł - PATRZ WSKAZÓWKA! ZACHOWAĆ TAKIE SAME NAPRĘŻENIE NICI JAK W PRZYPADKU PRÓBKI! Gdy schematy A.1-A.3 zostaną przerobione 1 raz na wysokość, dalej przer. ściegiem fantazyjnym i dodawać o. w taki sam sposób, aż w sumie zostanie przerobionych 13-14-14-15-16-17 rz. Jest teraz 71-77-77-81-85-85 sł/oł. Zostały dodane o. z każdej strony schematów A.1 i A.3, ale ścieg ażurowy zwęża się do dołu w róg na środku przodu. Dalej przer. następująco: 27-30-37-44-49-57 oł (w tym 5 zwrotnych oł), obrócić i przer. następująco: 1 sł w 6-te oł od szydełka, dalej przer. 1 sł w każde z 1-4-6-3-3-6 nast. oł, *ominąć 1 oł, 1 sł w każde z 4 nast. oł*, powt. od *-* jeszcze 3-3-4-6-7-8 razy, dalej przer. jak wcześniej ponad 71-77-77-81-85-85 nast. sł, dalej przer. 27-30-37-44-49-57 oł (w tym 5 zwrotnych oł). Obrócić i przer. następująco: 1 sł w 6-te oł od szydełka, dalej przer. 1 sł w każde z 1-4-6-3-3-6 nast. oł, *ominąć 1 oł, 1 sł w każdy z 4 nast. sł*, powt. od *-* jeszcze 3-3-4-6-7-8 razy, dalej przer. jak wcześniej ponad 71-77-77-81-85-85 nast. sł, dalej przer. 1 sł w każdy z ost. sł = 107-119-131-145-157-171 sł/oł. Dalej przer. 1 sł w każdy sł i zamykać o. w ściegu ażurowym na środku przodu, w róg. Gdy zostaje 4 łuki zakończyć motyw jak w schemacie A.4. Dalej przer. 1 sł w każdy sł, aż dł. robótki wynosi 24-26-28-30-32-34 cm od początku robótki na środku przodu. Zakończyć. WYKOŃCZENIE: Zagiąć 2 cm z każdej strony na lewą stronę robótki i doszyć drobnym starannym ściegiem wkłuwając igłę przez 2 warstwy, aby powstał tunelik, przez który będą przechodzić tasiemki. TASIEMKI: Luźno wykonać 1 tasiemkę następująco: na szydełku nr 4 przer. łańcuszek włóczką Muskat, tak aby dł. tasiemki wynosiła 140-150-160-170-180-190 cm, obrócić i przer. 1 oz w każde oł, pamiętając, aby oz nie były przerabiane zbyt ścisło. Zakończyć. Drugą tasiemkę wykonać tak samo. Zaczynając na prawej stronie robótki przewlec końcówkę jednej z tasiemek przez otwór na górze bluzeczki, wokół sł i przeciągnąć ją raz jeszcze przez nast. otwór (= 2 końcówki tasiemki na prawej stronie robótki). Dopasować, aby 2 końcówki miały taką samą długość, następnie przeciągnąć te 2 nitki przez pętelkę na lewej stronie robótki i zacisnąć. Powt. to samo z drugiej strony. Skrzyżować tasiemki z tyłu I przeciągnąć je przez tunelik – patrz schemat. Zawiązać. |
|||||||||||||||||||
Objaśnienia do schematu |
|||||||||||||||||||
|
|||||||||||||||||||
 |
|||||||||||||||||||
 |
|||||||||||||||||||
 |
|||||||||||||||||||
 |
|||||||||||||||||||
Skończyłaś ten wzór?Otaguj swoje zdjęcia #dropspattern #mandarinatop lub prześlij je do #dropsfan gallery. Potrzebujesz pomocy w związku z tym wzorem?Zobacz 6 instrukcje video, sekcję Komentarze/Pytania i jeszcze więcej, wchodząc na stronę wzoru na garnstudio.com © 1982-2026 DROPS Design A/S. Wszelkie prawa zastrzeżone. Ten dokument, w całości, jest chroniony prawem. Zobacz co możesz robić z naszymi wzorami na dole każdego wzoru na naszej stronie. |
|||||||||||||||||||


Posiadając 40 lat doświadczenia w projektowaniu wzorów na druty i szydełko, DROPS Design oferuje jedną z największych kolekcji bezpłatnych wzorów w internecie – przetłumaczonych na 17 języków. Obecnie jest dostępnych 324 katalogów i 12290 wzorów w języku polskim.
Dokładamy wszelkich starań, aby oferować Wam druty i szydełka, inspiracje, fachowe porady oraz doskonałej jakości włóczki w najlepszych cenach! Zamierzasz wykorzystać nasze wzory inaczej niż tylko do osobistego użytku? Przeczytaj jakie masz prawa w Copyright, który znajdziesz na końcu każdego wzoru. Miłej pracy!
Dodaj komentarz do modelu DROPS 170-16
Chcielibyśmy się dowiedzieć co masz do powiedzenia o tym wzorze!
Jeśli chcesz zadać pytanie i szybko uzyskać odpowiedź, upewnij się, że została wybrana właściwa kategoria w formularzu poniżej. Pola obowiązkowe są oznaczone *.