
Popularne kategorie
Szukasz włóczki?


Komentarze / Pytania (166)
![]() Aina Eilen Krogh napisała::
Aina Eilen Krogh napisała::
Nydelig🤩
13.06.2024 - 10:43
![]() Julia napisała::
Julia napisała::
Garnmenge für Größe S passte bei mir nicht! Sonst stimmten die Angaben für den Garnverbrauch von Drops in den letzten 10 Jahren bei mir immer. Ich musste jetzt für die letzten sechs Reihen noch Wolle nachbestellen.
24.05.2024 - 21:10
![]() Marilyn Growns napisała::
Marilyn Growns napisała::
Thankyou for all the support given over the various stages with issues I have had understanding how to knit this cardigan. I am extremely happy as I have finished it and it looks amazing:)
20.05.2024 - 14:20
![]() Marilyn Growns napisała::
Marilyn Growns napisała::
Really appreciate the support. Last question I hope. Re Raglan sleeve and raglan body. At row 17 size L - . Would this starting row look like the following..Knit pattern to 1st sleeve - K2 tog,k2,slip 1,k1, psso, repeated at end of sleeve, then immediaetly the same instruction k2 tog, k2, slip 1,k1,psso at the start of the back body, knit the rest of the pattern, then k2 tog, k2, slip 1, k1, psso and then start the decrease process again for the next sleeve? Cannot find a video for this. Thanks
08.05.2024 - 10:11Odpowiedź DROPS Design :
Dear Mrs Growns, in size L you will first decrease 8 sts for raglan 17 times on every other row, ie decrease on both sleeve and body (front and back pieces), then decrease only on body on next row from RS (18th decrease for body), then decrease again 8 sts (1st decrease on every 4th row on sleeves + 19th decrease on body); from now on, decrease on every other right side row = on every 4th row 8 sts (both body and sleeve) a total of 2 times then increase only on sleeve a total of 3 times on every 4th row - you have increased (17+1+2+3= 23 times on sleeves and 17+1+1+2=21 times on body). Happy knitting!
08.05.2024 - 13:09
![]() Marilyn Growns napisała::
Marilyn Growns napisała::
Please clarify - RAGLAN SLEEVE instruction - decrease every other row 17 times for LARGE and then decrease every row 6 times. Does this mean - Dec on the RS only 17 times - 34 rows in total (K2tog, K2,slip 1 st as if to knit, K1, psso) and thereafter decrease on the RS (K2tog, K2,slip 1 st as if to knit, K1, psso) followed by the WS (P2 twisted tog, P2, P2 tog) 6 times Thanks in advance
05.05.2024 - 08:58Odpowiedź DROPS Design :
Dear Marilyn, yes, it means just that. "Every other row" is every row from the right side, "every row" means every right side AND every wrong side row as well. Happy Crafting!
05.05.2024 - 15:30
![]() Marilyn Growns napisała::
Marilyn Growns napisała::
Drops 169-1 no w‐583. Size Large Re instruction: Yoke - slip sleeves on to same circular needle as body where armholes were cast off = 306 stitches. My question is....instructions say slip. However looking at the video on YouTube for' how to work raglan from the bottom up' the video shows 'knitting' the sleeve on NOT 'slipping' the sleeves onto the circular needle. Please could you clarify if I should SLIP or KNIT the sleeve onto the circular needle. Thanks in advance
03.05.2024 - 19:55Odpowiedź DROPS Design :
Dear Marily, honestly, it does not really matter. If you slip the stitches, then you can continue from the right side, if you knit the stitches, the next row will be from the wrong side. In both cases you should pay attention to continue the pattern from the right place in the diagram. Happy Knitting!
03.05.2024 - 23:13
![]() Marilyn Growns napisała::
Marilyn Growns napisała::
Re - Sleeve....when piece measures 48 cm ( size large) the pattern says... cast off 6 stitches mid under sleeve which leaves 60 stitches.. I have placed markers all the way up the sleeve, therefore should I decrease 3 stitches either side of the last marker? The video is not working. Thankyou
02.04.2024 - 00:10Odpowiedź DROPS Design :
Hi Marilyn, Yes you cast off 3 stitches on each side of the marker. Happy knitting!
02.04.2024 - 06:38
![]() Marilyn Growns napisała::
Marilyn Growns napisała::
Can you please let me know how often the cable is done? i cannot see it in the pattern. I am making size L. I do however note that on 16/06/21 you answered Jenny's question - every 8th row. Have I interpreted that correctly? Looking at the picture of the cardigan it looks like in total there are 11 cables to the neckline. Please could you confirm. Sorry for the many questions. I love this pattern and really want to be able to complete it. Thanks in advance
23.01.2024 - 14:54Odpowiedź DROPS Design :
Dear Mrs Growsn, cables are worked on every 8th row as follows in A.1: Row 1 with cable, Row 2 til 8 without cable, repeat these 8 rows. Happy knitting!
24.01.2024 - 08:14
![]() Marilyn Growns napisała::
Marilyn Growns napisała::
I posted 7/01/24 re the 11 decreases for size L. Decrease at the beginning of first Purl section and decrease at the end of the next purl section. Julia's question on 29/04/17 says in one row you do all decreases at the beginning of each P section and in the second decrease row you do them at the end of each P section. This contradicts what I have done and is concerning me that I have done this incorrectly. Please can you clarify. Thanks in advance
23.01.2024 - 14:35Odpowiedź DROPS Design :
Dear Mrs Growns, you should decrease 11 stitches on every decrease row = 1 stitch in each of the P-sections and work these decreases a total of 5 times. the first time you will decrease at the beg of every P-section, the 2nd time at the end of every P-section and continue like this decreasing alternately one time at the beg of every P-section and next time at the end of every P-section. Happy knitting!
24.01.2024 - 08:10
![]() Marilyn Growns napisała::
Marilyn Growns napisała::
Thanks for answering my question. However, what I am confused with is 'When piece measures 5 cm, dec 1 sts in all P-sections (= 11-11-11-12-12-12 dec per dec round)' Read decrease tip which is ' Dec 1 st by P 2 tog. Dec alternately at beg and end of P section'. From 8 stitches it would mean each purl section decreases to 6 which would make the calculation wrong. What does it mean - alternately? I am just totally confused. :(
05.01.2024 - 22:50Odpowiedź DROPS Design :
Dear Marilyn, you decrease by purling 2 together in each section once. However, in each purl section you will decrease either at the beginning or the end of the section (alternately means every other or on alternate sections). For example, in the first section you purl together the first 2 stitches, in the second section you purl together the last 2 stitches, in the third section you purl together the first 2 stitches, e.t.c. Happy knitting!
07.01.2024 - 23:34
|
||||||||||
Romantic Twist#romantictwistcardigan |
||||||||||
 |
 |
|||||||||
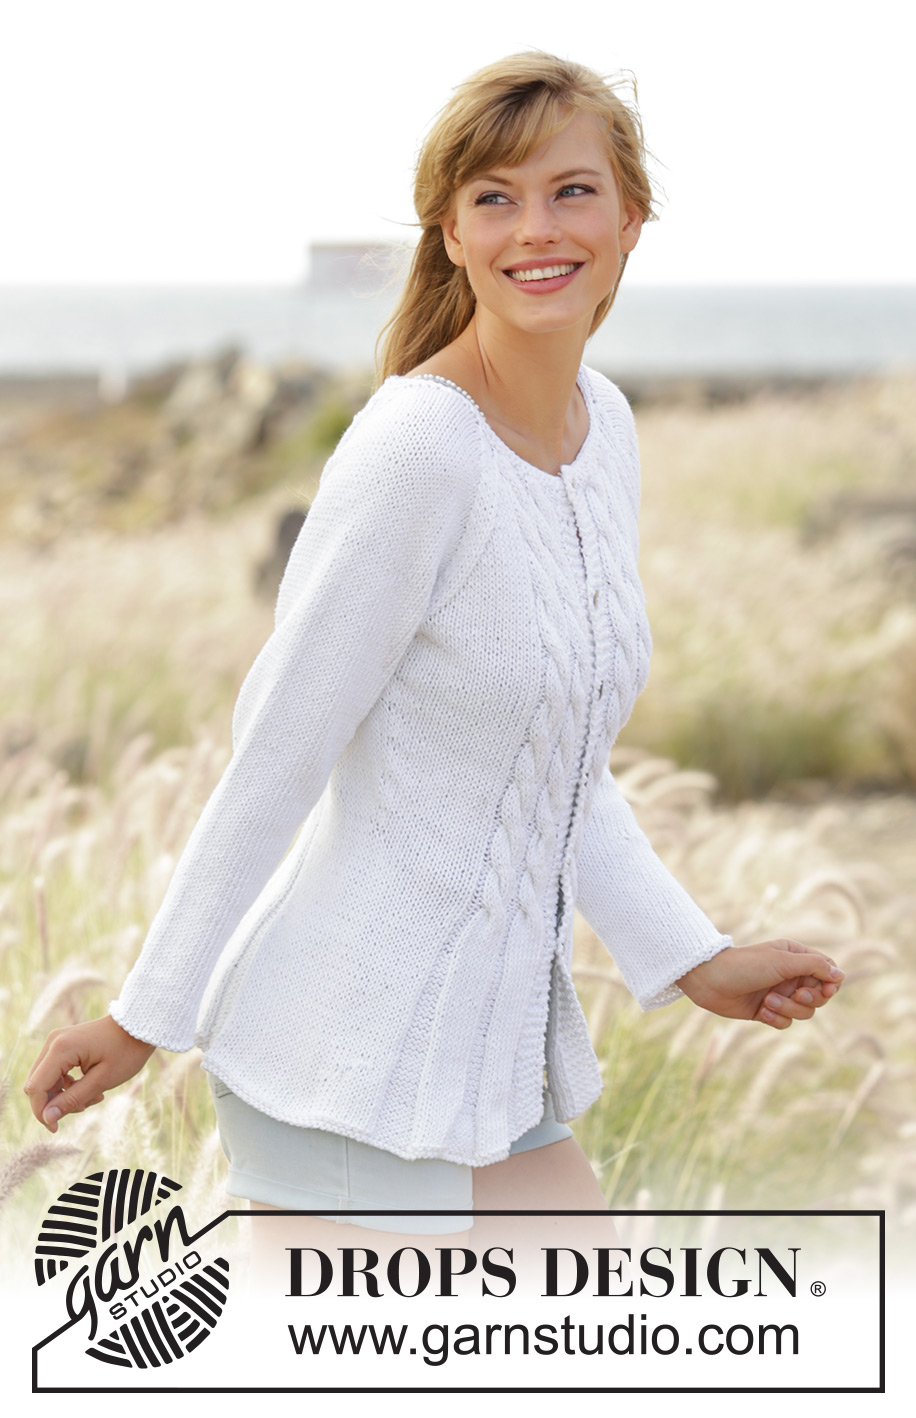
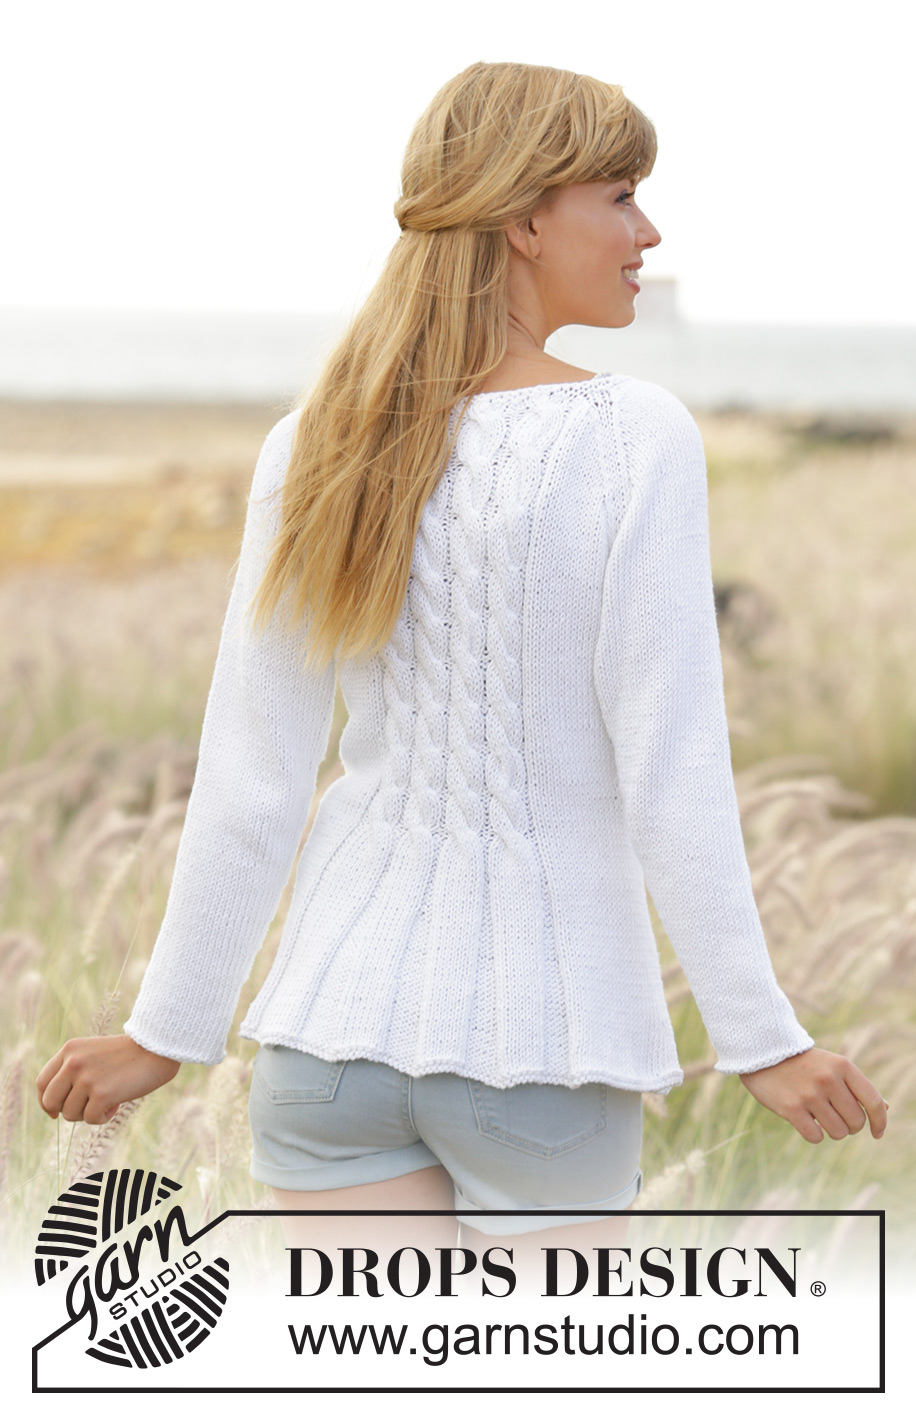
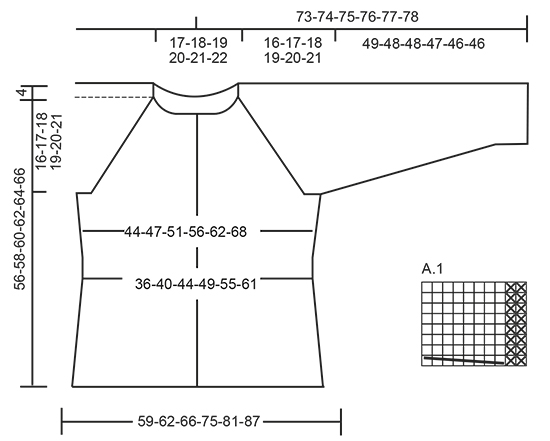
Dopasowany rozpinany sweter DROPS z warkoczami i reglanem, z włóczki „Paris”. Od S do XXXL.
DROPS 169-1 |
||||||||||
|
ŚCIEG FRANCUSKI (w tę i z powrotem): Przer. wszystkie rzędy na prawo. 1 „ściągacz” francuski = 2 rz. na prawo. ŚCIEG FRANCUSKI (na okrągło): Przer.: *1 okr. na prawo, 1 okr. na lewo*, powt. od *-*. 1 „ściągacz” francuski = 2 okr. ZAMYKANIE OCZEK: Zamknąć 1 o. przerabiając 2 o. razem na lewo. Zamykać o. na przemian na pocz. i na końcu grup oczek lewych. ŚCIEG FANTAZYJNY: Patrz schemat A.1. Schemat przedstawia wszystkie rzędy ściegu fantazyjnego, widok na prawej stronie robótki. REGLAN: Zamknąć 2 o. w miejscu każdego przejścia między tyłem/przodami i rękawami. Zamykać na prawej stronie robótki następująco: 2 o. razem na prawo, 2 o.p. (marker znajduje się między tymi oczkami), zdjąć 1 o. jak do przerobienia na prawo, 1 o.p., przełożyć oczko zdjęte nad przerobionym oczkiem. Zamknąć następująco na lewej stronie robótki: 2 o. przekręcone i przerobione na lewo, 2 o.l. (marker znajduje się między tymi oczkami), 2 o. razem na lewo. WSKAZÓWKA: Jeżeli wymiar próbki nie zgadza się na wysokość, a robótka jest zbyt ścisła, reglan będzie za krótki i podkroje rękawów zbyt krótkie. Można to zniwelować przerabiając równomiernie 1 dodatkowy rząd bez zamykania oczek między rzędami z zamykaniem oczek. DZIURKI NA GUZIKI: Wykonać dziurki na guziki na obszyciu prawego przodu. 1 dziurka na guzik = przer. razem na prawo 2-gie i 3-cie o. zaczynając od środka przodu, następnie wykonać 1 narzut. Rozmieszczenie dziurek na guziki (w cm od dołu robótki): ROZMIAR S: 19, 26, 33, 40, 47 i 54 cm. ROZMIAR M: 19, 26, 33, 40, 48 i 56 cm. ROZMIAR L: 19, 26, 34, 42, 50 i 58 cm. ROZMIAR XL: 19, 28, 36, 44, 52 i 60 cm. ROZMIAR XXL: 19, 26, 33, 40, 47, 54 i 62 cm ROZMIAR XXXL: 19, 26, 33, 40, 48, 56 i 64 cm ---------------------------------------------------------- TYŁ & PRZODY: Przerabiane w tę i z powrotem na drutach z żyłką zaczynając od środka przodu. Na drutach z żyłką nr 5 nabrać 216-228-240-266-286-306 o. (w tym 5 o. obszycia przodu z każdej strony) włóczką Paris. Przer. 1 ściągacz ściegiem francuskim - patrz powyżej, dalej przer. następująco - na prawej stronie robótki: 5 o. ściegiem francuskim, *8 o.l., 8 o.p.*, powt. od *-* w sumie 2 razy, 8 o.l., 27-33-39-44-54-64 o. dżersejem, *8 o.l., 8 o.p.*, powt. od *-* w sumie 4-4-4-5-5-5 razy, 8 o.l., 27-33-39-44-54-64 o. dżersejem, *8 o.l., 8 o.p.*, powt. od *-* w sumie 2 razy, 8 o.l., 5 o. ściegiem francuskim. Dalej przer. tak samo. ZACHOWAĆ TAKIE SAME NAPRĘŻENIE NICI JAK W PRZYPADKU PRÓBKI! Na wys. 5 cm od dołu robótki zamknąć 1 o. w każdej grupie oczek lewych (= 11-11-11-12-12-12 zamkniętych o. w okrążeniu z zamykaniem o.) - PATRZ ZAMYKANIE OCZEK. Powt. zamykanie o. jeszcze 5 razy co 3 cm = 150-162-174-194-214-234 o. Wykonać DZIURKI NA GUZIKI na obszyciu prawego przodu - patrz powyżej. Na wys. 21 cm od dołu robótki przer. następująco: 5 o. ściegiem francuskim, 2 razy A.1, 2 o.l., 27-33-39-44-54-64 o. dżersejem, 4-4-4-5-5-5 razy A.1, 2 o.l., 27-33-39-44-54-64 o. dżersejem, 2 razy A.1, 2 o.l., 5 o. ściegiem francuskim. Umieścić 2 markery, w odl. 40-43-46-51-56-61 o. od brzegów z każdej strony (tył = 70-76-82-92-102-112 o.). Na wys. 23 cm od dołu robótki dodać 1 o. z każdej strony każdego markera (= 4 dodane o.), powt. dodawanie o. jeszcze 5 razy co 2½-3-3-3½-3½-4 cm = 174-186-198-218-238-258 o. Na wys. 40-41-42-43-44-45 cm od dołu robótki przer. kolejny rząd (na prawej stronie robótki) następująco: przer. 43-46-49-54-59-64 o., zamknąć 6 nast. o., przer. 76-82-88-98-108-118 o., zamknąć 6 nast. o. i przer. 43-46-49-54-59-64 pozostałych o. Odłożyć robótkę i teraz wykonać rękawy. RĘKAWY: Przerabiane na okrągło na drutach pończoszniczych. Na drutach pończoszniczych nr 5 nabrać 32-34-36-38-40-42 o. włóczką Paris. Przer. 1 ściągacz francuski, dalej przer. dżersejem. Umieścić 1 marker na początku okrążenia (= środek pod rękawem). Na wys. 8 cm od dołu robótki dodać 2 o. na środku pod rękawem. Dodawać o. jeszcze 13-13-14-15-16-16 razy co 3-2½-2½-2½-2-2 cm = 60-62-66-70-74-76 o. Na wys. 49-48-48-47-46-46 cm od dołu robótki (krócej dla większych rozmiarów, gdyż główka rękawa jest dłuższa) zamknąć 6 o. na środku pod rękawem = 54-56-60-64-68-70 o. Odłożyć robótkę i wykonać drugi rękaw. KARCZEK: Przełożyć o. rękawów na te same druty z żyłką co tył i przody, ponad oczkami zamkniętymi na podkroje rękawów = 270-286-306-334-362-386 o. Umieścić po 1 markerze w miejscu każdego przejścia między rękawami, tyłem a przodami. Dalej przer. jak wcześniej, W TYM SAMYM CZASIE zamykać o. na REGLAN – patrz powyżej. Oczka są zamykane inaczej na tyle/przodach i na rękawach. REGLAN RĘKAWY: Zamykać o. 16-17-17-18-18-19 razy co 2 rz., dalej 4-4-6-7-9-9 razy w każdym rzędzie (= w sumie 20-21-23-25-27-28 razy). REGLAN TYŁ & PRZODY: Zamykać 4-2-0-0-0-0 razy co 4 rz., 11-16-19-21-19-16 razy co 2 rz., dalej 0-0-2-0-7-15 razy w każdym rzędzie (= w sumie 15-18-21-21-26-31 razy). Po zamknięciu wszystkich o. zostaje 130-130-130-150-150-150 o. W nast. rzędzie zamknąć 2 o. ponad o. każdego warkocza A.1 = 114-114-114-132-132-132 o. Przer. 2 ściągacze francuskie przez wszystkie o., W TYM SAMYM CZASIE w 1-szym rz. równomiernie zamknąć 20-16-12-26-22-18 o. = 94-98-102-106-110-114 o. Zakończyć. WYKOŃCZENIE: Zszyć otwory pod rękawami. Przyszyć guziki na obszyciu lewego przodu. |
||||||||||
Objaśnienia do schematu |
||||||||||
|
||||||||||
 |
||||||||||
Skończyłaś ten wzór?Otaguj swoje zdjęcia #dropspattern #romantictwistcardigan lub prześlij je do #dropsfan gallery. Potrzebujesz pomocy w związku z tym wzorem?Zobacz 26 instrukcje video, sekcję Komentarze/Pytania i jeszcze więcej, wchodząc na stronę wzoru na garnstudio.com © 1982-2026 DROPS Design A/S. Wszelkie prawa zastrzeżone. Ten dokument, w całości, jest chroniony prawem. Zobacz co możesz robić z naszymi wzorami na dole każdego wzoru na naszej stronie. |
||||||||||


Posiadając 40 lat doświadczenia w projektowaniu wzorów na druty i szydełko, DROPS Design oferuje jedną z największych kolekcji bezpłatnych wzorów w internecie – przetłumaczonych na 17 języków. Obecnie jest dostępnych 324 katalogów i 12290 wzorów w języku polskim.
Dokładamy wszelkich starań, aby oferować Wam druty i szydełka, inspiracje, fachowe porady oraz doskonałej jakości włóczki w najlepszych cenach! Zamierzasz wykorzystać nasze wzory inaczej niż tylko do osobistego użytku? Przeczytaj jakie masz prawa w Copyright, który znajdziesz na końcu każdego wzoru. Miłej pracy!
Dodaj komentarz do modelu DROPS 169-1
Chcielibyśmy się dowiedzieć co masz do powiedzenia o tym wzorze!
Jeśli chcesz zadać pytanie i szybko uzyskać odpowiedź, upewnij się, że została wybrana właściwa kategoria w formularzu poniżej. Pola obowiązkowe są oznaczone *.