
Popularne kategorie
Szukasz włóczki?


Komentarze / Pytania (50)
![]() Niva napisała::
Niva napisała::
Must admit this is the most confusing pattern I’ve ever tried and I’m an accomplished knitter. I’ve read it so many times to work it out and I’m almost there. Does the A4 pattern stop after the 12 rows in the graph?
08.04.2021 - 04:33Odpowiedź DROPS Design :
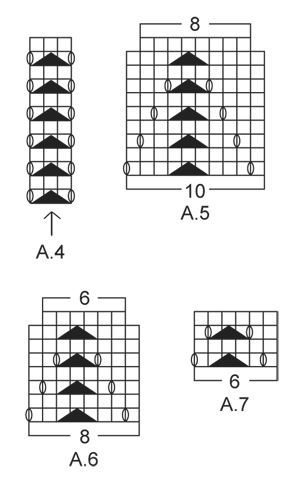
Dear Niva, A.4 will be repeated in height until all decreases for raglan are done. Happy knitting!
08.04.2021 - 07:51
![]() Nova napisała::
Nova napisała::
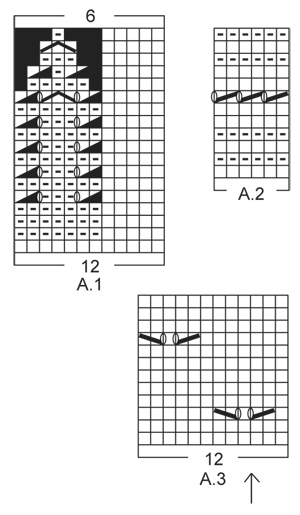
At the beginning of the A4 graph is the YO between the last stitch on the body and the first stitch on the sleeve?
07.04.2021 - 13:43Odpowiedź DROPS Design :
Dear Nova, the stitch with the arrow in A.4 should be the one with the marker at the transitions, so that you will have 1 yarn over, the double decrease with marker in the middle stitch, 1 yarn over; this means there will be one hole (yarn over) on body and on sleeve. Happy knitting!
07.04.2021 - 14:26
![]() Nova napisała::
Nova napisała::
After attaching the sleeves for size L and beginning middle back for the first round, it says to start on the same row for the sleeve as for the body. Does this mean if I’m on row 4 on the body (A1) that I start on row 4 for the sleeves (A3)? Also A1 the arrow designates the middle of the sleeve but the graph starts with A4 which is 3 stitches and A3 is another 3 sts total 6 sts wouldn't the middle be half of 68 sts which is 34 sts?
06.04.2021 - 14:03Odpowiedź DROPS Design :
Dear Nova, you should finish the sleeves 8adjust its length) so you will end up in the same row if the pattern as on the body, so you can continue the pattern without disrupting it. The arrow should match the middle of the sleeves, the upper middle line, put the stitch marked there, and count outwards to find out where you should start. Happy Knitting!
06.04.2021 - 14:26
![]() Nova napisała::
Nova napisała::
This is becoming a real challenge but I’m not going to give up! I am attaching the sleeves to the body but notice you don’t mention double pointed needles in your materials needed for this project. How are you supposed to knit these sleeves together with the body without them? It won’t work.
25.03.2021 - 01:52Odpowiedź DROPS Design :
Dear Nova, when you have knitted the sleeves, you put all the stitches on one curcular needle, (back, sleeve, fron, sleeve), and knot the circular needle on the round. You don't knit "together" as a three needle bind off, but along with the body, in one big circle, that is getting decreased as you get to the neckline. Happy Knitting!
25.03.2021 - 02:26
![]() Nova napisała::
Nova napisała::
Hi again. I’m up to the yoke and I’m really confused about this section of the pattern. The fact that there are 3 graphs to be worked is a challenge in itself. The confusion is in the A4 graph between the body and the sleeves, does this have to do with the shaping of the raglan?
09.03.2021 - 13:31Odpowiedź DROPS Design :
Dear Nova, pattern A.4 is between each body and sleeve, right at the raglan line. Shaping happens before and after this pattern. Happy Knitting!
09.03.2021 - 13:57
![]() Nova napisała::
Nova napisała::
When you get to the side where the first increases have been worked you have two extra stitches so to keep the eyelet pattern uniform, the space between the next eyelet is 9 stitches and that throws the whole eyelet pattern out. I don’t know how you can keep the eyelet pattern 7 stitches between with these increases on the side. The new repeat would make more sense at the beginning of the round.
26.02.2021 - 23:15Odpowiedź DROPS Design :
See answer below - if you can't work a part of decrease (K2 tog, YO), over the new stitches, just work these stitches in stocking stitch without the lace pattern. You shoulud have the correct number of sts between each eyelet in width. Hope this will help. Happy knitting!
01.03.2021 - 08:00
![]() Nova napisała::
Nova napisała::
The beginning of the round the increases can be worked out but it’s the increases halfway on the side marker those stitches throw the whole eyelet pattern out. You can’t do 7 stitches between the pattern it doesn’t work out I’ve tried it
26.02.2021 - 22:52Odpowiedź DROPS Design :
Dear Nova, if you don't have enough stitches to work the whole lace pattern on the side, this means there are not enough stitches yet, just work these stitches in stocking stitch. Work the lace pattern over the new stitches only if you have enough stitches to work them. This means each lace pattern should be worked with 7 knit stitches in between. Happy knitting!
01.03.2021 - 07:58
![]() Nova napisała::
Nova napisała::
Are you saying to read the graph from left to right and then right to left alternately and the added stitches will work out with the eyelet pattern?
26.02.2021 - 16:33Odpowiedź DROPS Design :
Hi Nova, when working in the round all rounds are worked from the right side, and the diagram is read solely from right to left. When starting a new round, simply start working the first symbol on the next row in diagram. Happy knitting!
28.02.2021 - 21:14
![]() Nova napisała::
Nova napisała::
For example on the 3rd round after the first increases there are 4 stitches left at the end of the round and I’m not sure whether to knit those stitches as normal or do the pattern.
26.02.2021 - 15:19Odpowiedź DROPS Design :
Dear Nova, see previous answer, make always sure that the eyelet pattern fit in height, it shouldn't be displaced. Happy knitting!
26.02.2021 - 16:17
![]() Nova napisała::
Nova napisała::
When doing the body and the A3 and making the increases on either side of the markers I notice that those extra stitches will throw the alternate pattern out where the holes should be. Is that how it’s supposed to be?
26.02.2021 - 15:08Odpowiedź DROPS Design :
Dear Nova, the increased stitches should be worked in A.3, this means at the beg of A.3 work the new stitches as a new repeat reading diagram from the left towards the right (= there should be always 7 sts before the next K2 tog, YO in the lace pattern. And at the end of A.3, work the new stitches as a new repeat of A.3 (reading from the right towards the left). Hope this will help. Happy knitting!
26.02.2021 - 16:16
|
||||||||||||||||||||||||||||
White Romance#whiteromancetop |
||||||||||||||||||||||||||||
 |
 |
|||||||||||||||||||||||||||
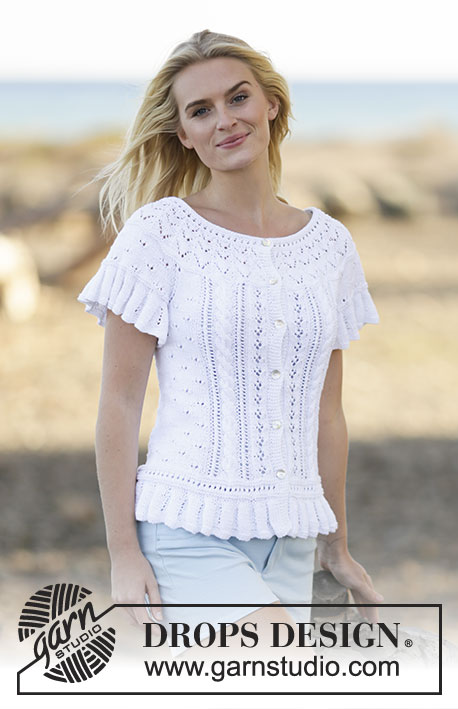
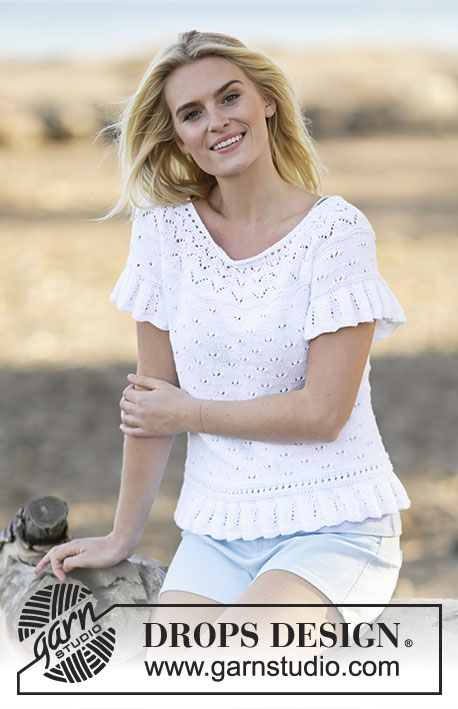
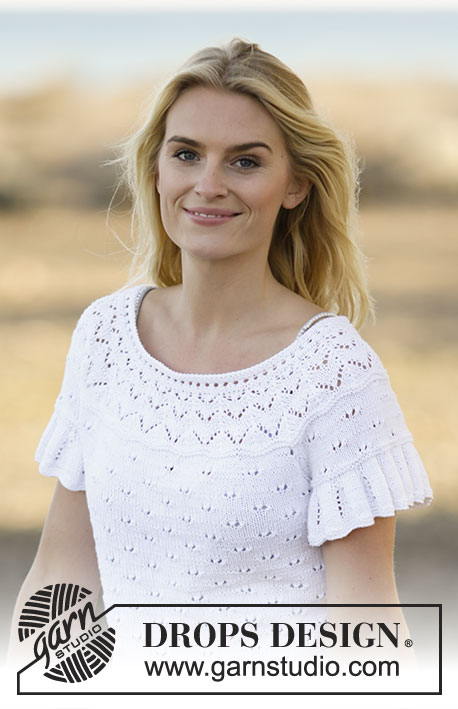
Ażurowy sweterek DROPS z krótkim rękawem i zaokrąglonym karczkiem, z włóczki „Safran”. Od S do XXXL.
DROPS 159-12 |
||||||||||||||||||||||||||||
|
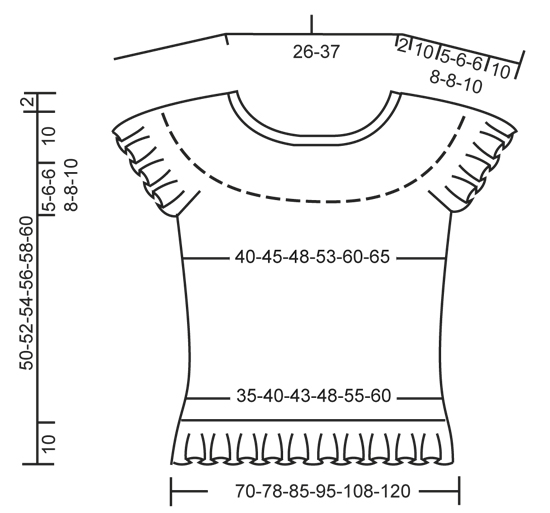
ŚCIEG FRANCUSKI (na okrągło na drutach z żyłką): Przer.: *1 okr. na prawo, 1 okr. na lewo*, powt. od *-*. 1 „ściągacz” francuski = 2 okr. ŚCIEG FANTAZYJNY: Patrz schematy od A.1 do A.7. Schematy pokazują wszystkie rzędy ściegu fantazyjnego, widok na prawej stronie robótki. DODAWANIE OCZEK: Dodać 1 o. wykonując 1 narzut. W nast. okrążeniu przer. oczko przekręcone w miejscu narzutu aby uniknąć dziur - przer. dodawane o. dżersejem. REGLAN: Zamknąć na reglan z każdej strony schematu A.4, w miejscu każdego przejścia między rękawami, tyłem i przodem. Zamknąć po przerobieniu schematu A.4 następująco: zdjąć 1 o. jak do przerobienia na prawo, 1 o.p., przełożyć oczko zdjęte nad przerobionym oczkiem. Zamknąć 2 o. przed schematem A.4 następująco: 2 o. razem na prawo. ---------------------------------------------------------- TYŁ & PRZÓD: Przerabiane na okrągło na drutach z żyłką. Na drutach z żyłką nr 2,5 nabrać 336-372-408-456-516-576 o. włóczką Safran. Przer. 2 ściągacze ściegiem francuskim - patrz powyżej. Dalej przer. na drutach z żyłką nr 3 i przer. ściegiem fantazyjnym wg schematu A.1. Gdy schemat A.1 zostanie przerobiony 1 raz na wysokość, zostaje 168-186-204-228-258-288 o. Dalej przer. wg schematu A.2. Po przerobieniu schematu A.2 przer. 2 okr. na prawo, W TYM SAMYM CZASIE w ost. okrążeniu równomiernie dodać 0-6-0-0-6-0 o. = 168-192-204-228-264-288 o. Umieścić 1 marker na początku okrążenia i kolejny marker za 84-96-102-114-132-144 o. (= oznaczenia boków). Dalej przer. wg schematu A.3. ZACHOWAĆ TAKIE SAME NAPRĘŻENIE NICI JAK W PRZYPADKU PRÓBKI! W TYM SAMYM CZASIE gdy dł. robótki wynosi 12 cm, dodać 1 o. z każdej strony 2 markerów - PATRZ DODAWANIE OCZEK (= 4 dodane o.). Powt. dodawanie o. z każdej strony w sumie 6 razy co 4-4-4-5-5-5 cm = 192-216-228-252-288-312 o. - UWAGA: przer. dodawane o. dżersejem. Dalej przer. aż dł. robótki wynosi 35-36-38-38-40-40 cm. Dalej przer. kolejne okrążenie następująco: zamknąć 5-5-5-6-6-6 o. na podkrój rękawa, przer. 86-98-104-114-132-144 o. (= przód), zamknąć 10-10-10-12-12-12 o. na podkrój rękawa (tj. 5-5-5-6-6-6 o. z każdej strony markera), przer. 86-98-104-114-132-144 o. (= tył) i zamknąć 5-5-5-6-6-6 pozostałych oczek. Zostawić na drucie pomocniczym i wykonać rękawy. RĘKAWY: Przerabiane na okrągło na drutach z żyłką. Na drutach z żyłką nr 2,5 nabrać 144-156-156-168-168-180 o. włóczka Safran. Przer. 2 ściągacze ściegiem francuskim - patrz powyżej. Dalej przer. na drutach z żyłką nr 3 i przer. schemat A.1. Po przerobieniu schematu A.1 zostaje 72-78-78-84-84-90 o. Przer. 2 ściągacze francuskie, W TYM SAMYM CZASIE w ost. okrążeniu zamknąć 10-10-10-12-12-12 o. na środku pod rękawem = zostaje 62-68-68-72-72-78 o. Zostawić na drucie pomocniczym i wykonać drugi rękaw. KARCZEK: Przełożyć oczka rękawów na te same druty z żyłką co tył i przód, ponad oczkami zamkniętymi na podkroje rękawów (bez ich wcześniejszego przerabiania) = 296-332-344-372-408-444 o., W TYM SAMYM CZASIE umieścić 1 marker w 1-sze i 1 marker w ost. o. każdego z rękawów (= 4 markery). Zacząć na środku tyłu i dalej przer. tył i przód ściegiem fantazyjnym jak wcześniej, W TYM SAMYM CZASIE przer. schemat A.3 ponad rękawami (strzałka w schemacie powinna odpowiadać środkowi rękawa, zacząć w tym samym rzędzie schematu co przód i tył). Przer. dodatkowo schemat A.4 w miejscu każdego przejścia między tyłem/przodem i rękawami (strzałka w schemacie powinna odpowiadać oczku z markerem). Gdy 2 okr. zostaną przerobione na okrągło przez wszystkie oczka, zacząć zamykanie o. na reglan - patrz powyżej (= 8 zamkniętych o.). Powt. zamykanie o. w sumie 4-5-5-7-7-8 razy co 4 okr. = 264-292-304-316-352-380 o. Przer. 2 ściągacze francuskie przez wszystkie oczka, W TYM SAMYM CZASIE w 1-szym okr. równomiernie zamknąć 4-12-4-6-12-10 o. = 260-280-300-310-340-370 o. Przer. 2 okr. na prawo. Zacząć teraz zamykanie o. na zaokrąglony karczek i przer. na okrągło wg schematu A.5 (= 26-28-30-31-34-37 razy przez całe okrążenie – UWAGA: jak to konieczne zmienić na krótsze druty z żyłką). Gdy schemat A.5 zostanie przerobiony 1 raz na wysokość, przer. schemat A.6 zamiast A.5. Gdy schemat A.6 zostanie przerobiony 1 raz na wysokość jest 156-168-180-186-204-222 o. Przer. teraz schemat A.7 zamiast A.6. Gdy schemat A.7 zostanie przerobiony 1 raz na wysokość wykonać podwyższenie na dekolt tyłu. Umieścić 1 marker na środku przodu. Zacząć na środku tyłu i przer. na prawo aż zostaje 14-14-16-16-18-20 o. przed markerem. Obrócić, przer. rząd powrotny na prawo aż zostaje 14-14-16-16-18-20 o. przed markerem z drugiej strony. Obrócić, przer. na prawo aż zostaje 30-30-34-34-38-42 o. przed markerem. Obrócić, przer. rząd powrotny na prawo aż zostaje 30-30-34-34-38-42 o. przed markerem z drugiej strony. Obrócić, przer. na prawo aż zostaje 46-46-52-52-58-64 o. przed markerem. Obrócić, przer. rząd powrotny na prawo aż zostaje 46-46-52-52-58-64 o. przed markerem z drugiej strony. Obrócić, przer. na prawo aż zostaje 62-62-70-70-76-86 o. przed markerem. Obrócić, przer. rząd powrotny na prawo aż zostaje 62-62-70-70-76-86 o. przed markerem z drugiej strony. Obrócić i przer. rząd powrotny na prawo, aż do pocz. okrążenia. WYKOŃCZENIE DEKOLTU: Dalej przer. na drutach z żyłką 2,5 i przer. na okrągło przez wszystkie oczka wg schematu A.2. W TYM SAMYM CZASIE w 1-szym okr. równomiernie zamknąć 22-24-24-26-30-32 o. = 134-144-156-160-174-190 o. Po przerobieniu schematu A.2 zamknąć luźno oczka na prawo na prawej stronie robótki. Dł. sweterka od ramienia w dół wynosi ok. 52-54-56-58-60-62 cm. WYKOŃCZENIE: Zszyć otwory pod rękawami |
||||||||||||||||||||||||||||
Objaśnienia do schematu |
||||||||||||||||||||||||||||
|
||||||||||||||||||||||||||||
 |
||||||||||||||||||||||||||||
 |
||||||||||||||||||||||||||||
 |
||||||||||||||||||||||||||||
Skończyłaś ten wzór?Otaguj swoje zdjęcia #dropspattern #whiteromancetop lub prześlij je do #dropsfan gallery. Potrzebujesz pomocy w związku z tym wzorem?Zobacz 30 instrukcje video, sekcję Komentarze/Pytania i jeszcze więcej, wchodząc na stronę wzoru na garnstudio.com © 1982-2026 DROPS Design A/S. Wszelkie prawa zastrzeżone. Ten dokument, w całości, jest chroniony prawem. Zobacz co możesz robić z naszymi wzorami na dole każdego wzoru na naszej stronie. |
||||||||||||||||||||||||||||


Posiadając 40 lat doświadczenia w projektowaniu wzorów na druty i szydełko, DROPS Design oferuje jedną z największych kolekcji bezpłatnych wzorów w internecie – przetłumaczonych na 17 języków. Obecnie jest dostępnych 324 katalogów i 12290 wzorów w języku polskim.
Dokładamy wszelkich starań, aby oferować Wam druty i szydełka, inspiracje, fachowe porady oraz doskonałej jakości włóczki w najlepszych cenach! Zamierzasz wykorzystać nasze wzory inaczej niż tylko do osobistego użytku? Przeczytaj jakie masz prawa w Copyright, który znajdziesz na końcu każdego wzoru. Miłej pracy!
Dodaj komentarz do modelu DROPS 159-12
Chcielibyśmy się dowiedzieć co masz do powiedzenia o tym wzorze!
Jeśli chcesz zadać pytanie i szybko uzyskać odpowiedź, upewnij się, że została wybrana właściwa kategoria w formularzu poniżej. Pola obowiązkowe są oznaczone *.