
Popularne kategorie
Szukasz włóczki?


Komentarze / Pytania (12)
![]() Wilnellia Diep napisała::
Wilnellia Diep napisała::
I love all your patterns. Unfortunately I do not understand how to knit the neck warmer which seems to me easy at first. `could you give me every step until the end? I started by doing the top 2K2P First row 2nd row etc… when to increase … Thank you so much for your support
14.12.2024 - 21:41Odpowiedź DROPS Design :
Dear Wilnellia, you cast on stitches for the neck warmer. Then work 4 rounds in garter stitch. Continue in stocking stitch until piece measures 12 cm. Then you start slipping stitches to a thread: work and slip the first 4 stitches to one thread, work in stocking stitches until 4 stitches are left, work and slip the last 4 stitches to another thread. *Turn the piece, work and slip the new first 2 stitches to the thread on this side, work in stocking stitch until 2 stitches are left, work and slip the last 2 stitches to the thread on this side.* Repeat * to * until 1 stitch is left on the needle. Cut the yarn and place all stitches back on needle to continue working. Happy knitting!
15.12.2024 - 22:59
![]() Corina Avram napisała::
Corina Avram napisała::
Also, what should happen after the hat reaches 14-16cm? One should knit without increasing until 17-18 cm?
18.12.2023 - 13:11Odpowiedź DROPS Design :
Dear Mrs Avram, when piece measures 14 cm, increase one more time, then when piece measures 16 cm increase one last time (there are now 67-69 sts), then continue over these stitches until pieces measures 17-18 cm, then cast off. Happy knitting!
19.12.2023 - 07:31
![]() Corina Avram napisała::
Corina Avram napisała::
Hello, about the hat instructions: "When piece measures 9-10 cm, work in garter st over all sts AT THE SAME TIME on 1st row inc 4 sts evenly = 59-61 sts. Repeat inc when piece measures 14 and 16 cm = 67-69 sts on needle" Is the increase done on every row, RS and WS? My hat reached 69 stitches, but measures only 12 cm. Thanks :) Corina
18.12.2023 - 13:09Odpowiedź DROPS Design :
Dear Mrs Avram, increase on a row from right side (read how to increase evenly here); increase when hat measures 10 cm, then work until it measures 14 cm and increase evenly 4 sts, then work until it measures 16 cm and increase 4 sts evenly = there are 69 sts in total when piece measures 16 cm.. Cast off when it measures 18 cm. Happy knitting!
18.12.2023 - 16:21
![]() Diane Turcot napisała::
Diane Turcot napisała::
Pour le tour du cou, après que l'ouvrage mesure 12 cm, vous dites de le diviser, en deux? Donc 25 et 24 m. Pouvez-vous expliquer clairement la suite. Tricoter les mailles restantes? Combien, le reste des 25? Ensuite on tourne?Je ne comprends pas. SVP, aidez-moi, je veux le réussir. MERCI
26.10.2021 - 02:56Odpowiedź DROPS Design :
Bonjour Mme Turcot, vous divisez l'ouvrage pour le tricoter de ce moment en allers et retours (pas en rond) en jersey sur les aiguilles circulaires. Ce sont les rangs raccourcis. Regardez la video ICI. Pour la suite, suivez les explications. Bon tricot!
26.10.2021 - 17:21
![]() Helena napisała::
Helena napisała::
Sadly, I still don't understand the instructions for the neck warmer. Also, it always helps to state if the item is knitted top down or bottom up. It helps get a picture of the garment in the head. Hat in this pattern is great though - I knitted 4 of them. Pity about the neck warmer, unless you improve on the instructions.
22.11.2019 - 20:21Odpowiedź DROPS Design :
Dear Helena, the neck warmer is worked top down, first in the round, then with short rhows (leave first 4 sts then 2 sts unworked at the end of each row until the middle stitch remains on needle, then work in the round again for the last rounds. Happy knitting!
25.11.2019 - 08:11
![]() Helena napisała::
Helena napisała::
I have done countless knitting from your patterns and I really like everything you do. However, the instructios for this neck warmer are totally incomprehensible to me. I don't understand at all where to make a division and what stitches to put on a stitch holder and which ones to knit. Love the hat though.
05.10.2019 - 12:47Odpowiedź DROPS Design :
Dear Helena, work now in rows (short rows): work the first 4 sts and slip them on a thread, work to the end of the row, turn and work the first 4 sts and slip them on a thread, work to the end of the row (= 4 sts on each side are on a thread). Continue like this but slip the first 2 sts at the beg of each row -both from RS and from WS on a thread until 1 stitch remains (= middle stitch). Happy knitting!
07.10.2019 - 10:55
![]() Rosalba Di Salvio napisała::
Rosalba Di Salvio napisała::
Salve,io vorrei fare questo cappello per una taglia 58 cm e 60 cm vorrei farlo con i ferri circolari e il filato Big delight,perché preferisco lavorare in cerchio che con i ferri diritti e poi cucire alla fine,come devo fare? Grazie per l'aiuto
15.02.2019 - 21:05Odpowiedź DROPS Design :
Buongiorno Rosalba, per un aiuto così personalizzato può rivolgersi al suo rivenditore DROPS di fiducia. Buon lavoro!
17.02.2019 - 09:37
![]() Rosalba napisała::
Rosalba napisała::
Salve,io vorrei fare questo cappello per una taglia 58 cm e 60 cm vorrei farlo con i ferri circolari e il filato Big delight,perché preferisco lavorare in cerchio che con i ferri diritti e poi cucire alla fine,come devo fare? Grazie per l'aiuto
15.02.2019 - 18:47
![]() Isabelle napisała::
Isabelle napisała::
Que veut dire 1m lis au point mousse de chaque côté? Vous dite de continuée en jersey. Merci!
18.02.2018 - 20:27Odpowiedź DROPS Design :
Bonjour Isabelle, on continue en jersey mais la 1ère et la dernière maille va se tricoter à l'endroit tous les rangs (= mailles lisière pour la couture). Bon tricot!
19.02.2018 - 10:18
![]() Jacqueline Lhote napisała::
Jacqueline Lhote napisała::
Je ne comprends pas la division et le glissement des mailles pour le tour de cou
08.02.2015 - 18:51Odpowiedź DROPS Design :
Bonjour Mme Lhote, vous tricotez comme pour les rangs raccourcis en laissant non travaillées les mailles de chaque côté, puis reprenez toutes les mailles ensemble, en rond. Bon tricot!
08.02.2015 - 19:34
|
|
Eliana#elianaset |
|
|
|
|
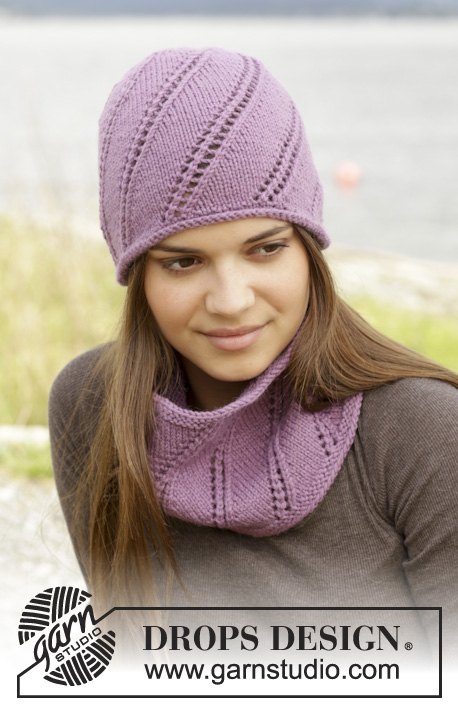
Czapka i komin DROPS ściegiem francuskim i dżersejem, z włóczki „Andes”.
DROPS 156-40 |
|
|
ŚCIEG FRANCUSKI (w tę i z powrotem): Przer. wszystkie rzędy na prawo. 1 „ściągacz” francuski = 2 rz. na prawo. ŚCIEG FRANCUSKI (na okrągło na drutach z żyłką): 1 „ściągacz” francuski = przer.: *1 okr. na prawo, 1 okr. na lewo*, powt. od *-*. ---------------------------------------------------------- CZAPKA: Przerabiana w tę i z powrotem ściegiem francuskim - patrz powyżej, z góry na dół. Na drutach nr 8 nabrać 9 o. włóczką Andes. Rz. 1 (i we wszystkich rzędach na lewej stronie robótki): przer. wszystkie o. na prawo. Rz. 2 (= na prawej stronie robótki): *1 o.p., 1 narzut *, powt. od *-* aż zostaje 1 o., zakończyć przerabiając 1 o.p. = 17 o. W nast. rzędzie przer. narzuty przekręcone na prawo (wkłuwając drut z tyłu robótki zamiast z przodu) aby uniknąć dziur. Rz. 4 (= na prawej stronie robótki): *2 o.p., 1 narzut *, powt. od *-* aż zostaje 1 o., zakończyć przerabiając 1 o.p. = 25 o. Rz. 6 (= na prawej stronie robótki): *3 o.p., 1 narzut *, powt. od *-* aż zostaje 1 o., zakończyć przerabiając 1 o.p. = 33 o. Rz. 8 (= na prawej stronie robótki): *4 o.p., 1 narzut *, powt. od *-* aż zostaje 1 o., zakończyć przerabiając 1 o.p. = 41 o. Rz. 10 (= na prawej stronie robótki): * 5 o.p., 1 narzut *, powt. od *-* aż zostaje 1 o., zakończyć przerabiając 1 o.p. = 49 o. Rz. 12 (= na prawej stronie robótki): przer. na prawo, W TYM SAMYM CZASIE równomiernie dodać 6-8 o. (= co ok. 8-6 o.) = 55-57 o. ZACHOWAĆ TAKIE SAME NAPRĘŻENIE NICI JAK W PRZYPADKU PRÓBKI! Umieścić 1 marker. OD TEJ CHWILI MIERZYĆ STĄD! Dalej przer. dżersejem z 1 o. brzeg. ściegiem francuskim z każdej strony. Na wys. 9-10 cm od dołu robótki zacząć przer. ściegiem francuskim przez wszystkie oczka, W TYM SAMYM CZASIE w 1-szym rz. równomiernie dodać 4 o. = 59-61 o. Powt. dodawanie o., gdy dł. robótki wynosi 14 i 16 cm = 67-69 o. Zakończyć, gdy dł. robótki wynosi 17-18 cm. WYKOŃCZENIE: Zszyć czapkę wkłuwając igłę w skrajne pętelki oczek. Zacisnąć nitkę na górze czapki i zabezpieczyć. ---------------------------------------------------------- KOMIN: Przerabiany na okrągło na drutach z żyłką. Na drutach z żyłką nr 8 nabrać 49 o. włóczką Andes. Przer. 2 ściągacze ściegiem francuskim - patrz powyżej. Przer. dżersejem, aż dł. robótki wynosi 12 cm. ZACHOWAĆ TAKIE SAME NAPRĘŻENIE NICI JAK W PRZYPADKU PRÓBKI! Podzielić teraz robótkę i przer. w tę i z powrotem dżersejem następująco: przer. 4 pierwsze o. i zdjąć je na drut pomocniczy, przer. pozostałe o., powt. z drugiej strony. Jest teraz 4 o. na drucie pomocniczym z każdej strony. Dalej przer. następująco: * przer. 2 pierwsze o. i zdjąć je na drut pomocniczy, przer. pozostałe o.*, powt. od *-* w każdym rzędzie. To oznacza zdjąć 2 o. na drut pomocniczy z każdej strony w tych 2 rz. Dalej przer. tak samo aż zostaje 1 o. (= oczko środk.). Odciąć nitkę. Wziąć z powrotem wszystkie o. na druty z żyłką = 49 o. Przer. teraz na okrągło na drutach z żyłką zaczynając od środka tyłu, następująco: *1 o.l., 1 narzut *, powt. od *-* do oczka środk. (= 24 razy), 1 o.l., *1 narzut, 1 o.l.*, powt. od *-* przez całe okrążenie (= 24 razy) = 97 o. Przer. 1 okr. na prawo, przer. narzuty przekręcone na prawo. Dalej przer. 1 ściągacz francuski przez wszystkie oczka, W TYM SAMYM CZASIE w 1-szym okr. dodać o. wykonując 1 narzut za 1-szym o., 1 narzut z każdej strony oczka środk. (lub 48 o. z każdej strony) i 1 narzut przed ost. oczkiem w okrążeniu = 101 o. Luźno zakończyć. |
|
Skończyłaś ten wzór?Otaguj swoje zdjęcia #dropspattern #elianaset lub prześlij je do #dropsfan gallery. Potrzebujesz pomocy w związku z tym wzorem?Zobacz 23 instrukcje video, sekcję Komentarze/Pytania i jeszcze więcej, wchodząc na stronę wzoru na garnstudio.com © 1982-2026 DROPS Design A/S. Wszelkie prawa zastrzeżone. Ten dokument, w całości, jest chroniony prawem. Zobacz co możesz robić z naszymi wzorami na dole każdego wzoru na naszej stronie. |


Posiadając 40 lat doświadczenia w projektowaniu wzorów na druty i szydełko, DROPS Design oferuje jedną z największych kolekcji bezpłatnych wzorów w internecie – przetłumaczonych na 17 języków. Obecnie jest dostępnych 324 katalogów i 12290 wzorów w języku polskim.
Dokładamy wszelkich starań, aby oferować Wam druty i szydełka, inspiracje, fachowe porady oraz doskonałej jakości włóczki w najlepszych cenach! Zamierzasz wykorzystać nasze wzory inaczej niż tylko do osobistego użytku? Przeczytaj jakie masz prawa w Copyright, który znajdziesz na końcu każdego wzoru. Miłej pracy!
Dodaj komentarz do modelu DROPS 156-40
Chcielibyśmy się dowiedzieć co masz do powiedzenia o tym wzorze!
Jeśli chcesz zadać pytanie i szybko uzyskać odpowiedź, upewnij się, że została wybrana właściwa kategoria w formularzu poniżej. Pola obowiązkowe są oznaczone *.