
Popularne kategorie
Szukasz włóczki?


Komentarze / Pytania (6)
![]() Jackie napisała::
Jackie napisała::
Make sure you have the stitch markers in place. Think of M1a chart as the 1st stitch, then repeat M1b 3 times, so you reach the 2nd stitch marker or the half way point. Now M1a becomes your next stitch and then repeat M1b another 3 times. When you come to the 6th row of the pattern remember to put in that stitch from M1a after each stitch marker. The M1a chart is the line of stitches you will use to crochet into when you make the border. Good luck. Jackie
14.11.2023 - 17:54
![]() Kelly Robertson napisała::
Kelly Robertson napisała::
I would call myself an intermediate knitter. I understood the pattern right away. I am not putting anyone down in anyway, I just want to help. I am taking pictures as I progress if they are any use to you. I think people just need to see the start of it in picture form. And then they will say ahhhh now I get it!!! So easy and cute. I want others to be able to whip these up :)
10.01.2023 - 23:42
![]() Paula napisała::
Paula napisała::
I have tried all ways to use this pattern but cannot make any sense. I have even tried to mark out on a graph.
14.12.2019 - 18:34Odpowiedź DROPS Design :
Dear Paula, should you need any individual assistance, you are welcome to contact the store where you bought the yarn, even per mail or telephone. Happy knitting!
16.12.2019 - 09:40
![]() Patti napisała::
Patti napisała::
I am an experienced knitter, but this pattern does not make sense. I understand that it is double side, but it does work woth the diagram. Is there just a written pattern for row to row and you could just sew both sides together or crochet them together with the crochet edging?
11.12.2019 - 03:02Odpowiedź DROPS Design :
Dear Patti, you will work the potholder in the round, ie cast on 74 stitches and then work the diagrams in the round as follows: M.1A (= first stitch at beg of each round = side of piece), repeat M.1B a total of 3 times (= snowmenn) = 1 st + 3x 12 sts= 37 sts. Then repeat one more time M.1A (= 38th stitch = other side of potholder) and M.1B. When piece is knitted, just crochet the 2 rounds for the edge around whole potholder (working in cast-on edge, sides and cast off edge). But you can just sew bottom and top without crochet edge if your rather. Happy knitting!
11.12.2019 - 08:45
![]() Salli Bordfeld napisała::
Salli Bordfeld napisała::
Is there a tutorial for this pattern? I am an experienced knitter but can’t figure out the pattern whatsoever! How can you knit a circular way for a flat cloth? Also casting on 74 stitches doesn’t seem To work out w the graph of stitches!
07.09.2019 - 06:24Odpowiedź DROPS Design :
Dear Sali, this is a double-side pot holder, so you'll knit it in the round, then fold it and work a crochet finishing border through both layers. Happy crafting!
08.09.2019 - 10:47
![]() Marit Haug napisała::
Marit Haug napisała::
Jeg forsøker å strikke disse grytelappene, men jeg sliter med å forstå mønsteret.Jeg får det ikke til å stemme.For det første , er det " snømenn" på begge sider av grytekluter? For det andre, skal både mønster M1A og M1B fortsette rundt det hele.For hvis jeg starter på M1A på 6 omgang blir det fire hvite masker først.Er det riktig? Gjentar jeg dette omgangen rundt ,stemmer det ikke på neste omgang. Jeg er ingen dreven strikker.😄
05.01.2019 - 15:37Odpowiedź DROPS Design :
Hei Marit. Ja, det er snømenn på begge sider: Du strikker M.1A (=1 m) og så gjentas M.1B 3 ganger = 37 m (den ene siden av grytekluten). Så gjentar du dette mønsteret 1 gang til. Du fortsetter slik oppover, med M.1A over maskene med merker i. På 6 omgang vil du få 4 m med hvit etter hverandre akkurat i overgangen mellom A.1A og A.1B (starten og midten av omgangen). Du vil avslutte 6 omgang med 3 hvite og 1 rød m, og videre starte 7 omgang med 1 hvit, 1 rød, 1 hvit, 3 rød osv. mønsteret vil derfor «brytes» i overgangen mellom A.1A og A.1B. Husk at du skal brette arbeidet ved merkene så dette vil ikke synes like godt når det er ferdig. God fornøyelse.
07.01.2019 - 09:56
|
||||||||||||||||
3 Little Snowmen#3littlesnowmenpotholders |
||||||||||||||||
 |
 |
|||||||||||||||
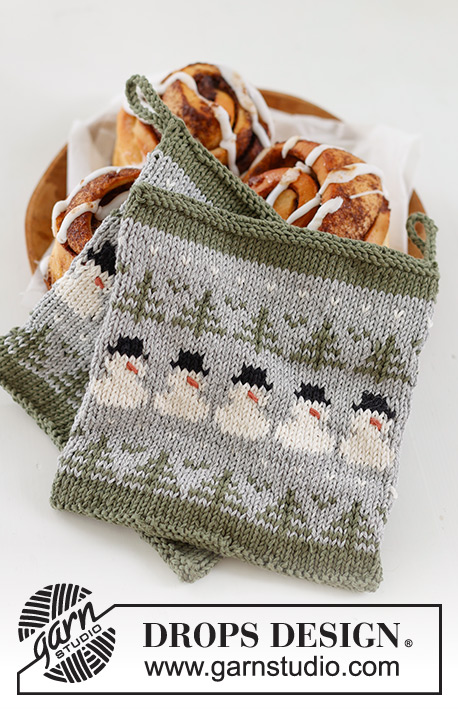
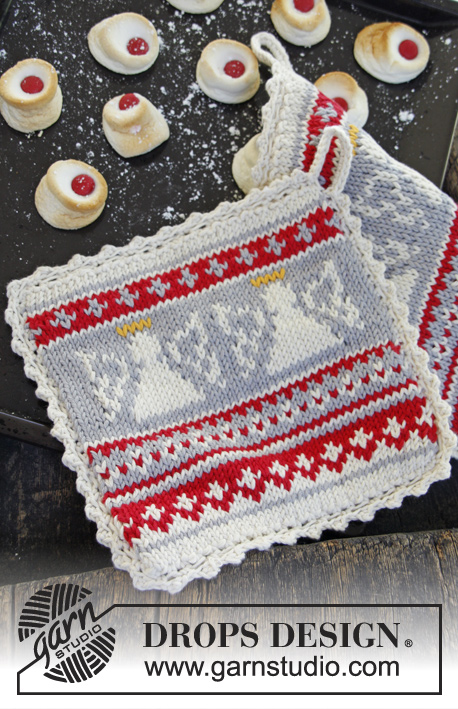
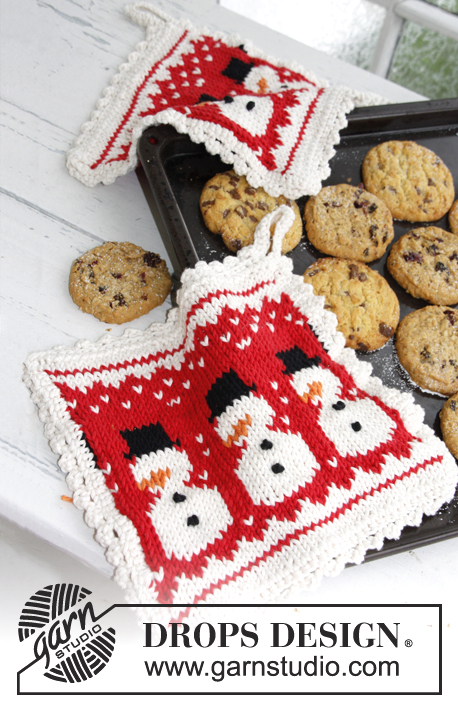
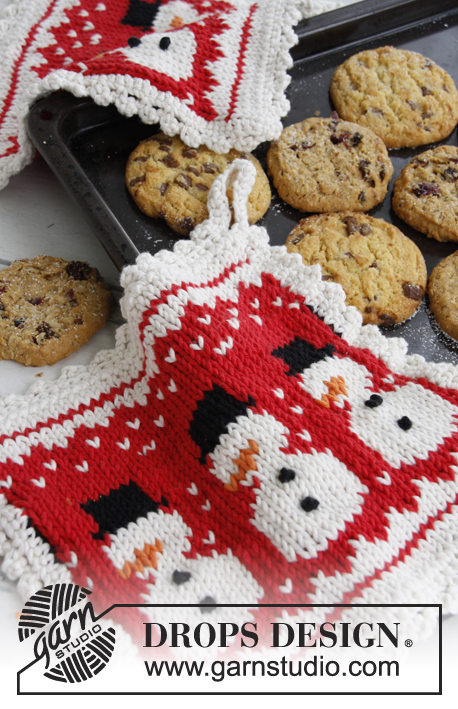
Świąteczne żakardowe rękawice kuchenne DROPS, z włóczki „Paris”.
DROPS Extra 0-792 |
||||||||||||||||
|
ŻAKARD: Patrz schematy M.1A i M.1B. SUPEŁKI FRANCUSKIE: Wyciągamy nitkę od spodu o lewej strony na prawą w miejscu oczka, gdzie ma się znajować supełek. Kierujemy igłę w stronę robótki i nawijamy dwa razy naprężoną nitkę na czubek igły. Pociągamy delikatnie palcami za nitkę, aby supełek zaciągnąć na igle. Wkłuwamy igłę jedną niteczkę dalej od wychodzenia nitki i mocujemy na lewej stronie robótki. Patrz rys.1. -------------------------------------------------------- RĘKAWICA KUCHENNA: Przer. na okrągło na drutach z żyłką. Na druty z żyłką nr 4 nabrać 74 o. kolorem ecru. Umieścić 1 marker w 1-sze o. na pocz. okrążenia i drugi marker w 38-me o. (= boki rękawicy). Dalej przer. następująco: przer. * 1 raz schemat M.1A, 3 razy schemat M.1B *, powt. od *-* w sumie 2 razy. Dalej przer., aż schematy M.1A i M.1B zostaną przerobione 1 raz na wysokość. Zakończyć kolorem ecru. Wyszywać kolorem czarnym supełki francuskie na wys. gwiazdki w schemacie. Złożyć rękawicę, aby oczka z markerami znalazły się na bokach na bokach. WYKOŃCZENIE NA SZYDEŁKU: Wykonać następujące wykończenie wokół rękawicy kolorem ecru na szydełku nr 4 na prawej stronie robótki, wbijając szydełko przez 2 warstwy. Zacząć od górnego lewego rogu i dalej przer. wokół całej rękawicy następująco: OKR. 1: Przer. 1 oś w róg, następnie 1 oś w każde o. całe okrążenie, zakończyć przerabiając 14 oł na zawieszkę. Zamknąć zawieszkę 1 oz w oś w rogu, na pocz. okrążenia. OKR. 2: *3 oł, 1 oś w 1-sze z tych 3 oł (= 1 pikotka), ominąć 2 oś, 1 oś w nast. oś*, powt. od *-* i zakończyć przerabiając 14 oś wokół zawieszki i 1 oz w oz na początku poprzedniego okrążenia. Odciąć i wrobić nitkę. |
||||||||||||||||
Objaśnienia do schematu |
||||||||||||||||
|
||||||||||||||||
 |
||||||||||||||||
Skończyłaś ten wzór?Otaguj swoje zdjęcia #dropspattern #3littlesnowmenpotholders lub prześlij je do #dropsfan gallery. Potrzebujesz pomocy w związku z tym wzorem?Zobacz 12 instrukcje video, sekcję Komentarze/Pytania i jeszcze więcej, wchodząc na stronę wzoru na garnstudio.com © 1982-2026 DROPS Design A/S. Wszelkie prawa zastrzeżone. Ten dokument, w całości, jest chroniony prawem. Zobacz co możesz robić z naszymi wzorami na dole każdego wzoru na naszej stronie. |
||||||||||||||||


Posiadając 40 lat doświadczenia w projektowaniu wzorów na druty i szydełko, DROPS Design oferuje jedną z największych kolekcji bezpłatnych wzorów w internecie – przetłumaczonych na 17 języków. Obecnie jest dostępnych 324 katalogów i 12290 wzorów w języku polskim.
Dokładamy wszelkich starań, aby oferować Wam druty i szydełka, inspiracje, fachowe porady oraz doskonałej jakości włóczki w najlepszych cenach! Zamierzasz wykorzystać nasze wzory inaczej niż tylko do osobistego użytku? Przeczytaj jakie masz prawa w Copyright, który znajdziesz na końcu każdego wzoru. Miłej pracy!
Dodaj komentarz do modelu DROPS Extra 0-792
Chcielibyśmy się dowiedzieć co masz do powiedzenia o tym wzorze!
Jeśli chcesz zadać pytanie i szybko uzyskać odpowiedź, upewnij się, że została wybrana właściwa kategoria w formularzu poniżej. Pola obowiązkowe są oznaczone *.