
Popularne kategorie
Szukasz włóczki?


Komentarze / Pytania (63)
![]() Lore napisała::
Lore napisała::
Cutest little bonnet ever! Easy to follow and beautiful result
04.08.2025 - 05:54
![]() Nannamira napisała::
Nannamira napisała::
Jeg har samme problem som Karolina, den blive høj i stedet for flad. Jeg kan ikke forstå det, for jeg har taget ind på hver anden pind. Hvordan skal jeg opklare dette? Må trevle op og prøve igen.
26.06.2025 - 22:57Odpowiedź DROPS Design :
Hei Nannamira. Hvilken str. strikker du? Har du riktig maskeantall når du skal sette de 6 merkene i arbeidet? mvh DROPS Design
30.06.2025 - 14:12
![]() Tracy napisała::
Tracy napisała::
So cute
19.12.2024 - 21:53
![]() Leah napisała::
Leah napisała::
Please help!! Can anyone explain the casing instructions better? Or have a video tutorial. I am not understanding what to do at all and it’s the last piece I have to figure out on this bonnet.
26.01.2024 - 05:14Odpowiedź DROPS Design :
Dear Leah, fold the ribbing edge (around face) double from RS and pick up the stitches into both layers along the rib then along the stocking stitch part, along the circle on back of hat, along the stocking stitch part and again in both layers along the rib, then work 2 cm stocking stitch cast off, fold double from RS (purl side is facing) and sew. Happy knitting!
26.01.2024 - 08:20
![]() Leah napisała::
Leah napisała::
Trying to clarify- following the ribbing the next row starting the stockinette section you decrease stitches? Why did you put remember the gauge in the middle of the instructions? What is this supposed to indicate? Not the most clearly written pattern.
22.01.2024 - 07:07
![]() Judith Jenkins napisała::
Judith Jenkins napisała::
I am really having difficulty with the tension. I have gone up to 3mm needles and I have got 8 cm across. It is a very thin fabric so if I go up 2 more needle sizes how will there be any warmth in the bonnet? I have reconciled myself to knitting the bonnet for a 3/4 year old because my 16 month old granddaughter has a head circumference of 48 where you measure for a bonnet or 47 but it will still be too small using 3 mm needles. My tension is usually fairly standard. What is happening here?
07.12.2021 - 21:25Odpowiedź DROPS Design :
Dear Mrs Jenkins, this hat is worked with a tension of 26 sts x 34 rows, to get the pattern matching the size you should have this tension. Read more about tension here. Happy knitting!
08.12.2021 - 07:56
![]() Judith Jenkins/ Judy napisała::
Judith Jenkins/ Judy napisała::
Thank you so much for replying straight away. However I always find that I have to re-knit hats smaller and she is a tiny 16 month old who has only just gone into 12 month clothes which are a generous fit on her so I cannot believe that she would need 3 - 4 years. I suppose the ribbing doesn’t need to meet as the bonnet is tied. As the ribbing would need to stretch in order not to be loose would I get away with 12 - 18 months? It must be either 12-18 months or 2 to 3 years.
22.11.2021 - 13:24
![]() Judith Jenkins napisała::
Judith Jenkins napisała::
Please will you look at my previous comment which should have been a question as it is urgent. I lost the first attempt and the second time I didn't c h range it to a question. Thank you
21.11.2021 - 08:50Odpowiedź DROPS Design :
Dear Judith, you can see the answer below.
21.11.2021 - 19:16
![]() Judith Jenkins napisała::
Judith Jenkins napisała::
Please could you advise as to size. My granddaughter has a bonnet circumference of 48 cm and a head circumference of 47 cm. The nearest I could get to 10 cm with 26 stitches is 9.1 cm on 3.25mm needles using Drops Fabel. If I knit the 12 - 18 month size it will be smaller than her head circumference suggests. On the other hand it seems unlikely that she would need the 2 - 3 year size as she is small for her age. I want it to fit her this winte r.I don't want to go up another needle size.
21.11.2021 - 08:47Odpowiedź DROPS Design :
Dear Judith, the age indicated in the sizes is not important, since the standard sizes may vary between the different countries and it would also depend on each child. If you need a head circumference of 47 cm, with the gauge you have indicated, you would need to knit an even larger size (3/4 years) to obtain the needed circumference. So you would be working the number of stitches for sizes 3/4 but the number of cm for the size 2 years. Happy knitting!
21.11.2021 - 19:15
![]() Maria napisała::
Maria napisała::
Jag har svårt att visualisera hur/var jag ska sticka upp maskorna för dragskon i den uppvikta resåren. Förstår inte hur det ska se ut sen, viker man ner uppviket efter att man stickat upp "dragskon". Det vore fint med en utförligare beskrivning, en bild eller en video. Tack på förhand!
14.04.2020 - 15:48Odpowiedź DROPS Design :
Hej Du stickar upp maskor längst hättans nederkant och där du vikt resåren dubbel stickar du upp maskor genom båda lager. Resårkanten fortsätter att vara dubbelvikt som på bilden så den ska inte vikas tillbaka. Mvh DROPS Design
22.04.2020 - 09:54
|
|
Little Miss#littlemissbonnet |
|
 |
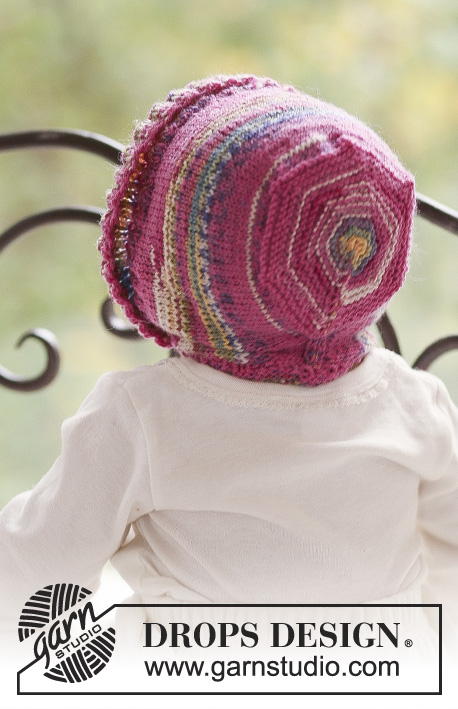 |
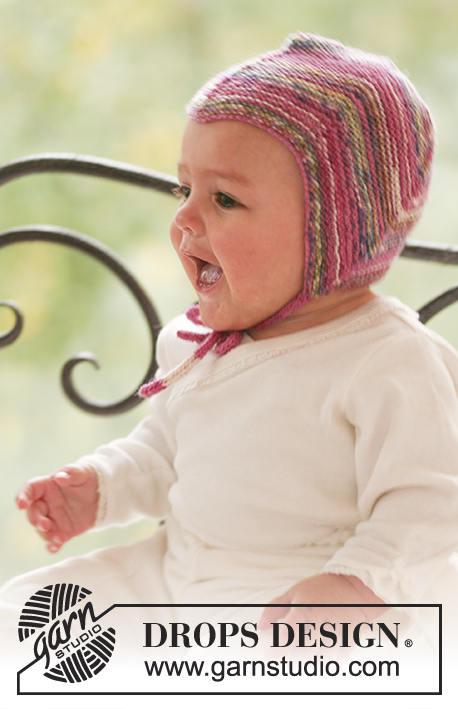
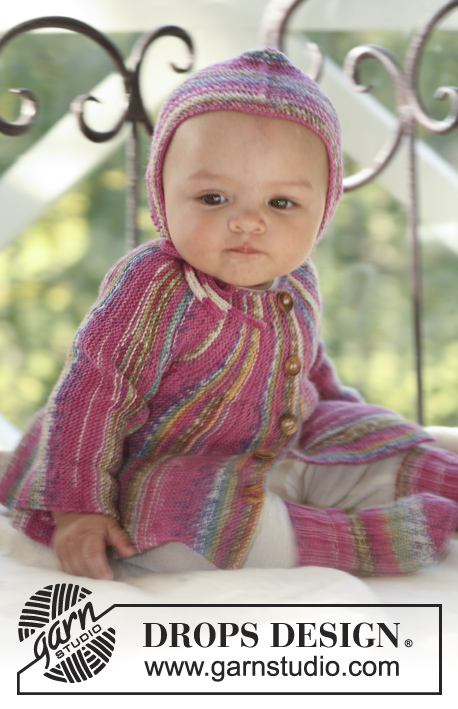
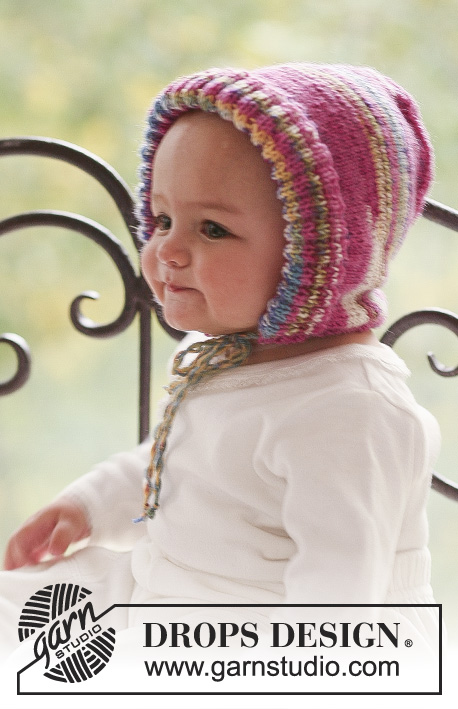
Niemowlęca i dziecięca czapka na drutach, z włóczki DROPS Fabel.
DROPS Baby 18-11 |
|
|
ŚCIEG FRANCUSKI (w tę i z powrotem): przerabiać wszystkie rzędy na prawo). CZAPKA: Jest przerabiana w tę i z powrotem. Włóczką Fabel i na drutach nr 2,5 nabrać 104-112-120 (128-136) oczek. Przerabiać ściągaczem następująco (1-szy rząd = na prawej stronie robótki): 1 oczko ściegiem francuskim – PATRZ POWYŻEJ - * 2 oczka lewe, 2 oczka prawe* powtarzać od * do *, zakończyć przerabiając 2 oczka lewe, 1 oczko ściegiem francuskim. Gdy wys. ściągacza wynosi 6-8-8 (10-10) cm, dalej przerabiać dżersejem z 1 oczkiem brzegowym z każdej strony, W TYM SAMYM CZASIE w 1-szym rzędzie równomiernie zamknąć 14-16-18 (20-22) oczka = 90-96-102 (108-114) oczek. ZACHOWAĆ TAKIE SAMO NAPRĘŻENIE NICI JAK W PRZYPADKU PRÓBKI! Na wys. 14-16-17 (19-20) cm zamknąć 6 oczek w następnym rzędzie na prawej stronie robótki, przerabiać koniec rzędu, następnie zamknąć 6 oczek na początku następnego rzędu na lewej stronie robótki, przerobić pozostałe oczka = 78-84-90 (96-102) oczka. Równomiernie rozmieścić 6 markerów (widok na prawej stronie robótki): 1 marker za 1-szym oczkiem i 5 kolejnych markerów co 13-14-15 (16-17) oczek każdy, zostaje 12-13-14 (15-16) oczek za ostatnim markerem. Dalej przerabiać ściegiem francuskim ponad wszystkimi oczkami – PATRZ POWYŻEJ – W TYM SAMYM CZASIE zamknąć 1 oczko za każdym markerem (na prawej stronie robótki), przerabiając 2 oczka razem na prawo co 2 rzędy, aż zostaje 12 oczek. Teraz przerabiać każde 2 kolejne oczka razem na prawo. Odciąć nitkę, przeciągnąć ją przez pozostałe oczka. Użyć końca nitki, aby zszyć tył czapki. Zszywać wkłuwając igłę w skrajne pętelki oczek brzegowych i zszyć 6 zamkniętych oczek. BRZEG NA DOLE CZAPKI: Zagiąć ściągacz na pół na prawą stronę robótki. Włóczką Fabel i na drutach nr 2,5 nabrać ok. 60 - 80 oczek wzdłuż oczek brzegowych na dolnym brzegu czapki – nabierać oczka wkłuwając drut przez 2 warstwy zagiętego brzegu ściągaczem. Przerobić 2 cm dżersejem i luźno zakończyć. Zagiąć na prawą stronę robótki (widoczna jest część dżersejem lewym) i przyszyć drobnym starannym ściegiem. TASIEMKI: Odciąć 2 nitki o dł. ok. 2 m każda. Zwinąć je razem, aż zaczną stawiać opór, złożyć na pół, puścić, a zwiną się ponownie same. Na każdym końcu zawiązać supełek. Przeciągnąć przez brzeg na dole czapki. |
|
Skończyłaś ten wzór?Otaguj swoje zdjęcia #dropspattern #littlemissbonnet lub prześlij je do #dropsfan gallery. Potrzebujesz pomocy w związku z tym wzorem?Zobacz 7 instrukcje video, sekcję Komentarze/Pytania i jeszcze więcej, wchodząc na stronę wzoru na garnstudio.com © 1982-2026 DROPS Design A/S. Wszelkie prawa zastrzeżone. Ten dokument, w całości, jest chroniony prawem. Zobacz co możesz robić z naszymi wzorami na dole każdego wzoru na naszej stronie. |
|


Posiadając 40 lat doświadczenia w projektowaniu wzorów na druty i szydełko, DROPS Design oferuje jedną z największych kolekcji bezpłatnych wzorów w internecie – przetłumaczonych na 17 języków. Obecnie jest dostępnych 324 katalogów i 12290 wzorów w języku polskim.
Dokładamy wszelkich starań, aby oferować Wam druty i szydełka, inspiracje, fachowe porady oraz doskonałej jakości włóczki w najlepszych cenach! Zamierzasz wykorzystać nasze wzory inaczej niż tylko do osobistego użytku? Przeczytaj jakie masz prawa w Copyright, który znajdziesz na końcu każdego wzoru. Miłej pracy!
Dodaj komentarz do modelu DROPS Baby 18-11
Chcielibyśmy się dowiedzieć co masz do powiedzenia o tym wzorze!
Jeśli chcesz zadać pytanie i szybko uzyskać odpowiedź, upewnij się, że została wybrana właściwa kategoria w formularzu poniżej. Pola obowiązkowe są oznaczone *.