
Popularne kategorie
Szukasz włóczki?


Komentarze / Pytania (65)
![]() Annick Mercier napisała::
Annick Mercier napisała::
Bonjour, je me demandais quel type de laine utiliser puisque la laine n'est pas disponible ici au Canada. Merci, Annick
02.09.2019 - 16:01Odpowiedź DROPS Design :
Bonjour Mme Mercier, je suis heureuse de vous informer que vous pouvez trouver notre laine au Canada - plus d'infos ici. Bon tricot!
02.09.2019 - 16:47
![]() Patricia Olivia Fuchs napisała::
Patricia Olivia Fuchs napisała::
Hallo, liebes Drops-Team. Wenn ich KEIN umgeknicktes Bündchen möchte, kann ich dann anstatt * 2 re., 3 li. * gleich mit Diagrammm M1 beginnen und der weiteren Anleitung folgen, oder muss ich dafür noch etwas anderes beachten?
24.06.2019 - 14:52Odpowiedź DROPS Design :
Liebe Frau Fuchs, also wahrscheinlich können Sie dann mit Zöpfen über die gewünschte Höhe stricken, dann setzt man eine Markierung und der Socken wird ab Markierer gemessen (nicht von der Anschlagskante). Viel Spaß beim stricken!
24.06.2019 - 17:00
![]() Mathilde napisała::
Mathilde napisała::
Bonjour, Je souhaiterais savoir ce que veux dire retourner le tricot ? Je ne comprends pas .... J'ai retourner mon ouvrage mais je tricote toujours dans le même sens ... Je vous remercie de bien vouloir l'éclairer Mathilde
14.01.2019 - 19:09Odpowiedź DROPS Design :
Bonjour Mathilde, après les côtes, retournez l'ouvrage sur l'envers = les premiers rangs de côtes seront retournés sur l'endroit à la fin et ont donc été tricotés sur l'envers. Au premier tour après avoir retourné votre ouvrage, vous allez tricoter la dernière maille du tour précédent pour terminer par la première maille, continuez ensuite toujours ainsi, c'est maintenant l'endroit de la chaussette. Bon tricot!
15.01.2019 - 09:02Nicola Stuart napisała::
Would love to knit these but would have to make them longer and bigger. How would I go about changing size?
11.11.2018 - 22:41Odpowiedź DROPS Design :
Dear Nicola, the pattern goes up to size 44. If you need even bigger by using a slightly bigger needle. Conversly, you can use the yarn Lima isntead of the Karisma =with bgger needles). If you only want it somewhat higher, you can continue knitting straight for a couple more cm-s, and6 or you can increase a stitch on both ides of this middle stitch. You can find the videos, related to this pattern at the left of the page, below the pictures. Also there are detailed explanation of the symbos of the pattern chart. If you need further help you can also ask for it in person in the store where you bought your DROPS yarn from. Happy Crafting!
12.11.2018 - 01:56
![]() Nicole napisała::
Nicole napisała::
Vielen Dank für diese tolle Anleitung. Die Strümpfe sehen im Original schöner aus wie auf Eurem Foto und war für mich als Anfänger leicht verständlich nach zu stricken. Inzwischen habe ich schon 3 Paar gestricht und es macht immer wieder Spaß.
08.08.2018 - 17:26
![]() Alexandra napisała::
Alexandra napisała::
When i get to this part in the M2 chart do I pearl the 6 after i pearl the first 18 or do i knit them I'm not sure how to determine if I am working on the right side or wrong side now? Knit following round like this: P the first 15-18-21 sts, chart M.2 (= 36 sts), P the last 15-18-21 sts. I hope you understand my question thank you , Alex
08.06.2016 - 21:34Odpowiedź DROPS Design :
Dear Alexandra, when working M.2 you are now working from RS and WS of M.1 is facing you (will be folded at the very end). M.2 is 36 sts in width, work rounds like this: P the first 15-18-21 sts from beg of round, then work the 36 sts in M.2 starting to read at the bottom corner on the right side towards the left and P the last 15-18-21 sts on round. Happy knitting!
09.06.2016 - 08:49
![]() Alexandra napisała::
Alexandra napisała::
I'm talking about the Drops long Sock pattern their is M,M2, M3 Diagram it's just a little harder to understand . Thanks, Alex
18.05.2016 - 16:05Odpowiedź DROPS Design :
Dear Alexandra, then follow the legend to diagram, and start reading diagram from the bottom corner on the right side towards the left every round. 1 square = 1 st x 1 round. Read more here. Happy knitting!
18.05.2016 - 17:11
![]() Alexandra napisała::
Alexandra napisała::
Okay What about the empty space at the bottom of the diagrams? What is that about? I'm sorry I'm new and to doING and reading diagrams. Thank you, Alexandra
18.05.2016 - 04:38Odpowiedź DROPS Design :
Dear Alexandra, an empty space can be added at the bottom of a diagram when there are less sts on some rows before you inc and get then more sts than on previous rows. Maybe you could ask your question on the pattern you are thinking about, it might help to make an accurate answer. Happy knitting!
18.05.2016 - 09:23
![]() Alexandra Dick napisała::
Alexandra Dick napisała::
I am wondering about the pattern for 103-10 are you to read the diagram from top to bottom or bottom to top? And is it read right to left or left to right? And what are the empty space at the bottom of diagram ment for? And are you to repeat pattern like the M1 it was p1,k4,p1,k4 do you continue doing that for a whole round? I tried finding a video to help but was unable to . Thank you
29.04.2016 - 05:27Odpowiedź DROPS Design :
Dear Mrs Dick, diagrams are read from bottom up starting on the corner on the right side, every round from the right towards the left (see here) 1st round in M1 will be workd; (K4, P1,K4, P1) repeat from (to) over all sts on round. Happy knitting!
29.04.2016 - 09:09
![]() Birgitt napisała::
Birgitt napisała::
Hallo, danke für die schnelle Antwort. Genau so habe ich die Anleitung auch verstanden, hatte schon bedenken, ich hätte es nicht kapiert. Meinem Mann ist das aber -zu langweilig- (OTon). Da ich für ihn die Maschenzahl ohnehin ändern muss, bekommt er auf der Rückseite M3 gestrickt (bis FerseI und in den linken Maschen zw. beiden Mustern kann ich super die Abnahmen für die Wade vornehmen. Gruß Birgitt
14.03.2016 - 19:03
|
||||||||||||||||||||||
Hilde & Winter |
||||||||||||||||||||||
|
|
||||||||||||||||||||||
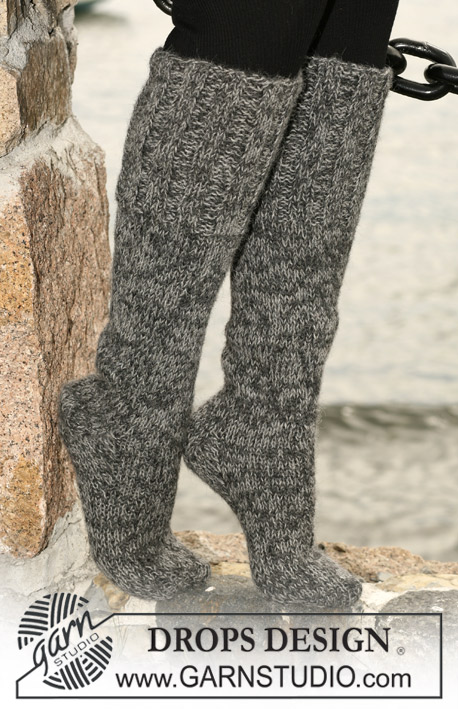
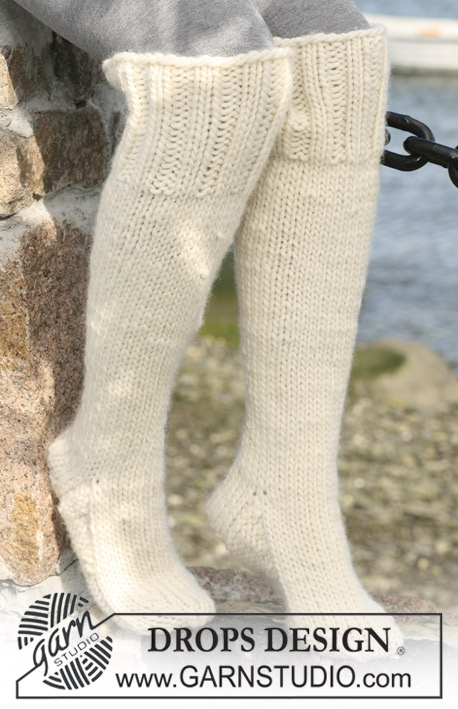
Długie skarpety DROPS ściegiem irlandzkim z włóczki „Karisma Superwash”
DROPS 103-10 |
||||||||||||||||||||||
|
ŚCIĄGACZ: * 2 o.p., 3 o.l. * powt. od * do * ŚCIEG FANTAZYJNY: patrz schematy M1, M2 i M3. Schematy przedstawiają ścieg fantazyjny na prawej stronie robótki. ZAMYKANIE OCZEK NA PIĘTĘ Rz. 1 (= na prawej stronie robótki): przer. na prawo aż zostaje 7-8-9 o., zdjąć nast. oczko jak do przerobienia na prawo, 1 o.p., przełożyć oczko zdjęte nad przerobionym oczkiem Rz. 2 (= na lewej stronie robótki): przer. na lewo aż zostaje 7-8-9 o., zdjąć nast. oczko jak do przerobienia na lewo, 1 o.l., przełożyć oczko zdjęte nad przerobionym oczkiem Rz. 3 (= na prawej stronie robótki): przer. na prawo aż zostaje 6-7-8 o., zdjąć nast. oczko jak do przerobienia na prawo, 1 o.p., przełożyć oczko zdjęte nad przerobionym oczkiem Rz. 4 (= na lewej stronie robótki): przer. na lewo aż zostaje 6-7-8 o., zdjąć nast. oczko jak do przerobienia na lewo, 1 o.l., przełożyć oczko zdjęte nad przerobionym oczkiem Rz. 5 (= na prawej stronie robótki): przer. na prawo aż zostaje 5-6-7 o., zdjąć nast. oczko jak do przerobienia na prawo, 1 o.p., przełożyć oczko zdjęte nad przerobionym oczkiem Rz. 6 (= na lewej stronie robótki): przer. na lewo aż zostaje 5-6-7 o., zdjąć nast. oczko jak do przerobienia na lewo, 1 o.l., przełożyć oczko zdjęte nad przerobionym oczkiem Dalej przer. tak aby było zawsze o 1 o. mniej przed zdjęciem oczka, aż zostanie na drucie 8-10-12 o. WYKONANIE Przerabiane na okrągło zaczynając od środka tyłu. Włóczką Karisma na drutach pończoszniczych nr 3,5 nabrać 80-90-100 o. Przer. ściągaczem – patrz powyżej – po przerobieniu 2 cm ściągacza zacząć przer. ściegiem fantazyjnym M1. Na wys. 20 cm od dołu robótki obrócić robótkę – tzn. dalej przer. na lewej stronie robótki (20 przerobionych cm zostaną na końcu wyłożone). Przer. 1 rz. na prawo, w tym samym czasie zamykając równomiernie 14-18-22 o. = 66-72-78 o. Przer. 1 rz. na lewo. Umieścić marker i mierzyć od markera. Dalej przer. nast. rząd: 15-18-21 pierwszych o. dżersejem lewym, M2 (= 36 o.), 15-18-21 ost. o. dżersejem lewym. Po przerobieniu 5 cm, zamknąć 1 o. z każdej strony schematu M2 11-12-13 razy co 2 cm (przerabiając 2 o. razem na lewo) = 44-48-52 o. Na wys. 33-36-39 cm od dołu robótki zdjąć 24 o. środk. na drut pomocniczy. Dalej przer. 5 - 5,5 - 6 cm dżersejem tylko przez 20-24-28 pozostałe o. z tyłu (= pięta). Następnie wykonać zamykanie oczek na piętę (patrz powyżej). Po zamknięciu o. na piętę, równomiernie nabrać po 11-13-15 o. z każdej strony pięty na druty pończosznicze = 54-60-66 o. Przer. schemat M3 przez 24 o. wierzchu stopy (pozostałe o. dżersejem). W TYM SAMYM CZASIE zamknąć o. następująco: 2 o. razem na prawo przed schematem M3 i 2 o. razem na prawo wbijając drut z tyłu oczek za schematem M3: 6 razy co 2 rz. = 42-48-54 o. Przer. aż dł. stopy od brzegu pięty wynosi ok. 18-20-22 cm (tam gdzie był początek zamykania oczek na piętę). Dalej przer. dżersejem przez wszystkie oczka. Umieścić 1 marker z każdej strony stopy, tak, aby było 22-24-26 o. na wierzch stopy i 20-24-28 o. na spód stopy. Zamykać na palce z każdej strony każdego markera: 2 o. razem na prawo przed markerem i 2 o. razem na prawo wbijając drut z tyłu oczek za markerem. Zamykać tak samo 3 razy co 2 rz. = 30-36-42 o., dalej 6-7-9 razy w każdym rzędzie = 6-8-6 o. Przeciągnąć nitkę przez pozostałe oczka i zszyć. |
||||||||||||||||||||||
Objaśnienia do schematu |
||||||||||||||||||||||
|
||||||||||||||||||||||
 |
||||||||||||||||||||||
Skończyłaś ten wzór?Otaguj swoje zdjęcia #dropspattern lub prześlij je do #dropsfan gallery. Potrzebujesz pomocy w związku z tym wzorem?Zobacz 15 instrukcje video, sekcję Komentarze/Pytania i jeszcze więcej, wchodząc na stronę wzoru na garnstudio.com © 1982-2026 DROPS Design A/S. Wszelkie prawa zastrzeżone. Ten dokument, w całości, jest chroniony prawem. Zobacz co możesz robić z naszymi wzorami na dole każdego wzoru na naszej stronie. |
||||||||||||||||||||||


Posiadając 40 lat doświadczenia w projektowaniu wzorów na druty i szydełko, DROPS Design oferuje jedną z największych kolekcji bezpłatnych wzorów w internecie – przetłumaczonych na 17 języków. Obecnie jest dostępnych 324 katalogów i 12290 wzorów w języku polskim.
Dokładamy wszelkich starań, aby oferować Wam druty i szydełka, inspiracje, fachowe porady oraz doskonałej jakości włóczki w najlepszych cenach! Zamierzasz wykorzystać nasze wzory inaczej niż tylko do osobistego użytku? Przeczytaj jakie masz prawa w Copyright, który znajdziesz na końcu każdego wzoru. Miłej pracy!
Dodaj komentarz do modelu DROPS 103-10
Chcielibyśmy się dowiedzieć co masz do powiedzenia o tym wzorze!
Jeśli chcesz zadać pytanie i szybko uzyskać odpowiedź, upewnij się, że została wybrana właściwa kategoria w formularzu poniżej. Pola obowiązkowe są oznaczone *.