
Popularne kategorie
Szukasz włóczki?


Komentarze / Pytania (19)
![]() David Porter napisała::
David Porter napisała::
Hi Just to add has anyone else knitted this and had the same problem David
02.01.2022 - 00:55Odpowiedź DROPS Design :
Dear David, you might want to try and put that question up in th eDROPS Workshop group on Facebook. Maybe there will you find someone who also made this piece. Happy Stitching!
03.01.2022 - 02:03
![]() David Porter napisała::
David Porter napisała::
Very disappointed in this, i am 3 quarter through the pattern and i thought i would put the stitches on a piece of yarn to try it on. Its far too small i cant get both arms in to pull it over my head. David 😭😢
01.01.2022 - 23:55
![]() David Porter napisała::
David Porter napisała::
Further to my question, I am talking about normal straight needles not DPN'S.. David
15.12.2021 - 23:54Odpowiedź DROPS Design :
Sure - see answer below
16.12.2021 - 07:29
![]() David Porter napisała::
David Porter napisała::
Is it possible to do this pattern on straight needles please. Looking forward to hearing from you. David Porter
15.12.2021 - 23:44Odpowiedź DROPS Design :
Dear Mr Porter, this lesson explains how to adjust a pattern for circular needles into straight needles and should be able to help you. Happy knitting!
16.12.2021 - 07:28
![]() David Porter napisała::
David Porter napisała::
How can the pattern start 24cm up, the picture doesnt show that. Is this pattern suppose to be top down then i can understand the 24cm bit. There isnt 24cm at the bottom before the pattern starts looking at the picture
22.11.2021 - 10:48Odpowiedź DROPS Design :
Dear Mr Porter, diagram 1 is worked when piece measures 24 cm from cast on edge, but on the picture you cannot see the very bottom of jumper because ribbing edge is tightening the bottom of jumper. Happy knitting!
22.11.2021 - 16:09
![]() David Porter napisała::
David Porter napisała::
So do you start the pattern straight after the increase
22.11.2021 - 00:02Odpowiedź DROPS Design :
Dear David no. After the ribbing, you increase the stitches, knit stockinett with black until the piece is 24 cm long, and then start the pattern. Happy stitching!
22.11.2021 - 00:50
![]() David Porter napisała::
David Porter napisała::
Hi can anyone help please, i dont understand the bit after the rib on the body, where it says work 24cm before starting M1. Has the pattern been printed incorrectly. David Porter
20.11.2021 - 01:07Odpowiedź DROPS Design :
Dear David, after the ribbing you will have to increase the number of stitches. See THIS video on how to increase evenly. Then you will have to start knitting the pattern when your piece is 24 cm long (from the casting on- so including the ribbing). Happy Stitching!
21.11.2021 - 15:01
![]() David Porter napisała::
David Porter napisała::
What does in mean steek stitching for armhole, i would love to knit thus but not done armholes like this before. I have done it in nordic patterns where t goes in with stitches knitted from stitch holder or normal sown in ones. Looking forward to hearing from you David
11.11.2021 - 18:36Odpowiedź DROPS Design :
Dear Mrs Porter, steek stitches are stitches you cast on extra over armholes instead of casting off and dividing piece and you will then continue working in the round. This video shows how to work steek stitches and cut piece for armholes. and This one another way to work and cut these sts for a jacket. Happy knitting!
12.11.2021 - 07:37
![]() Christina Faurbye napisała::
Christina Faurbye napisała::
Hejsa Jeg vil gerne strikke den her trøje med de her farver, men farverne stemmer slet ikke overens med billedet. Som det fremgår af billedet er bundfarven sort, men der står marineblå, og denne er slet ikke den samme farve. Ingen af farverne i karisma stemmer overens med de her stærke farver. Lilla 012, findes overhovedet ikke i karisma. Jeg tænker om det er noget helt andet garn end karisma, som trøjen er strikket i? Mvh Christina
10.04.2014 - 19:00Odpowiedź DROPS Design :
Hej Christina. Farver kan fremkomme anderledes paa din computer ifm indstillinger/lys osv. Men den er i bundfarven marineblaa. Og den er strikket i Karisma, men det er ogsaa en gammel sag, saa farverne i Karisma er tilpasset siden da. Findes en farve ikke mere, saa er der alternativer du kan vaelge.
11.04.2014 - 09:48
|
|||||||||||||
DROPS 16-13 |
|||||||||||||
|
|
|||||||||||||
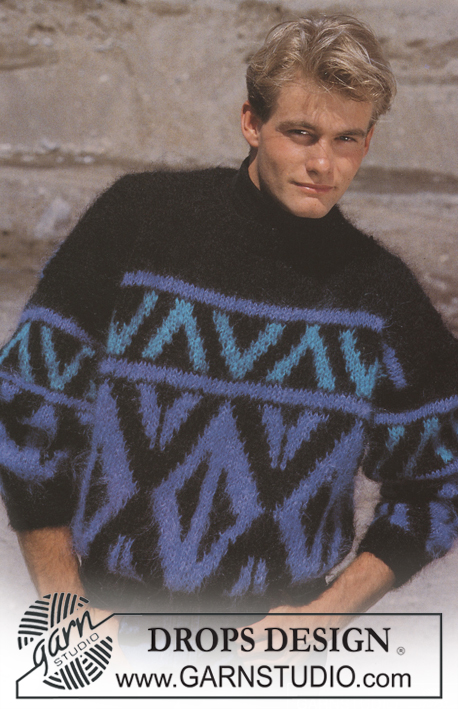
Sweter męski na drutach, z żakardem w romby, z włóczki DROPS Karisma. Od S do L.
DROPS 16-13 |
|||||||||||||
|
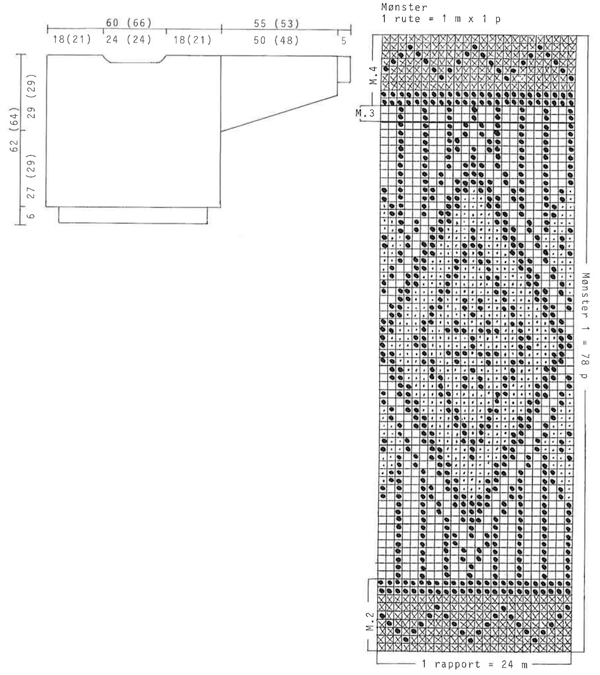
ŻAKARD: patrz schematy poniżej. Schematy przedstawiają motyw na prawej stronie robótki i są przerabiane dżersejem. Rękaw: 1 cm kolorem granatowym, M.2, kolorem granatowym do wys. 31,5-29,5 cm, M.2, 7 cm wg schematu M.3, M.4, kończyć robótkę kolorem granatowym. ŚCIĄGACZ: * 1 oczko przekręcone i przerobione na prawo (wbijając drut z tyłu oczka), 1 oczko lewe *, powtarzać od *-*. TYŁ & PRZÓD: sweter jest przerabiany na okrągło na drutach z żyłką, z oczkami steek przecinanymi następnie przez ich środek na podkroje rękawów. Na drutach z żyłką nr 2,5 nabrać 190-200 oczek nitką w kolorze granatowym i przerobić 6 cm ściągaczem. Dalej przerabiać na drutach z żyłką nr 4 dżersejem, W TYM SAMYM CZASIE w 1-szym okrążeniu równomiernie dodać 50-64 oczka = 240-264 oczka. ZACHOWAĆ TAKIE SAMO NAPRĘŻENIE NICI JAK W PRZYPADKU PRÓBKI! Na wys. 24 cm przerabiać schemat M.1 i dalej kończyć robótkę kolorem granatowym. W tym samym czasie na wys. 33-35 cm nabrać 5 oczek z każdej strony (oczka steek przecinane następnie na podkroje rękawów, przerabiane dżersejem, nie żakardem). Na wys. 59-61 cm zamknąć na dekolt przodu 44 oczka środkowe i kończyć robótkę w tę i z powrotem. Zamykać od strony dekoltu co 2 rzędy: 2 razy 1 oczko. W tym samym czasie na wys. 61-63 cm zamknąć 46 oczek środkowych na dekolt tyłu, a w następnym rzędzie zamknąć 1 oczko od strony dekoltu. Zamknąć pozostałe oczka na ramię na wys. 62-64 cm. RĘKAWY: Na drutach pończoszniczych nr 2,5 nabrać 46-48 oczek nitką w kolorze granatowym i przerobić 5 cm ściągaczem. Dalej przerabiać na drutach pończoszniczych nr 4 żakardem – patrz powyżej – W TYM SAMYM CZASIE w 1-szym okrążeniu równomiernie dodać 13-13 oczek = 59-61 oczek. W tym samym czasie po przerobieniu ściągacza dodać 2 oczka na środku pod rękawem; powtarzać dodawanie oczek w sumie 29-28 razy co 4 okrążenia = 117-117 oczek. Na wys. 55-53 cm przerobić 5 okrążeń dżersejem lewym na brzeg doszywany do przeciętych części przodu i tyłu. Luźno zakończyć. WYKOŃCZENIE: Przeszyć nitką (marker) przez środek oczek ‘steek’ z każdej strony (na podkroje rękawów). Wykonać 2 maszynowe szwy wokół nitki markera, 1-szy w odl. ½ oczka od nitki markera, 2-gi w odl. ½ oczka od 1-szego szwu. Przeciąć na bokach na podkroje rękawów. Zszyć ramiona. Na drutach z żyłką nr 2,5 nabrać ok. 100 oczek wokół dekoltu nitką w kolorze granatowym i przerobić 3 cm ściągaczem. Zakończyć. Wszywać rękawy na prawej stronie robótki następująco: zszywać na przemian 1 oczko ostatniego rzędu rękawa (przed częścią dżersejem lewym) z 1 oczkiem tyłu/przodu (za maszynowym szwem). Obrócić sweter na lewą stronę i przyszyć część dżersejem lewym ponad przeciętymi brzegami tyłu/przodu. |
|||||||||||||
Objaśnienia do schematu |
|||||||||||||
|
|||||||||||||
 |
|||||||||||||
 |
|||||||||||||
Skończyłaś ten wzór?Otaguj swoje zdjęcia #dropspattern lub prześlij je do #dropsfan gallery. Potrzebujesz pomocy w związku z tym wzorem?Zobacz 27 instrukcje video, sekcję Komentarze/Pytania i jeszcze więcej, wchodząc na stronę wzoru na garnstudio.com © 1982-2026 DROPS Design A/S. Wszelkie prawa zastrzeżone. Ten dokument, w całości, jest chroniony prawem. Zobacz co możesz robić z naszymi wzorami na dole każdego wzoru na naszej stronie. |
|||||||||||||


Posiadając 40 lat doświadczenia w projektowaniu wzorów na druty i szydełko, DROPS Design oferuje jedną z największych kolekcji bezpłatnych wzorów w internecie – przetłumaczonych na 17 języków. Obecnie jest dostępnych 324 katalogów i 12290 wzorów w języku polskim.
Dokładamy wszelkich starań, aby oferować Wam druty i szydełka, inspiracje, fachowe porady oraz doskonałej jakości włóczki w najlepszych cenach! Zamierzasz wykorzystać nasze wzory inaczej niż tylko do osobistego użytku? Przeczytaj jakie masz prawa w Copyright, który znajdziesz na końcu każdego wzoru. Miłej pracy!
Dodaj komentarz do modelu DROPS 16-13
Chcielibyśmy się dowiedzieć co masz do powiedzenia o tym wzorze!
Jeśli chcesz zadać pytanie i szybko uzyskać odpowiedź, upewnij się, że została wybrana właściwa kategoria w formularzu poniżej. Pola obowiązkowe są oznaczone *.