
Popularne kategorie
Szukasz włóczki?


Komentarze / Pytania (17)
![]() Marlene Bernardi napisała::
Marlene Bernardi napisała::
Your patterns are beautiful, but not workable for me unless you can put them into a written pattern. At 80 I find the charts too challenging. Will have to pass on these lovely patterns.
17.04.2025 - 13:46
![]() Zoi Mastoridou napisała::
Zoi Mastoridou napisała::
Guten Tag, Bin zwar keine Anfängerin, aber ich verzweifle an der Anleitung A.1 ist gehäkelt aber mit A.2 komme ich nicht weiter, da ist auch die Spitze nicht dabei, Breite ich da auch mit 4 Luftmaschen?
12.02.2025 - 14:43Odpowiedź DROPS Design :
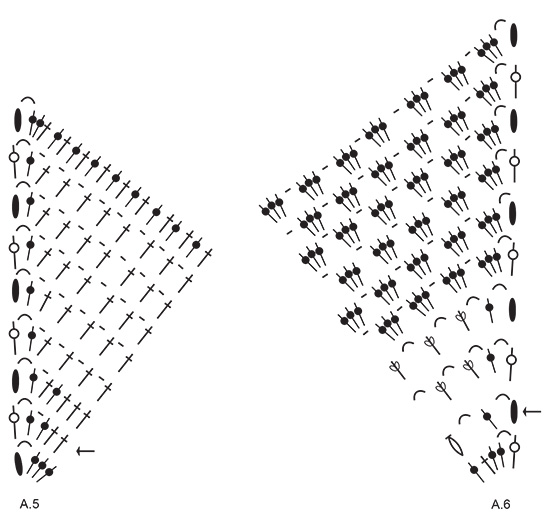
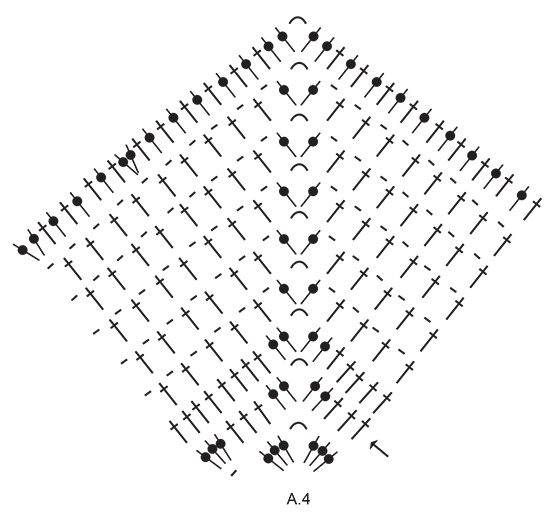
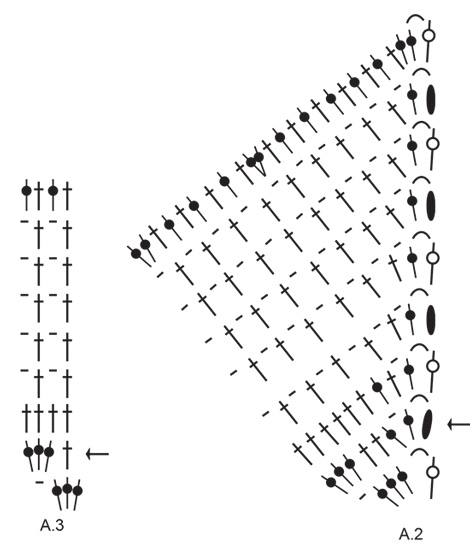
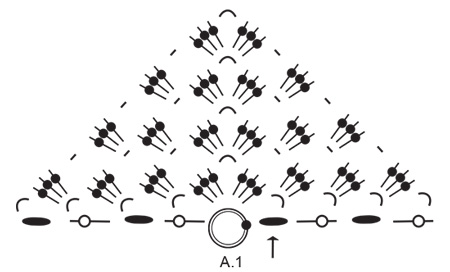
Liebe Frau Mastoridou, wenn A.1 fertig ist mus mann dann A.2 bis A.5 so häkeln: A.2 am Anfang von den Hin-Reihen, dann wiederholen Sie A.3 insgesamt 4 Mal, dann häkeln Sie A.4 in der Mitte von A.1, dann wiederholen Sie A.3 insgesamt 4 Mal und enden Sie mit A.5. Bei den Rückreihen lesen Sie die Diagramme links bei rechts und häkeln Sie A.5, A.3, A.4, A.3 und A.2. Viel Spaß beim Häkeln!
12.02.2025 - 16:08
![]() Lori napisała::
Lori napisała::
Is there a site you have that teaches me how to use your patterns? I just can't seem to wrap my head around the A1, A2, etc. parts. I need some help in learning how to read your patterns. Your patterns are beautiful and I so want to make this items. Maybe a tutorial on Drops Design pattern reading. Thank you
02.08.2024 - 18:24Odpowiedź DROPS Design :
Dear Lori, we have a tutorial on how to read our knitting diagrams HERE. It is well worth to try a simpler piece first to understand our way of writing knitting patterns, and then start on a more difficult one. Also, don't forget, that you can always ask for help (either in person, or over the phone) in the store where you bought your DROPS yarn from. Happy Knitting!
04.08.2024 - 18:27
![]() Shirley Messerschmidt napisała::
Shirley Messerschmidt napisała::
I cant do this. Do you have a regularly pattern. Thanks! this is greek to me.
14.07.2024 - 10:04Odpowiedź DROPS Design :
Dear Shirley, this pattern is only available in the format shown in this webpage, we don't make custom patterns. You can ask us if there is any section that you have difficulty understanding. Happy crochetting!
15.07.2024 - 01:15
![]() Céline V napisała::
Céline V napisała::
Bonjour, Après avoir réalisé A2, j ai donc terminé par 2 brides puis 1 arceau et une double bride dans l arceau ; comment commencer le schéma A3 ? Le schéma A3 indique 3 brides dans un arceau puis une maille en l air sur le rang précédent…ce que je n ai pas sur le dernier rang de A2. Pouvez-vous m aider ? Merci
24.05.2024 - 22:34Odpowiedź DROPS Design :
Bonjour Céline, au 1er rang de A.2 vous terminez par 3 brides autour de l'arceau d'1 maille en l'air, puis vous répétez A.3 ainsi: (1 bride dans la 2ème des 3 brides du groupe de brides du rang précédent, 3 bride dans l'arceau d'1 maille en l'air), répétez de *à*. Bon crochet!
27.05.2024 - 09:05
![]() Bettina napisała::
Bettina napisała::
I'm not sure but I think there are too much stitches in diagrams A2 and A4. 4 times in the top row there is an extra double crochet which isn't on the other half of the shawl in diagrams A4 and A5. If you crochet it like in the diagram there would be 64 instead of 60 stitches on one side. Could it be a mistake in the diagrams?
03.03.2024 - 13:00Odpowiedź DROPS Design :
Dear Bettina, on the last row in diagrams, there are 25 sts + 1 ch-space in A.2 + 4 x 4 sts in A.3 + 19 sts before middle ch-space in A.4 = 60 sts; then 24 sts after ch-space in A.4 + 4 x 4 sts in A.4 + 20 sts in A.5 = 60 sts after the middle ch-space. Hope it can help. Happy crocheting!
04.03.2024 - 09:32
![]() Rochas Julie napisała::
Rochas Julie napisała::
Bonjour je viens de faire le diagramme 1 mais je ne comprend pas d'où on part pour commencer le n°2. Merci de votre aide c'est un cadeau de Noël qui va finir en cadeau d'anniversaire enfin si j'arrive à le finir
27.02.2024 - 18:29Odpowiedź DROPS Design :
Bonjour Mme Rochas, quand A.1 est terminé, vous devez encore crocheter 1 fois les 2 derniers rangs pour avoir un total de 6 rangs et 12 groupes de brides, crochetez ensuite ainsi, sur l'endroit et en commençant par le rang avec la flèche: A.2 (côté droit du châle, vu sur l'endroit), répétez 4 fois A.3 (jusqu'au dernier groupe de brides avant l'arceau du milieu), crochetez A.4, répétez 4 fois A.3 et terminez par A.5 dans le dernier groupe de brides. Sur l'endroit, crochetez en lisant de gauche à droite: A.5, A.3, A.4, A.3, A.2. Bon crochet!
28.02.2024 - 09:12
![]() Ran napisała::
Ran napisała::
Thank you so much for sharing this beautiful pattern. I worked this shawl for 3days and now ready to give my mother-in-law as a new year's gift. Happy new year!
01.02.2024 - 09:58
![]() Julie Dufaj napisała::
Julie Dufaj napisała::
I wish you had a diagram showing all of the diagrams put together like a jigsaw puzzle. I don't find this method intuitive at all. But it's what you have experienced, I guess.
27.01.2024 - 22:11
![]() Doris Ouellet napisała::
Doris Ouellet napisała::
It was not clear how to do the edges. Very confusing. Why doesn’t it show how to increase
19.09.2023 - 07:58Odpowiedź DROPS Design :
Dear Mrs Ouellet, the increases on the sides as well as on the middle of the shawl are included in the diagrams, so that at the very beg you increase on each side + in the middle as shown in A.1, then increase at the beg of row from RS/end of row from WS as shown in A.2, increase in the middle as shown in A.4 and increase at the end of row from RS/beg of row from WS as shown in A.5. This lesson might help you understanding how to read crochet diagrams. Happy crocheting!
19.09.2023 - 09:31
|
|||||||||||||||||||||||||||||||
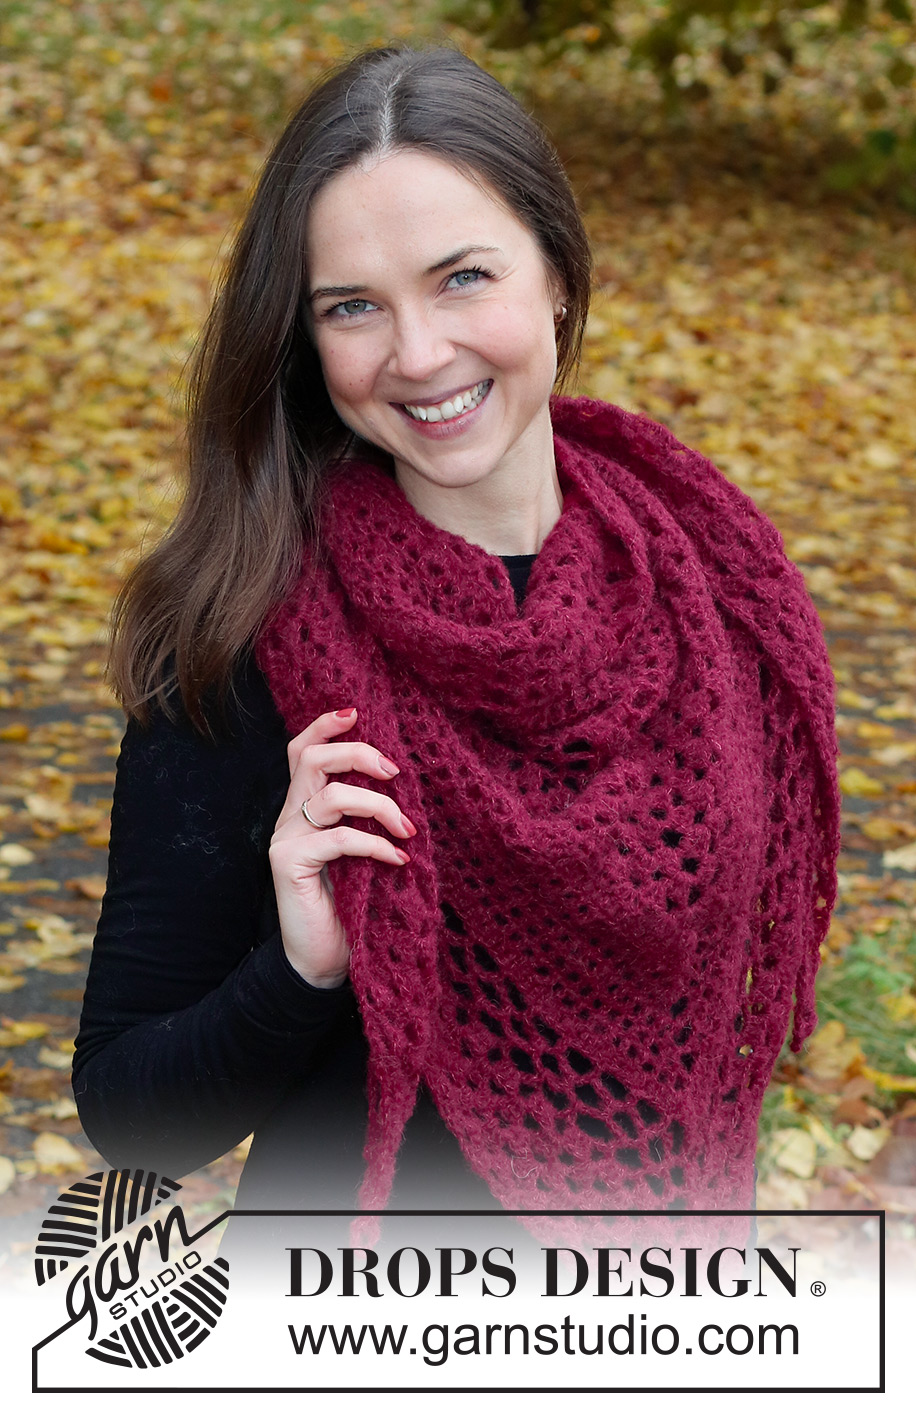
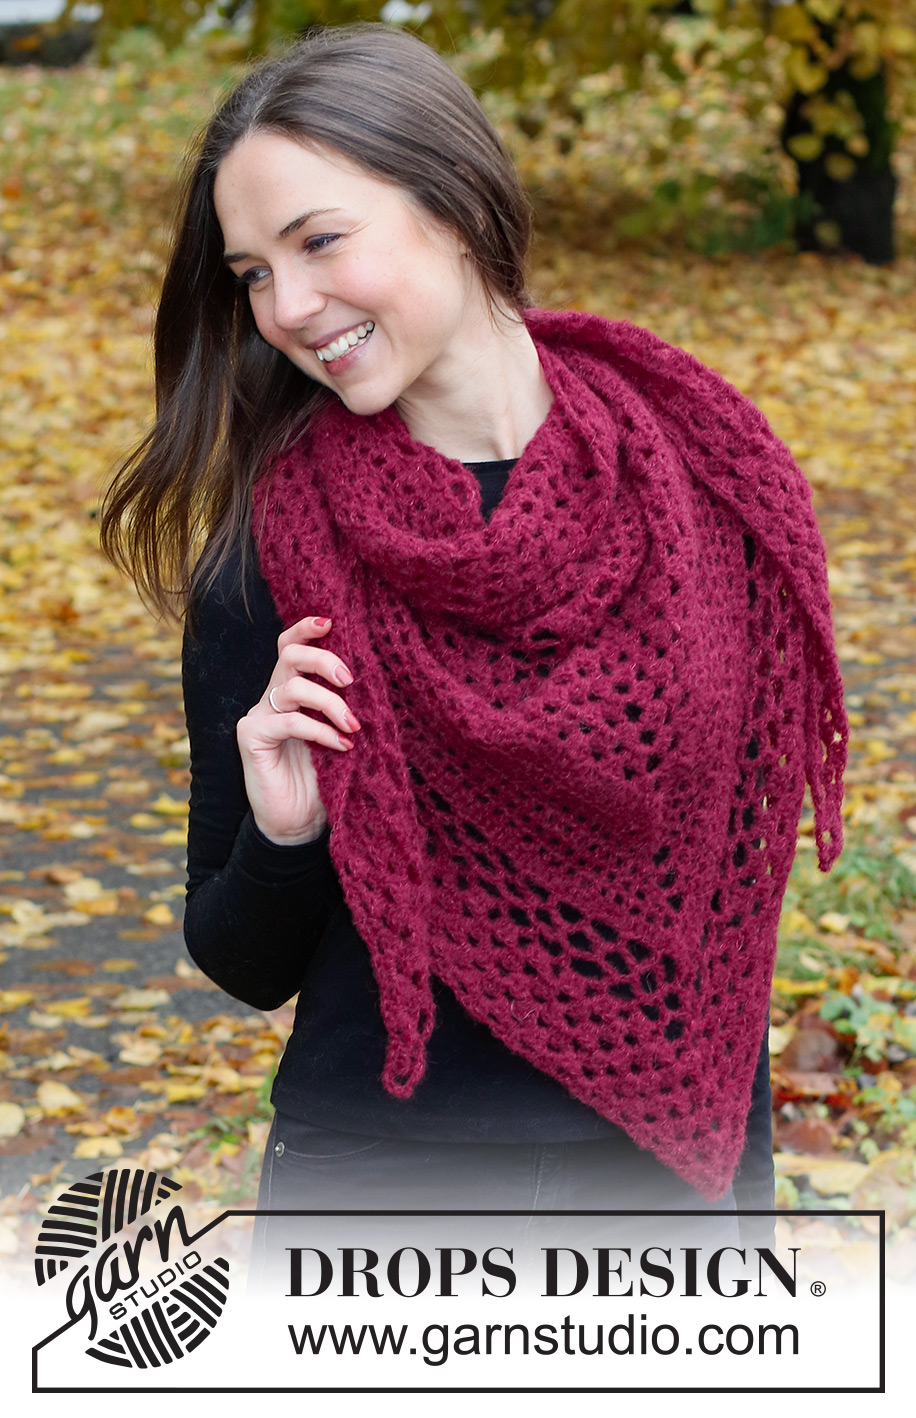
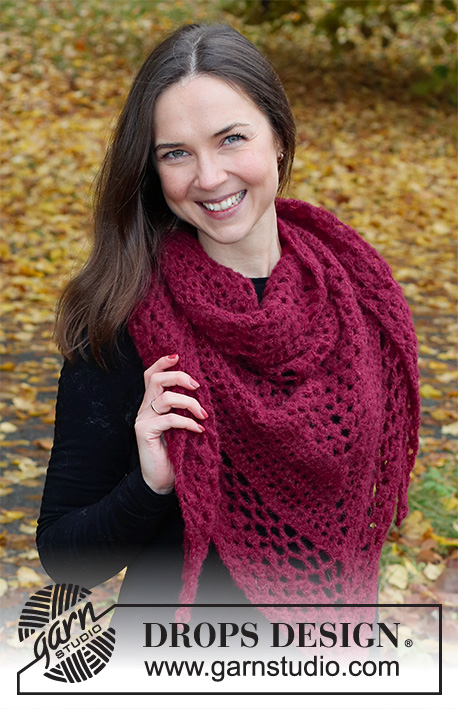
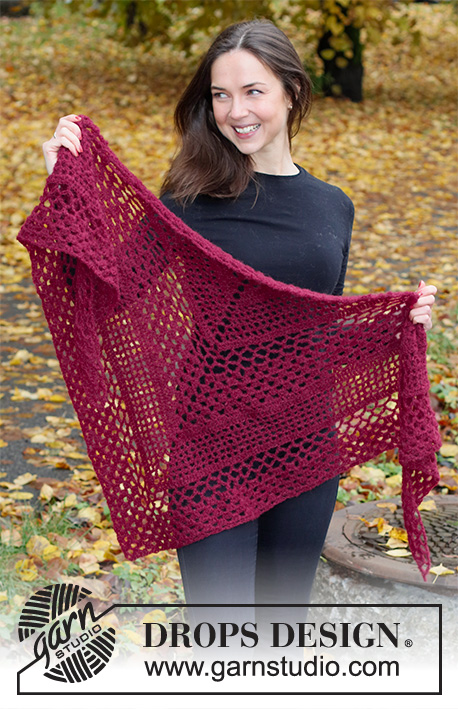
Cranberry Shawl#cranberryshawl |
|||||||||||||||||||||||||||||||
 |
 |
||||||||||||||||||||||||||||||
Szal na szydełku przerabiany z góry na dół ściegiem ażurowym, z włóczki DROPS Brushed Alpaca Silk.
DROPS 226-47 |
|||||||||||||||||||||||||||||||
|
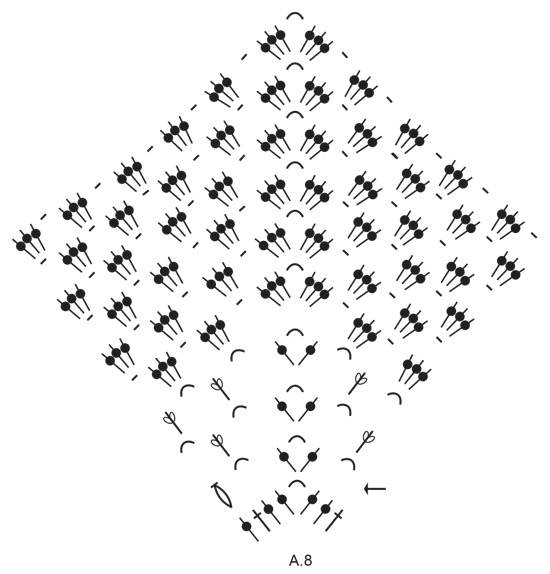
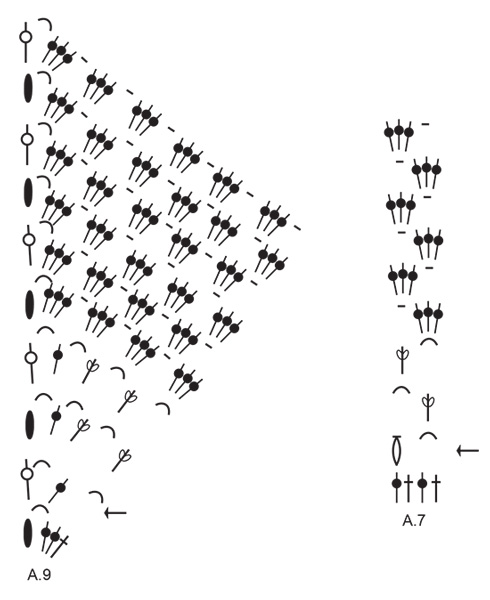
---------------------------------------------------------- WYKORZYSTYWANE TECHNIKI: ---------------------------------------------------------- ŚCIEG FANTAZYJNY: Patrz schematy A.1 - A.9. OCZKA ŁAŃCUSZKA: Jeżeli oczka łańcuszka są przerabiane samym czubkiem szydełka, mogą się okazać zbyt małe; 1 oczko łańcuszka powinno mieć taką samą długość jaką szerokość ma 1 półsłupek nawijany/słupek/słupek podwójny. ---------------------------------------------------------- ROBÓTKĘ ROZPOCZYNAMY TUTAJ: ---------------------------------------------------------- SZAL – SKRÓCONY OPIS ROBÓTKI: Przerabiany w tę i z powrotem, z góry na dół, ściegiem ażurowym. SZAL: Na szydełku nr 5 wykonać 5 OCZEK ŁAŃCUSZKA – patrz powyżej, włóczką DROPS Brushed Alpaca Silk, zamknąć w pierścień podstawy przerabiając 1 oczko zamykające w 1-sze oczko łańcuszka. Przerabiać schemat A.1. Gdy schemat A.1 jest zakończony, jest 8 pęczków słupków w ostatnim rzędzie. Powtórzyć jeszcze 1 raz 2 ostatnie rzędy. W sumie zostało przerobionych 6 rzędów i jest 12 pęczków słupków w ostatnim rzędzie. ZACHOWAĆ TAKIE SAMO NAPRĘŻENIE NICI JAK W PRZYPADKU PRÓBKI! Przerabiać teraz następująco: schemat A.2 (= dodawanie oczek z boku), powtórzyć w sumie 4 razy schemat A.3 na szerokość, A.4 (= dodawanie oczek na środku), powtórzyć 4 razy schemat A.3 na szerokość, A.5 (= dodawanie oczek z boku). Dalej przerabiać w tę i z powrotem tak samo, aż schematy A.2 - A.5 będą zakończone. Jest 60 oczek z każdej strony łuku na środku szala (w tym 4 pierwsze oczka łańcuszka na początku rzędu / słupek podwójny na końcu rzędu – te oczka są liczone jako 1 oczko z każdej strony). Teraz przerabiać następująco: schemat A.6 (= dodawanie oczek z boku), powtarzać 13 razy schemat A.7 na szerokość, A.8 (= dodawanie oczek na środku), powtórzyć w sumie 13 razy schemat A.7 na szerokość, A.9 (= dodawanie oczek z boku). Gdy schematy są zakończone, jest 25 pęczków słupków z każdej strony łuku na środku. Teraz powtarzać schematy od rzędu oznaczonego strzałką w schematach A.2, A.3, A.4 i A.5 w taki sam sposób co wcześniej (przerabiać tyle razy schemat A.3 ile jest oczek między schematami z dodawaniem oczek). Dalej przerabiać od rzędu oznaczonego strzałką w schematach A.6, A.7, A.8, A.9 w taki sam sposób co wcześniej (przerabiać tyle razy schemat A.7 ile jest oczek między schematami z dodawaniem oczek). Dalej przerabiać tak samo, aż dł. robótki wzdłuż łuku na środku wynosi ok. 70 cm lub ma inną długość. Odciąć i wrobić nitkę. |
|||||||||||||||||||||||||||||||
Objaśnienia do schematu |
|||||||||||||||||||||||||||||||
|
|||||||||||||||||||||||||||||||
 |
|||||||||||||||||||||||||||||||
 |
|||||||||||||||||||||||||||||||
 |
|||||||||||||||||||||||||||||||
 |
|||||||||||||||||||||||||||||||
 |
|||||||||||||||||||||||||||||||
 |
|||||||||||||||||||||||||||||||
Skończyłaś ten wzór?Otaguj swoje zdjęcia #dropspattern #cranberryshawl lub prześlij je do #dropsfan gallery. Potrzebujesz pomocy w związku z tym wzorem?Zobacz 6 instrukcje video, sekcję Komentarze/Pytania i jeszcze więcej, wchodząc na stronę wzoru na garnstudio.com © 1982-2026 DROPS Design A/S. Wszelkie prawa zastrzeżone. Ten dokument, w całości, jest chroniony prawem. Zobacz co możesz robić z naszymi wzorami na dole każdego wzoru na naszej stronie. |
|||||||||||||||||||||||||||||||


Posiadając 40 lat doświadczenia w projektowaniu wzorów na druty i szydełko, DROPS Design oferuje jedną z największych kolekcji bezpłatnych wzorów w internecie – przetłumaczonych na 17 języków. Obecnie jest dostępnych 324 katalogów i 12290 wzorów w języku polskim.
Dokładamy wszelkich starań, aby oferować Wam druty i szydełka, inspiracje, fachowe porady oraz doskonałej jakości włóczki w najlepszych cenach! Zamierzasz wykorzystać nasze wzory inaczej niż tylko do osobistego użytku? Przeczytaj jakie masz prawa w Copyright, który znajdziesz na końcu każdego wzoru. Miłej pracy!
Dodaj komentarz do modelu DROPS 226-47
Chcielibyśmy się dowiedzieć co masz do powiedzenia o tym wzorze!
Jeśli chcesz zadać pytanie i szybko uzyskać odpowiedź, upewnij się, że została wybrana właściwa kategoria w formularzu poniżej. Pola obowiązkowe są oznaczone *.