
Categorie popolari
State cercando un filato?


Commenti / Domande (260)
![]() Marion Saurer ha scritto:
Marion Saurer ha scritto:
Hallo. Gibt es dazu eine Vidoanleitung? Ich habe noch nie einen Pullover gestrickt und tue mich schwer die schriftliche Anleitung umzusetzen
13.02.2025 - 11:14DROPS Design ha risposto:
Liebe Frau Saurer, für dieses Modell gibt es kein spezielles Video - oben unter Tab "Videos" und "Lektion" finden Sie einige Tipps, die Ihnen helfen können. Sonnst können Sie auch mal Ihre Frage hier stellen, wir versuchen dann Ihnen am besten zu helfen. Viel Spaß beim Stricken!
13.02.2025 - 15:17
![]() Elena ha scritto:
Elena ha scritto:
For XXL size If cast on 132st at start that's mean the yoke must be divided as 23st (half the back piece), 19st (sleeve), 47st (front piece), 19st (sleeve), 24st (half the back piece). Because it was wrong from the beginning, I think the body and under sleeve will not be right. Can you help me adjust the pattern? Sincerely thank you. I really love this design.
14.11.2024 - 11:33DROPS Design ha risposto:
Dear Elena, note that the markers should be each inserted in one stitch, so that you will have: 22 sts (half back piece) + 1 stitch with a marker + 19 sts (sleeve) + 1 stitch with a marker + 45 sts (front piece) + 1 stitch with a marker + 19 sts (sleeve) + 1 stitch with a marker + 23 sts (half back piece) = 132 stitches. Happy knitting!
15.11.2024 - 08:39
![]() Nancy ha scritto:
Nancy ha scritto:
Fe telling in het patroon is of niet correct en anders heel verwarrend. Als je er 2 omslagen hebt op 3 steken dan kan je in de volgende naald geen drie steken hebben maar 5
25.10.2024 - 15:53
![]() Danielle Graisse ha scritto:
Danielle Graisse ha scritto:
Ou trouver les explications en français? Merci.
01.09.2024 - 14:22DROPS Design ha risposto:
Bonjour Mme Graisse, vous pouvez basculer les explications en français en cliquant sur le menu déroulant à côté de l'imprimante (sélectionnez ensuite français dans la liste), - ou bien cliquez ici pour ce modèle. Bon tricot!
02.09.2024 - 08:44
![]() Lois ha scritto:
Lois ha scritto:
Confused in Body section. Insert 1 marker thread in middle of 11 stitches (my size) cast on under each sleeve. Cut the strand (is this the yarn I was knitting with?) and begin the round 6 stitches before one of the stitches with marker thread. Does this become the new BOR and I choose which arm to start under? Is there a video which might show this? I apologize if I've sent this already but not sure it went through.
01.08.2024 - 14:05DROPS Design ha risposto:
Hi Lois, The marker-stitch mid-under the sleeve is the middle stitch in A.4 and, as you say, the beginning of the round is 6 stitches before the marker-stitch. And , it does not matter which side of the body you begin the new round. Happy knitting!
02.08.2024 - 06:40
![]() Maria PL ha scritto:
Maria PL ha scritto:
Hej Jag undrar över A1 på varv 2. Var kom 1:a maskan ifrån. Ökningen sitter ju till vänster, jag får de aviga maskerna ovanpå varandra. Vad gör ja jag för fel?
28.07.2024 - 11:22DROPS Design ha risposto:
Hej Maria, strik maskerne som du ser dem i diagrammet, da vil de aviga masker komme over hinanden, men på skrå, som du ser på billedet :)
01.08.2024 - 11:34
![]() Susanne Hansen ha scritto:
Susanne Hansen ha scritto:
Kan ikke få diagram til at passe ved ærmerne, p22. Strikker M. A1: p 21: 15 m. P 22: 14 m. A2: p 21: 14 m. P22 : 14 m A3: p21: 14 m. P22: 15 m. Fuldstændig de samme antal ved næste ærme. Der må være fejl i diagrammet.
27.07.2024 - 16:36DROPS Design ha risposto:
Hej Susanne, på pind 21 har du 15, 14, 12 (41 masker). Pind 22 har du 14,14,15 (43 masker) de 2 ekstra masker på pind 22 er dem du tog ud på pind 21 i A.3. Hvis du har yderligere spørgsmål, så skrive hvilken størrelse du strikker, hvor mange masker du har og hvad som ikke stemmer :)
01.08.2024 - 11:13
![]() Catherine ha scritto:
Catherine ha scritto:
Bonjour, doit on lire les diagramme de droite à gauche? Merci de votre réponse.
23.07.2024 - 07:49DROPS Design ha risposto:
Bonjour Catherine, oui. Bon tricot!
23.07.2024 - 09:56
![]() Anna ha scritto:
Anna ha scritto:
Nu är jag igång å stickar a4 längs med sidorna på bålen å undrar om korrigeringarna verkligen stämmer? Jag tycker inte att det stämmer med det övriga mönstret på blad/blommorna, där de aviga maskorna följer ovanpå förra varvets aviga maskor. Som det ser ut nu så förskjuts dem aviga på varv 10 och 14. Hoppas ni fattar vad jag menar?! Mvh/Anna
21.07.2024 - 10:20DROPS Design ha risposto:
Hej Anna, jo aviga maskorna skal følge mønsteret med indtagningerne, så de bliver forskudt på samme måde som hullerne :)
31.07.2024 - 12:32
![]() Darleen Monague ha scritto:
Darleen Monague ha scritto:
Having trouble understanding the pattern for the sleeves. According to directions you start with 19 stitches in the sleeve. Working the pattern doesn’t give enough stitches to get to work A2 twice. Where do these extra stitches get added in the pattern?
21.07.2024 - 01:30DROPS Design ha risposto:
Dear Darleen, in the sleeve you will start working: A.1 (= 2 stitches), A.2 (= 14 stitches) and A.3 ( = 3 stitches) = 19 stitches. A.1 and A.3 includes increases in the charts. Since you start with 3 and 2 stitches and end up with 17 and 16 respectively, each charts adds 14 sts (28 sts in total). Each repeat of A.2 contains 14 stitches, so 1 full repeat of A.1 and A.3 will give space for 2 extra repeats of A.2. A.3 and A.1 will be repeated over their respective initial stitches. Happy knitting!
21.07.2024 - 21:14
|
|||||||||||||||||||
Catch the Wind#catchthewindtop |
|||||||||||||||||||
 |
 |
||||||||||||||||||
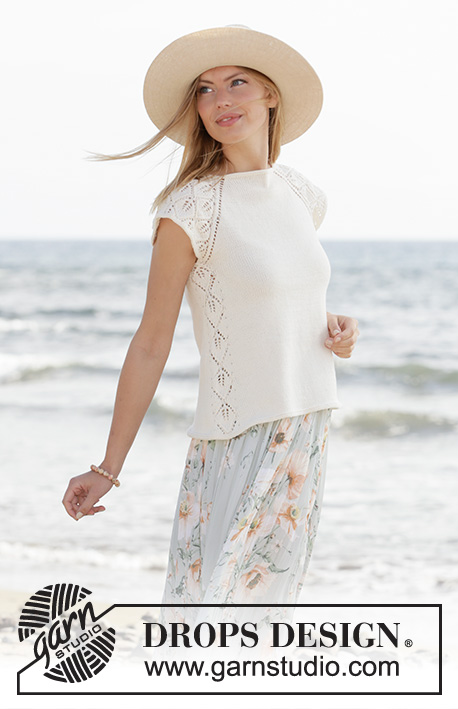
Top lavorato ai ferri con raglan e maniche corte in DROPS Safran. Lavorato dall’alto in basso con motivo traforato. Taglie: XS - XXL.
DROPS 211-5 |
|||||||||||||||||||
|
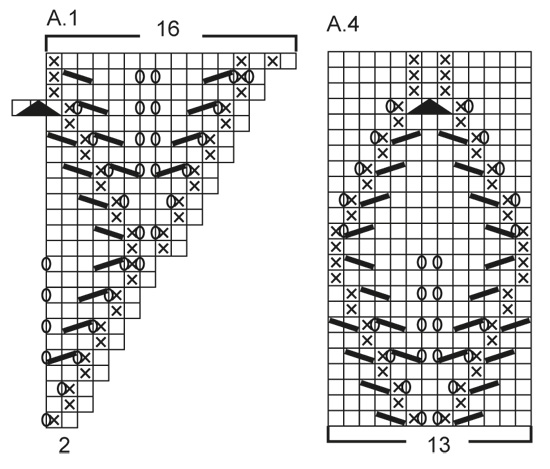
------------------------------------------------------- TECNICHE IMPIEGATE: ------------------------------------------------------- COSTA/MAGLIA LEGACCIO (lavorata in tondo): 1 costa = 2 giri. Lavorare 1 giro diritto e 1 giro rovescio. MOTIVO: Vedere i diagrammi A.1 - A.4. RAGLAN: Aumentare per il raglan a ogni lato del dietro e a ogni lato del davanti (verso le maniche). Aumentare facendo 1 gettato prima/dopo la maglia con il segnapunti; sul giro successivo lavorare i gettati a diritto per creare buchi. Gli aumenti per le maniche sono indicate nel motivo A.1 e A.3. ------------------------------------------------------- INIZIO DEL LAVORO: ------------------------------------------------------- TOP – BREVE RIASSUNTO DEL LAVORO: Lavorare il collo e lo sprone in tondo con i ferri circolari, dall’alto in basso. Dividere lo sprone per il corpo e le maniche e continuare il corpo in tondo. Lavorare un piccolo bordo attorno agli scalfi. COLLO: Avviare 106-110-116-120-124-132 maglie con i ferri circolari n° 3 mm e Safran. Lavorare 2 COSTE – leggere la descrizione sopra. Poi lavorare lo sprone come descritto sotto. SPRONE: Inserire 4 segnapunti nel lavoro come descritto sotto (senza lavorare le maglie). I segnapunti verranno usati per gli aumenti del raglan. Contare 16-17-18-19-20-22 maglie (= metà dietro), inserire 1 segnapunti nella maglia successiva, contare 19 maglie (= manica), inserire 1 segnapunti nella maglia successiva, contare 32-34-37-39-41-45 maglie (= davanti) inserire 1 segnapunti nella maglia successiva, contare 19 maglie (= manica), inserire 1 segnapunti nella maglia successiva. Ci sono 16-17-19-20-21-23 maglie dopo l’ultimo segnapunti (metà dietro). Il primo giro è lavorato come segue: lavorare a maglia rasata fino al 1° segnapunti, fare 1 gettato (1° aumento del RAGLAN – leggere la descrizione sopra), lavorare la maglia con il segnapunti a maglia rasata, A.1 (= 2 maglie), A.2 (= 14 maglie) e A.3 ( = 3 maglie) (= 19 maglie per la manica), lavorare la maglia con il segnapunti a maglia rasata, 1 gettato, lavorare a maglia rasata fino alla maglia con il segnapunti successiva (= davanti), 1 gettato, lavorare la maglia con il segnapunti a maglia rasata, A.1 (= 2 maglie), A.2 (= 14 maglie) e A.3 (= 3 maglie) (= 19 maglie per la manica), lavorare la maglia con il segnapunti a maglia rasata, 1 gettato, lavorare a maglia rasata sulle maglie rimaste (= metà dietro). Continuare questo motivo a maglia rasata sul davanti e dietro e A.1, A.2 e A.3 sulle maniche. Ogni volta che vengono lavorati A.1, A.2 e A.3 in altezza, si lavorano 2 ripetizioni in più di A.2 tra A.1 e A.3. FARE ATTENZIONE ALLA TENSIONE DEL LAVORO! ALLO STESSO TEMPO continuare ad aumentare per il raglan ogni 2 giri per un totale di 22-26-28-31-35-39 volte all’altezza di ogni segnapunti (compreso il 1° aumento descritto sopra). Lavorare le nuove maglie a maglia rasata sul davanti e dietro e con il motivo traforato come mostrato nei diagrammi sulle maniche. Alla fine degli aumenti per il raglan ci sono 294-334-356-388-424-468 maglie sul ferro. Lavorare il giro successivo come segue: lavorare 39-44-47-51-56-62 maglie (= metà dietro), mettere le 69-79-83-91-99-109 maglie successive in sospeso per la manica, avviare 9-9-9-11-13-15 nuove maglie sul ferro (= a lato sotto la manica), lavorare 78-88-95-103-113-125 maglie (= davanti), maglie successive in sospeso per la manica, avviare 9-9-9-11-13-15 nuove maglie sul ferro (= a lato sotto la manica), lavorare le ultime 39-44-48-52-57-63 maglie (= metà dietro). Finire il corpo e le maniche in modo separato. ORA MISURARE IL LAVORO DA QUI! CORPO: = 174-194-208-228-252-280 maglie. Inserire 1 segnapunti al centro delle 9-9-9-11-13-15 maglie avviate sotto ogni manica. Tagliare il filo e iniziare il giro 6 maglie prima di 1 delle maglie con il segnapunti. Lavorare A.4 (= 13 maglie), lavorare 74-84-91-101-113-127 maglie a maglia rasata, lavorare A.4 e poi a maglia rasata sulle ultime 74-84-91-101-113-127 maglie. Continuare questo motivo, ALLO STESSO TEMPO, quando il lavoro misura 2 cm, aumentare facendo 1 gettato a ogni lato di A.4, sul giro successivo lavorare i gettati a diritto ritorto per evitare buchi (= 4 aumenti). Ripetere gli aumenti ogni 1 ½ cm per un totale di 18 volte; lavorare gli aumenti a maglia rasata = 246-266-280-300-324-352 maglie. Quando il lavoro misura 28-29-29-30-29-29 cm dalla divisione, lavorare 2 coste su tutte le maglie, poi intrecciare. BORDO DELLE MANICHE: Riportare le 69-79-83-91-99-109 maglie di uno dei fermamaglie sui ferri circolari corti n° 3 mm e riprendere 1 maglia in ognuna delle 9-9-9-11-13-15 nuove maglie sotto la manica = 78-88-92-102-112-124 maglie. Lavorare 2 coste su tutte le maglie, poi intrecciare. Lavorare l’altro bordo della manica nello stesso modo. |
|||||||||||||||||||
Spiegazioni del diagramma |
|||||||||||||||||||
|
|||||||||||||||||||
 |
|||||||||||||||||||
 |
|||||||||||||||||||
 |
|||||||||||||||||||
Avete terminato questo modello?Allora taggate le vostre foto con #dropspattern #catchthewindtop o inviatele alla #dropsfan gallery. Avete bisogno di aiuto con questo modello?Troverete 20 video tutorial, una sezione per i commenti/domande e molto altro guardando il modello su www.garnstudio.com © 1982-2026 DROPS Design A/S. Ci riserviamo tutti i diritti. Questo documento, compreso tutte le sue sotto-sezioni, è protetto dalle leggi sul copyright. Potete leggere quello che potete fare con i nostri modelli alla fine di ogni modello sul nostro sito. |
|||||||||||||||||||


Con oltre 40 anni di esperienza nel design di modelli di maglia e uncinetto, DROPS Design offre la più estesa collezione di modelli gratuiti su internet - tradotti in 17 lingue. Ad oggi vi possiamo fornire 324 cataloghi e 12290 modelli - 9561 dei quali sono tradotti in Italiano.
Ci stiamo impegnando molto per darvi il meglio che vi possiamo offrire in termini di maglia e uncinetto, ispirazioni e consigli così come filati di grande qualità ad un prezzo incredibile! Volete utilizzare i nostri modelli per qualcosa d'altro oltre al vostro uso personale? Potete leggere tutto ciò che è consentito nel testo sul Copyright in basso su tutte le pagine dei nostri modelli. Buon lavoro!
Lasciare un commento sul modello DROPS 211-5
Noi saremmo felici di ricevere i tuoi commenti e opinioni su questo modello!
Se vuoi fare una domanda, fai per favore attenzione a selezionare la categoria corretta nella casella qui sotto per velocizzare il processo di risposta. I campi richiesti sono indicati da *.