
Categorie popolari
State cercando un filato?


Commenti / Domande (260)
![]() Lena ha scritto:
Lena ha scritto:
Guten Tag, vielen Dank für die schöne Anleitung. Für Menschen mit Strickerfahrung finde ich sie eindeutig und wunderbar zu stricken. Das Ergebnis ist wirklich hübsch! Ich hatte viel Freude beim Stricken.
01.04.2025 - 07:54
![]() Emma ha scritto:
Emma ha scritto:
Hej! Jag har stickat och rivit upp flera gånger men får ändå inte till det. På rad 11 får jag kvar två maskor trots att diagrammen är "klara" över ärmen. Jag misstänker att det har att göra med att det är två omslag efter varandra, kanske gör jag fel men jag har kollat på er instruktionsvideo som ni har gällande två omslag efter varandra och jag gör som där.. Saknas det någon maska i diagrammen?
20.03.2025 - 10:46DROPS Design ha risposto:
Hej Emma. Jag är inte helt säker på vad du menar, men på varv 11 i A.3 och A.1 är det inte 2 omslag efter varandra, utan det är: omslag, avig maska, omslag. Mvh DROPS Design
21.03.2025 - 13:35
![]() Verena ha scritto:
Verena ha scritto:
Hallo nochmal, zu meiner Frage: Ich habe meinen Denkfehler gefunden. Vielen Dank
12.03.2025 - 22:23
![]() Verena ha scritto:
Verena ha scritto:
Hallo, Ich bin gerade dabei "Catch the wind" zu stricken. Dabei ist mir aufgefallen, dass nach dem stricken der Halsblende, die Aufteilung der Mascjen für die Passe nicht passt. Wenn ich für Größe L, 120 Maschen stricke komme ich auf die Aufteilung von Größe XL. Hätte ich nur 116 Maschen aufnehmen sollen? Oder soll ich die Aufteilung 20-19-41-19-21 nehmen? Vielen Dank im Voraus
12.03.2025 - 21:54DROPS Design ha risposto:
Liebe Verena, beachten Sie, daß die Markierungsfaden jeweils in einer Masche (und nicht zwischen 2 Maschen) eingesetzt sind, so haben Sie: 19+1+19+1+39+1+19+1+20=120. Viel Spaß beim Stricken!
13.03.2025 - 15:43
![]() Marion Saurer ha scritto:
Marion Saurer ha scritto:
Leider verstehe ich nicht wieso am Beginn des Rumpfes der Faden abgeschnitten werden muss. Und 6 Maschen vor der markierten Masche wieder angefangen werden muss. Was passiert mit den Maschen des halben Rückenteils?
01.03.2025 - 16:23DROPS Design ha risposto:
Liebe Marion Saurer, alle Maschen vom vorigen Anfang der Runden bis zu den 6. Maschen vor der markierte Maschen legen Sie auf der rechten Nadel, ohne sie zu Stricken, damit die Runden jetzt an diese neue Stelle anfangen. Viel Spaß beim Stricken!
03.03.2025 - 09:08
![]() Sijt ha scritto:
Sijt ha scritto:
Ik brei het patroon cath the wind. Brei je het telpatroon van links naar rechts?
27.02.2025 - 12:42DROPS Design ha risposto:
Dag Sijt,
Je leest de telpatronen van rechts naar links aan de goede kant en van onder naar boven.
09.03.2025 - 13:20
![]() Marion Saurer ha scritto:
Marion Saurer ha scritto:
Hallo. Ich verstehe die Raglanzunahmen nicht. Ich versteh nicht genau wann ich wieviel Maschen zunehme. Habe jetzt überall Vor und Nach der Raglanmasche 1 Masche dazugenommen. Aber das ist zu viel. Dankeschön
19.02.2025 - 06:54DROPS Design ha risposto:
Liebe Frau Saurer, die Raglanzunahmen für die Ärmel sind in Diagramme A.1 und A.3 gezeichnet, für Rücken und Vorderteil nehmen Sie mit 1 Umschlang vor der Masche mit dem Marker am Ende Rückenteil, nach der Masche mit dem Marker am Anfang Vorderteil, vor der Masche mit dem Marker am Ende Vorderteil und nach der Masche mit einem Marker am Anfang Rückenteil. Viel Spaß beim Stricken!
19.02.2025 - 07:52
![]() Annlaug Magerøy Aarseth ha scritto:
Annlaug Magerøy Aarseth ha scritto:
Hvordan strikker vi videre på mønster på arm etter A1 , A2 og A3 en gang, Da strikkes 2 rapporter mer av A2 , korleis strikkes det?
18.02.2025 - 23:15DROPS Design ha risposto:
Hej Annlaug. När du börjar på ärmen så har du 19 maskor och stickar då A.1 (= 2 masker), A.2 (= 14 masker) og A.3 (= 3 masker). När diagram A.1. A.2 och A.3 har stickats 1 gång på höjden så har du 16 (A.1) + 14 (A.2) + 17 (A.3) maskor, dvs totalt 47 maskor på ärmen. Du börjar då längst ner på diagrammen och stickar: A.1 (= 2 masker), A.2 (= 14 masker), A.2 (= 14 masker), A.2 (= 14 masker) og A.3 (= 3 masker). Mvh DROPS Design
21.02.2025 - 15:18
![]() Irene Overgaard Larsen ha scritto:
Irene Overgaard Larsen ha scritto:
På billedet ser det ud til at der er ‘huller’ ved siden af A.4, men det er der ikke i mønstret. Er det en fejl? Ved udtagningerne står der at der ikke skal blive hul?
17.02.2025 - 17:29DROPS Design ha risposto:
Hej Irene, jo det skal blive hul - se her - RAGLAN: Der tages ud til raglan i hver side af bagstykket og i hver side af forstykket (mod ærmerne). Tag ud ved at slå om før/efter masken med mærketråd, på næste omgang strikkes omslaget ret, det skal blive hul.
18.02.2025 - 14:18
![]() Marion Saurer ha scritto:
Marion Saurer ha scritto:
Bleibt die Halsblende offen oder muss ich die erste und letzte Masche zusammenstricken? Herzlichen dank
16.02.2025 - 10:03DROPS Design ha risposto:
Liebe Frau Saurer, das Top wird von oben nach unten in der Runde gestrickt, wenn alle Maschen angeschlagen sind, wird man in Runden weiter stricken. Viel Spaß beim Stricken!
17.02.2025 - 09:32
|
|||||||||||||||||||
Catch the Wind#catchthewindtop |
|||||||||||||||||||
 |
 |
||||||||||||||||||
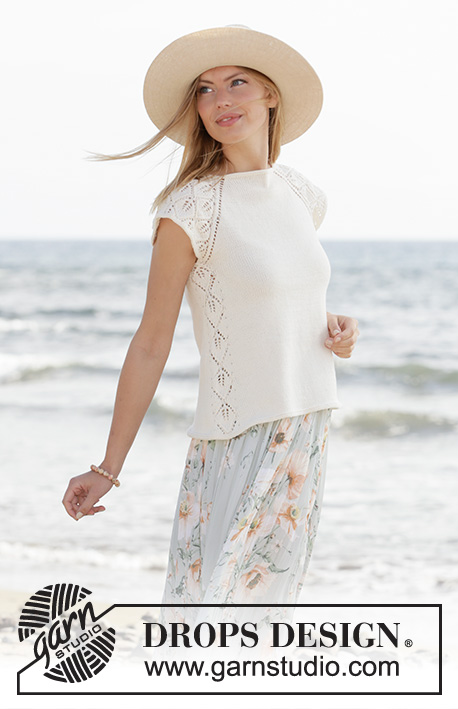
Top lavorato ai ferri con raglan e maniche corte in DROPS Safran. Lavorato dall’alto in basso con motivo traforato. Taglie: XS - XXL.
DROPS 211-5 |
|||||||||||||||||||
|
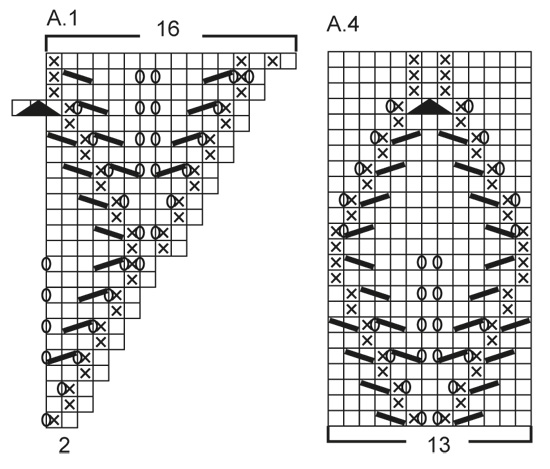
------------------------------------------------------- TECNICHE IMPIEGATE: ------------------------------------------------------- COSTA/MAGLIA LEGACCIO (lavorata in tondo): 1 costa = 2 giri. Lavorare 1 giro diritto e 1 giro rovescio. MOTIVO: Vedere i diagrammi A.1 - A.4. RAGLAN: Aumentare per il raglan a ogni lato del dietro e a ogni lato del davanti (verso le maniche). Aumentare facendo 1 gettato prima/dopo la maglia con il segnapunti; sul giro successivo lavorare i gettati a diritto per creare buchi. Gli aumenti per le maniche sono indicate nel motivo A.1 e A.3. ------------------------------------------------------- INIZIO DEL LAVORO: ------------------------------------------------------- TOP – BREVE RIASSUNTO DEL LAVORO: Lavorare il collo e lo sprone in tondo con i ferri circolari, dall’alto in basso. Dividere lo sprone per il corpo e le maniche e continuare il corpo in tondo. Lavorare un piccolo bordo attorno agli scalfi. COLLO: Avviare 106-110-116-120-124-132 maglie con i ferri circolari n° 3 mm e Safran. Lavorare 2 COSTE – leggere la descrizione sopra. Poi lavorare lo sprone come descritto sotto. SPRONE: Inserire 4 segnapunti nel lavoro come descritto sotto (senza lavorare le maglie). I segnapunti verranno usati per gli aumenti del raglan. Contare 16-17-18-19-20-22 maglie (= metà dietro), inserire 1 segnapunti nella maglia successiva, contare 19 maglie (= manica), inserire 1 segnapunti nella maglia successiva, contare 32-34-37-39-41-45 maglie (= davanti) inserire 1 segnapunti nella maglia successiva, contare 19 maglie (= manica), inserire 1 segnapunti nella maglia successiva. Ci sono 16-17-19-20-21-23 maglie dopo l’ultimo segnapunti (metà dietro). Il primo giro è lavorato come segue: lavorare a maglia rasata fino al 1° segnapunti, fare 1 gettato (1° aumento del RAGLAN – leggere la descrizione sopra), lavorare la maglia con il segnapunti a maglia rasata, A.1 (= 2 maglie), A.2 (= 14 maglie) e A.3 ( = 3 maglie) (= 19 maglie per la manica), lavorare la maglia con il segnapunti a maglia rasata, 1 gettato, lavorare a maglia rasata fino alla maglia con il segnapunti successiva (= davanti), 1 gettato, lavorare la maglia con il segnapunti a maglia rasata, A.1 (= 2 maglie), A.2 (= 14 maglie) e A.3 (= 3 maglie) (= 19 maglie per la manica), lavorare la maglia con il segnapunti a maglia rasata, 1 gettato, lavorare a maglia rasata sulle maglie rimaste (= metà dietro). Continuare questo motivo a maglia rasata sul davanti e dietro e A.1, A.2 e A.3 sulle maniche. Ogni volta che vengono lavorati A.1, A.2 e A.3 in altezza, si lavorano 2 ripetizioni in più di A.2 tra A.1 e A.3. FARE ATTENZIONE ALLA TENSIONE DEL LAVORO! ALLO STESSO TEMPO continuare ad aumentare per il raglan ogni 2 giri per un totale di 22-26-28-31-35-39 volte all’altezza di ogni segnapunti (compreso il 1° aumento descritto sopra). Lavorare le nuove maglie a maglia rasata sul davanti e dietro e con il motivo traforato come mostrato nei diagrammi sulle maniche. Alla fine degli aumenti per il raglan ci sono 294-334-356-388-424-468 maglie sul ferro. Lavorare il giro successivo come segue: lavorare 39-44-47-51-56-62 maglie (= metà dietro), mettere le 69-79-83-91-99-109 maglie successive in sospeso per la manica, avviare 9-9-9-11-13-15 nuove maglie sul ferro (= a lato sotto la manica), lavorare 78-88-95-103-113-125 maglie (= davanti), maglie successive in sospeso per la manica, avviare 9-9-9-11-13-15 nuove maglie sul ferro (= a lato sotto la manica), lavorare le ultime 39-44-48-52-57-63 maglie (= metà dietro). Finire il corpo e le maniche in modo separato. ORA MISURARE IL LAVORO DA QUI! CORPO: = 174-194-208-228-252-280 maglie. Inserire 1 segnapunti al centro delle 9-9-9-11-13-15 maglie avviate sotto ogni manica. Tagliare il filo e iniziare il giro 6 maglie prima di 1 delle maglie con il segnapunti. Lavorare A.4 (= 13 maglie), lavorare 74-84-91-101-113-127 maglie a maglia rasata, lavorare A.4 e poi a maglia rasata sulle ultime 74-84-91-101-113-127 maglie. Continuare questo motivo, ALLO STESSO TEMPO, quando il lavoro misura 2 cm, aumentare facendo 1 gettato a ogni lato di A.4, sul giro successivo lavorare i gettati a diritto ritorto per evitare buchi (= 4 aumenti). Ripetere gli aumenti ogni 1 ½ cm per un totale di 18 volte; lavorare gli aumenti a maglia rasata = 246-266-280-300-324-352 maglie. Quando il lavoro misura 28-29-29-30-29-29 cm dalla divisione, lavorare 2 coste su tutte le maglie, poi intrecciare. BORDO DELLE MANICHE: Riportare le 69-79-83-91-99-109 maglie di uno dei fermamaglie sui ferri circolari corti n° 3 mm e riprendere 1 maglia in ognuna delle 9-9-9-11-13-15 nuove maglie sotto la manica = 78-88-92-102-112-124 maglie. Lavorare 2 coste su tutte le maglie, poi intrecciare. Lavorare l’altro bordo della manica nello stesso modo. |
|||||||||||||||||||
Spiegazioni del diagramma |
|||||||||||||||||||
|
|||||||||||||||||||
 |
|||||||||||||||||||
 |
|||||||||||||||||||
 |
|||||||||||||||||||
Avete terminato questo modello?Allora taggate le vostre foto con #dropspattern #catchthewindtop o inviatele alla #dropsfan gallery. Avete bisogno di aiuto con questo modello?Troverete 20 video tutorial, una sezione per i commenti/domande e molto altro guardando il modello su www.garnstudio.com © 1982-2026 DROPS Design A/S. Ci riserviamo tutti i diritti. Questo documento, compreso tutte le sue sotto-sezioni, è protetto dalle leggi sul copyright. Potete leggere quello che potete fare con i nostri modelli alla fine di ogni modello sul nostro sito. |
|||||||||||||||||||


Con oltre 40 anni di esperienza nel design di modelli di maglia e uncinetto, DROPS Design offre la più estesa collezione di modelli gratuiti su internet - tradotti in 17 lingue. Ad oggi vi possiamo fornire 324 cataloghi e 12290 modelli - 9561 dei quali sono tradotti in Italiano.
Ci stiamo impegnando molto per darvi il meglio che vi possiamo offrire in termini di maglia e uncinetto, ispirazioni e consigli così come filati di grande qualità ad un prezzo incredibile! Volete utilizzare i nostri modelli per qualcosa d'altro oltre al vostro uso personale? Potete leggere tutto ciò che è consentito nel testo sul Copyright in basso su tutte le pagine dei nostri modelli. Buon lavoro!
Lasciare un commento sul modello DROPS 211-5
Noi saremmo felici di ricevere i tuoi commenti e opinioni su questo modello!
Se vuoi fare una domanda, fai per favore attenzione a selezionare la categoria corretta nella casella qui sotto per velocizzare il processo di risposta. I campi richiesti sono indicati da *.