
Categorie popolari
State cercando un filato?


Commenti / Domande (260)
![]() Elisa Cicchetti ha scritto:
Elisa Cicchetti ha scritto:
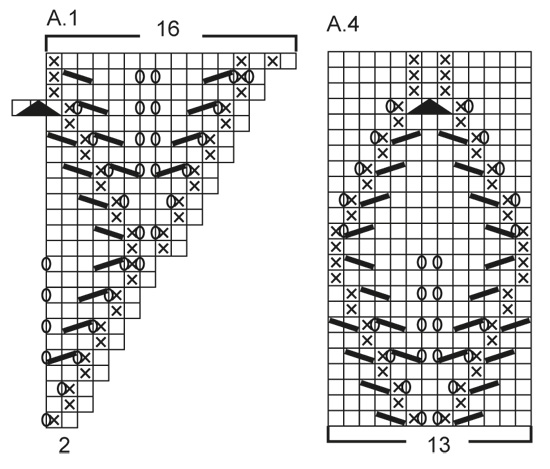
Nella riga 11 sono corretti i gettati? In A1 l'ultimo e il primo di A3, danno due maglie in più nella 12' riga, che non fa combaciare i rovesci uno sull'altro come dovrebbe essere. Ho risolto facendo due maglie insieme nella 12 riga. E in effetti così il motivo funziona e il raglan non è sfalsato. (ho ricominciato la seconda volta, la prima, arrivata alla fine del motivo, il raglan era sfalsato).
04.05.2021 - 09:37
![]() Marta ha scritto:
Marta ha scritto:
Una duda, no se que tengo que hacer con la siguiente indicación: “continuar a aumentar para el reglan a cada 2a vuelta un total de X veces en cada marcador”. Significa que cada 2a vuelta se teje toda del derecho y en la siguiente se sigue con el diagrama?? Muchas gracias!
04.05.2021 - 00:33DROPS Design ha risposto:
Hola Marta, Se trabaja siempre según el diagrama. El delantero y la espalda se trabajan en punto jersey y las mangas en punto de calados.
09.05.2021 - 20:12
![]() Fenella ha scritto:
Fenella ha scritto:
Hi, my first attempt at lacework so apologies if this is a dumb question, but when the pattern says “Each time A.1, A.2 and A.3 are worked 1 time in height, you work 2 more repeats of A.2 between A.1 and A.3“ does that mean twice on each sleeve or once on each side? Thanks all you expert knitters!
12.04.2021 - 12:21DROPS Design ha risposto:
Dear Fenella, this applies on both sleeves, when diagrams are done in height , you have increased enough sts to work 2 more repeats in A.2, ie over the 16 sts previous A.1 work: 2 sts new A.1 in height + A.2 (=14sts); repeat A.2 as before and over the 17 sts previous A.3 work a new reapeat of A.2 (=14 sts)+ a new A.3 (=3 sts). Happy knitting!
12.04.2021 - 13:01
![]() Joan Jensen ha scritto:
Joan Jensen ha scritto:
Hvilken maske skal strikkes i diagrammet når der er X ? Mangler forklaring. Rubrik uden kryds skal være ret - hvordan ser vrang og 2 ret sammen ud
16.03.2021 - 21:59DROPS Design ha risposto:
Hej Joan, du finder diagrammet og forklaring til symbolerne nederst i opskriften. God fornøjelse!
17.03.2021 - 14:57
![]() Jytte Knudsen ha scritto:
Jytte Knudsen ha scritto:
Er der en fejl på p 11 i A1 og A3 for jeg kan ikke få p 12 til at passe?
14.03.2021 - 22:08DROPS Design ha risposto:
Hej Jytte, A.1 på pind nr 11 har du 7 masker og strikker 1 ret, 1omslag, 1ret, 1 omslag, 2 sammen, 3 ret, 1 omslag og slutter med 9 masker (2 udtagninger). God fornøjelse!
23.03.2021 - 14:32
![]() Maggie ha scritto:
Maggie ha scritto:
Ik heb deze top gebreid, maar de ribbelranden krullen erg om. Zowel langs de hals als de onderrand. Hebben jullie tips om dat te verbeteren en een volgende keer te voorkomen?
09.03.2021 - 22:00DROPS Design ha risposto:
Dag Maggie,
Dit zou je kunnen doen door de ribbelrand voorzichtig op te persen. Leg je werkstuk op de strijkplank en leg er een natte theedoek overheen. Dep heel voorzichtig met het strijkijzer. Let op dat je dit echt heel voorzichtig doet, anders kun je de breistructuur vernielen.
18.03.2021 - 10:48
![]() Carmen Cerveró ha scritto:
Carmen Cerveró ha scritto:
Buenas tardes, he tejido sin problemas hasta terminar los digramas A1, A2, y A3, coinciden los puntos.. Mi pregunta: como continuar?, tengo que empezar de nuevo el A1 desde el comienzo que son tres puntos para ir aumentando hasta alcanzar los 16 puntos finales? y lo mismo con el A3?, El A2 no hay problema porque tiene los mismos puntos desde el inicio hasta el final, pero los otros diagramas son escalonados. Gracias por su ayuda.
08.03.2021 - 17:41DROPS Design ha risposto:
Hola Carmen, A.1 y A.3, después de terminar una repetición, se vuelven a trabajar desde la fila 1, pero se aumenta el número de repeticiones del diagrama A.2. Después de completar todos los diagramas 1 vez, tienes espacio para 2 repeticiones más del diagrama A.2 entre A.1 y A.3.
21.03.2021 - 20:35
![]() Jytte Knudsen ha scritto:
Jytte Knudsen ha scritto:
Hvorfor kan I ikke lave jeres opskrifter så de er højere i nakken med vendemasker når man strikker ovenfra og ned? Mvh Jytte Knudsen
05.03.2021 - 10:02DROPS Design ha risposto:
Hej Jytte, mange af vores opskrifter har også en forhøjning i nakken, men de fleste former sig faktisk helt fint til kroppen uden forhøjning. Her kan du se hvordan man gør: Hvordan strikkes en forhøjning midt bag
05.03.2021 - 11:48
![]() Jen Dale ha scritto:
Jen Dale ha scritto:
Unable to follow a diagram A1, A2,A3,A4. Can ANYONE PLEASE write out the pattern in size 3X for me ROW BY ROW?? Ex: Row 1, K17, P1, YO , K to end Row 2: P1, YO knit to last st, YO Row 3 etc. if the pattern was written out by Row I could follow easily but I’ve tried numerous times to follow diagram and just rip it out and try again and again. I need help. I need it written out by row. Size 3X please help if possible. Many thanks
18.02.2021 - 13:54DROPS Design ha risposto:
Dear Mrs Dale, we are unfortunately not able to adapt every pattern to every individual request, but this lesson should help you to understand how to read diagram. Please contact your DROPS store - even per mail or telephone - for any individual assistance. Thanks for your comprehension. Happy knitting!
18.02.2021 - 14:19
![]() Pierangela ha scritto:
Pierangela ha scritto:
Il problema riguarda il CORPO. Il motivo laterale invece di risultare verticale ruota spostandosi verso il centro del lavoro come se non aumentassi correttamente su tutti i lati. Ma non è così. Lo stesso succede per entrambi i lati. Cosa sbaglio? Quello che non ho eseguito seguendo lo schema del CORPO, non capendone la ragione, è: Tagliare il filo e iniziare il giro 6 maglie prima di 1 delle maglie con il segnapunti. Inoltre non ho fatto le correzioni indicate del motivo A4. Grazie
09.02.2021 - 18:29DROPS Design ha risposto:
Buonasera Pierangela, le correzioni sono già incorporate nel modello. In che senso non ha seguito quella parte? Dove ha iniziato il giro? Buon lavoro!
10.02.2021 - 17:56
|
|||||||||||||||||||
Catch the Wind#catchthewindtop |
|||||||||||||||||||
 |
 |
||||||||||||||||||
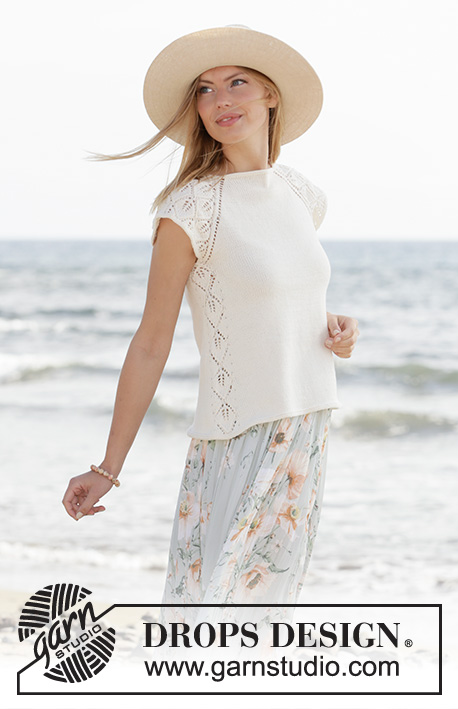
Top lavorato ai ferri con raglan e maniche corte in DROPS Safran. Lavorato dall’alto in basso con motivo traforato. Taglie: XS - XXL.
DROPS 211-5 |
|||||||||||||||||||
|
------------------------------------------------------- TECNICHE IMPIEGATE: ------------------------------------------------------- COSTA/MAGLIA LEGACCIO (lavorata in tondo): 1 costa = 2 giri. Lavorare 1 giro diritto e 1 giro rovescio. MOTIVO: Vedere i diagrammi A.1 - A.4. RAGLAN: Aumentare per il raglan a ogni lato del dietro e a ogni lato del davanti (verso le maniche). Aumentare facendo 1 gettato prima/dopo la maglia con il segnapunti; sul giro successivo lavorare i gettati a diritto per creare buchi. Gli aumenti per le maniche sono indicate nel motivo A.1 e A.3. ------------------------------------------------------- INIZIO DEL LAVORO: ------------------------------------------------------- TOP – BREVE RIASSUNTO DEL LAVORO: Lavorare il collo e lo sprone in tondo con i ferri circolari, dall’alto in basso. Dividere lo sprone per il corpo e le maniche e continuare il corpo in tondo. Lavorare un piccolo bordo attorno agli scalfi. COLLO: Avviare 106-110-116-120-124-132 maglie con i ferri circolari n° 3 mm e Safran. Lavorare 2 COSTE – leggere la descrizione sopra. Poi lavorare lo sprone come descritto sotto. SPRONE: Inserire 4 segnapunti nel lavoro come descritto sotto (senza lavorare le maglie). I segnapunti verranno usati per gli aumenti del raglan. Contare 16-17-18-19-20-22 maglie (= metà dietro), inserire 1 segnapunti nella maglia successiva, contare 19 maglie (= manica), inserire 1 segnapunti nella maglia successiva, contare 32-34-37-39-41-45 maglie (= davanti) inserire 1 segnapunti nella maglia successiva, contare 19 maglie (= manica), inserire 1 segnapunti nella maglia successiva. Ci sono 16-17-19-20-21-23 maglie dopo l’ultimo segnapunti (metà dietro). Il primo giro è lavorato come segue: lavorare a maglia rasata fino al 1° segnapunti, fare 1 gettato (1° aumento del RAGLAN – leggere la descrizione sopra), lavorare la maglia con il segnapunti a maglia rasata, A.1 (= 2 maglie), A.2 (= 14 maglie) e A.3 ( = 3 maglie) (= 19 maglie per la manica), lavorare la maglia con il segnapunti a maglia rasata, 1 gettato, lavorare a maglia rasata fino alla maglia con il segnapunti successiva (= davanti), 1 gettato, lavorare la maglia con il segnapunti a maglia rasata, A.1 (= 2 maglie), A.2 (= 14 maglie) e A.3 (= 3 maglie) (= 19 maglie per la manica), lavorare la maglia con il segnapunti a maglia rasata, 1 gettato, lavorare a maglia rasata sulle maglie rimaste (= metà dietro). Continuare questo motivo a maglia rasata sul davanti e dietro e A.1, A.2 e A.3 sulle maniche. Ogni volta che vengono lavorati A.1, A.2 e A.3 in altezza, si lavorano 2 ripetizioni in più di A.2 tra A.1 e A.3. FARE ATTENZIONE ALLA TENSIONE DEL LAVORO! ALLO STESSO TEMPO continuare ad aumentare per il raglan ogni 2 giri per un totale di 22-26-28-31-35-39 volte all’altezza di ogni segnapunti (compreso il 1° aumento descritto sopra). Lavorare le nuove maglie a maglia rasata sul davanti e dietro e con il motivo traforato come mostrato nei diagrammi sulle maniche. Alla fine degli aumenti per il raglan ci sono 294-334-356-388-424-468 maglie sul ferro. Lavorare il giro successivo come segue: lavorare 39-44-47-51-56-62 maglie (= metà dietro), mettere le 69-79-83-91-99-109 maglie successive in sospeso per la manica, avviare 9-9-9-11-13-15 nuove maglie sul ferro (= a lato sotto la manica), lavorare 78-88-95-103-113-125 maglie (= davanti), maglie successive in sospeso per la manica, avviare 9-9-9-11-13-15 nuove maglie sul ferro (= a lato sotto la manica), lavorare le ultime 39-44-48-52-57-63 maglie (= metà dietro). Finire il corpo e le maniche in modo separato. ORA MISURARE IL LAVORO DA QUI! CORPO: = 174-194-208-228-252-280 maglie. Inserire 1 segnapunti al centro delle 9-9-9-11-13-15 maglie avviate sotto ogni manica. Tagliare il filo e iniziare il giro 6 maglie prima di 1 delle maglie con il segnapunti. Lavorare A.4 (= 13 maglie), lavorare 74-84-91-101-113-127 maglie a maglia rasata, lavorare A.4 e poi a maglia rasata sulle ultime 74-84-91-101-113-127 maglie. Continuare questo motivo, ALLO STESSO TEMPO, quando il lavoro misura 2 cm, aumentare facendo 1 gettato a ogni lato di A.4, sul giro successivo lavorare i gettati a diritto ritorto per evitare buchi (= 4 aumenti). Ripetere gli aumenti ogni 1 ½ cm per un totale di 18 volte; lavorare gli aumenti a maglia rasata = 246-266-280-300-324-352 maglie. Quando il lavoro misura 28-29-29-30-29-29 cm dalla divisione, lavorare 2 coste su tutte le maglie, poi intrecciare. BORDO DELLE MANICHE: Riportare le 69-79-83-91-99-109 maglie di uno dei fermamaglie sui ferri circolari corti n° 3 mm e riprendere 1 maglia in ognuna delle 9-9-9-11-13-15 nuove maglie sotto la manica = 78-88-92-102-112-124 maglie. Lavorare 2 coste su tutte le maglie, poi intrecciare. Lavorare l’altro bordo della manica nello stesso modo. |
|||||||||||||||||||
Spiegazioni del diagramma |
|||||||||||||||||||
|
|||||||||||||||||||
 |
|||||||||||||||||||
 |
|||||||||||||||||||
 |
|||||||||||||||||||
Avete terminato questo modello?Allora taggate le vostre foto con #dropspattern #catchthewindtop o inviatele alla #dropsfan gallery. Avete bisogno di aiuto con questo modello?Troverete 20 video tutorial, una sezione per i commenti/domande e molto altro guardando il modello su www.garnstudio.com © 1982-2026 DROPS Design A/S. Ci riserviamo tutti i diritti. Questo documento, compreso tutte le sue sotto-sezioni, è protetto dalle leggi sul copyright. Potete leggere quello che potete fare con i nostri modelli alla fine di ogni modello sul nostro sito. |
|||||||||||||||||||


Con oltre 40 anni di esperienza nel design di modelli di maglia e uncinetto, DROPS Design offre la più estesa collezione di modelli gratuiti su internet - tradotti in 17 lingue. Ad oggi vi possiamo fornire 324 cataloghi e 12290 modelli - 9561 dei quali sono tradotti in Italiano.
Ci stiamo impegnando molto per darvi il meglio che vi possiamo offrire in termini di maglia e uncinetto, ispirazioni e consigli così come filati di grande qualità ad un prezzo incredibile! Volete utilizzare i nostri modelli per qualcosa d'altro oltre al vostro uso personale? Potete leggere tutto ciò che è consentito nel testo sul Copyright in basso su tutte le pagine dei nostri modelli. Buon lavoro!
Lasciare un commento sul modello DROPS 211-5
Noi saremmo felici di ricevere i tuoi commenti e opinioni su questo modello!
Se vuoi fare una domanda, fai per favore attenzione a selezionare la categoria corretta nella casella qui sotto per velocizzare il processo di risposta. I campi richiesti sono indicati da *.