
Categorie popolari
State cercando un filato?


Commenti / Domande (260)
![]() Janet M ha scritto:
Janet M ha scritto:
I would like to know how much positive ease is in the finished size. I do not quite get the same gauge and would normally knit the XL. If there is not much positive ease, I may knit the XXL instead to make sure it isn't too small.
19.07.2022 - 23:10DROPS Design ha risposto:
Hi Janet, The measurements suitable for each size are in the size chart at the bottom of the pattern. If you normally work size XL, and the measurements in the chart seem right, then we would recommend you work this size here too. Happy crafting!
20.07.2022 - 06:47
![]() Quynh ha scritto:
Quynh ha scritto:
When beginning the body, what do you mean by "Cut the strand and begin the round 6 stitches before 1 of the stitches with marker thread"? Can I keep knitting stocking stitches until 6 sts before the marker and then work A4? Thank you.
18.07.2022 - 03:51DROPS Design ha risposto:
Dear Quynh, no, you need to cut the yarn. The new markers are indicating where the sides are. You need to start A.4 just 6 stitches before the marker so that the pattern is centered. If you work in knitting stitch instead of cutting, both sides will be at different heights and will be inequal. Happy knitting!
24.07.2022 - 18:07
![]() María ha scritto:
María ha scritto:
Lo quiero empezar en breve, ¿Corresponden las tallas con las tallas reales de UE? Es que a veces te decides por una M y luego resulta muy pequeña o al contrario muy grande.
26.06.2022 - 19:08DROPS Design ha risposto:
Hola María, puedes ver las medidas que se corresponden para cada talla en el esquema de medidas bajo el patrón y los diagramas. Cada número de cada serie se corresponde a una talla y todas las medidas están en cm. Para entender mejor el esquema puedes leer la siguiente lección: https://www.garnstudio.com/lesson.php?id=24&cid=23
26.06.2022 - 19:37
![]() Heidrun Kunert ha scritto:
Heidrun Kunert ha scritto:
Ist die Änderung der Anleitung im Diagramm berücksichtigt? Ich beabsichtige diese Anleitung auszudrucken und nachzustricken allerdings nur, wenn ich nicht noch Mal rätseln muß. Mfg Heidrun
15.06.2022 - 13:06DROPS Design ha risposto:
Liebe Frau Kunert, wenn Sie die Anleitung zum ersten Mal drucken, dann sind alle Korrektur schon gemacht. Viel Spaß beim stricken!
15.06.2022 - 15:38
![]() Sabine ha scritto:
Sabine ha scritto:
Gibt es die Anleitung auch in deutsch?
01.06.2022 - 11:20DROPS Design ha risposto:
Liebe Sabine, ja sicher, klicken Sie auf dem Drop-down Menü unter dem Foto, so können Sie die Sprache ändern. Viel Spaß beim stricken!
01.06.2022 - 13:35
![]() Humeau Nadia ha scritto:
Humeau Nadia ha scritto:
Je vais donc devoir tout remettre à zéro. Ce qui me dérangeait c'est qu avec 20 augmentations de raglan j avais déjà plus de Mailles de prévu pour l ensemble du tricot. Aurais je fait une erreur sur les augmentations. Pourtant j ai bien tenu compte de l'augmentation avant ou après la maille marqueur ! 1 augmentation côté dos manche et 1 de chaque côté manches devant soit 4 à chaque tour ?
10.05.2022 - 10:38DROPS Design ha risposto:
Bonjour Mme Humeau, vous augmentez 2 mailles sur le devant/le dos tous les 2 rangs (après 28 augmentations = 56 augmentations), mais pour les diagrammes A.1 et A.3, attention, car vous augmentez parfois 2 mailles (cf réponses précédentes); donc 1 au début et à la fin du dos et du devant, et soit 1 soit 2 au début et à la fin de chaque manche, comme dans A.1/A.3. Bon tricot!
10.05.2022 - 14:01
![]() Humeau Nadia ha scritto:
Humeau Nadia ha scritto:
Je viens de compter mes rangs de diagramme A1 je suis au 40 ème rang pour 368 mailles en tour pour mon tricot dont seulement si je comprend bien les 28 augmentations au total tous les 2 rangs j en ai 19 augmentations jetées , pourquoi ces mailles en trop. Je reste sur mon problème.
10.05.2022 - 07:21DROPS Design ha risposto:
Bonjour Mme Humeau, il est difficile de repérer votre erreur à distance, essayez de bien vérifier votre nombre de mailles pour chaque partie dos/devant et manches. Vérifiez votre nombre d'augmentations également. Si vous avez tricoté 40 tours depuis le début, vous devez avoir augmenté 20 fois (on augmente tous les 2 tours). Vous avez ainsi: 18+20=38 m pour le demi-dos avant la maille avec le fil marqueur. Bon tricot!
10.05.2022 - 08:56
![]() Humeau Nadia ha scritto:
Humeau Nadia ha scritto:
Bonjour désolée suite à mon message hier soir je me suis trompée de nombres de mailles. Pour la taille M j ai au total 368 mailles au lieu de 356, je pensais qu il fallait finir un dessin complet du diagramme 2 du coup j'ai continué. Je ne comprenais pas le sens de augmenter 28 fois au total tous les 2 tours ... J ai le diagramme 2 avec 4 épis presque finis. Dois je redémarrer mon travail du coup et jusqu'à quel rang des diagramme. Merci d avance.
10.05.2022 - 06:59DROPS Design ha risposto:
Bonjour Mme Humeau, effectivement, 28 fois tous les 2 tours signifie que vous allez augmenter sur 28 rangs sur l'endroit (56 tours au total); pour que votre nombre de mailles soit juste pour la suite, il sera probablement plus simple de défaire les rangs en trop pour que vous retombiez juste; Si vous le souhaitez, vous pourrez terminer le motif ajouré des manches avant de terminer par les 2 côtes mousse. Bon tricot!
10.05.2022 - 08:51
![]() HUMEAU NADIA ha scritto:
HUMEAU NADIA ha scritto:
Bonsoir Une question concernant la fin du diagramme manche et mes augmentations raglan. Que signifie pour la taille M augmenter 28 fois au total tous les 2 tours à chaque fil marqueur ? Je pense avoir été trop loin dans le dessin. Je me retrouve avec 356 Mailles au lieu de 356 donc plus de Mailles pour les 1/2dos et le devant. Je ne savais pas jusqu'où travailler le diagramme des manches. Je laisse mon travail en suspend le temps d avoir vos conseils. Merci d avance.
09.05.2022 - 20:02DROPS Design ha risposto:
Bonjour Mme Humeau, vous devez augmenter à chaque tour d'augmentation des raglans: 1 m au début + 1 m à la fin de chaque dos et du devant comme indiqué sous RAGLAN, les augmentations du dos/devant se tricotent en jersey et celles des manches comme dans les diagrammes A.1 et A.3 - à chaque fois que vous tricotez les 24 rangs des diagrammes, vous avez augmenté 14 mailles dans A.1 et A.3 (aux rangs 11 et 23 , on augmente 2 mailles ans A.1 et 2 m ailles dans A.3 = 4 m pour chacune des manches, soit 12 mailles au total sur ce tour). Vérifiez votre nombre de mailles d'après celui indiqué pour la division, ceci pourrait vous aider. Bon tricot!
10.05.2022 - 08:41
![]() Humeau ha scritto:
Humeau ha scritto:
Binsiir Je viens de finir les diagrammes A1 A2 A3. Dos manches devant. Pour continuer mon tricot avec les raglans et la continuité du motif où dois je reprendre ce dessin. Au 1er rg.? Merci pour votre aide et merci de m avoir bien expliqué les autres fois. Je suis bien répartie. Nadia Humeau
04.05.2022 - 23:11DROPS Design ha risposto:
Bonjour Mme Humeau, tout à fait, vous allez répéter les diagrammes ainsi: A.1 au-dessus des 2 premières m du A.1 précédent et A.2 sur les 14 m suivantes (=les 16 m du dernier rang de A.1), répétez A.3 comme avant jusqu'aux 17 m du dernier rang de A.3, tricotez alors A.2 (= 14 m) et A.3 (= 3 m). Continuez les diagrammes ainsi, autrement dit, vous tricotez 2 fois A.2 en plus entre A.1 et A.3. Bon tricot!
05.05.2022 - 09:06
|
|||||||||||||||||||
Catch the Wind#catchthewindtop |
|||||||||||||||||||
 |
 |
||||||||||||||||||
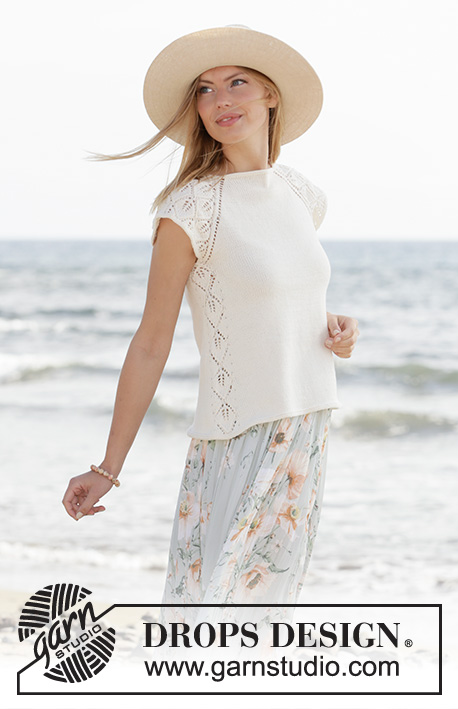
Top lavorato ai ferri con raglan e maniche corte in DROPS Safran. Lavorato dall’alto in basso con motivo traforato. Taglie: XS - XXL.
DROPS 211-5 |
|||||||||||||||||||
|
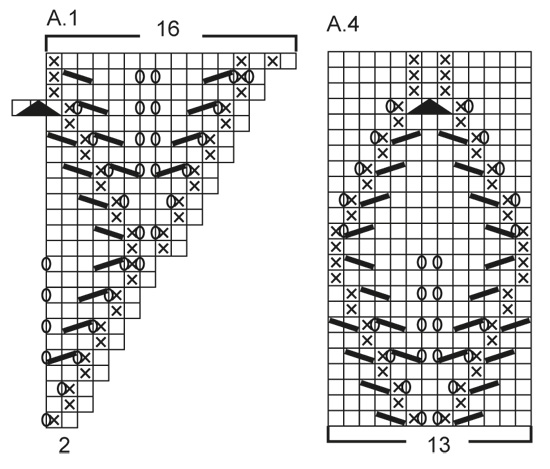
------------------------------------------------------- TECNICHE IMPIEGATE: ------------------------------------------------------- COSTA/MAGLIA LEGACCIO (lavorata in tondo): 1 costa = 2 giri. Lavorare 1 giro diritto e 1 giro rovescio. MOTIVO: Vedere i diagrammi A.1 - A.4. RAGLAN: Aumentare per il raglan a ogni lato del dietro e a ogni lato del davanti (verso le maniche). Aumentare facendo 1 gettato prima/dopo la maglia con il segnapunti; sul giro successivo lavorare i gettati a diritto per creare buchi. Gli aumenti per le maniche sono indicate nel motivo A.1 e A.3. ------------------------------------------------------- INIZIO DEL LAVORO: ------------------------------------------------------- TOP – BREVE RIASSUNTO DEL LAVORO: Lavorare il collo e lo sprone in tondo con i ferri circolari, dall’alto in basso. Dividere lo sprone per il corpo e le maniche e continuare il corpo in tondo. Lavorare un piccolo bordo attorno agli scalfi. COLLO: Avviare 106-110-116-120-124-132 maglie con i ferri circolari n° 3 mm e Safran. Lavorare 2 COSTE – leggere la descrizione sopra. Poi lavorare lo sprone come descritto sotto. SPRONE: Inserire 4 segnapunti nel lavoro come descritto sotto (senza lavorare le maglie). I segnapunti verranno usati per gli aumenti del raglan. Contare 16-17-18-19-20-22 maglie (= metà dietro), inserire 1 segnapunti nella maglia successiva, contare 19 maglie (= manica), inserire 1 segnapunti nella maglia successiva, contare 32-34-37-39-41-45 maglie (= davanti) inserire 1 segnapunti nella maglia successiva, contare 19 maglie (= manica), inserire 1 segnapunti nella maglia successiva. Ci sono 16-17-19-20-21-23 maglie dopo l’ultimo segnapunti (metà dietro). Il primo giro è lavorato come segue: lavorare a maglia rasata fino al 1° segnapunti, fare 1 gettato (1° aumento del RAGLAN – leggere la descrizione sopra), lavorare la maglia con il segnapunti a maglia rasata, A.1 (= 2 maglie), A.2 (= 14 maglie) e A.3 ( = 3 maglie) (= 19 maglie per la manica), lavorare la maglia con il segnapunti a maglia rasata, 1 gettato, lavorare a maglia rasata fino alla maglia con il segnapunti successiva (= davanti), 1 gettato, lavorare la maglia con il segnapunti a maglia rasata, A.1 (= 2 maglie), A.2 (= 14 maglie) e A.3 (= 3 maglie) (= 19 maglie per la manica), lavorare la maglia con il segnapunti a maglia rasata, 1 gettato, lavorare a maglia rasata sulle maglie rimaste (= metà dietro). Continuare questo motivo a maglia rasata sul davanti e dietro e A.1, A.2 e A.3 sulle maniche. Ogni volta che vengono lavorati A.1, A.2 e A.3 in altezza, si lavorano 2 ripetizioni in più di A.2 tra A.1 e A.3. FARE ATTENZIONE ALLA TENSIONE DEL LAVORO! ALLO STESSO TEMPO continuare ad aumentare per il raglan ogni 2 giri per un totale di 22-26-28-31-35-39 volte all’altezza di ogni segnapunti (compreso il 1° aumento descritto sopra). Lavorare le nuove maglie a maglia rasata sul davanti e dietro e con il motivo traforato come mostrato nei diagrammi sulle maniche. Alla fine degli aumenti per il raglan ci sono 294-334-356-388-424-468 maglie sul ferro. Lavorare il giro successivo come segue: lavorare 39-44-47-51-56-62 maglie (= metà dietro), mettere le 69-79-83-91-99-109 maglie successive in sospeso per la manica, avviare 9-9-9-11-13-15 nuove maglie sul ferro (= a lato sotto la manica), lavorare 78-88-95-103-113-125 maglie (= davanti), maglie successive in sospeso per la manica, avviare 9-9-9-11-13-15 nuove maglie sul ferro (= a lato sotto la manica), lavorare le ultime 39-44-48-52-57-63 maglie (= metà dietro). Finire il corpo e le maniche in modo separato. ORA MISURARE IL LAVORO DA QUI! CORPO: = 174-194-208-228-252-280 maglie. Inserire 1 segnapunti al centro delle 9-9-9-11-13-15 maglie avviate sotto ogni manica. Tagliare il filo e iniziare il giro 6 maglie prima di 1 delle maglie con il segnapunti. Lavorare A.4 (= 13 maglie), lavorare 74-84-91-101-113-127 maglie a maglia rasata, lavorare A.4 e poi a maglia rasata sulle ultime 74-84-91-101-113-127 maglie. Continuare questo motivo, ALLO STESSO TEMPO, quando il lavoro misura 2 cm, aumentare facendo 1 gettato a ogni lato di A.4, sul giro successivo lavorare i gettati a diritto ritorto per evitare buchi (= 4 aumenti). Ripetere gli aumenti ogni 1 ½ cm per un totale di 18 volte; lavorare gli aumenti a maglia rasata = 246-266-280-300-324-352 maglie. Quando il lavoro misura 28-29-29-30-29-29 cm dalla divisione, lavorare 2 coste su tutte le maglie, poi intrecciare. BORDO DELLE MANICHE: Riportare le 69-79-83-91-99-109 maglie di uno dei fermamaglie sui ferri circolari corti n° 3 mm e riprendere 1 maglia in ognuna delle 9-9-9-11-13-15 nuove maglie sotto la manica = 78-88-92-102-112-124 maglie. Lavorare 2 coste su tutte le maglie, poi intrecciare. Lavorare l’altro bordo della manica nello stesso modo. |
|||||||||||||||||||
Spiegazioni del diagramma |
|||||||||||||||||||
|
|||||||||||||||||||
 |
|||||||||||||||||||
 |
|||||||||||||||||||
 |
|||||||||||||||||||
Avete terminato questo modello?Allora taggate le vostre foto con #dropspattern #catchthewindtop o inviatele alla #dropsfan gallery. Avete bisogno di aiuto con questo modello?Troverete 20 video tutorial, una sezione per i commenti/domande e molto altro guardando il modello su www.garnstudio.com © 1982-2026 DROPS Design A/S. Ci riserviamo tutti i diritti. Questo documento, compreso tutte le sue sotto-sezioni, è protetto dalle leggi sul copyright. Potete leggere quello che potete fare con i nostri modelli alla fine di ogni modello sul nostro sito. |
|||||||||||||||||||


Con oltre 40 anni di esperienza nel design di modelli di maglia e uncinetto, DROPS Design offre la più estesa collezione di modelli gratuiti su internet - tradotti in 17 lingue. Ad oggi vi possiamo fornire 324 cataloghi e 12290 modelli - 9561 dei quali sono tradotti in Italiano.
Ci stiamo impegnando molto per darvi il meglio che vi possiamo offrire in termini di maglia e uncinetto, ispirazioni e consigli così come filati di grande qualità ad un prezzo incredibile! Volete utilizzare i nostri modelli per qualcosa d'altro oltre al vostro uso personale? Potete leggere tutto ciò che è consentito nel testo sul Copyright in basso su tutte le pagine dei nostri modelli. Buon lavoro!
Lasciare un commento sul modello DROPS 211-5
Noi saremmo felici di ricevere i tuoi commenti e opinioni su questo modello!
Se vuoi fare una domanda, fai per favore attenzione a selezionare la categoria corretta nella casella qui sotto per velocizzare il processo di risposta. I campi richiesti sono indicati da *.