
Categorie popolari
State cercando un filato?


Commenti / Domande (260)
![]() Susanne ha scritto:
Susanne ha scritto:
Schönen guten Tag, ich möchte mir dieses tolle Top in Größe M stricken, komme aber mit den Angaben der Maschen nicht ganz klar. Meine Frage: Werden die Raglan-Zunahmen jeweils vor und nach dem markierten Faden gemacht, also pro Faden zwei Maschen?
17.06.2024 - 11:10DROPS Design ha risposto:
Liebe Susanne, es wird nicht immer 1 masche beidseitig von den Markierugen zugenommen, da in A.1 und A.3 manchmal auch 2 Maschen zugenommen werden; aber beim Vorder/Rückenteil sollen Sie jeweils 1 Masche am Anfang + 1 Masche am Ende vom Vorder/Rückenteil zunehmen und für die Ärmel nehmen Sie wie den Diagramme zu, dh nach den 24 Reihen von A.1-A.3 haben Sie 14 Maschen in A.1 und 14 Maschen in A.3 zugenommen. Viel Spaß beim Stricken!
17.06.2024 - 15:06
![]() Mary De Bock ha scritto:
Mary De Bock ha scritto:
Ik kom niet aan mijn 356 steken. 1achterkant is 43, mouw 75 voorste 85steken mouw 75 steken 2achterkant 45 kom ik maar aan 322 steken. wat doe ik verkeerd. mouw brei 1e keer 16-14-17 herhaal 2e maal 16 3x14 - 17= 75 steken achterkant 18st+24toeren= 42 dit maal 2 = 84 / 19st +24toeren= 86 st wat doe ik verkeerd
15.06.2024 - 08:51
![]() Lois ha scritto:
Lois ha scritto:
At end of yoke, it states continue this pattern....work 2 more repeats of A.2 between A.1 and A.3. Is this the same as as working the original pattern of A.1, A.2 and A.3 stated differently? I'm a little confused.
14.06.2024 - 13:34DROPS Design ha risposto:
Dear Lois, it means that between the A.1 and A.3 patterns there will be enough stitches tp work two moe repeats of the A.2 patterns (two more repeats than there were previously). Happy Knitting!
15.06.2024 - 00:37
![]() Lia ha scritto:
Lia ha scritto:
Ik kom niet uit regel 1 en 2 van A1. De mouw telt 19 steken. Je begint met 1 rechte en 1 averechtse en dan een omslag. De volgende pen moet je 1 rechte, 1 averechtse en dan 1 rechte. De averechtse steek komt boven de rechte steek van toer 1. Ik heb dan geen steek over om de eerste rechte te breien. Hoe doe ik dat. Graag uw reactie.
04.06.2024 - 15:30DROPS Design ha risposto:
Dag Lia,
Zoals ik het zie staan de steken niet op de juiste manier boven elkaar in A.1. Als je gewoon de beschrijving volgt, dan komen de averechte steken van A.1 steeds boven elkaar.
05.06.2024 - 19:57
![]() Sylvie Chevrier ha scritto:
Sylvie Chevrier ha scritto:
Merci pour votre réponse mais comme je dis la maille envers n est donc pas décalée puisqu au 1er tour on fait 1 end 1 env 1 j et le 2eme rang on recommence avec 1end 1 env. La maille envers se retrouve donc sur la maille envers du 1er tour ? Et non décalée comme sur le diagramme?
04.06.2024 - 09:34DROPS Design ha risposto:
Bonjour Mme Chevrier, tout à fait, elle n'est décalée que dans le diagramme pour des raisons techniques de construction de ce même diagramme, mais la maille envers sera toujours la 2ème maille de A.1 et l'avant dernière maille de A.3 tout du long. Bon tricot!
04.06.2024 - 12:59
![]() Sylvie Chevrier ha scritto:
Sylvie Chevrier ha scritto:
Bonjour. Je ne comprends pas le 2eme Rang sur le diagramme a1 comment la maille envers peut être décalée par rapport au rang 1 étant donné qu il n y a pas d augmentation à cet endroit au rang 1 ?
04.06.2024 - 01:14DROPS Design ha risposto:
Bonjour Mme Chevrier, pour des raisons techniques les augmentations des diagrammes sont représentées à droite (dans A.1) ou à gauche (dans A.3), autrement dit, au 1er tour, vous augmentez (vous faites 1 jeté) après la maille envers =(= 1 m end, 1 m env, 1 jeté) vous aurez donc 1 m en plus après la maille envers au 2ème tour, soit: 1 m end, 1 m env, 1 m end (le jeté du 1er tour). Bon tricot!
04.06.2024 - 08:17
![]() Sylvie Chevrier ha scritto:
Sylvie Chevrier ha scritto:
Bonjour. Je ne comprends pas le 2eme Rang sur le diagramme a1 comment la maille envers peut être décalée par rapport au rang 1 étant donné qu il n y a pas d augmentation à cet endroit au rang 1 ?
04.06.2024 - 01:13
![]() Lia Van Velzen ha scritto:
Lia Van Velzen ha scritto:
Zijn de markeersteken in patroondeel A1 en A3 aangegeven? Graag uw reactie.
03.06.2024 - 16:49DROPS Design ha risposto:
Dag Lia,
Nee, je breit de markeersteken zijn niet in de telpatronen aangegeven. In de beschrijving van de pas staat ook '...brei de markeerdraad-steek in tricotsteek, A.1 (= 2 steken), A.2 (= 14 steken) en A.3 ( = 3 steken) (= 19 steken op de mouw), brei de markeerdraad-steek in tricotsteek, 1 omslag... enz'
03.06.2024 - 20:22
![]() Lia Van Velzen ha scritto:
Lia Van Velzen ha scritto:
Het patroon van A2 is bij de regels 1 3 5 fout. De omslagen moeten na en voor de mindering komen te staan, anders kan je nooit van 7 steken 9 steken krijgen.
03.06.2024 - 07:17
![]() Petra Geißert ha scritto:
Petra Geißert ha scritto:
Bei der Anleitung 211-5 steht, wenn 1x A1,A2 u A3 in der höhe gestrickt wurde.dann 2 Rapport mehr von A2 stricken ? Also dann A2 3x , dann 5x. Habe ich das richtig verstanden? Dankeschön im voraus. Lg
30.05.2024 - 20:05DROPS Design ha risposto:
Liebe Frau Geißelt, wenn A.1 fertig ist sind es 16 Maschen, bei der nächsten Reihe stricken Sie A.1 über die ersten 2 Maschen dann A.2 über die letzten 14 Maschen (1 x A.2 mehr in der Breite); wenn A.3 fertig ist sind es 17 Maschen, bei der nächsten Reihe stricken Sie 1 x A.2 über die ersten 14 Maschen und A.3 über die letzten 3 Maschen; so sind es 2 Rapporte A.2 mehr. So genau sind es dann 3 x A.2, dann 5 x A.2 usw Viel Spaß beim Stricken!
31.05.2024 - 07:36
|
|||||||||||||||||||
Catch the Wind#catchthewindtop |
|||||||||||||||||||
 |
 |
||||||||||||||||||
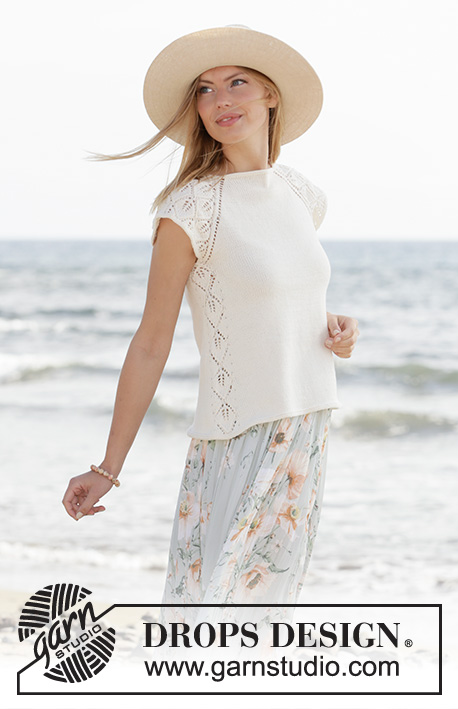
Top lavorato ai ferri con raglan e maniche corte in DROPS Safran. Lavorato dall’alto in basso con motivo traforato. Taglie: XS - XXL.
DROPS 211-5 |
|||||||||||||||||||
|
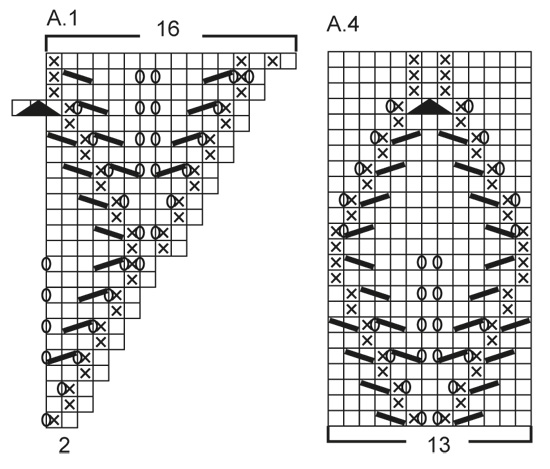
------------------------------------------------------- TECNICHE IMPIEGATE: ------------------------------------------------------- COSTA/MAGLIA LEGACCIO (lavorata in tondo): 1 costa = 2 giri. Lavorare 1 giro diritto e 1 giro rovescio. MOTIVO: Vedere i diagrammi A.1 - A.4. RAGLAN: Aumentare per il raglan a ogni lato del dietro e a ogni lato del davanti (verso le maniche). Aumentare facendo 1 gettato prima/dopo la maglia con il segnapunti; sul giro successivo lavorare i gettati a diritto per creare buchi. Gli aumenti per le maniche sono indicate nel motivo A.1 e A.3. ------------------------------------------------------- INIZIO DEL LAVORO: ------------------------------------------------------- TOP – BREVE RIASSUNTO DEL LAVORO: Lavorare il collo e lo sprone in tondo con i ferri circolari, dall’alto in basso. Dividere lo sprone per il corpo e le maniche e continuare il corpo in tondo. Lavorare un piccolo bordo attorno agli scalfi. COLLO: Avviare 106-110-116-120-124-132 maglie con i ferri circolari n° 3 mm e Safran. Lavorare 2 COSTE – leggere la descrizione sopra. Poi lavorare lo sprone come descritto sotto. SPRONE: Inserire 4 segnapunti nel lavoro come descritto sotto (senza lavorare le maglie). I segnapunti verranno usati per gli aumenti del raglan. Contare 16-17-18-19-20-22 maglie (= metà dietro), inserire 1 segnapunti nella maglia successiva, contare 19 maglie (= manica), inserire 1 segnapunti nella maglia successiva, contare 32-34-37-39-41-45 maglie (= davanti) inserire 1 segnapunti nella maglia successiva, contare 19 maglie (= manica), inserire 1 segnapunti nella maglia successiva. Ci sono 16-17-19-20-21-23 maglie dopo l’ultimo segnapunti (metà dietro). Il primo giro è lavorato come segue: lavorare a maglia rasata fino al 1° segnapunti, fare 1 gettato (1° aumento del RAGLAN – leggere la descrizione sopra), lavorare la maglia con il segnapunti a maglia rasata, A.1 (= 2 maglie), A.2 (= 14 maglie) e A.3 ( = 3 maglie) (= 19 maglie per la manica), lavorare la maglia con il segnapunti a maglia rasata, 1 gettato, lavorare a maglia rasata fino alla maglia con il segnapunti successiva (= davanti), 1 gettato, lavorare la maglia con il segnapunti a maglia rasata, A.1 (= 2 maglie), A.2 (= 14 maglie) e A.3 (= 3 maglie) (= 19 maglie per la manica), lavorare la maglia con il segnapunti a maglia rasata, 1 gettato, lavorare a maglia rasata sulle maglie rimaste (= metà dietro). Continuare questo motivo a maglia rasata sul davanti e dietro e A.1, A.2 e A.3 sulle maniche. Ogni volta che vengono lavorati A.1, A.2 e A.3 in altezza, si lavorano 2 ripetizioni in più di A.2 tra A.1 e A.3. FARE ATTENZIONE ALLA TENSIONE DEL LAVORO! ALLO STESSO TEMPO continuare ad aumentare per il raglan ogni 2 giri per un totale di 22-26-28-31-35-39 volte all’altezza di ogni segnapunti (compreso il 1° aumento descritto sopra). Lavorare le nuove maglie a maglia rasata sul davanti e dietro e con il motivo traforato come mostrato nei diagrammi sulle maniche. Alla fine degli aumenti per il raglan ci sono 294-334-356-388-424-468 maglie sul ferro. Lavorare il giro successivo come segue: lavorare 39-44-47-51-56-62 maglie (= metà dietro), mettere le 69-79-83-91-99-109 maglie successive in sospeso per la manica, avviare 9-9-9-11-13-15 nuove maglie sul ferro (= a lato sotto la manica), lavorare 78-88-95-103-113-125 maglie (= davanti), maglie successive in sospeso per la manica, avviare 9-9-9-11-13-15 nuove maglie sul ferro (= a lato sotto la manica), lavorare le ultime 39-44-48-52-57-63 maglie (= metà dietro). Finire il corpo e le maniche in modo separato. ORA MISURARE IL LAVORO DA QUI! CORPO: = 174-194-208-228-252-280 maglie. Inserire 1 segnapunti al centro delle 9-9-9-11-13-15 maglie avviate sotto ogni manica. Tagliare il filo e iniziare il giro 6 maglie prima di 1 delle maglie con il segnapunti. Lavorare A.4 (= 13 maglie), lavorare 74-84-91-101-113-127 maglie a maglia rasata, lavorare A.4 e poi a maglia rasata sulle ultime 74-84-91-101-113-127 maglie. Continuare questo motivo, ALLO STESSO TEMPO, quando il lavoro misura 2 cm, aumentare facendo 1 gettato a ogni lato di A.4, sul giro successivo lavorare i gettati a diritto ritorto per evitare buchi (= 4 aumenti). Ripetere gli aumenti ogni 1 ½ cm per un totale di 18 volte; lavorare gli aumenti a maglia rasata = 246-266-280-300-324-352 maglie. Quando il lavoro misura 28-29-29-30-29-29 cm dalla divisione, lavorare 2 coste su tutte le maglie, poi intrecciare. BORDO DELLE MANICHE: Riportare le 69-79-83-91-99-109 maglie di uno dei fermamaglie sui ferri circolari corti n° 3 mm e riprendere 1 maglia in ognuna delle 9-9-9-11-13-15 nuove maglie sotto la manica = 78-88-92-102-112-124 maglie. Lavorare 2 coste su tutte le maglie, poi intrecciare. Lavorare l’altro bordo della manica nello stesso modo. |
|||||||||||||||||||
Spiegazioni del diagramma |
|||||||||||||||||||
|
|||||||||||||||||||
 |
|||||||||||||||||||
 |
|||||||||||||||||||
 |
|||||||||||||||||||
Avete terminato questo modello?Allora taggate le vostre foto con #dropspattern #catchthewindtop o inviatele alla #dropsfan gallery. Avete bisogno di aiuto con questo modello?Troverete 20 video tutorial, una sezione per i commenti/domande e molto altro guardando il modello su www.garnstudio.com © 1982-2026 DROPS Design A/S. Ci riserviamo tutti i diritti. Questo documento, compreso tutte le sue sotto-sezioni, è protetto dalle leggi sul copyright. Potete leggere quello che potete fare con i nostri modelli alla fine di ogni modello sul nostro sito. |
|||||||||||||||||||


Con oltre 40 anni di esperienza nel design di modelli di maglia e uncinetto, DROPS Design offre la più estesa collezione di modelli gratuiti su internet - tradotti in 17 lingue. Ad oggi vi possiamo fornire 324 cataloghi e 12290 modelli - 9561 dei quali sono tradotti in Italiano.
Ci stiamo impegnando molto per darvi il meglio che vi possiamo offrire in termini di maglia e uncinetto, ispirazioni e consigli così come filati di grande qualità ad un prezzo incredibile! Volete utilizzare i nostri modelli per qualcosa d'altro oltre al vostro uso personale? Potete leggere tutto ciò che è consentito nel testo sul Copyright in basso su tutte le pagine dei nostri modelli. Buon lavoro!
Lasciare un commento sul modello DROPS 211-5
Noi saremmo felici di ricevere i tuoi commenti e opinioni su questo modello!
Se vuoi fare una domanda, fai per favore attenzione a selezionare la categoria corretta nella casella qui sotto per velocizzare il processo di risposta. I campi richiesti sono indicati da *.