
Categorie popolari
State cercando un filato?


Commenti / Domande (99)
![]() Yannick ha scritto:
Yannick ha scritto:
Bonjour (modèle petronella top - laine muskat) je ne comprends pas comment faire les augmentations du raglan en même temps que le motif A1 merci de m'expliquer - en effet je fais un jeté une maille endroit - une maille endroit et un jeté pour le motif A1 de la manche - comment puis-je alors faire une augmentation pour le raglan ?
24.08.2017 - 09:47DROPS Design ha risposto:
Bonjour Yannick, vous n'allez pas augmenter pour le devant/le dos et les manches en même temps, par ex en taille S, on augmente 12x tous les 2 tours et 7x tous les 4 tours pour le devant/le dos mais 18x tous les 2 tours et 4 x tous les 4 tours pour les manches. Ainsi, les 12 premières augmentations seront sur chaque pièce (= manches + dos/devant), mais par la suite, vous augmenterez soit uniquement sur les manches (4 augm par tour), soit partout (8 augm par tour). Comment augmenter mailles pour le reglan tandis que l’on fait le schemat A.1 sur les manches, consulter la partie apres les fournitures entitulee REGLAN. Bon tricot!
24.08.2017 - 09:58Genevieve ha scritto:
Hi. I've read some of the questions and answers and have figured out the pattern and increases. 😉
16.08.2017 - 04:06Genevieve ha scritto:
And for chart A.2, for the 2nd row of k2together followed by 1 yarn over, for the increase round, I've started with marker thread, k1, yarn over followed by k2together, yarn over (8 times) and left with 1 stitch. Which means after the pattern yo, I yarn over again followed by k1 marker thread?
14.08.2017 - 07:24Genevieve ha scritto:
I don't quite get the instruction for chart A.1 and A.2. I'm knitting for S size and I need to do the increase for sleeves 23 times. I worked chart A.1 1 time in height is 6 rows and chart A.2 in height is 8 rows. After that do I just knit all around till I reached the 23rd increases? Or I continue with A.2?
14.08.2017 - 00:46DROPS Design ha risposto:
Hello Genevieve. You continue working A.2 during all the increases. Please remember that after the next to last increase on the sleeve (there are 4 rounds left), you must work the stitches on each sleeve in garter stitch. Happy knitting!
20.08.2017 - 18:08Genevieve ha scritto:
I'm now at the beginning raglan increase and I'm stuck on the sleeves increase instruction. I've started with knit till 1 stitch before 1st marker thread, I've also made the yarn over, knit 1 and marker thread. After that I'll follow A.1 which is purl 10 for sleeves? If yes, how do I increase stitches on the sleeves now?
12.08.2017 - 06:39DROPS Design ha risposto:
Hi Genevieve, You also need to increase after the marker - Knit 1, 1 yarn over. Do the same at all markers and you will have increases to raglan both on body and sleeves. On the next round knit all yarn overs so that you get holes. Happy knitting!
12.08.2017 - 07:57Genevieve ha scritto:
Hi. I've just increased the stitches after the 4th round from the beginning. Do I knit 1 round followed by Raglan increase since the Raglan increase is from 2nd round onwards?
10.08.2017 - 17:44DROPS Design ha risposto:
Hi Genevieve, Yes you knit 1 round between each round with increases to raglan on the body. On the sleeves you are increasing every 2nd round, but are working A.2 (while increasing alternate rounds). I hope this helps and happy knitting!
11.08.2017 - 07:10
![]() Bodil Jensen ha scritto:
Bodil Jensen ha scritto:
Ang. de 20 masker der skal tages ud i halsen. Er det korrekt at der skal tages ud på pind. 4 - dvs. en vrang pind, der efterfølges af ret (første raglan pind)? Hviken teknink tages der ud med? - Jeg har prøvet forskellige og udtagningerne blev desværre meget tydelige på næste pind. Mvh Bodil
29.07.2017 - 10:13DROPS Design ha risposto:
Hej Bodil, ja du tager ud på 4.omgang som er vrang, her strikker du 2 vrang i samme maske, 1 i forreste maskeled og 1 i bagerste maskeled. God fornøjelse!
17.08.2017 - 15:48
![]() Virginia ha scritto:
Virginia ha scritto:
I think my question was not well put. What I see now for RAGLAN increases is that you do one height of A.1 (6 rows) increasing every 2nd row then move on to A.2 and increase every 2nd row until you have reached the number of 2nd row increases (27 times for L). THEN you do the 2nd paragraph - 4th row increases which are listed as Round 1-4 (2 times for L). When do you do the third paragraph "Increase as follows after the marker thread:" showing Rounds 1-4?
28.07.2017 - 18:15DROPS Design ha risposto:
Dear Virginia, after you have inc every 2nd row, inc every 4th row: after the marking thread (= 3rd paragraph, ie at the beg of the sleeve) and before marking thread (= 2nd paragraph, ie at the end of the sleeve). Happy knitting!
31.07.2017 - 09:15Virginia ha scritto:
I think my question was not well put. What I see now for RAGLAN increases is that you do one height of A.1 (6 rows) increasing every 2nd row then move on to A.2 and increase every 2nd row until you have reached the number of 2nd row increases (27 times for L). THEN you do the 2nd paragraph - 4th row increases which are listed as Round 1-4 (2 times for L). When do you do the third paragraph "Increase as follows after the marker thread:" showing Rounds 1-4
28.07.2017 - 16:55Virginia ha scritto:
Thank you regarding A.3. Reading the pattern under RAGLAN in the first paragraph it says to "Increase every 2nd rounds as follows:" (27 times for L) and in the second paragraph it says "Increase every 4th round as follows:" (2 times for L). Then in the 3rd paragraph it says "Increase as follows, after the marker thread:" Is this 3rd paragraph referring to increases after you complete A.1 and A.2 once - 14 rows total? Yes?
28.07.2017 - 13:33DROPS Design ha risposto:
Dear Virginia, under "RAGLAN" you are explained how to inc every 2nd round: first before the marking thread (at the end of each sleeve/front/back piece) then after the marking thread: at the beg of sleeve/front/back piece. Same when dec every 4th round: first how to inc before the marking thread, then how to inc after the marking thread. When A.1 has been worked 1 time in height, repeat A.2 in height until end of sleeve. Happy knitting!
28.07.2017 - 14:26
|
|||||||||||||
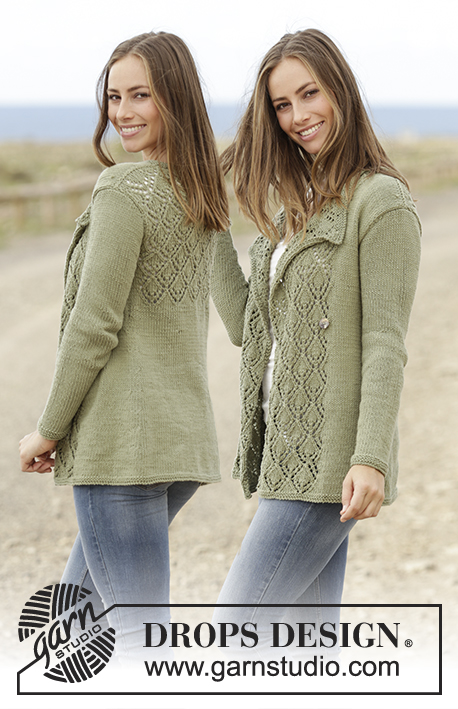
Petronella Top#petronellatop |
|||||||||||||
|
|
|||||||||||||
Top ai ferri con raglan e motivo traforato, lavorato dall’alto verso il basso (top down), in DROPS Muskat. Taglie: Dalla S alla XXXL.
DROPS 175-32 |
|||||||||||||
|
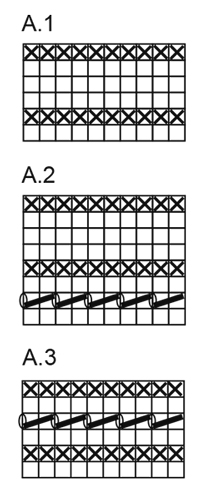
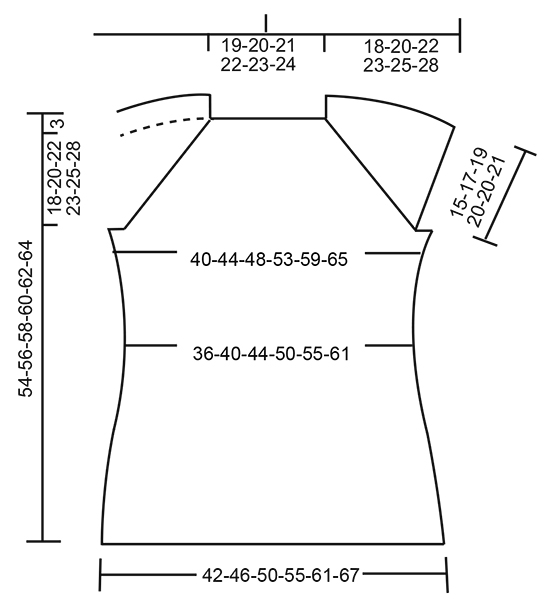
COSTE A LEGACCIO/PUNTO LEGACCIO (in tondo): 1 costa a legaccio = 2 giri Lavorare 1 giro a diritto e 1 giro a rov. MOTIVO: Vedere i diagrammi A.1, A.2 e A.3. I diagrammi mostrano tutti i ferri del motivo, visti sul diritto del lavoro. RAGLAN: Aumentare ogni 2 giri come segue: Aumentare come segue prima del segno: Iniziare 1 maglia prima del segno: fare 1 maglia gettata, 1 maglia a diritto, segno. Aumentare come segue dopo il segno: segno, lavorare 1 maglia a diritto, fare 1 maglia gettata. Nel corso del giro successivo, lavorare le maglie gettate a dir; si devono formare i buchi. Aumentare ogni 4 giri come segue: Aumentare come segue prima del segno: GIRO 1: Iniziare 1 maglia prima del segno: fare 1 maglia gettata, 1 maglia a diritto, segno. GIRO 2: lavorare le maglie gettate a diritto, si devono formare dei buchi GIRO 3: Iniziare 3 maglie prima del segno: lavorare 2 maglie insieme a diritto, fare 1 maglia gettata, 1 maglia a diritto, segno. Non ci sono aumenti, ma il motivo traforato continua come prima. GIRO 4: lavorare le maglie gettate a diritto, si devono formare dei buchi. Aumentare come segue dopo il segno: GIRO 1: segno, 1 maglia a diritto, fare 1 maglia gettata. GIRO 2: lavorare le maglie gettate a diritto, si devono formare dei buchi . GIRO 3: segno, 1 maglia a diritto, 1 maglia gettata, passare 1 maglia a diritto senza lavorarla, 1 maglia a diritto, accavallare la maglia passata sulla maglia lavorata. Non ci sono aumenti, ma il motivo traforato continua come prima. GIRO 4: lavorare le maglie gettate a diritto; si devono formare dei buchi SUGGERIMENTO PER LE DIMINUZIONI: Iniziare 3 maglie prima del segno: lavorare 2 maglie insieme a diritto, 2 maglie diritto (il segno si trova al centro di queste 2 maglie), passare 1 maglia a diritto senza lavorarla, 1 maglia a diritto, accavallare la maglia passata sulla maglia lavorata = 2 maglie diminuite. SUGGERIMENTI PER GLI AUMENTI: Lavorare finché non rimane 1 maglia prima del segno. Fare 1 maglia gettata, lavorare 2 maglie diritto (il segno si trova al centro di queste 2 maglie), 1 maglia gettata. Al giro successivo, lavorare le maglie gettate a diritto ritorto per evitare che si formino i buchi (lavorare le maglie aumentate a maglia rasata). --------------------------------------------------------- TOP: Si lavora in tondo, sui ferri circolari a partire dal centro, sul dietro, dall’alto verso il basso. SPRONE: Avviare 80-84-88-92-96-100 maglie sui ferri circolari n° 4 con il filato Muskat. Lavorare 2 COSTE A LEGACCIO – vedere le spiegazioni sopra; sull’ ultimo giro delle coste a legaccio aumentare 20 maglie a intervalli regolari = 100-104-108-112-116-120 maglie. Inserire 4 segni nel lavoro come segue: il primo segno dopo 19-20-21-22-23-24 maglie (= metà dietro), il secondo segno dopo 12 maglie (= manica), il terzo segno dopo 38-40-42-44-46-48 maglie (= davanti), il quarto segno dopo 12 maglie (= manica); dopo l’ ultimo segno ci sono 19-20-21-22-23-24 maglie (= metà dietro). Iniziare ad aumentare per il raglan come indicato sopra, lavorare a maglia rasata le maglie del dietro e del davanti e lavorare il diagramma A.1 sulle maniche. LEGGERE TUTTE LE INDICAZIONI SUCCESSIVE PRIMA DI PROSEGUIRE! Gli aumenti hanno una frequenza diversa sul davanti /dietro e sulle maniche; aumentare come segue: DAVANTI /DIETRO: Aumentare ogni 2 giri 12-15-17-25-30-35 volte, poi ogni 4 giri 7-7-7-4-3-2 volte. MANICHE: Aumentare ogni 2 giri 18-23-27-29-26-25 volte, poi ogni 4 giri 4-3-2-2-5-7 volte. Dopo aver lavorato il diagramma A.1 1 volta in verticale, ripetere il diagramma A.2 in verticale. Lavorare le maglie aumentate delle maniche seguendo il motivo man mano che si procede con il lavoro. Dopo il penultimo aumento sulle maniche (rimangono ancora 4 giri), lavorare le maglie delle maniche a punto legaccio, e continuare a lavorare a maglia rasata come prima le maglie del davanti /dietro. RICORDARSI DI MANTENERE LA CORRETTA TENSIONE DEL LAVORO! Terminati gli aumenti per il raglan, ci sono 264-296-320-352-372-396 maglie. Lavorare il giro successivo come segue: Lavorare 38-42-45-51-56-61 maglie (= metà dietro), intrecciare le 56-64-70-74-74-76 maglie successive, lavorare le 76-84-90-102-112-122 maglie successive (= davanti), intrecciare le 56-64-70-74-74-76 maglie successive, lavorare le ultime 38-42-45-51-56-61 maglie (= metà dietro). DAVANTI E DIETRO: Continuare come segue: lavorare la metà del dietro, avviare 8-8-10-10-12-14 nuove maglie, lavorare il davanti, avviare 8-8-10-10-12-14 nuove maglie, lavorare la metà del dietro. Ci sono ora 168-184-200-224-248-272 maglie per il davanti e il dietro. Inserire un segno da ciascun lato, al centro delle nuove maglie avviate. DA ADESSO IN AVANTI MISURARE IL LAVORO DA QUI. Continuare a maglia rasata, ma sulle 8-8-10-10-12-14 nuove maglie ai lati, lavorare 2 coste a legaccio. Lavorare poi tutte le maglie a maglia rasata. Quando il lavoro misura 4 cm, diminuire 1 maglia da ciascun lato di ogni segno (= 4 maglie diminuite), diminuire ogni 3 cm in tutto 4 volte – VEDERE IL SUGGERIMENTO PER LE DIMINUZIONI = 152-168-184-208-232-256 maglie. Quando il lavoro misura 19-19-19-18-18-19 cm, aumentare 1 maglia da ciascun lato di ogni segno (= 4 maglie aumentate), aumentare ogni 2 cm in tutto 6 volte – VEDERE IL SUGGERIMENTO PER GLI AUMENTI = 176-192-208-232-256-280 maglie. Quando il lavoro misura 32-32-32-33-33-32 cm, lavorare il diagramma A.3 su tutte le maglie. Poi intrecciare lavorando le maglie a diritto; il lavoro misura ca.54-56-58-60-62-64 cm dalla spalla. |
|||||||||||||
Spiegazioni del diagramma |
|||||||||||||
|
|||||||||||||
 |
|||||||||||||
 |
|||||||||||||
Avete terminato questo modello?Allora taggate le vostre foto con #dropspattern #petronellatop o inviatele alla #dropsfan gallery. Avete bisogno di aiuto con questo modello?Troverete 24 video tutorial, una sezione per i commenti/domande e molto altro guardando il modello su www.garnstudio.com © 1982-2026 DROPS Design A/S. Ci riserviamo tutti i diritti. Questo documento, compreso tutte le sue sotto-sezioni, è protetto dalle leggi sul copyright. Potete leggere quello che potete fare con i nostri modelli alla fine di ogni modello sul nostro sito. |
|||||||||||||


Con oltre 40 anni di esperienza nel design di modelli di maglia e uncinetto, DROPS Design offre la più estesa collezione di modelli gratuiti su internet - tradotti in 17 lingue. Ad oggi vi possiamo fornire 324 cataloghi e 12290 modelli - 9561 dei quali sono tradotti in Italiano.
Ci stiamo impegnando molto per darvi il meglio che vi possiamo offrire in termini di maglia e uncinetto, ispirazioni e consigli così come filati di grande qualità ad un prezzo incredibile! Volete utilizzare i nostri modelli per qualcosa d'altro oltre al vostro uso personale? Potete leggere tutto ciò che è consentito nel testo sul Copyright in basso su tutte le pagine dei nostri modelli. Buon lavoro!
Lasciare un commento sul modello DROPS 175-32
Noi saremmo felici di ricevere i tuoi commenti e opinioni su questo modello!
Se vuoi fare una domanda, fai per favore attenzione a selezionare la categoria corretta nella casella qui sotto per velocizzare il processo di risposta. I campi richiesti sono indicati da *.