
Categorie popolari
State cercando un filato?


Commenti / Domande (99)
![]() Shay ha scritto:
Shay ha scritto:
Just starting. When I increase front/back piece, is that the "Raglan" increase? Where does the "Increase as follows after marker thread' start?
06.03.2018 - 14:56DROPS Design ha risposto:
Dear Shay, the raglan inc on next round after inserting marking thread. You will inc for raglan on front/back piece after the marking thread at the beg of piece and before the marking thread at the end of piece. You will increase for raglan at the beg of sleeve after marking thread and at the end of sleeve before the marking thread. Happy knitting!
06.03.2018 - 16:08Sue ha scritto:
Arrr yes that makes perfect sense. I asked the question about which the row to start the increases on on Oct 2nd and was told to increase on even rows after the ridges. That's row 6,8,10, 12. (Row12 is row 2 of A2). But I should inc on row 5,7,9,11 (row 11 is row 1 of A2) . That is what I thought should happen. Thank you. So much. Confusion over :-).
30.10.2017 - 11:54Sue ha scritto:
Starting with 18 sleeve stitches. Marker, knit1, YO (raglan inc). Knit 2 tog, Yarn over (8times - A2). Then you need to do a YO, knit 1 for last raglan inc to make 20 stitches. That makes 2 YO's next to each other. If you don't do 2 yo's next to each oth r you end up with 19 stitches!!!
30.10.2017 - 08:49DROPS Design ha risposto:
Dear Sue, the row with K2tog, YO, is not a row with increase for raglan, you should have increased on row before, then work row 2 in diagram as explained in previous answer (repeating K2 tog/YO the number of sts required as number of sts will inc). Happy knitting!
30.10.2017 - 10:37Sue ha scritto:
Im sorry I just don't understand how this can occur. The increase occurs on the 2nd row of the A2 pattern. The row with all knit 2 tog followed by Yarn over. If you follow the pattern as per the chart as well as with the Raglan increase instructions then it should go like this..see above
30.10.2017 - 08:38DROPS Design ha risposto:
Dear Sue, you inc 1 st on first row in A.2, so that you will work the 12 sts between markers for sleeve as follows: marker, K1, YO, K10, YO, K1 (= 14 sts between markers). On row 2 in A.2 work: K2 (the first K1 + YO), (K2 tog, YO) x 6, K2 (the YO + last K1). Happy knitting!
30.10.2017 - 10:34Sue ha scritto:
Also I note that doing 2 Yarn overs next to each other just creates one big hole instead of 2 holes next to each other which I can't imagine is ideal. I'm stumped.
30.10.2017 - 00:53DROPS Design ha risposto:
Hi Sue, The pattern does not have 2 yarn overs next to each other. They are either between 2 stitches, with 2 stitches either side or have 1 knitted stitch either side. I hope this helps and happy knitting!
30.10.2017 - 08:04Sue ha scritto:
Just to add the the last comment. I tried knitting the last 'knit 2 tog followed by Yarn over' (the 8th one - on the 2nd line A2) then just knitting the last s titch but that leaves you with an odd number of stitches, which I note is the same problem another person had. I think the difficulty with this pattern is that the increases aren't so straight forward when they fall on the patterned round for the sleeves, and the instructions don't seem to account for this.
29.10.2017 - 14:07DROPS Design ha risposto:
Dear Sue, you are starting sleeves with 12 sts less 2 sts for raglan line (1 st at the beg + 1 st at the end of sleeve) and you will increase 2 sts so that you should always get an even number of sts for sleeve. Happy knitting!
30.10.2017 - 09:52Sue ha scritto:
Hi I'm having trouble trying to figure out the increases on the sleeve pattern A2. As per raglan instructions I knit 1 Yarn over after the marker. Then knit 2 tog, Yarn over 8 times then I'm left with 1 stitch. How do I get the last Yarn over in before the last stitch.....do I do 2 Yarn overs next to each other ??
29.10.2017 - 07:34DROPS Design ha risposto:
Dear Sue, knit the last st in this case, ie when the number of sts do not match the diagram, finish pattern with K1 to avoid double yarn overs next to each other. Happy knitting!
30.10.2017 - 09:22Sue ha scritto:
Secondly with the increases for the Raglan the pattern states that the increases are to be done every 2nd row, but it doesn't indicate which row to start the raglan increases on. Is it row 5 or row 6? I am assuming the first round of increases is on row 5 then 7,9 etc as this means the increases are done on the knit rows of the sleeve pattern and are not getting mixed up in the lace patterning rows. Is this correct?
01.10.2017 - 03:37DROPS Design ha risposto:
Dear Sue, you will inc on round 6, ie after ridges, work 1 round in pattern as explained, then start to inc on next round. Happy knitting!
02.10.2017 - 09:50Sue ha scritto:
Sorry, typos on he last question. Hello, I am trying to work out this pattern before I start. The pattern states to increase 20 stitches on the last ROUND of the ridges. Does this mean it can be done on either row 3 or 4 which both make up the last round of ridges. I wound prefer to increase on the knit row which is row 3 with a kfb. Or do the increases have to be on the 4th and last row of the ridges which is a purl row.
01.10.2017 - 03:35DROPS Design ha risposto:
Hi Sue, The last round of the ridges is round 4, the purl round. So you increase on this 4th round. Happy knitting!
01.10.2017 - 12:25Sue ha scritto:
Hello, I am trying to work out this pattern before I start. The pattern states to increase 20 stitches on the last ROUND of the ridges. Does this mean it can be one I thee row 3 or 4 which both make up the last round of ridges. I wound prefer to increase on the knit row which is row 3 with a kfb. Or do the increase have to be on the 4th and last row of the ridges which is a purl row.
01.10.2017 - 03:33DROPS Design ha risposto:
Dear Sue, you will increase on the last round of ridges, ie on 4th round, you can increase also with kfb on last round of ridges (= P round). Happy knitting!
02.10.2017 - 09:48
|
|||||||||||||
Petronella Top#petronellatop |
|||||||||||||
|
|
|||||||||||||
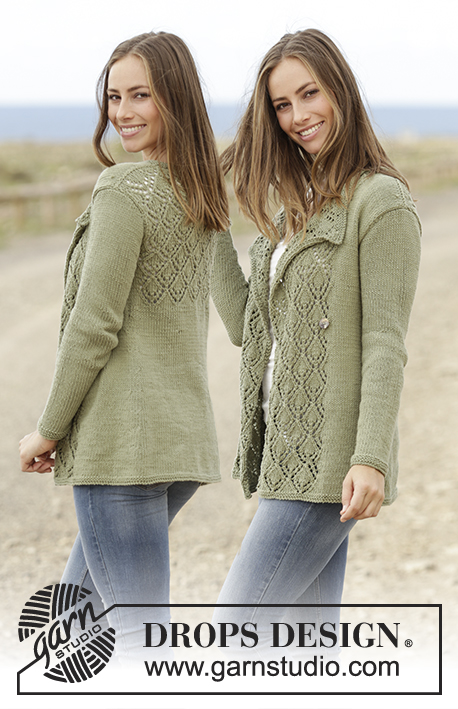
Top ai ferri con raglan e motivo traforato, lavorato dall’alto verso il basso (top down), in DROPS Muskat. Taglie: Dalla S alla XXXL.
DROPS 175-32 |
|||||||||||||
|
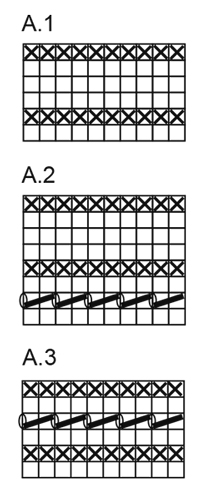
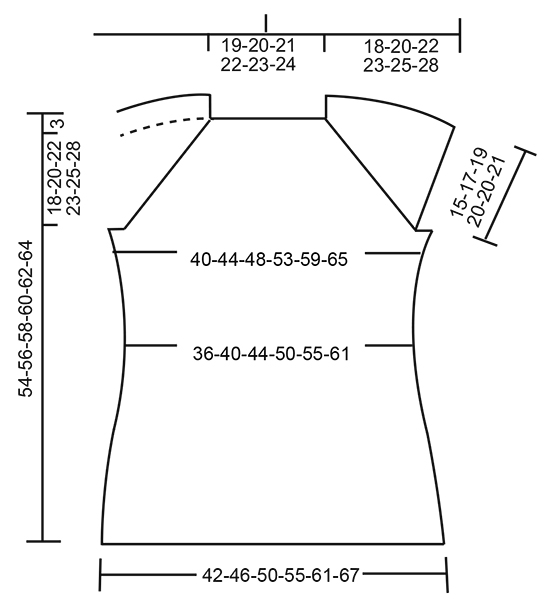
COSTE A LEGACCIO/PUNTO LEGACCIO (in tondo): 1 costa a legaccio = 2 giri Lavorare 1 giro a diritto e 1 giro a rov. MOTIVO: Vedere i diagrammi A.1, A.2 e A.3. I diagrammi mostrano tutti i ferri del motivo, visti sul diritto del lavoro. RAGLAN: Aumentare ogni 2 giri come segue: Aumentare come segue prima del segno: Iniziare 1 maglia prima del segno: fare 1 maglia gettata, 1 maglia a diritto, segno. Aumentare come segue dopo il segno: segno, lavorare 1 maglia a diritto, fare 1 maglia gettata. Nel corso del giro successivo, lavorare le maglie gettate a dir; si devono formare i buchi. Aumentare ogni 4 giri come segue: Aumentare come segue prima del segno: GIRO 1: Iniziare 1 maglia prima del segno: fare 1 maglia gettata, 1 maglia a diritto, segno. GIRO 2: lavorare le maglie gettate a diritto, si devono formare dei buchi GIRO 3: Iniziare 3 maglie prima del segno: lavorare 2 maglie insieme a diritto, fare 1 maglia gettata, 1 maglia a diritto, segno. Non ci sono aumenti, ma il motivo traforato continua come prima. GIRO 4: lavorare le maglie gettate a diritto, si devono formare dei buchi. Aumentare come segue dopo il segno: GIRO 1: segno, 1 maglia a diritto, fare 1 maglia gettata. GIRO 2: lavorare le maglie gettate a diritto, si devono formare dei buchi . GIRO 3: segno, 1 maglia a diritto, 1 maglia gettata, passare 1 maglia a diritto senza lavorarla, 1 maglia a diritto, accavallare la maglia passata sulla maglia lavorata. Non ci sono aumenti, ma il motivo traforato continua come prima. GIRO 4: lavorare le maglie gettate a diritto; si devono formare dei buchi SUGGERIMENTO PER LE DIMINUZIONI: Iniziare 3 maglie prima del segno: lavorare 2 maglie insieme a diritto, 2 maglie diritto (il segno si trova al centro di queste 2 maglie), passare 1 maglia a diritto senza lavorarla, 1 maglia a diritto, accavallare la maglia passata sulla maglia lavorata = 2 maglie diminuite. SUGGERIMENTI PER GLI AUMENTI: Lavorare finché non rimane 1 maglia prima del segno. Fare 1 maglia gettata, lavorare 2 maglie diritto (il segno si trova al centro di queste 2 maglie), 1 maglia gettata. Al giro successivo, lavorare le maglie gettate a diritto ritorto per evitare che si formino i buchi (lavorare le maglie aumentate a maglia rasata). --------------------------------------------------------- TOP: Si lavora in tondo, sui ferri circolari a partire dal centro, sul dietro, dall’alto verso il basso. SPRONE: Avviare 80-84-88-92-96-100 maglie sui ferri circolari n° 4 con il filato Muskat. Lavorare 2 COSTE A LEGACCIO – vedere le spiegazioni sopra; sull’ ultimo giro delle coste a legaccio aumentare 20 maglie a intervalli regolari = 100-104-108-112-116-120 maglie. Inserire 4 segni nel lavoro come segue: il primo segno dopo 19-20-21-22-23-24 maglie (= metà dietro), il secondo segno dopo 12 maglie (= manica), il terzo segno dopo 38-40-42-44-46-48 maglie (= davanti), il quarto segno dopo 12 maglie (= manica); dopo l’ ultimo segno ci sono 19-20-21-22-23-24 maglie (= metà dietro). Iniziare ad aumentare per il raglan come indicato sopra, lavorare a maglia rasata le maglie del dietro e del davanti e lavorare il diagramma A.1 sulle maniche. LEGGERE TUTTE LE INDICAZIONI SUCCESSIVE PRIMA DI PROSEGUIRE! Gli aumenti hanno una frequenza diversa sul davanti /dietro e sulle maniche; aumentare come segue: DAVANTI /DIETRO: Aumentare ogni 2 giri 12-15-17-25-30-35 volte, poi ogni 4 giri 7-7-7-4-3-2 volte. MANICHE: Aumentare ogni 2 giri 18-23-27-29-26-25 volte, poi ogni 4 giri 4-3-2-2-5-7 volte. Dopo aver lavorato il diagramma A.1 1 volta in verticale, ripetere il diagramma A.2 in verticale. Lavorare le maglie aumentate delle maniche seguendo il motivo man mano che si procede con il lavoro. Dopo il penultimo aumento sulle maniche (rimangono ancora 4 giri), lavorare le maglie delle maniche a punto legaccio, e continuare a lavorare a maglia rasata come prima le maglie del davanti /dietro. RICORDARSI DI MANTENERE LA CORRETTA TENSIONE DEL LAVORO! Terminati gli aumenti per il raglan, ci sono 264-296-320-352-372-396 maglie. Lavorare il giro successivo come segue: Lavorare 38-42-45-51-56-61 maglie (= metà dietro), intrecciare le 56-64-70-74-74-76 maglie successive, lavorare le 76-84-90-102-112-122 maglie successive (= davanti), intrecciare le 56-64-70-74-74-76 maglie successive, lavorare le ultime 38-42-45-51-56-61 maglie (= metà dietro). DAVANTI E DIETRO: Continuare come segue: lavorare la metà del dietro, avviare 8-8-10-10-12-14 nuove maglie, lavorare il davanti, avviare 8-8-10-10-12-14 nuove maglie, lavorare la metà del dietro. Ci sono ora 168-184-200-224-248-272 maglie per il davanti e il dietro. Inserire un segno da ciascun lato, al centro delle nuove maglie avviate. DA ADESSO IN AVANTI MISURARE IL LAVORO DA QUI. Continuare a maglia rasata, ma sulle 8-8-10-10-12-14 nuove maglie ai lati, lavorare 2 coste a legaccio. Lavorare poi tutte le maglie a maglia rasata. Quando il lavoro misura 4 cm, diminuire 1 maglia da ciascun lato di ogni segno (= 4 maglie diminuite), diminuire ogni 3 cm in tutto 4 volte – VEDERE IL SUGGERIMENTO PER LE DIMINUZIONI = 152-168-184-208-232-256 maglie. Quando il lavoro misura 19-19-19-18-18-19 cm, aumentare 1 maglia da ciascun lato di ogni segno (= 4 maglie aumentate), aumentare ogni 2 cm in tutto 6 volte – VEDERE IL SUGGERIMENTO PER GLI AUMENTI = 176-192-208-232-256-280 maglie. Quando il lavoro misura 32-32-32-33-33-32 cm, lavorare il diagramma A.3 su tutte le maglie. Poi intrecciare lavorando le maglie a diritto; il lavoro misura ca.54-56-58-60-62-64 cm dalla spalla. |
|||||||||||||
Spiegazioni del diagramma |
|||||||||||||
|
|||||||||||||
 |
|||||||||||||
 |
|||||||||||||
Avete terminato questo modello?Allora taggate le vostre foto con #dropspattern #petronellatop o inviatele alla #dropsfan gallery. Avete bisogno di aiuto con questo modello?Troverete 24 video tutorial, una sezione per i commenti/domande e molto altro guardando il modello su www.garnstudio.com © 1982-2026 DROPS Design A/S. Ci riserviamo tutti i diritti. Questo documento, compreso tutte le sue sotto-sezioni, è protetto dalle leggi sul copyright. Potete leggere quello che potete fare con i nostri modelli alla fine di ogni modello sul nostro sito. |
|||||||||||||


Con oltre 40 anni di esperienza nel design di modelli di maglia e uncinetto, DROPS Design offre la più estesa collezione di modelli gratuiti su internet - tradotti in 17 lingue. Ad oggi vi possiamo fornire 324 cataloghi e 12290 modelli - 9561 dei quali sono tradotti in Italiano.
Ci stiamo impegnando molto per darvi il meglio che vi possiamo offrire in termini di maglia e uncinetto, ispirazioni e consigli così come filati di grande qualità ad un prezzo incredibile! Volete utilizzare i nostri modelli per qualcosa d'altro oltre al vostro uso personale? Potete leggere tutto ciò che è consentito nel testo sul Copyright in basso su tutte le pagine dei nostri modelli. Buon lavoro!
Lasciare un commento sul modello DROPS 175-32
Noi saremmo felici di ricevere i tuoi commenti e opinioni su questo modello!
Se vuoi fare una domanda, fai per favore attenzione a selezionare la categoria corretta nella casella qui sotto per velocizzare il processo di risposta. I campi richiesti sono indicati da *.