
Categorie popolari
State cercando un filato?


Commenti / Domande (99)
![]() Catriona Graham ha scritto:
Catriona Graham ha scritto:
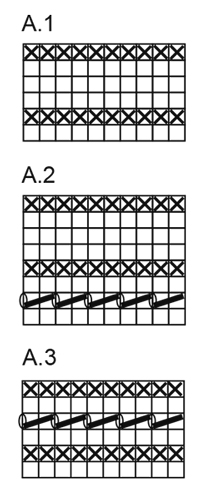
Thank you for your reply. I love Drops patterns, getting brilliant results but think some things do get lost in translation! Where A3 fits in is not explained anywhere in the pattern though perhaps it is a convention well understood in Norway so can I confirm the sleeve pattern? The yoke has a total of 52 rows, and I have tried to work out how that translates into the A1/A2/A3 pattern. Is A2 the repeat one? A1, A2x5,A3?
12.06.2020 - 14:03DROPS Design ha risposto:
Dear Mrs Graham, A.3(= 6 rows) is worked at the very end of body see: When the piece measures 32-32-32-33-33-32 cm work A.3 across all stitches. Then cast off ... - diagrams A.1 and A.2 are worked on yoke: you first work A.1 (= 6 rows), then repeat A.2 (=8 rows) while increasing for raglan as explained in the writte pattern (see RAGLAN)- read more here about diagrams. Happy knitting!
12.06.2020 - 15:12
![]() Catriona ha scritto:
Catriona ha scritto:
I am not clear about the sleeves. The diagram shows A1, A2 and A3 but there is no mention of A3 though it implies there are 6 rounds. Is the sequence A1, A2, A3, A1, A2, A3?
12.06.2020 - 10:36DROPS Design ha risposto:
Dear Catriona, A.3 is worked at the very end of the body, just before casting off the stitches. Happy knitting!
12.06.2020 - 12:24
![]() Bente Arlo Schønemann ha scritto:
Bente Arlo Schønemann ha scritto:
Jeg sliter også med å forstå økningene på erm/bol. Raglan er jo 4 ganger(8) mellom bol og ermer. Armene er jo mellom forstykket og bakstykket. Kommer dette i tillegg til raglanfellingen?
11.06.2020 - 20:35DROPS Design ha risposto:
Hei Bente. Denne toppen strikkes ovenfra og ned, (raglansøkninger, ikke fellinger). Det økes forskjellig på for-bakstykket og på ermene. For-bakstykket økes det på hver 2.omgang 12-15-17-25-30-35 ganger, deretter på hver 4.omgang 7-7-7-4-3-2 ganger. På ermene økes det (samtidig som for-bakstykket) på hver 2.omgang 18-23-27-29-26-25 ganger, deretter på hver 4.omgang 4-3-2-2-5-7 ganger. I str S vil man øke til både for-bakstykke og ermene på hver 2. omgang 12 ganger, deretter på for-bakstykke øke på hver 4. omgang 7 ganger, samtidig som det ved ermene fortsettes å økes på 2. omgang 6 ganger og deretter på hver 4. omgang 4 ganger. God Fornøyelse!
15.06.2020 - 10:26
![]() Fabienne ha scritto:
Fabienne ha scritto:
Rebonjour, j'ai bien avancé mais j'ai besoin d'une confirmation. Est-ce juste qu'après avoir augmenté 15x tous les 2 tours sur le dos/devant, on ne le fait plus et donc on a plus les trous du raglan sur le dos/devant alors que l'on continue sur les manches encore 8x ? (Ça ne se voit pas sur l'image!) Taille M
16.05.2020 - 15:40DROPS Design ha risposto:
Bonjour Fabienne, vous devez avoir des trous tous les 2 tours comme avant - quand vous commencez à diminuer tous les 4 tours, tricotez comme indiqué sous Augmenter tous les 4 tours ainsi: ... avant le fil marqueur... après le fil marqueur. En tricotant les 4 tours décrits, vous augmentez au 1er tour, et au 3ème tour, vous tricotez le motif ajouré (= 1 jeté et 1 diminution pour compenser le jeté). Bon tricot!
18.05.2020 - 08:01
![]() Fabienne ha scritto:
Fabienne ha scritto:
Bonjour, je vois que pas mal de questions sont au sujet du raglan et des manches. J'ai déjà lu les réponses mais j'ai encore besoin d'une précision. Quand on commence le raglan doit-on faire successivement les augmentations des 2 tours puis ceux des 4 tours ou tous les 4 tours on additionne les augmentations. Dit autrement, est-ce que le Tour 1 correspond à l'augmentation faite tous les deux tours ? J'espère me faire comprendre ;-)
12.05.2020 - 13:58DROPS Design ha risposto:
Bonjour Fabienne, les augmentations du dos/du devant et des manches se font en même temps mais à un rythme différent, autrement dit vous allez d'abord augmenter 8 mailles tous les 2 tours (dos, devant et manches), puis soit 4 mailles (manches seulement ou dos/devant seulement en fonction de la taille) soit 8 mailles (partout). Vous augmentez donc d'abord tous les 2 tours, puis tous les 4 tours. En espérant répondre à votre question. Bon tricot!
12.05.2020 - 14:28
![]() Linda Medhus ha scritto:
Linda Medhus ha scritto:
Just below the raglan info there are 2 paragraphs. Increase every 4 round as follows: and Increase as follows, after the marker thread: Is the 1st paragraph for the body and the 2nd paragraph for the sleeve?
02.05.2020 - 22:55DROPS Design ha risposto:
Dear Mrs Medhus, these both p aragraphs apply to the increases, first it explains how to increase for raglan on every other round, then how to increase for raglan on every 4th round before the marker thread, then how to increase on 4th round after the marker thread. You will increase for body and sleeve first on every other round then on every 4th round. You will increase on each piece (front, back and sleeves) first after the marker (raglan) then before the marker (next raglan). Happy knitting!
04.05.2020 - 12:28
![]() María José Ayala ha scritto:
María José Ayala ha scritto:
Porfavor si pudieran contestar la última pregunta 🙏🙏🙏 Muchas gracias
08.02.2020 - 18:34
![]() María José ha scritto:
María José ha scritto:
Buen día, después de aumentar cada dos vueltas 12 veces (talla s) en delantero espalda sigo aumentando solo en mangas por 6 veces más, y luego cuando termine estos aumentos en mangas comienzo simultáneamente aumentando cada 4 vueltas? O cuando termine de hacer los aumentos cada dos vueltas de espalda /delantero comienzo inmediatamente cada 4 vueltas? En la foto el raglán no deja de tener agujeros, y si no sigo con los aumentos no quedarán agujeros Muchas gracias
04.02.2020 - 12:03DROPS Design ha risposto:
Hola Maria Jose. Los aumentos en el raglán se trabajan sin interrupciones, es decir, cuando termines de aumentar cada 2ª vuelta, continuamos aumentando en cada 4ª vuelta. Los aumentos en el cuerpo y en las mangas se trabajan diferente, no se trabajan simultáneamente. La linea de raglán no se interrumpe en ningún momento.
09.02.2020 - 19:26
![]() María José ha scritto:
María José ha scritto:
En el diagrama A.1 las líneas horizontales representan las vueltas 2,4,6,8 .. etc o es vuelta 1,2,3,4,5,6 ...y terminado A.1 realizar A.2 y luego repetir A.1 y así sucesivamente?
24.01.2020 - 23:23DROPS Design ha risposto:
Hola María Jose. El diagrama representa todas las filas del patrón vistas por el lado derecho, es decir la fila 1 (= lado derecho) se lee de derecho a izquierda y se trabaja como se presentan los puntos, la fila 2 (= lado revés) se lee de izquierda a derecho y los puntos se trabajan al contrario de lo que ves ( si ves un derecho debes trabajar un revés).
26.01.2020 - 21:02
![]() María José Ayala ha scritto:
María José Ayala ha scritto:
En raglán dice aumentar en 2 da vuelta, y luego en 4ta vuelta, no entiendo como contar las vueltas para hacer raglán, si luego se va repitiendo, o se hace solo una vez, la verdad me confunde un poco las vueltas El delantero/espalda aumentar 12 veces y cada 4 vueltas 7 veces? Soy talla s , porfavor si pudieran explicarme mejor el tema de las vueltas. Gracias
19.01.2020 - 15:58DROPS Design ha risposto:
Hola Maria José. Los aumentos para el raglán se trabajan como sigue: aumentar cada 2ª vuelta ( es decir, trabajar una vuelta sin aumentos y la siguiente con aumentos) y repetir para la talla S 18 veces en las mangas y 12 veces en el cuerpo (delantero/espalda), después cada 4ª vuelta ( es decir, 3 vueltas sin aumentos y 1 vuelta con aumentos) las veces indicada según el patrón y la talla.
19.01.2020 - 23:36
|
|||||||||||||
Petronella Top#petronellatop |
|||||||||||||
|
|
|||||||||||||
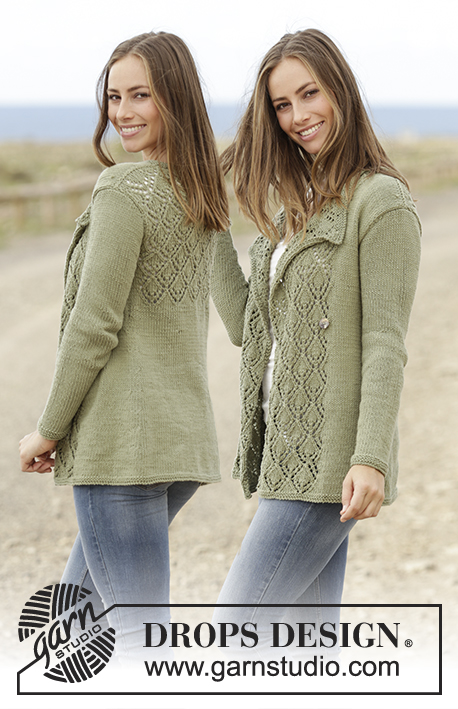
Top ai ferri con raglan e motivo traforato, lavorato dall’alto verso il basso (top down), in DROPS Muskat. Taglie: Dalla S alla XXXL.
DROPS 175-32 |
|||||||||||||
|
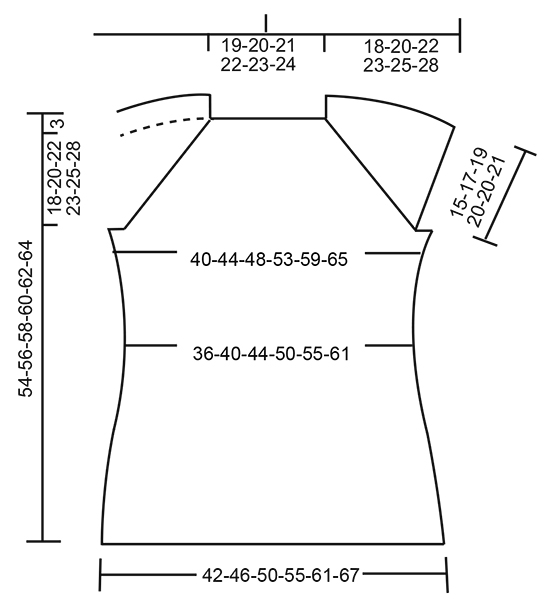
COSTE A LEGACCIO/PUNTO LEGACCIO (in tondo): 1 costa a legaccio = 2 giri Lavorare 1 giro a diritto e 1 giro a rov. MOTIVO: Vedere i diagrammi A.1, A.2 e A.3. I diagrammi mostrano tutti i ferri del motivo, visti sul diritto del lavoro. RAGLAN: Aumentare ogni 2 giri come segue: Aumentare come segue prima del segno: Iniziare 1 maglia prima del segno: fare 1 maglia gettata, 1 maglia a diritto, segno. Aumentare come segue dopo il segno: segno, lavorare 1 maglia a diritto, fare 1 maglia gettata. Nel corso del giro successivo, lavorare le maglie gettate a dir; si devono formare i buchi. Aumentare ogni 4 giri come segue: Aumentare come segue prima del segno: GIRO 1: Iniziare 1 maglia prima del segno: fare 1 maglia gettata, 1 maglia a diritto, segno. GIRO 2: lavorare le maglie gettate a diritto, si devono formare dei buchi GIRO 3: Iniziare 3 maglie prima del segno: lavorare 2 maglie insieme a diritto, fare 1 maglia gettata, 1 maglia a diritto, segno. Non ci sono aumenti, ma il motivo traforato continua come prima. GIRO 4: lavorare le maglie gettate a diritto, si devono formare dei buchi. Aumentare come segue dopo il segno: GIRO 1: segno, 1 maglia a diritto, fare 1 maglia gettata. GIRO 2: lavorare le maglie gettate a diritto, si devono formare dei buchi . GIRO 3: segno, 1 maglia a diritto, 1 maglia gettata, passare 1 maglia a diritto senza lavorarla, 1 maglia a diritto, accavallare la maglia passata sulla maglia lavorata. Non ci sono aumenti, ma il motivo traforato continua come prima. GIRO 4: lavorare le maglie gettate a diritto; si devono formare dei buchi SUGGERIMENTO PER LE DIMINUZIONI: Iniziare 3 maglie prima del segno: lavorare 2 maglie insieme a diritto, 2 maglie diritto (il segno si trova al centro di queste 2 maglie), passare 1 maglia a diritto senza lavorarla, 1 maglia a diritto, accavallare la maglia passata sulla maglia lavorata = 2 maglie diminuite. SUGGERIMENTI PER GLI AUMENTI: Lavorare finché non rimane 1 maglia prima del segno. Fare 1 maglia gettata, lavorare 2 maglie diritto (il segno si trova al centro di queste 2 maglie), 1 maglia gettata. Al giro successivo, lavorare le maglie gettate a diritto ritorto per evitare che si formino i buchi (lavorare le maglie aumentate a maglia rasata). --------------------------------------------------------- TOP: Si lavora in tondo, sui ferri circolari a partire dal centro, sul dietro, dall’alto verso il basso. SPRONE: Avviare 80-84-88-92-96-100 maglie sui ferri circolari n° 4 con il filato Muskat. Lavorare 2 COSTE A LEGACCIO – vedere le spiegazioni sopra; sull’ ultimo giro delle coste a legaccio aumentare 20 maglie a intervalli regolari = 100-104-108-112-116-120 maglie. Inserire 4 segni nel lavoro come segue: il primo segno dopo 19-20-21-22-23-24 maglie (= metà dietro), il secondo segno dopo 12 maglie (= manica), il terzo segno dopo 38-40-42-44-46-48 maglie (= davanti), il quarto segno dopo 12 maglie (= manica); dopo l’ ultimo segno ci sono 19-20-21-22-23-24 maglie (= metà dietro). Iniziare ad aumentare per il raglan come indicato sopra, lavorare a maglia rasata le maglie del dietro e del davanti e lavorare il diagramma A.1 sulle maniche. LEGGERE TUTTE LE INDICAZIONI SUCCESSIVE PRIMA DI PROSEGUIRE! Gli aumenti hanno una frequenza diversa sul davanti /dietro e sulle maniche; aumentare come segue: DAVANTI /DIETRO: Aumentare ogni 2 giri 12-15-17-25-30-35 volte, poi ogni 4 giri 7-7-7-4-3-2 volte. MANICHE: Aumentare ogni 2 giri 18-23-27-29-26-25 volte, poi ogni 4 giri 4-3-2-2-5-7 volte. Dopo aver lavorato il diagramma A.1 1 volta in verticale, ripetere il diagramma A.2 in verticale. Lavorare le maglie aumentate delle maniche seguendo il motivo man mano che si procede con il lavoro. Dopo il penultimo aumento sulle maniche (rimangono ancora 4 giri), lavorare le maglie delle maniche a punto legaccio, e continuare a lavorare a maglia rasata come prima le maglie del davanti /dietro. RICORDARSI DI MANTENERE LA CORRETTA TENSIONE DEL LAVORO! Terminati gli aumenti per il raglan, ci sono 264-296-320-352-372-396 maglie. Lavorare il giro successivo come segue: Lavorare 38-42-45-51-56-61 maglie (= metà dietro), intrecciare le 56-64-70-74-74-76 maglie successive, lavorare le 76-84-90-102-112-122 maglie successive (= davanti), intrecciare le 56-64-70-74-74-76 maglie successive, lavorare le ultime 38-42-45-51-56-61 maglie (= metà dietro). DAVANTI E DIETRO: Continuare come segue: lavorare la metà del dietro, avviare 8-8-10-10-12-14 nuove maglie, lavorare il davanti, avviare 8-8-10-10-12-14 nuove maglie, lavorare la metà del dietro. Ci sono ora 168-184-200-224-248-272 maglie per il davanti e il dietro. Inserire un segno da ciascun lato, al centro delle nuove maglie avviate. DA ADESSO IN AVANTI MISURARE IL LAVORO DA QUI. Continuare a maglia rasata, ma sulle 8-8-10-10-12-14 nuove maglie ai lati, lavorare 2 coste a legaccio. Lavorare poi tutte le maglie a maglia rasata. Quando il lavoro misura 4 cm, diminuire 1 maglia da ciascun lato di ogni segno (= 4 maglie diminuite), diminuire ogni 3 cm in tutto 4 volte – VEDERE IL SUGGERIMENTO PER LE DIMINUZIONI = 152-168-184-208-232-256 maglie. Quando il lavoro misura 19-19-19-18-18-19 cm, aumentare 1 maglia da ciascun lato di ogni segno (= 4 maglie aumentate), aumentare ogni 2 cm in tutto 6 volte – VEDERE IL SUGGERIMENTO PER GLI AUMENTI = 176-192-208-232-256-280 maglie. Quando il lavoro misura 32-32-32-33-33-32 cm, lavorare il diagramma A.3 su tutte le maglie. Poi intrecciare lavorando le maglie a diritto; il lavoro misura ca.54-56-58-60-62-64 cm dalla spalla. |
|||||||||||||
Spiegazioni del diagramma |
|||||||||||||
|
|||||||||||||
 |
|||||||||||||
 |
|||||||||||||
Avete terminato questo modello?Allora taggate le vostre foto con #dropspattern #petronellatop o inviatele alla #dropsfan gallery. Avete bisogno di aiuto con questo modello?Troverete 24 video tutorial, una sezione per i commenti/domande e molto altro guardando il modello su www.garnstudio.com © 1982-2026 DROPS Design A/S. Ci riserviamo tutti i diritti. Questo documento, compreso tutte le sue sotto-sezioni, è protetto dalle leggi sul copyright. Potete leggere quello che potete fare con i nostri modelli alla fine di ogni modello sul nostro sito. |
|||||||||||||


Con oltre 40 anni di esperienza nel design di modelli di maglia e uncinetto, DROPS Design offre la più estesa collezione di modelli gratuiti su internet - tradotti in 17 lingue. Ad oggi vi possiamo fornire 324 cataloghi e 12290 modelli - 9561 dei quali sono tradotti in Italiano.
Ci stiamo impegnando molto per darvi il meglio che vi possiamo offrire in termini di maglia e uncinetto, ispirazioni e consigli così come filati di grande qualità ad un prezzo incredibile! Volete utilizzare i nostri modelli per qualcosa d'altro oltre al vostro uso personale? Potete leggere tutto ciò che è consentito nel testo sul Copyright in basso su tutte le pagine dei nostri modelli. Buon lavoro!
Lasciare un commento sul modello DROPS 175-32
Noi saremmo felici di ricevere i tuoi commenti e opinioni su questo modello!
Se vuoi fare una domanda, fai per favore attenzione a selezionare la categoria corretta nella casella qui sotto per velocizzare il processo di risposta. I campi richiesti sono indicati da *.