
Categorie popolari
State cercando un filato?


Commenti / Domande (258)
![]() Mme Ladour ha scritto:
Mme Ladour ha scritto:
Merci gentillement
22.01.2022 - 22:10
![]() Ladour ha scritto:
Ladour ha scritto:
Je ne comprends pas en aller et en retour svp est-ce-que je continue en rond ou je doits tpourner en arrie r merci
17.01.2022 - 18:31DROPS Design ha risposto:
Bonjour Mme Ladour, lorsque vous tricotez la réhausse, vous devez tricoter en rangs, autrement dit, vous tricotez maintenant alternativement sur l'endroit et sur l'envers (diminuez comme indiqué pour le raglan). Bon tricot!
18.01.2022 - 10:55
![]() Rose ha scritto:
Rose ha scritto:
I have done my first 4cm, and now the pattern asks I work in A.1 working the last two stitches and finishing with the first. Does this instruction refer to just the first line in the A.1 diagram please? Eg p1, k1(p2, k1)p1 for each round for 14cm (working L size)?
12.01.2022 - 19:35DROPS Design ha risposto:
Dear Rose, when working A.1, you will start every round the same way, ie start with the last 2 sts in A.1 ( alternately P1,K1 and K2) then repeat A.1 (alternately P2, K1) finishing the round with the last stitch in A.1 (= alternately P1, K1) - NB: alternately means here first round, then 2nd round and repeat these 2 rounds. Happy knitting!
13.01.2022 - 08:36
![]() Claude Yvonne GUERCHE ha scritto:
Claude Yvonne GUERCHE ha scritto:
Question : dans le modèle, après toutes les diminutions, on dit de tricoter les 78 premières mailles par exemple. De quel endroit du tricot part-on pour compter ces 78 mailles ??? et on dit "tricoter une ré-hausse pour l'encolure en allers et retours ... " je ne sais pas comment faire ! Merci de m'aider ....
06.01.2022 - 14:36DROPS Design ha risposto:
Bonjour Mme Guerche, vous partez du même début des tours comme avant, mais décalez maintenant le début de rangs de 78 mailles (pour la 3ème et 4ème taille). Autrement dit, quand toutes vos diminutions sont faites, tricotez encore les 78 premières mailles du tour, placez un marqueur et tricotez la réhausse tout simplement comme indiqué en tricotant alternativement sur l'endroit et sur l'envers et en diminuant pour le raglan (8 mailles à chaque fois: 2 m sur la manche droite + 4 mailles sur le dos (2 au début + 2 à la fin) + 2 mailles sur la manche gauche). Bon tricot!
06.01.2022 - 16:33
![]() Grädel Ursula ha scritto:
Grädel Ursula ha scritto:
Hallo, folgende Unklarheit möchte ich klären bevor ich die Raglanabnahmen beginne: ich habe folgendes verstanden (nachdem ich einige Rechnungen betreffend der bleibenden Maschen gemacht habe): - alle 2 Rd strickt man, vor und nach dem Muster A2, 2 M rechts zusammen (für den Rumpfteil) - alle 4 Rd strickt man, vor und nach dem Muster A2, 3 M rechts zusammen zur Erhöhung teilt man die Arbeit und strickt in Hin- und Rückrunden. Danke im voraus für ihre Hilfe.
26.12.2021 - 12:39DROPS Design ha risposto:
Liebe Frau Grädel, die Raglanabnahmen vor der Erhöhung werden wie unter RAGLANABNAHMEN: gestrickt, dh entweder mit 2 M re zs vor A.2 und/oder mit 1 M abheben, 1 M re, die abgehobene M überziehen nach A.2. Es wird jeweils entweder 8 Maschen (wenn man beim Vorder/Rückenteil + Ärmel abnimmt) oder nur 4 Maschen (bei den Ärmeln nimmt man zuerst in jeder 4. Reihe ab). Viel Spaß beim stricken!
03.01.2022 - 08:30
![]() Sandrine ha scritto:
Sandrine ha scritto:
Concernant le raglan. On perd 2 m par dim car on tricote 3 mailles ens. A chaque tour de dim on perdrait donc 8 m pour les diminutions dos & devant (2 dos gauche,2 d droit, 2 avant G et 2 av D) et 8 m pour les diminutions des manches. En taille S on part de 234 mailles. On doit faire 21 rgs de dim pour le raglan dos & devant soit 21X8=168 ms en moins et 15 rgs de dim manches soit 12X8=120 m en moins. On n'arrive pas à 90m! Ou alors il faut diminuer en tricotant 2 mailles ensemble et pas 3???
12.12.2021 - 01:20DROPS Design ha risposto:
Bonjour Sandrine, vous diminuez 21 fois pour le devant et autant pour le dos (soit 21 x 4 m = 84 m) et en même temps, vous diminuez pour les manches 15 fois (soit 15x4 m = 60m), il va donc vous rester: 234-84-60=90mailles. On diminue 1 m à chaque fois (2 pour le devant, 2 pour le dos, 2 pour chaque manche - cf RAGLAN). Bon tricot!
13.12.2021 - 09:29
![]() Roberta ha scritto:
Roberta ha scritto:
Grazie per la risposta, ma non mi tornano i conti per le diminuzioni che dovrebbero essere 8 ma poi nello specifico del suggerimento per le diminuzioni sull’alzaza dice 3 insieme a diritto ritorto + 3 che fa 6 e non 8. E poi: come si passa dalle 72 maglie a 55, come viene fuori 55? Complimenti! Siete un ottimo sito!
03.12.2021 - 08:42DROPS Design ha risposto:
Buonasera Roberta, non si diminuiscono le maglie da 72 a 55, ma si lavora solo su una parte delle maglie sul ferro, in questo caso deve lavorare su 55 maglie maglie (comprese quelle diminuite), poi girare il lavoro, lavorare su 45 maglie, girare il lavoro e così via. Buon lavoro!
06.12.2021 - 20:32
![]() Roberta ha scritto:
Roberta ha scritto:
Sono arrivata alla fine ma non capisco come si lavora l’alzata per lo scollo! Posso avere una spiegazione più chiara? Grazie
02.12.2021 - 22:22DROPS Design ha risposto:
Buonasera Roberta, per l'alzata deve lavorare sul numero di maglie indicato, poi girare il lavoro e proseguire come indicato. Buon lavoro!
03.12.2021 - 00:09
![]() Isabelle Defer ha scritto:
Isabelle Defer ha scritto:
Beste, kheb nu 96 steken en versta de uitleg aan geen kanten om de kraag af te werken. Kber eerst de 78, markeer en dan? Het is zeer verwarrend, grtjs
06.10.2021 - 16:23DROPS Design ha risposto:
Dag Isabelle,
Je breit eerst 78 steken en dan plaats je een markeerdraad. Vervolgens brei je gewoon verder met NLD 1: 58 steken. Dan keer je het werk en brei je 48 steken terug op de verkeerde kant. Je keert het werk opnieuw en breit 46 steken op de goede kant. Tot slot nog eens keren en 36 steken op de verkeerde kant breien. Daarnaast ga je ook verder met minderingen, dus op naald 1 en 3 van deze verkorte toeren maak je de minderingen.
07.10.2021 - 11:35
![]() Yasmin ha scritto:
Yasmin ha scritto:
Hi, ik had een vraagje over de maten van dit patroon. Hoe weet ik welke maat ik moet breien, er staat namelijk nergens afmetingen in cm voor de maten s-xxxl. Alvast bedankt!
07.09.2021 - 09:29DROPS Design ha risposto:
Dag Yasmin,
Het handigst is om een kledingstuk erbij te pakken die goed zit en daarmee de maten te vergelijken. Vaak is maat S ongeveer 34/36, maat M 38/40 etc.
12.09.2021 - 18:00
|
|||||||
Twin River#twinriversweater |
|||||||
 |
 |
||||||
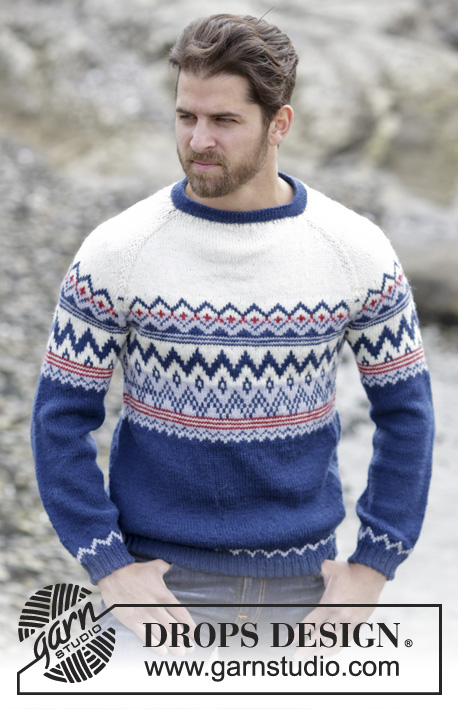
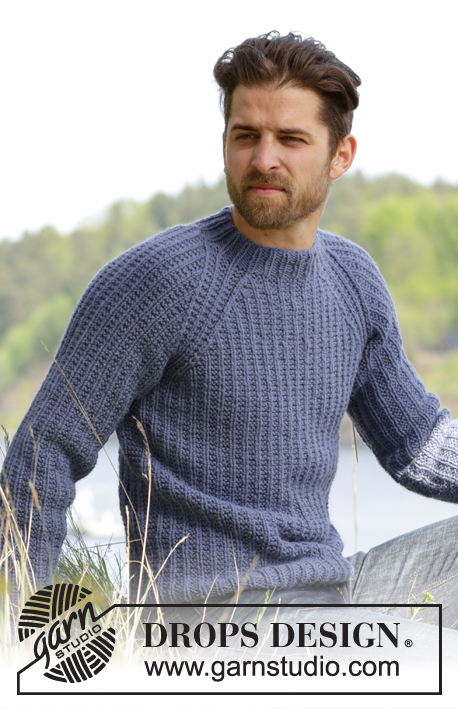
Maglione DROPS per uomo ai ferri con motivo a punto fantasia e raglan in Nepal. Taglie: Dalla S alla XXXL.
DROPS 174-14 |
|||||||
|
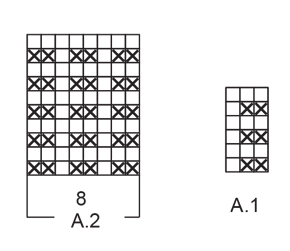
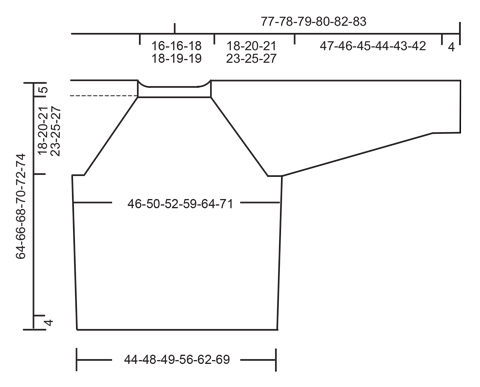
MOTIVO: Vedere i diagrammi A.1 e A.2. RAGLAN: Diminuire come segue prima del diagramma A.2: lavorare finché non rimangono 2 m prima del diagramma A.2, lavorare le 2 m successive insieme a dir. Diminuire come segue dopo il diagramma A.2: passare 1 m a dir senza lavorarla, 1 m dir, accavallare la m passata sulla m lavorata. SUGGERIMENTO PER GLI AUMENTI (sul davanti e dietro): Aumentare 4 m come segue: Lavorare finché non rimane 1 m prima del segno sul lato, 1 m gettata, lavorare 2 m a punto legaccio, 1 m gettata (= 2 m aumentate). Ripetere questi aumenti sull’altro lato del lavoro. Al giro successivo, lavorare le m gettate ritorte (nel filo dietro e non in quello davanti) per evitare che si formino dei buchi. Lavorare le nuove m a punto legaccio. SUGGERIMENTO PER GLI AUMENTI (per le maniche): Aumentare come segue al centro, sotto la manica: Lavorare finché non rimane 1 m prima del segno, 1 m gettata, lavorare 2 m a punto legaccio, 1 m gettata. Al giro successivo, lavorare le m gettate ritorte per evitare che si formino dei buchi. Lavorare le m aumentate seguendo il motivo. ATTENZIONE: Lavorare la m prima e quella dopo il segno a punto legaccio (= 2 m a punto legaccio al centro, sotto la manica). DIMINUZIONI PER IL RAGLAN (per l’alzata): Diminuire sempre sul diritto del lavoro! Diminuire come segue dopo il diagramma A.2: lavorare 3 m insieme a dir ritorto (= nel filo dietro delle m e non in quello davanti). Diminuire come segue prima del diagramma A.2: Lavorare finché non 3 m rimangono prima del diagramma A.2, 3 m insieme a dir. ---------------------------------------------------------- MAGLIONE: Si lavora in tondo. DAVANTI e DIETRO: Avviare 150-162-168-192-210-234 m con il filato Nepal sui ferri circolari n° 5. Lavorare * 1 m rov, (1 m dir, 2 m rov), ripetere da (-) altre 23-25-26-30-33-37 volte, 1 m dir, 1 m rov, inserire un segno qui (= lato) *, ripetere da *-* ancora 1 volta. ATTENZIONE: Spostare i segni verso l’alto man mano che si procede con il lavoro. Proseguire a coste in tondo in questo modo finché il lavoro non misura 4 cm. Lavorare ora il diagramma A.1 come segue: Lavorare le ultime 2 m del diagramma A.1, poi ripetere il diagramma A.1 su tutto il giro finché non rimane 1 m, lavorare questa m come indicato per la prima m del diagramma A.1. RICORDARSI DI MANTENERE LA CORRETTA TENSIONE DEL LAVORO ! Quando il lavoro misura 13-13-14-14-15-15 cm, aumentare 1 m da ciascun lato di ogni segno – vedere il SUGGERIMENTO PER GLI AUMENTI (sul davanti e dietro). Ripetere questi aumenti quando il lavoro misura 27-28-29-29-30-30 cm = 158-170-176-200-218-242 m. Quando il lavoro misura 41-41-42-42-42-42 cm (assicurarsi che il giro successivo da lavorare sia un giro 2 del diagramma A.1), intrecciare le m per gli scalfi come segue: Intrecciare le prime 5 m del giro, lavorare le 69-75-78-90-99-111 m successive, intrecciare le 10 m successive per lo scalfo, lavorare le 69-75-78-90-99-111 m successive, intrecciare le rimanenti 5 m. Tagliare il filo. Lasciare il lavoro in sospeso e proseguire con le maniche. MANICHE: Lavorare le maniche in tondo sui ferri a doppia punta. Avviare 42-42-42-48-48-48 m con il filato Nepal sui ferri a doppia punta n° 5. Inserire un segno all’inizio del giro = centro, sotto la manica. Lavorare a coste, come segue: 1 m rov, 1 m dir, * 2 m rov, 1 m dir *, ripetere da *-* finché non rimane 1 m sul giro, 1 m rov. Proseguire in questo modo in tondo finché le coste non misurano 4 cm. Lavorare ora il motivo come segue: Lavorare le ultime 2 m del diagramma A.1, ripetere il diagramma A.1 finché non rimane 1 m sul giro, lavorare questa m come indicato per la prima m del diagramma A.1. Quando il lavoro misura 9-8-7-6-10-9 cm, aumentare 1 m da ciascun lato del segno – vedere il SUGGERIMENTO PER GLI AUMENTI (per le maniche). Aumentare in questo modo ca. ogni 13-9-7-7-6-5 giri 8-11-14-14-14-17 volte in tutto = 58-64-70-76-76-82 m. Quando il lavoro misura 51-50-49-48-47-46 cm - assicurarsi che il giro successivo da lavorare sia un giro 2 del diagramma A.1, intrecciare le 10 m centrali sotto la manica (= intrecciare quindi le 5 m che precedono e le 5 m che seguono il segno) = 48-54-60-66-66-72 m. Lavorare la seconda manica in modo uguale. SPRONE: Trasferire (senza lavorarle) le m delle maniche sullo stesso ferro circolare n° 5 usato per lavorare il dietro e il davanti, nel punto in cui sono state intrecciate le m per gli scalfi = 234-258-276-312-330-366 m. Inserire un segno in corrispondenza di ogni passaggio tra le maniche ed il davanti/dietro = 4 segni. Iniziare il giro sul dietro, 4 m dopo il segno tra la manica e il dietro. Proseguire ora con il motivo come prima e lavorare inoltre il diagramma A.2 (= 8 m) in corrispondenza di ogni passaggio tra il davanti/dietro e le maniche (i segni sono al centro del diagramma A.2). Al giro successivo, iniziare a diminuire per il RAGLAN – vedere le spiegazioni sopra ! ATTENZIONE: Diminuire in modo diverso sul davanti / dietro e sulle maniche come segue: RAGLAN sul DAVANTI E DIETRO: Diminuire ogni 2 giri 21-24-24-24-26-26 volte e ad ogni giro 0-0-0-6-7-13 volte (= 21-24-24-30-33-39 volte in tutto). RAGLAN sulle MANICHE: Diminuire ogni 4 giri 6-6-4-3-5-5 volte e ogni 2 giri 9-12-17-21-19-22 volte (= 15-18-21-24-24-27 volte in tutto). Terminate tutte le diminuzioni, sul giro rimangono 90-90-96-96-102-102 m (= in tutto sono state diminuite 144-168-180-216-228-264 m). Lavorare ora il motivo come prima sulle prime 72-72-78-78-84-84 m, inserire un segno qui (= tra il diagramma A.2 e la manica destra). Lavorare ora un’alzata per lo scollo, avanti e indietro, seguendo il motivo come prima e, ALLO STESSO TEMPO, diminuire per il RAGLAN ad ogni ferro sul diritto del lavoro sulle m lavorate – VEDERE DIMINUZIONI PER IL RAGLAN (PER L’ALZATA) come segue: ATTENZIONE: Stringere il filo ogni volta che si gira il lavoro per evitare che si formi un buco. FERRO 1 (= diritto del lavoro): Lavorare 55-55-58-58-61-61 m (comprese le 8 m da diminuire), FERRO 2 (= rovescio del lavoro): Girare e lavorare 45-45-48-48-51-51 m, FERRO 3: Girare e lavorare 43-43-46-46-49-49 m (comprese le 8 m da diminuire), FERRO 4: Girare e lavorare 33-33-36-36-39-39 m. Ci sono ora in tutto 74-74-80-80-86-86 m. Girare e proseguire in tondo a coste come segue: Lavorare a dir le m dir e a rov le m a punto legaccio finché le coste non misurano 4 cm. Intrecciare le m lavorando a dir le m dir e a rov le m rov. Il maglione misura 64-66-68-70-72-74 cm dal ferro di avvio delle m fino alla spalla. Tagliare il filo. CONFEZIONE: Cucire le aperture sotto le maniche. |
|||||||
Spiegazioni del diagramma |
|||||||
|
|||||||
 |
|||||||
 |
|||||||
Avete terminato questo modello?Allora taggate le vostre foto con #dropspattern #twinriversweater o inviatele alla #dropsfan gallery. Avete bisogno di aiuto con questo modello?Troverete 25 video tutorial, una sezione per i commenti/domande e molto altro guardando il modello su www.garnstudio.com © 1982-2026 DROPS Design A/S. Ci riserviamo tutti i diritti. Questo documento, compreso tutte le sue sotto-sezioni, è protetto dalle leggi sul copyright. Potete leggere quello che potete fare con i nostri modelli alla fine di ogni modello sul nostro sito. |
|||||||


Con oltre 40 anni di esperienza nel design di modelli di maglia e uncinetto, DROPS Design offre la più estesa collezione di modelli gratuiti su internet - tradotti in 17 lingue. Ad oggi vi possiamo fornire 324 cataloghi e 12245 modelli - 9515 dei quali sono tradotti in Italiano.
Ci stiamo impegnando molto per darvi il meglio che vi possiamo offrire in termini di maglia e uncinetto, ispirazioni e consigli così come filati di grande qualità ad un prezzo incredibile! Volete utilizzare i nostri modelli per qualcosa d'altro oltre al vostro uso personale? Potete leggere tutto ciò che è consentito nel testo sul Copyright in basso su tutte le pagine dei nostri modelli. Buon lavoro!
Lasciare un commento sul modello DROPS 174-14
Noi saremmo felici di ricevere i tuoi commenti e opinioni su questo modello!
Se vuoi fare una domanda, fai per favore attenzione a selezionare la categoria corretta nella casella qui sotto per velocizzare il processo di risposta. I campi richiesti sono indicati da *.