
Categorie popolari
State cercando un filato?


Commenti / Domande (84)
![]() Nadia Trouillet ha scritto:
Nadia Trouillet ha scritto:
Bonsoir, je réalise la taille M, j'ai tricoté 17 cm , mis les mailles des manches sur arrêt de mailles, mais je ne comprend pas : quand et comment arrêter les torsades et les trous du raglan. Dois-je tricoter tout en jersey à partir des augmentations des 6 mailles du dessous de bras. merci d'avance pour votre rapidité à répondre. Cordialement. nadia
15.02.2021 - 18:19DROPS Design ha risposto:
Bonjour Mme Trouillet, vous tricotez toutes les mailles comme avant, mais les 6 mailles montées sous chacune des deux manches se tricotent maintenant en jersey. Vous n'avez ainsi plus que les torsades de chaque devant et celles du dos. Bon tricot!
16.02.2021 - 09:12
![]() Nadia Trouillet ha scritto:
Nadia Trouillet ha scritto:
Bonjour, sur les diagrammes vous indiquez pour la case noire cette maille a été diminuée sautez cette case mais que fait-on de la maille ? Par ailleurs, vous serait-il possible dans le logiciel d'avoir toutes les questions posées dans la langue du modèle ( pour moi en Français) car il est peut être possible qu'une autre personne à l'autre bout du monde se pose la même question. Merci d'avance.
03.02.2021 - 10:34DROPS Design ha risposto:
Bonjour Mme Trouillet, comme cette case noire ne représente pas de mailles, sautez la simplement à la lecture, autrement dit, au 1er rang de A.1 tricotez: 1 m env, 1 m end, 1 jeté, 1 m end, 1 m env (= 4 mailles augmentées à 5 avec le jeté), vous avez ensuite 3 m end au milieu, et comme vous en diminuez 1 au 3ème rang, au 4ème rang, vous n'aurez plus que 2 mailles endroit (= à tricoter à l'envers sur l'endroit). J'espère que ce complément d'informations pourra vous aider. Vous pouvez utiliser un traducteur en ligne pour vous donner une idée des questions/réponses dans d'autres langues ou bien simplement poser votre question ici, tout comme vous avez fait. Bon tricot!
03.02.2021 - 11:22
![]() Mona ha scritto:
Mona ha scritto:
Etter man har tatt av til armene, strikkes d en rad med mønster A2 under armen på bolen også?
21.11.2020 - 22:23
![]() Ute Marx ha scritto:
Ute Marx ha scritto:
Hallo liebes Drops-Team, ich verzweifel gerade. Zählen die beiden Vorderteile auch zum Rumpf? Ich denke ja. Aber dann habe ich im linken Vorderteil kein A2, vor/nach dem ich zunehmen kann. Und im rechten Vorderteil habe ich auch mehr Maschen (weil es dort ja A1 und A2 gibt) als im linken Vorderteil. Oder sind in der Anleitung die Kommata falls gesetzt und die Ärmel bestehen aus A2. 16M re A2? Ich bin verwirrt. Liebe Grüße Ute Marx
29.07.2020 - 20:37DROPS Design ha risposto:
Liebe Frau Marx, so werden die Maschen verteilt: 4 Blenden-M, 1 M li, A.1 (= 4 M) 2-2-2-3-3-3 x, 1 M li, 1-2-2-1-2-3 M re (= linkes Vorderteil), A.2, 14-14-16-16-16-16 M re (= Ärmel), A.2, 1-2-2-1-2-3 M re, 1 M li, A.1 5-5-5-7-7-7 x, 1 M li, 1-2-2-1-2-3 M re, (= Rückenteil), A.2, 14-14-16-16-16-16 M re (= Ärmel), A.2, 1-2-2-1-2-3 M re, 1 M li, A.1 2-2-2-3-3-3 x, 1 M li, 4 Blenden-M(= rechtes Vorderteil). Es sind 4 Mal A.2 insgesamt. Viel Spaß beim stricken!
30.07.2020 - 09:06
![]() Jacqueline Kentgens ha scritto:
Jacqueline Kentgens ha scritto:
Ik heb verkeerde lengte breinaalden besteld . kan ik die omruilen voor de juiste lengte? Zo ja hoe ontvang ik een retourformulier?
22.04.2020 - 11:58DROPS Design ha risposto:
Dag Jacqueline,
Hiervoor kun je het beste even contact opnemen met de winkel waar je de breinaalden gekocht hebt.
22.04.2020 - 20:24
![]() Tiina ha scritto:
Tiina ha scritto:
Hei! Raglanlisäyksessä ongelma, etu- ja takakappale. Ensin lisätään 8 s. Kaarrokkeessa on 4* A2 mallikerta. Jos malli kerran MOLEMMIN puolin lisätään 2s. tulee tästä 16s, ei 8. Jatkossa lisätään 1s. molemmin puolin, ohjeen mukaan tulee 4s lisää, mutta 4*A2 molemmin puolin =8s. En ymmärrä.
17.02.2020 - 12:48DROPS Design ha risposto:
Kaarrokkeen raglanlisäykset tehdään miehustassa ja hihoissa eri tavalla. Tästä syystä ohjeessa on erikseen selitetty miehustan ja hihojen lisäykset. Eli miehustassa on tällöin 4 lisäyskohtaa ja hihoissa on 4 lisäyskohtaa.
24.02.2020 - 16:38
![]() Lita ha scritto:
Lita ha scritto:
Hi. I am very frustrated. I have ripped out and ripped out until I can rip out no more. I have done the math over and over and written out your diagrams in plain English, but no matter how I try I cannot get your pattern to fit my 118 stitches (med) I have 14 stitches remaining before I get to the 4 band garter. HELP! I am about to give up!
17.08.2019 - 00:38DROPS Design ha risposto:
Dear Lita, work the first row in pattern as follows: 4 sts in garter st, P 1, A.1 (= 4 sts) 2 times, P1, K2 (= left front piece), A.2 (= 8 sts on 1st row), K14 (= sleeve), A.2, K2, P1, A.1 5times, P1, K2, (= back piece) A.2, K14 (= sleeve), A.2, K2, P1, A.1 2 times, P1, 4 sts in garter st = 4+1+(2 x 4 sts)+1+2+8 +14+8+2+1+(5x4 sts)+1+2+8+14+8+2+1+(2x4 sts)+1+4 = 4+1+8+1+2+8+14+8+2+1+ 20+1+2+8+14+8+2+1+8+1+4 = 118 sts. but since you will work a yo in first row in A.1.A.2 you will have on needle: 4+1+(2x4 sts+4 yos)+1+2+8+14 +8+2+1+(5x4 sts+5yos)+1+2+8+14+8+2+1+(2x4 sts+2yos)+1+4, but the yarn overs in diagrams do not count in the total number of stitches on the row. Happy knitting!
19.08.2019 - 09:14
![]() Lita ha scritto:
Lita ha scritto:
The A1 diagram has 5 squares - so 5 stitches. The A2 diagram has 9 squares - so 9 stitches. Why are you saying there are 4 and 8? This pattern is terribly confusing!
16.08.2019 - 23:12DROPS Design ha risposto:
Dear Lita, the number of stitches in A.1 and A.2 will vary from 4 to 5 /8 to 9: you first work over 4-8 stitches, then make 1 YO on first row = there are now 5-9 sts in each repeat, on 3rd row, you decrease 1 st (= 4th symbol) = there are again 4-8 sts. see also this vdieo. Happy knitting!
19.08.2019 - 09:02
![]() Lita ha scritto:
Lita ha scritto:
YOKE - from where says now work pattern as follows from RS - This does. It seem to work out. I have 118 sts. If I follow the pattern I would need to have 131 sts. Can you please explain? What am I doing wrong?
14.08.2019 - 19:55DROPS Design ha risposto:
Dear Lita, in diagrams A.1 and A.2 you will make 1 yarn over in each diagram for the small cable so that the number of stitches will increase every time you will work this row (= there are now 5 sts in each A.1 instead of 4 and 9 sts in each A.2 instead of 8), but on 3rd and 4th rows in diagrams, you should have again 4 sts in each A.1 and 8 sts in each A.2. Happy knitting!
15.08.2019 - 09:54
![]() Kim Oliver ha scritto:
Kim Oliver ha scritto:
Hi, please help! I keep finding I have extra stitches at the beginning and end of DPNs. Am working the sleeves,
09.08.2019 - 13:32
|
|||||||||||||||||||
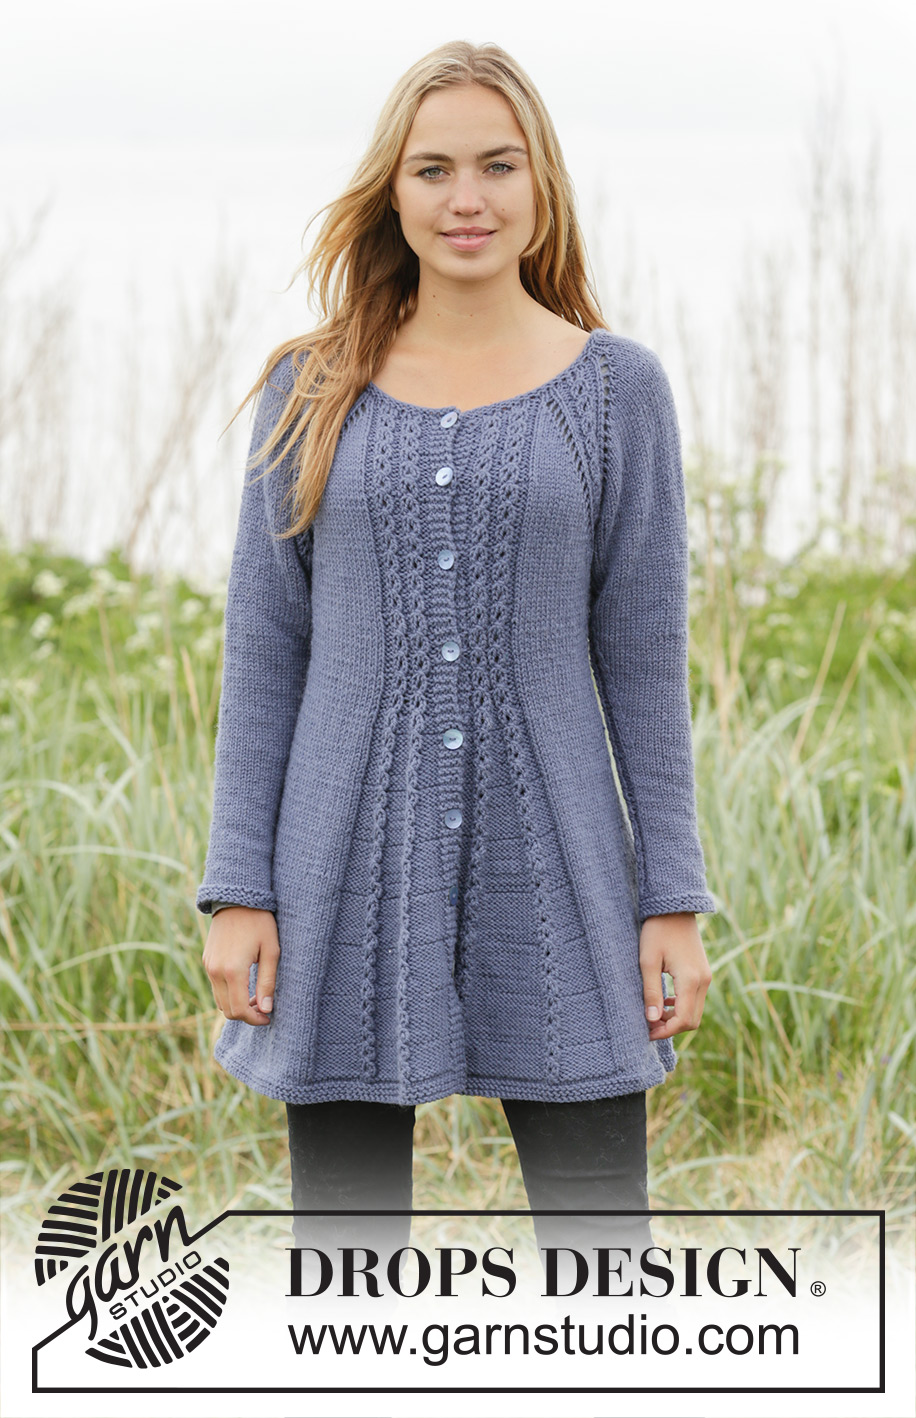
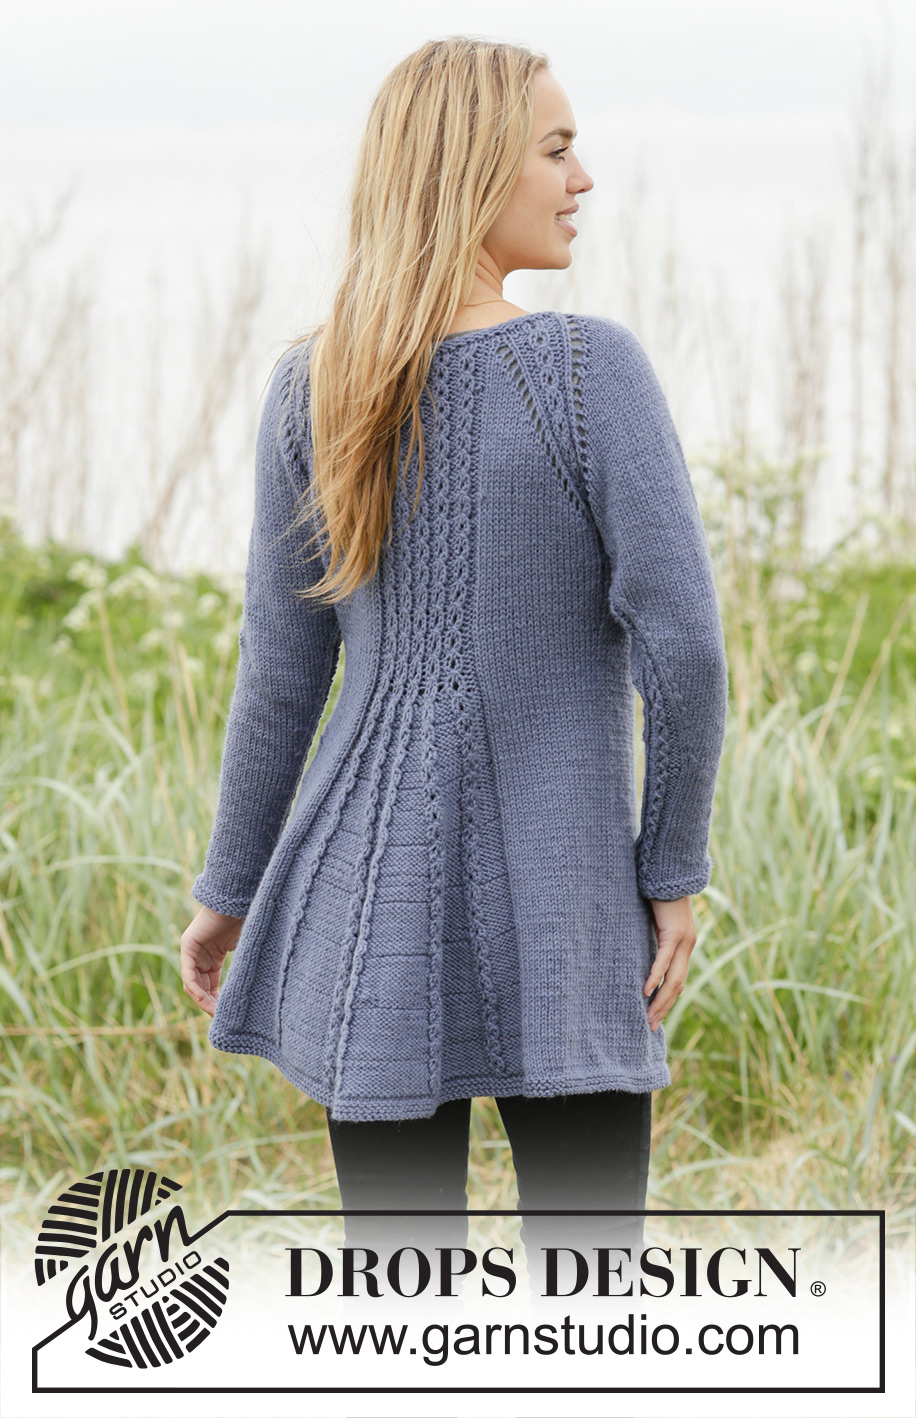
Lobelia#lobeliacardigan |
|||||||||||||||||||
 |
 |
||||||||||||||||||
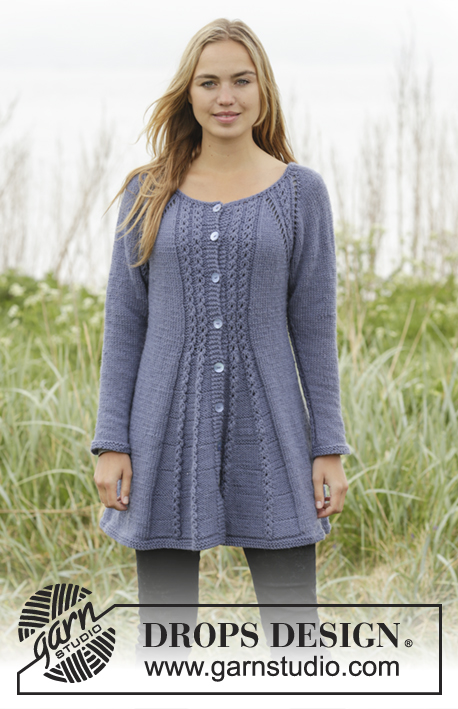
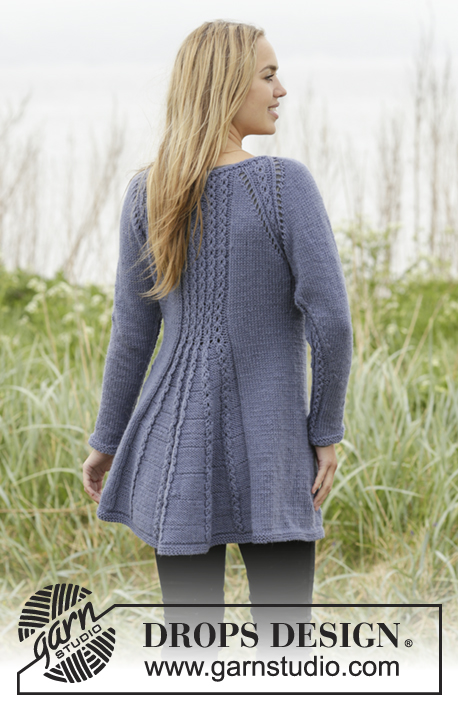
Giacca DROPS ai ferri, con raglan e trecce, lavorata dall’alto verso il basso (top down), in "Nepal". Taglie: Dalla S alla XXXL.
DROPS 171-14 |
|||||||||||||||||||
|
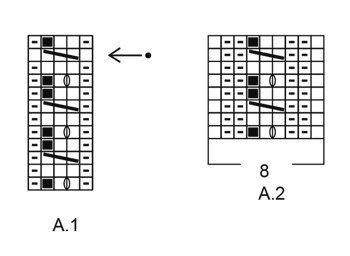
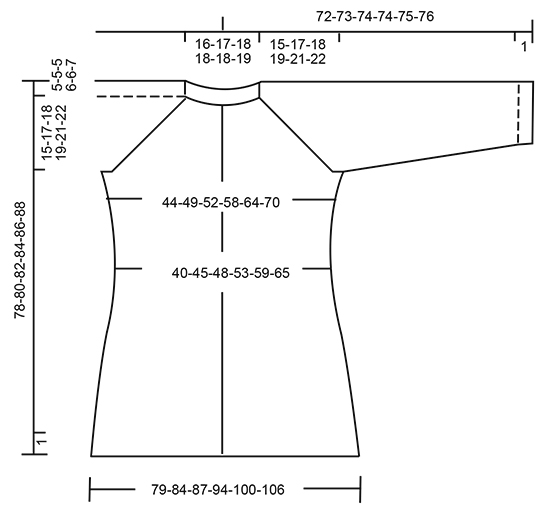
PUNTO LEGACCIO (in tondo): Lavorare * 1 giro a dir e 1 giro a rov *, ripetere da *-*. 1 costa a legaccio = 2 giri PUNTO LEGACCIO (avanti e indietro sui ferri): Lavorare tutti i ferri a dir. 1 costa a legaccio = 2 ferri a dir. MOTIVO: Vedere i diagrammi A.1 e A.2. I diagrammi mostrano tutti i ferri del motivo, visti sul diritto del lavoro. SUGGERIMENTO PER GLI AUMENTI -1 (per aumentare a intervalli regolari): Per calcolare ogni quante m aumentare, sottrarre dal numero complessivo delle m (p.es 97 m) le m dei bordi davanti (p.es 8 m) e dividere il risultato per il numero di aumenti da fare (p.es 20) = 4,4. Quindi, in questo esempio, bisogna aumentare 1 m ogni 4 e 5 m in modo alternato (e non aumentare sulle m dei bordi davanti). SUGGERIMENTO PER GLI AUMENTI-2 (davanti e dietro): Aumentare sempre sul diritto del lavoro. Per aumentare 1 m rov, fare 1 m gettata. Al ferro successivo, lavorare la m gettata a dir ritorto (quindi nel filo dietro e non in quello davanti) per evitare che si formi un buco. RAGLAN sulle MANICHE: Aumentare per le maniche 1 m dopo /prima del diagramma A.2 facendo 1 m gettata (= 2 m aumentate su ogni manica). Al ferro successivo, lavorare le m gettate a rov perché si formino dei buchi. RAGLAN sul DAVANTI E DIETRO: Aumentare 2 m prima /dopo il diagramma A.2 sui davanti e dietro (= 8 m aumentate in tutto), poi aumentare 1 m prima/dopo il diagramma A.2 sui davanti e dietro (= 4 m aumentate in tutto). Aumentare 2 m prima del diagramma A.2 come segue: Lavorare finché non rimane 1 m prima del diagramma A.2, 1 m gettata, 1 m dir, 1 m gettata. Aumentare 2 m dopo il diagramma A.2 come segue: 1 m gettata, 1 m dir, 1 m gettata. ATTENZIONE: Al ferro successivo lavorare a rov le m gettate più vicine al diagramma A.2 per formare dei buchi. Lavorare le altre m gettate a rov ritorto per evitare che si formino i buchi. Aumentare 1 m prima/dopo il diagramma A.2 come segue: per aumentare 1 m, fare 1 m gettata. Al ferro successivo, lavorare la m gettata a rov per formare un buco. SUGGERIMENTO PER LE DIMINUZIONI -1 (DAVANTI e DIETRO): Lavorare finché non rimangono 4 m prima del segno, 2 m insieme a dir, 4 m dir (il segno si trova tra queste m), passare la m successiva a dir senza lavorarla, 1 m dir, accavallare la m passata sulla m lavorata. Ripetere sull’altro lato (= 4 m diminuite). SUGGERIMENTO PER LE DIMINUZIONI -2 (maniche): Lavorare finché non rimangono 2 m prima del diagramma A.2, 2 m insieme a dir, diagramma A.2, passare la m successiva a dir senza lavorarla, 1 m dir, accavallare la m passata sulla m lavorata (= 2 m diminuite). ASOLE: Intrecciare le m per le ASOLE sul bordo davanti destro. Quindi sul bordo davanti alla fine del ferro, visto sul diritto del lavoro. 1 asola = lavorare insieme a dir la 3a e la 4a m dal bordo e fare 1 m gettata. Intrecciare le m per le asole quando il lavoro misura (dall’avvio delle m e lungo il bordo davanti): TAGLIA S: 2, 11, 20, 29, 38 e 47 cm. TAGLIA M: 2, 11, 20, 29, 38 e 47 cm. TAGLIA L: 2, 12, 21, 31, 40 e 50 cm. TAGLIA XL: 2, 12, 21, 31, 40 e 50 cm. TAGLIA XXL: 2, 12, 22, 32, 42 e 52 cm. TAGLIA XXXL: 2, 12, 22, 32, 42 e 52 cm. SUGGERIMENTO PER INTRECCIARE LE MAGLIE: Per evitare un bordo di chiusura delle m troppo stretto, potete usare un ferro più grande di ½ misura. ---------------------------------------------------------- GIACCA: Si lavora avanti e indietro sui ferri circolari, dall’alto verso il basso. SPRONE: Avviare 97-99-103-109-111-117 m (comprese 4 m per il bordo davanti a punto legaccio da ciascun lato) sui ferri circolari n° 4,5. Lavorare 2 coste a PUNTO LEGACCIO - vedere le spiegazioni sopra e aumentare 17-19-19-25-27-25 m a intervalli regolari nel corso dell’ultimo ferro sul diritto del lavoro - VEDERE IL SUGGERIMENTO PER GLI AUMENTI-1 = 114-118-122-134-138-142 m. Passare ai ferri circolari n° 5. Lavorare ora un’alzata a maglia rasata per lo scollo sul dietro, come segue: Lavorare le prime 61-63-67-73-77-79 m, girare e lavorare 16-16-20-20-24-24 m, girare e lavorare 20-20-24-24-28-28 m, girare e lavorare 24-24-28-28-32-32 m, girare e lavorare le restanti m. Lavorare ora 1 ferro a rov con 4 m per il bordo davanti a punto legaccio da ciascun lato. RICORDARSI DI INTRECCIARE LE M PER LE ASOLE ! Lavorare ora il motivo come segue sul diritto del lavoro: 4 m per il bordo davanti a punto legaccio, 1 m rov, diagramma A.1 (= 4 m) 2-2-2-3-3-3 volte, 1 m rov, 1-2-2-1-2-3 m dir (= davanti sinistro), diagramma A.2 (= 8 m sul 1° ferro), 14-14-16-16-16-16 m dir (= manica), diagramma A.2, 1-2-2-1-2-3 m dir, 1 m rov, diagramma A.1 5-5-5-7-7-7 volte, 1 m rov, 1-2-2-1-2-3 m dir, (= dietro), diagramma A.2, 14-14-16-16-16-16 m dir (= manica), diagramma A.2, 1-2-2-1-2-3 m dir, 1 m rov, diagramma A.1 2-2-2-3-3-3 volte, 1 m rov, 4 m per il bordo davanti a punto legaccio. Lavorare 1 ferro sul rovescio del lavoro in modo uguale. RICORDARSI DI MANTENERE LA CORRETTA TENSIONE DEL LAVORO ! Al ferro successivo sul diritto del lavoro, iniziare ad aumentare per il RAGLAN sul DAVANTI E DIETRO e per il RAGLAN sulle MANICHE – vedere le spiegazioni sopra. ATTENZIONE: aumentare in modo diverso sulle maniche e sul davanti e dietro. DAVANTI E DIETRO: Aumentare 2 m ogni 2 ferri 4-4-5-6-7-9 volte e 1 m ogni 2 ferri 11-14-14-14-15-14 volte (= 15-18-19-20-22-23 volte in tutto). MANICHE: Aumentare 1 m ogni 2 ferri 15-18-19-20-22-23 volte in tutto. Terminati tutti gli aumenti ci sono 250-278-294-318-342-362 m. Lavorare ora come segue sul rovescio del lavoro: Lavorare le prime 38-42-44-49-53-57 m (= davanti destro), mettere in attesa su un ferma maglie le 52-58-62-64-68-70 m successive (= manica), avviare 6-6-8-8-10-12 m sotto la manica, lavorare le 70-78-82-92-100-108 m successive (= dietro), mettere in attesa su un ferma maglie le 52-58-62-64-68-70 m successive (= manica), avviare 6-6-8-8-10-12 m sotto la manica, lavorare le rimanenti 38-42-44-49-53-57 m (= davanti sinistro). Il lavoro misura ca.15-17-18-19-21-22 cm lungo il bordo davanti. DAVANTI E DIETRO: Ci sono ora 158-174-186-206-226-246 m per i davanti e il dietro. DA ADESSO IN AVANTI MISURARE IL LAVORO DA QUESTO PUNTO. Proseguire con il motivo avanti e indietro come prima e inserire un segno al centro delle nuove m sotto la manica da ciascun lato. Diminuire ora da ciascun lato e seguendo il motivo come segue: DIMINUZIONI AI LATI: Quando il lavoro misura 4 cm, diminuire 1 m da ciascun lato di ognuno dei 2 segni ai lati - VEDERE IL SUGGERIMENTO PER LE DIMINUZIONI-1 (DAVANTI e DIETRO). Ripetere queste diminuzioni ogni 8 ferri 2 volte in tutto = 8 m diminuite in tutto. DIMINUZIONI SEGUENDO IL MOTIVO: Quando il lavoro misura 6 cm, diminuire 1 m rov lavorando 2 m insieme a rov in ogni sezione di m rov tra 2 trecce = 6-6-6-10-10-10 m diminuite (quindi diminuire 1-1-1-2-2-2 m su ogni davanti e 4-4-4-6-6-6 m sul dietro). Terminate tutte le diminuzioni, ci sono 144-160-172-188-208-228 m. Quando il lavoro misura 15-15-16-16-16-16 cm, aumentare 1 m rov in ogni sezione di m rov in cui era stata diminuita 1 m rov – VEDERE IL SUGGERIMENTO PER GLI AUMENTI-2 (= 6-6-6-10-10-10 m aumentate) = 150-166-178-198-218-238 m. Al ferro successivo sul diritto del lavoro, aumentare 1 m rov da ciascun lato di ogni treccia = 18-18-18-26-26-26 m aumentate. Aumentare in questo modo ogni 10-10-10-14-14-14 ferri (= quindi ogni 5-5-5-7-7-7 ferri sul diritto del lavoro) 7-7-7-5-5-5 volte in tutto = 276-292-304-328-348-368 m. Terminati tutti gli aumenti, proseguire avanti e indietro seguendo il motivo. Quando il lavoro misura 56-56-57-57-57-57 cm – assicurarsi di finire dopo un ferro 4 oppure un ferro 8 del motivo, lavorare 2 ferri a maglia rasata e lavorare le 4 m dei bordi davanti a punto legaccio da ciascun lato. Passare ai ferri circolari n° 4,5 e lavorare 2 coste a legaccio. Intrecciare le m - VEDERE IL SUGGERIMENTO PER INTRECCIARE LE MAGLIE MANICHE: Si lavorano in tondo sui ferri a doppia punta. Riportare sui ferri a doppia punta n° 5 le 52-58-62-64-68-70 m messe in attesa sul ferma maglie e riprendere 1 m in ognuna delle 6-6-8-8-10-12 nuove m avviate sotto la manica = 58-64-70-72-78-82 m. Inserire un segno al centro delle nuove m. DA ADESSO IN AVANTI MISURARE IL LAVORO DA QUESTO PUNTO. Lavorare ora il diagramma A.2 (= 8 m sul 1° ferro) al centro, sotto la manica (quindi ci sono 4 m del diagramma A.2 da ciascun lato del segno), lavorare le rimanenti m del giro a maglia rasata. Quando il lavoro misura 4 cm, diminuire 1 m da ciascun lato del diagramma A.2 - VEDERE IL SUGGERIMENTO PER LE DIMINUZIONI-2 (maniche). Diminuire in questo modo ogni 8-6-5-4-4-4 giri 11-14-15-19-18-19 volte in tutto = 36-36-40-40-42-44 m. Quando la manica misura 48-47-46-45-44-44 cm, passare ai ferri a doppia punta n° 4,5. Lavorare 2 coste a legaccio. Intrecciare le m. Lavorare la seconda manica in modo uguale. CONFEZIONE: Attaccare i bottoni sul bordo davanti sinistro. |
|||||||||||||||||||
Spiegazioni del diagramma |
|||||||||||||||||||
|
|||||||||||||||||||
 |
|||||||||||||||||||
 |
|||||||||||||||||||
Avete terminato questo modello?Allora taggate le vostre foto con #dropspattern #lobeliacardigan o inviatele alla #dropsfan gallery. Avete bisogno di aiuto con questo modello?Troverete 30 video tutorial, una sezione per i commenti/domande e molto altro guardando il modello su www.garnstudio.com © 1982-2026 DROPS Design A/S. Ci riserviamo tutti i diritti. Questo documento, compreso tutte le sue sotto-sezioni, è protetto dalle leggi sul copyright. Potete leggere quello che potete fare con i nostri modelli alla fine di ogni modello sul nostro sito. |
|||||||||||||||||||


Con oltre 40 anni di esperienza nel design di modelli di maglia e uncinetto, DROPS Design offre la più estesa collezione di modelli gratuiti su internet - tradotti in 17 lingue. Ad oggi vi possiamo fornire 324 cataloghi e 12290 modelli - 9561 dei quali sono tradotti in Italiano.
Ci stiamo impegnando molto per darvi il meglio che vi possiamo offrire in termini di maglia e uncinetto, ispirazioni e consigli così come filati di grande qualità ad un prezzo incredibile! Volete utilizzare i nostri modelli per qualcosa d'altro oltre al vostro uso personale? Potete leggere tutto ciò che è consentito nel testo sul Copyright in basso su tutte le pagine dei nostri modelli. Buon lavoro!
Lasciare un commento sul modello DROPS 171-14
Noi saremmo felici di ricevere i tuoi commenti e opinioni su questo modello!
Se vuoi fare una domanda, fai per favore attenzione a selezionare la categoria corretta nella casella qui sotto per velocizzare il processo di risposta. I campi richiesti sono indicati da *.