
Categorie popolari
State cercando un filato?


Commenti / Domande (67)
![]() Astasia Leblanc ha scritto:
Astasia Leblanc ha scritto:
Does this pattern start from the bottom up or top to the bottom???
18.12.2018 - 18:58DROPS Design ha risposto:
Dear Mrs Leblanc, this jumper is worked bottom up, first work the bottom of back and front piece separately for the vents on the side, then work them together in the round to the armholes. Work now the sleeves separately and now work yoke in the round to the elevation on back piece (worked back and forth), then work neck edge. Happy knitting!
19.12.2018 - 08:57
![]() Susanne Thesbjerg ha scritto:
Susanne Thesbjerg ha scritto:
Ang. ærmerne; Skal man starte med mønster A1 lige efter udtagning (midt på ærmet) eller? Kan ikke få det til at passe, når man skal strikke de nye masker med. Venlig hilsen Susanne Thesbjerg
13.12.2018 - 15:07
![]() Anita Gregersen ha scritto:
Anita Gregersen ha scritto:
Jeg vil gerne strikke denne bluse. Men jeg syntes at Garner er for tykt. Findes der noget garn uden uld? Som måske passer til pinde 3,5 og 4
02.11.2018 - 09:58DROPS Design ha risposto:
Hei Anita. Det er strikkefastheten som avgjør hvilke garn du kan strikke med og hvilken pinnestørrelse du trenger. Denne er strikket med garn fra garngruppe C, og alle garn i denne gruppen har i utgangspunktet samme strikkefasthet. Bomull-Lin og Paris begge bomullsbaserte garn i garngruppe C, om du ikke vil strikke med ull. Vær obs på at bomull har andre kvaliteter enn ull og genseren vil derfor ikke se helt ut som på bildet. Om du vil strikke med tynnere garn anbefaler vi at du finner en oppskrift som er skrevet med garn fra gruppe A eller B, da målene på denne genseren vil bli endret om du har en annen strikkefasthet enn angitt. God fornøyelse.
02.11.2018 - 14:55
![]() Helle Zinck Høegh ha scritto:
Helle Zinck Høegh ha scritto:
Kan man ikke med fordel atrikke den på rundpind fra starten? Hvad er tanken med at starte med at strikke frem og tilbage de første 18 cm? Super flot, jeg glæder mig til at komme i gang :)
21.10.2018 - 14:58DROPS Design ha risposto:
Hei Helle. Du strikker forstykke og bakstykke hver for seg de første 18 cm fordi det skal være en splitt i hver side. God fornøyelse.
22.10.2018 - 07:58
![]() Chrystel Bouché ha scritto:
Chrystel Bouché ha scritto:
Vous nous demandez de réunir les manches avec le tronc du pull alors que notre ouvrage ne mesure que 39 cm est-ce normal ( 18cm d'uni et 18 cm de A1) ? Alors que sur le patron dessiné la réunification s'opère à 66cm. A quel moment me suis-je trompée? Merci d'avance Chrystel
15.10.2018 - 08:38DROPS Design ha risposto:
Bonjour Mme Bouché, les 66 cm indiqués à gauche du schéma représentent la longueur totale du pull à partir de l'épaule. En taille S, on rabat les mailles des emmanchures à 40 cm (= au dernier tour de A.1). Bon tricot!
15.10.2018 - 10:59
![]() Smile ha scritto:
Smile ha scritto:
Hallo, waarom word het voorpand en achterpand niet meteen van begin af aan samen op een rondbreinaald gebreit? Dat is toch veel gemakkelijker.
03.09.2018 - 15:53DROPS Design ha risposto:
Dag Smile, Er is niet een speciale reden voor; je kunt er ook voor kiezen om de voor- en achterpanden vanaf het begin in de rondte te breien. Je hoeft dan geen kantsteken te breien.
06.09.2018 - 11:11
![]() Lousha ha scritto:
Lousha ha scritto:
Mistakes in the A.2? End of row 8 the pattern will be off. There should be 3 white ss between every grey-white-grey ss. But according to the chart after the last g-w-g you k2tog, that makes ONE stitch, then start the chart with ONE white. This way it's 2 whites instead of 3. In the next row this causes 4 whites instead of 5 if you look at the end and the beginning of the chart. Also k2tog in rows 43 and 50 schould indicate grey.
18.07.2018 - 20:23DROPS Design ha risposto:
Dear Lousha, when you repeat the diagram in width make sure to continue the pattern as it should look at, so that the st in grey on 9th round should be on the right place. When you decrease in A.1 you should dec in the background colour, ie on row 49, K2 tog with grey. Happy knitting!
19.07.2018 - 09:26
![]() Lavendeltje ha scritto:
Lavendeltje ha scritto:
Hallo, ik heb heel wat truien gebreid in het verleden, maar een trui op een rondbreinaald is voor mij nieuw. Daarbij zie ik ook geen omschrijving van een voorpand, alleen van een achterpand... ? Ik wil deze trui heel graag breien, maar zoals ik het patroon bekijk, lijkt het onbegonnen werk. Mvg
17.03.2018 - 18:20DROPS Design ha risposto:
Hallo Lavendeltje, Het voor en achterpand worden eerst los van elkaar gebreid (evt. kun je dit eerste )ook op rechte naalden doen. (Aan het eind van de paragraaf staat dat je het voorpand op dezelfde manier als het achterpand breit.). Daarna zet je beide panden samen op een rondbreinaald en brei je in de rondte. Het is eerst even wennen op een rondbreinaald, maar na verloop van tijd gaat het je steeds makkelijker af. Bekijk evt. wat instructievideo's. In deze video zie bijvoorbeeld hoe je tricotsteek in de rondte breit. Succes!
19.03.2018 - 07:49Elnor Elis-Williams ha scritto:
Can you explain what the back elevation portion contributes to the pattern? I am about to begin the youke in the round having just attached the arms and don't understand the Elevation at the back instructions or what this bit creates?
13.12.2017 - 00:09DROPS Design ha risposto:
Hi Elnor, The back elevation makes the back of the neck higher than the front and also helps the collar to lie nicely when folded down. The elevation is short rows over the mid back of neck, back and forth with the number of stitches on each row as described in the text. I hope this helps and happy knitting!
13.12.2017 - 08:19
![]() Anna Vohs ha scritto:
Anna Vohs ha scritto:
Hej jeg skal til at starte med Raglan på denne super flotte trøje. Mit spørgsmål er om hvor man skal starte henne? Midt bagpå eller ved et af ærmerne?
23.10.2017 - 02:27DROPS Design ha risposto:
Hei Anna. Du kan fint starte ved en overgang mellom erme og bolen. God Fornøyelse!
23.10.2017 - 14:14
|
||||||||||
Black Ice#blackicesweater |
||||||||||
|
|
||||||||||
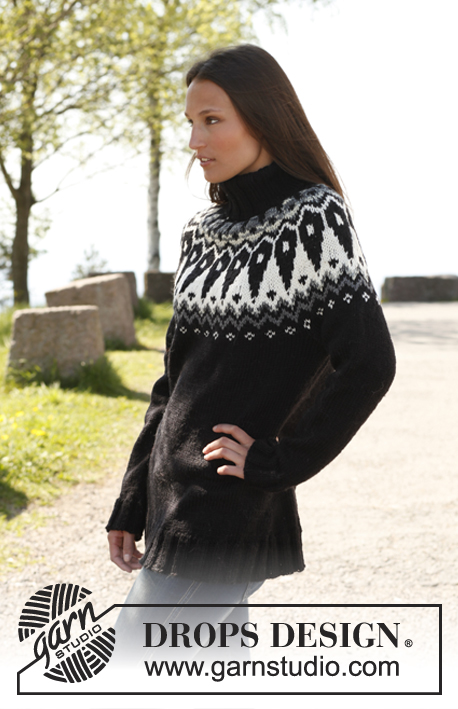
Maglione DROPS lavorato ai ferri con sprone rotondo e motivo nordico in "Nepal". Taglie: S - XXXL.
DROPS 173-5 |
||||||||||
|
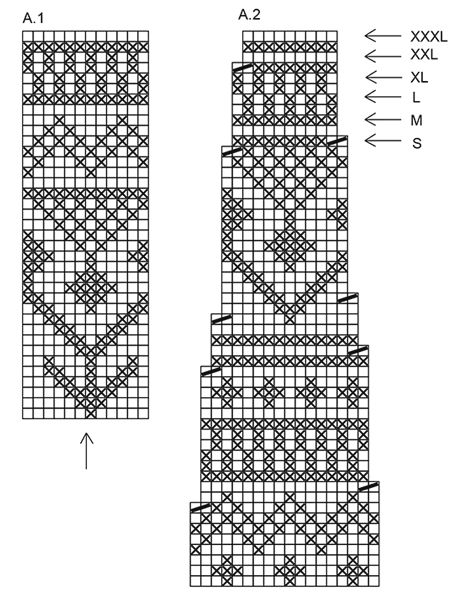
M LEGACCIO (avanti e indietro): Lavorare tutti i f a dir. 1 “costa” a m legaccio = 2 f dir. M LEGACCIO (lavorata in tondo): 1 “costa” a m legaccio = 2 giri. * 1 giro dir e 1 giro rov *, ripetere *-*. SUGGERIMENTO PER LE DIMINUZIONI: Per calcolare dove diminuire, prendere il n° totale delle maglie, (es. 148 m) e dividerlo per il n° di diminuzioni da fare (es. 34) = 4,3. Quindi in questo esempio lavorare insieme a dir ogni 3 e 4 m circa. SUGGERIMENTO PER GLI AUMENTI (applicato alle maniche): Aumentare a ogni lato del segnapunti come segue: Iniziare 1 m prima del segnapunti e fare 1 gettato, 2 m dir (il segnapunti è al centro di queste 2 m), fare 1 gettato (= 2 aumenti). Sul giro successivo lavorare i gettati a dir ritorto per evitare buchi. MOTIVO: Vedere i diagrammi A.1-A.2. Lavorare tutto il motivo a m rasata. SUGGERIMENTO PER IL LAVORO: Per evitare che la tensione del lavoro aumenti durante la lavorazione del motivo, è importante non tirare i fili sul dietro del lavoro. Passare ai f più grandi quando si lavora il motivo se questo dovesse risultare in qualche modo tirato. ---------------------------------------------------------- CORPO: Per prima cosa lavorare avanti e indietro sui f circolari in 2 parti, poi unire il lavoro e lavorare in tondo con i f circolari. DIETRO: Avviare 92-100-112-124-132-148 m con i f circolari n° 4,5 mm con il panna. Lavorare 1 f rov dal rovescio del lavoro, poi lavorare come segue dal diritto del lavoro: 3 m a M LEGACCIO – leggere la spiegazione sopra, 2 m dir, coste (= 2 m rov/2 m dir) fino a quando rimangono 3 m, finire con 3 m a m legaccio. Quando le coste misurano 8 cm, passare ai f circolari n° 5,5 mm, lavorare 1 f dir e allo stesso tempo distribuire 20-22-28-28-30-34 diminuzioni in modo uniforme = 72-78-84-96-102-114 m – LEGGERE IL SUGGERIMENTO PER LE DIMINUZIONI. Continuare a m rasata con 3 m a m legaccio a ogni lato fino a quando il lavoro misura 18 cm. Mettere il lavoro da parte e lavorare il davanti nello stesso modo. CORPO: Riportare le 2 parti sullo stesso f circolare n° 5,5 mm poi lavorare in tondo su tutte le m = 144-156-168-192-204-228 m. Continuare a m rasata. FARE ATTENZIONE ALLA TENSIONE DEL LAVORO! Quando il lavoro misura 21-22-23-24-25-26 cm, lavorare A.1 su tutte le m (= 12-13-14-16-17-19 ripetizioni in larghezza) – LEGGERE IL SUGGERIMENTO PER IL LAVORO. Quando rimane 1 giro di A.1 (il lavoro misura circa 40-41-42-43-44-45 cm), lavorare il giro successivo come segue (= ultimo giro in A.1): intrecciare 3-3-4-4-5-5 m per lo scalfo, lavorare 66-72-76-88-92-104 m (= davanti), intrecciare 6-6-8-8-10-10 m per lo scalfo, lavorare 66-72-76-88-92-104 m (= dietro) e intrecciare le ultime 3-3-4-4-5-5 m per lo scalfo. Mettere il lavoro da parte e lavorare le maniche. MANICA: Lavorata in tondo con i f a doppia punta. Passare ai f circolari corti quando sono state aumentate abbastanza m. Avviare 52-52-52-56-56-56 m con i f a doppia punta n° 4,5 mm con il panna. Lavorare 1 giro dir. Poi lavorare a coste = 2 m dir/ 2 m rov per 6 cm. Lavorare 1 giro dir e allo stesso tempo distribuire 12 diminuzioni in modo uniforme per tutte le taglie = 40-40-40-44-44-44 m. Inserire 1 segnapunti all’inizio del giro. Passare ai f a doppia punta n° 5,5 mm e lavorare a m rasata con il panna. Quando il lavoro misura 11-11-13-13-10-12 cm, aumentare 2 m al centro sotto la manica – LEGGERE IL SUGGERIMENTO PER GLI AUMENTI. Aumentare in questo modo ogni 3½-3-2½-2½-2½-2 cm 10-11-12-12-13-15 volte in totale = 60-62-64-68-70-74 m. ALLO STESSO TEMPO quando il lavoro misura 24-24-23-23-23-22 cm, lavorare A.1, la freccia in A.1 mostra il centro della manica, contare verso l’esterno dalla freccia e lavorare in modo che il motivo sia uguale a entrambi i lati, incorporare gli aumenti nel motivo, NOTA: Il motivo non coprirà un’intera ripetizione. Sull’ultimo giro di A.1 (il lavoro misura circa 43-43-42-42-42-41 cm, NOTA: Misure più piccole per le taglie più grandi a causa della maggiore ampiezza delle spalle), intrecciare le 6-6-8-8-10-10 m centrali al centro sotto la manica = 54-56-56-60-60-64 m rimaste sul f. Mettere il lavoro da parte e lavorare l’altra manica. SPRONE: Trasferire le maniche sullo stesso f circolare n° 5,5 mm del corpo dove sono state intrecciate le m = 240-256-264-296-304-336 m. Lavorare il 1° giro in A.2 e ALLO STESSO TEMPO aggiustare il n° di m a 234-252-270-288-306-324. Continuare il motivo a le diminuzioni come indicato in A.2 (= 13-14-15-16-17-18 ripetizioni). LEGGERE IL SUGGERIMENTO PER IL LAVORO! Quando è stato lavorato A.2 – vedere la freccia per la vostra taglia, ci sono 130-140-150-160-153-162 m sul giro. Lavorare 1 giro dir e allo stesso tempo distribuire 34-44-50-56-49-54 diminuzioni in modo uniforme = 96-96-100-104-104-108 m. ALZATA SUL DIETRO: Inserire 1 segnapunti al centro davanti. Iniziare al centro dietro e lavorare un’alzata sul dietro con i f circolari n° 5,5 mm con il panna come segue: lavorare a dir fino a quando rimangono 10-10-12-12-14-16 m prima del segnapunti sul davanti, girare e lavorare a rov fino a quando rimangono 10-10-12-12-14-16 m prima del segnapunti dall’altro lato. Girare e lavorare a dir fino a quando rimangono 20-20-22-22-24-26 m prima del segnapunti sul davanti, girare e lavorare a rov fino a quando rimangono 20-20-22-22-24-26 m prima del segnapunti dall’altro lato. Girare e lavorare a dir fino a quando rimangono 30-30-32-32-34-36 m prima del segnapunti sul davanti, girare e lavorare a rov fino a quando rimangono 30-30-32-32-34-36 m prima del segnapunti dall’altro lato. Girare e lavorare a dir fino al centro dietro. Il lavoro misura 66-68-70-73-75-77 cm dal bordo inferiore alla spalla. COLLO: = 96-96-100-104-104-108 m. Lavorare 1 costa a M LEGACCIO – leggere la spiegazione sopra, passare ai f circolari corti n° 6 mm, poi lavorare a coste in tondo (2 m dir/2 m rov). Continuare a coste fino a quando il lavoro misura 22-22-22-24-24-24 cm. Intrecciare con dir su dir e rov su rov. CONFEZIONE: Cucire le aperture sotto le maniche. |
||||||||||
Spiegazioni del diagramma |
||||||||||
|
||||||||||
 |
||||||||||
 |
||||||||||
Avete terminato questo modello?Allora taggate le vostre foto con #dropspattern #blackicesweater o inviatele alla #dropsfan gallery. Avete bisogno di aiuto con questo modello?Troverete 31 video tutorial, una sezione per i commenti/domande e molto altro guardando il modello su www.garnstudio.com © 1982-2026 DROPS Design A/S. Ci riserviamo tutti i diritti. Questo documento, compreso tutte le sue sotto-sezioni, è protetto dalle leggi sul copyright. Potete leggere quello che potete fare con i nostri modelli alla fine di ogni modello sul nostro sito. |
||||||||||


Con oltre 40 anni di esperienza nel design di modelli di maglia e uncinetto, DROPS Design offre la più estesa collezione di modelli gratuiti su internet - tradotti in 17 lingue. Ad oggi vi possiamo fornire 324 cataloghi e 12290 modelli - 9561 dei quali sono tradotti in Italiano.
Ci stiamo impegnando molto per darvi il meglio che vi possiamo offrire in termini di maglia e uncinetto, ispirazioni e consigli così come filati di grande qualità ad un prezzo incredibile! Volete utilizzare i nostri modelli per qualcosa d'altro oltre al vostro uso personale? Potete leggere tutto ciò che è consentito nel testo sul Copyright in basso su tutte le pagine dei nostri modelli. Buon lavoro!
Lasciare un commento sul modello DROPS 173-5
Noi saremmo felici di ricevere i tuoi commenti e opinioni su questo modello!
Se vuoi fare una domanda, fai per favore attenzione a selezionare la categoria corretta nella casella qui sotto per velocizzare il processo di risposta. I campi richiesti sono indicati da *.