
Categorie popolari
State cercando un filato?


Commenti / Domande (22)
![]() Guylaine ha scritto:
Guylaine ha scritto:
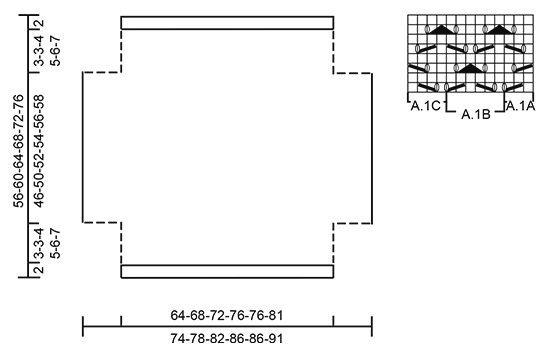
Bonjour, Pouvez-vous m'expliquer comment tricoter la répétition de A. 1B dans le rang 7? Je comprends que la fin de A.1A est le début de A.1B et que la fin de A.1B est le début de A.1C. merci beaucoup
16.04.2026 - 16:58DROPS Design ha risposto:
Bonjour Guylaine, au 7ème rang, tricotez la dernière maille de A.1A ensemble avec les 2 premières mailles de A.1B (le 1er jeté est maintenant la dernière maille de A.1A), puis à la fin de chaque A.1B, tricotez la dernière maille de A.1B avec les 2 premières mailles du A.1B suivant puis de A.1C à la fin du motif. Bon tricot!
16.04.2026 - 17:13
![]() Jenny ha scritto:
Jenny ha scritto:
Hej, hur stickar man rad7 i mönstret? Man skulle stickar 15 gånger A1.B, hur stickar man 2, 3,... för A1. B? Kan ni förklara lite mer ?
10.02.2026 - 10:40DROPS Design ha risposto:
Hei Jenny. Når 7. rad strikkes går ikonene over i hverandre. Første gang du strikker 7. rad strikkes det slik: Kantmasker +2 rett - 1 kast - ta 1 m løs av p som om den skulle strikkes rett, 2 rett sammen, løft den løse m over (nå strikkes A.1A og A1B sammen) - kast - 3 rett masker - kast - ta 1 m løs av p som om den skulle strikkes rett, 2 rett sammen, løft den løse m over (nå strikkes A.1B og A1B sammen til det gjenstår 7 masker på pinnen). Kast - ta 1 m løs av p som om den skulle strikkes rett, 2 rett sammen, løft den løse m over - kast - 2 rett masker (= du har nå strikket siste A.1B og A.1C sammen) + kantmasker. mvh DROPS Design
13.02.2026 - 08:51
![]() Jenny ha scritto:
Jenny ha scritto:
Hej, Jag förstår inte det här steg: Sticka sista v rätt från avigsidan. Byt till rundst 5 och sticka 2 v slätst med 2 kantm i rätst i varje sida. Nästa v stickas så här från rätsidan: När man byt till rundst 5, det börjar sticka avig eftersom sista v är rätt. Sen stickar man rätt i v2. Hur stickar man pattern från rätsidan eftersom det blir avigsidan efter v2?
08.02.2026 - 23:20DROPS Design ha risposto:
Hej Jenny, Sticka sista v rätt från avigsidan. Byt till rundst 5 och sticka 2 v slätst med 2 kantm i rätst i varje sida = rät från rätsidan och avig från avigsidan. Nästa v stickas så här från rätsidan.
11.02.2026 - 14:28
![]() Maz ha scritto:
Maz ha scritto:
I really like this pattern and would love to knit it but I don’t understand the instructions ? Is there a simpler way of explaining it or A video on how to make this beautiful bolero Thank you Maz
16.04.2025 - 23:28DROPS Design ha risposto:
Dear Maz, all videos that are useful for making this pattern can be found in the "Videos" section at the top of the pattern. There is no full tutorial of this pattern. You can ask us any specific questions regarding the pattern instructions and we will try to explain it in other words. Happy knitting!
20.04.2025 - 20:36
![]() HILLION ha scritto:
HILLION ha scritto:
Bonjour, Quand après la ligne avec point fantaisie vous dite, continuez ainsi Faut il à la ligne suivante reprendre le point fantaisie à chaque nouveau rang , ou faut il reprendre partir des deux rang jersey puis point fantaisie, deux rang jersey etc ? Merci beaucoup, vos modèles sont très beau
15.06.2024 - 10:25DROPS Design ha risposto:
Bonjour Mme Hillion, le point fantaisie doit continuer exactement comme avant, autrement dit tricotez 3 m point mousse, 3 m de A.1A (6 des 7 mailles montées), répétez A.1B (le 1er A.1B va se tricoter sur la dernière des 7 m montées + les 2 m tricotées auparavant au point mousse + les 3 m de A.1A), le dernier A.1B se fera de la même façon sur les 3 m de A.1A+ les 2 m point mousse+ la 1ère des 7 m montées, tricotez ensuite A.1C et 3 m point mousse. Bon tricot!
17.06.2024 - 08:17
![]() Laura ha scritto:
Laura ha scritto:
In row 1 do the yarn overs that fall between A.1A and A.1B as well as A.1B and A.1C get worked in all of the A.1B repeats?
06.09.2023 - 07:55DROPS Design ha risposto:
Dear Laura, each yarn over should compensate the decreases, so that on row 1, the yarn over in A.1A belongs to A.1A (last stitch in A.1A = there are still 3 sts). And the last yarn over in A.1B belongs to A.1B (= 6 sts in each A.1B). Happy knitting!
06.09.2023 - 09:24
![]() Darline Crane ha scritto:
Darline Crane ha scritto:
I have ripped out the pattern three times, might just drop all together. Doing size XXL. I get to the 107 count , cast on the 7 (x2) for 121 stitches fine but then when I work the pattern end up with 115 stitches. Where could I be losing the 6 stitches? In the yarn overs? The graph is so small I did not see them .
03.06.2023 - 16:35DROPS Design ha risposto:
Dear Darline, for size XXL, after reaching 121 stitches, work as before but with 3 sts in garter stitch on each side, instead of 2, and two more repeats of A.1B. That is: 3 sts in garter stitch, A.1A (= 3 sts), 18 repeats of A.1B (= 108 sts (6x18)), A.1C (= 4 sts) and 3 sts in garter stitch = 121 stitches. To enlarge the chart, you can increase its size when printing the pattern and then print the chart or save it as a PDF. Happy knitting!
04.06.2023 - 18:19
![]() Catia Lo Giacco ha scritto:
Catia Lo Giacco ha scritto:
Buongiorno vorrei fare una copertina per neonata con questo punto usando baby alpaca silk, quanti gomitoli devo acquistare x farla grande circa 50x70 Grazie.
01.02.2023 - 15:32DROPS Design ha risposto:
Buonasera Catia, per un'assistenza così personalizzata può rivolgersi al suo rivenditore DROPS di fiducia. Buon lavoro!
01.02.2023 - 22:46
![]() Fran ha scritto:
Fran ha scritto:
Are the measurements in inches or centimeters?
14.08.2019 - 00:22DROPS Design ha risposto:
Dear Fran, to get the measurements in the pattern in inches, make sure you are reading the US-English pattern by clicking on the arrow under the picture. Measurements in chart are in cm - convert here into inches. Happy crocheting!
14.08.2019 - 08:10
![]() Henker Bettina ha scritto:
Henker Bettina ha scritto:
Wie geht das mit den 7 M zunehmen für den Ärmel
12.10.2018 - 19:48DROPS Design ha risposto:
Liebe Frau Henker, die 7 M schlagen Sie am ende jeder 2 Reihe wie in diesem Video gezeigt, dh am Ende der nächsten Hinreihe, wenden, die nächste Rückreihe stricken und die Maschen am Ende dieser Reihe anschlagen = Sie haben jetzt 7 neuen Maschen auf beide Seiten. Viel Spaß beim stricken!
15.10.2018 - 08:06
|
||||||||||||||||
Always Cute#alwayscuteshoulderpiece |
||||||||||||||||
 |
 |
|||||||||||||||
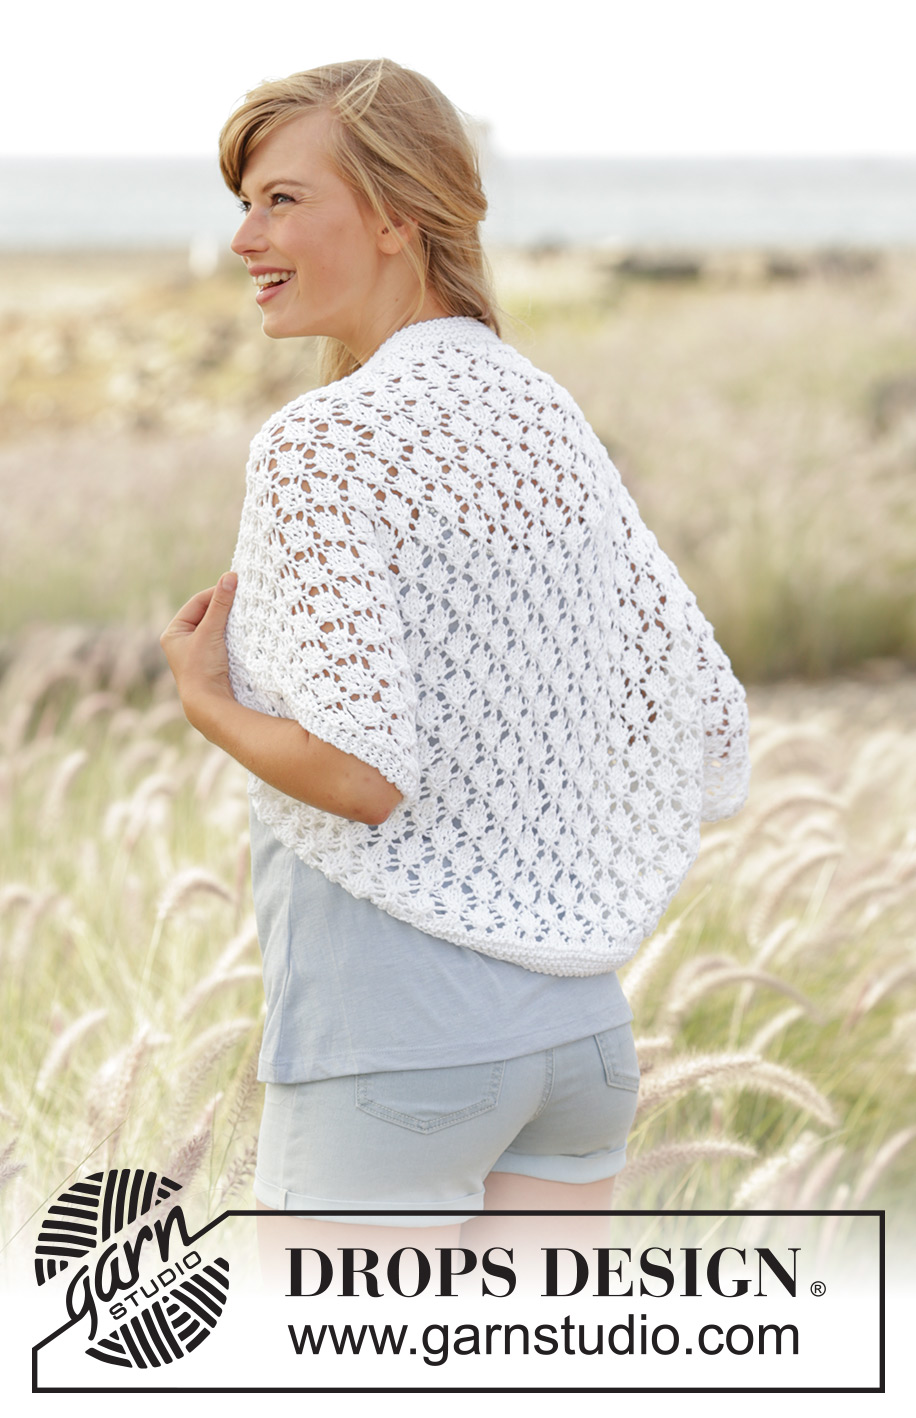
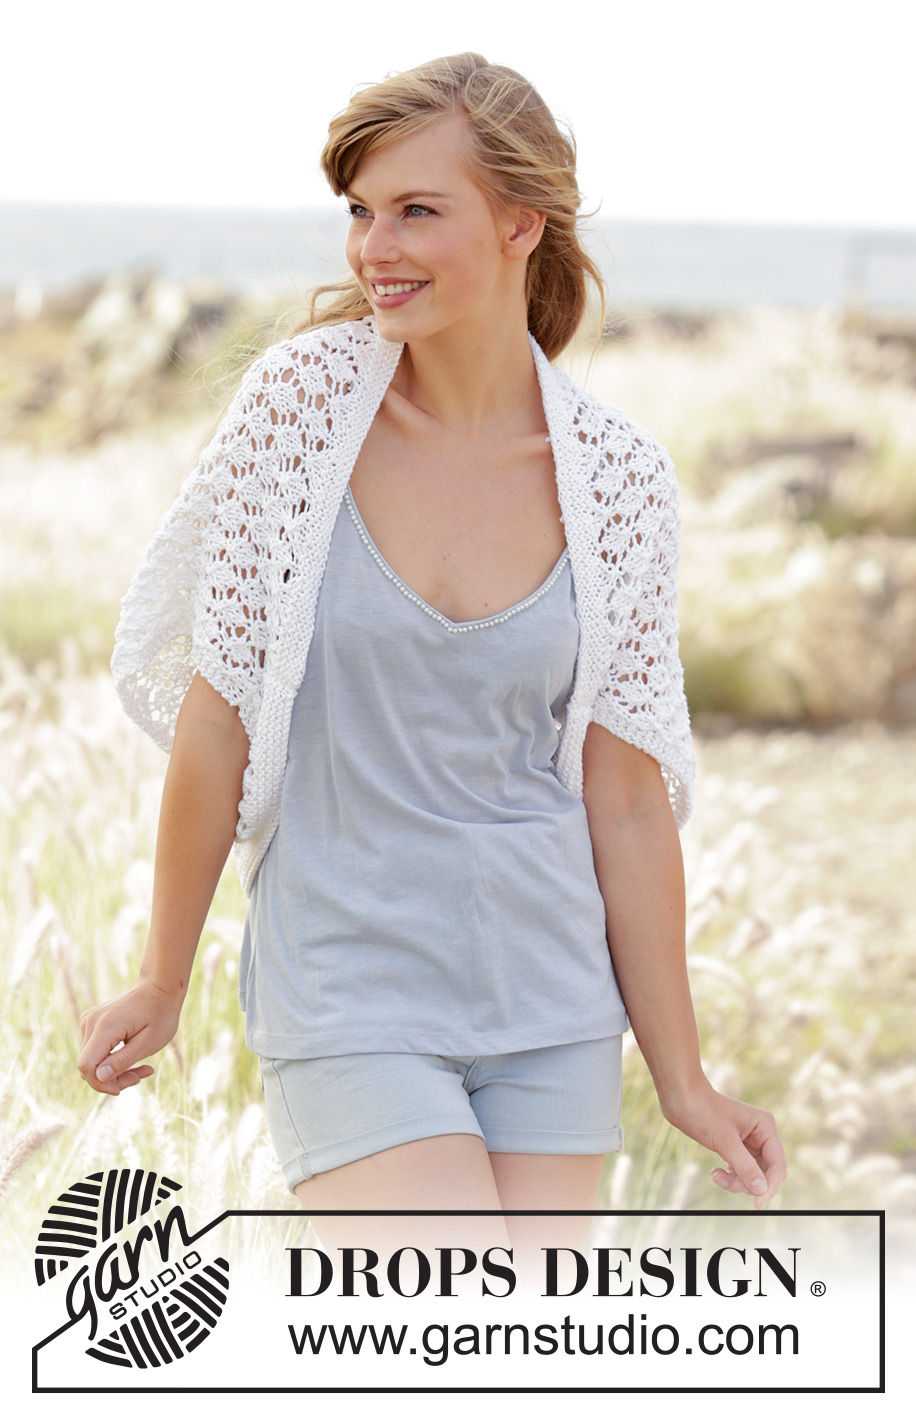
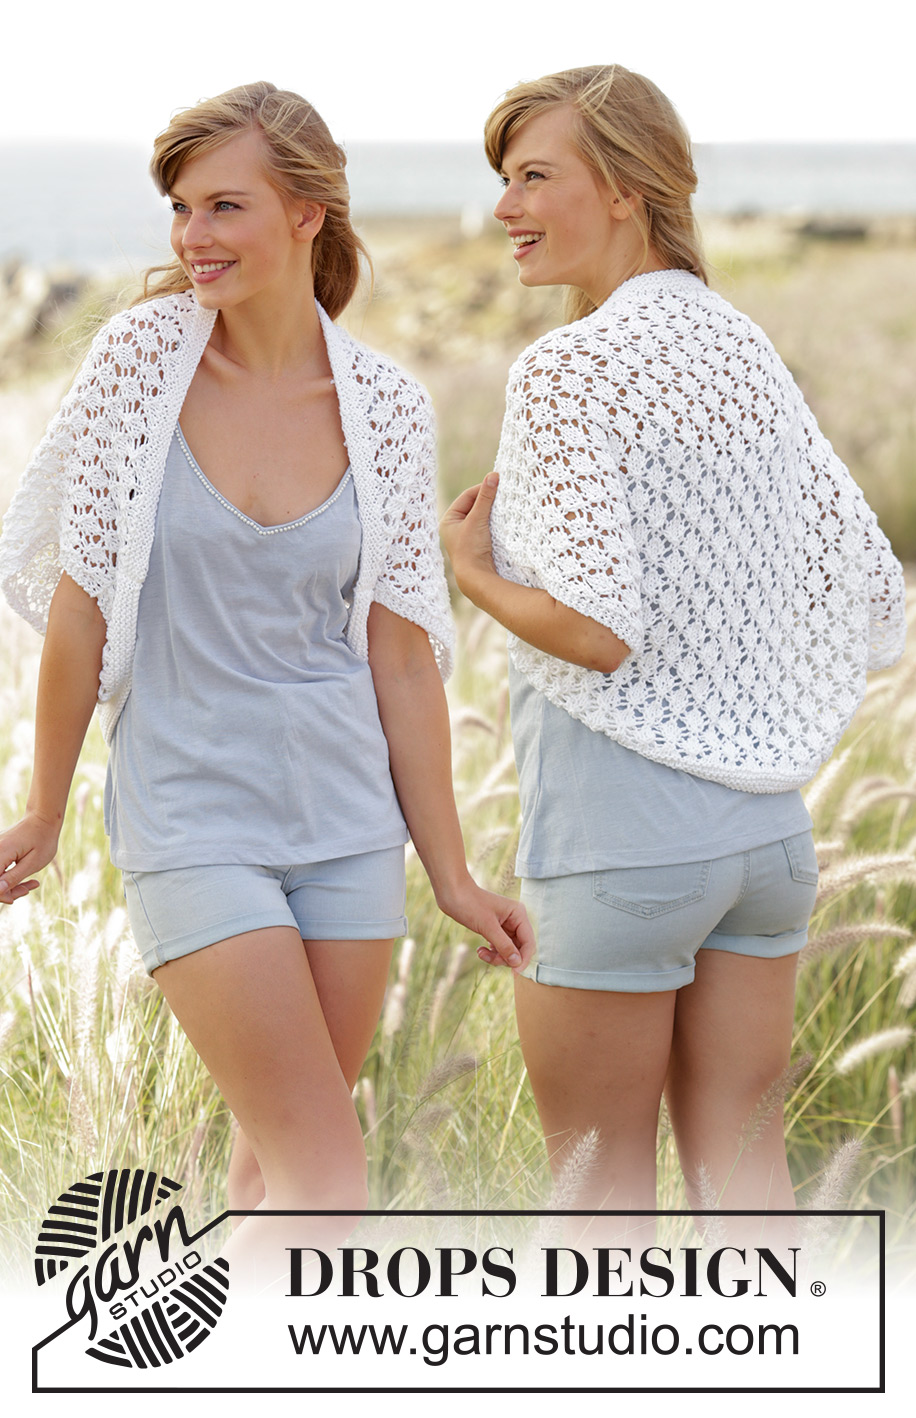
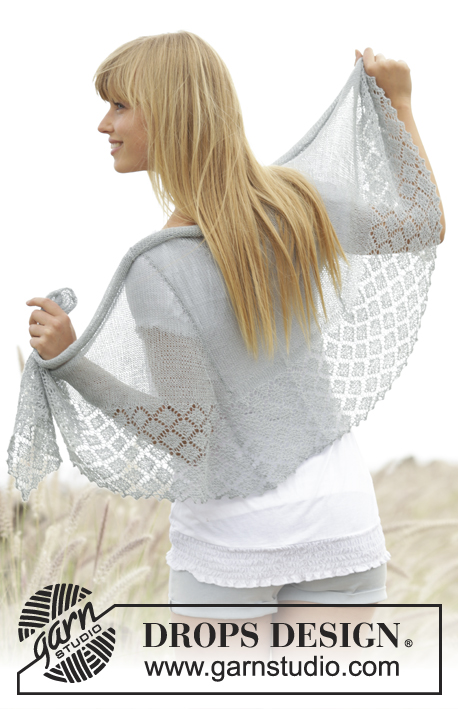
Copri spalle DROPS ai ferri, con motivo traforato, in "Paris". Taglie: Dalla S alla XXXL.
DROPS 169-14 |
||||||||||||||||
|
PUNTO LEGACCIO (avanti e indietro sui ferri): Lavorare tutti i ferri a dir. 1 “costa” a legaccio = 2 ferri a dir. MOTIVO: Vedere il diagramma A.1. Il diagramma mostra tutti i ferri del motivo, visti sul diritto del lavoro. SUGGERIMENTO PER GLI AUMENTI/DIMINUZIONI: Per calcolare ogni quante m diminuire/aumentare, dividere il numero complessivo delle m sui ferri (p.es: 108 m) per il numero di diminuzioni/aumenti da fare (p.es 19) = 5.68. Quindi, in questo caso: Per le diminuzioni: si lavorano insieme a dir alternativamente ogni 4a e 5a m e ogni 5a e 6a m (quindi: la prima volta si lavorano insieme la 4a e 5a m, la volta successiva la 5a e 6a m e così via); Per gli aumenti: si aumenta alternativamente dopo ogni 5a e 6a m (quindi: la prima volta dopo 5 m, la seconda dopo 6 m e così via). ATTENZIONE: per aumentare 1 m fare 1 m gettata. Nel corso del ferro successivo, lavorare la m gettata a dir ritorto per evitare che si formi un buco. ---------------------------------------------------------- COPRI SPALLE: Avviare 108-116-122-130-130-138 m sui ferri circolari n° 4 con il filato Paris. Lavorare 4 coste a PUNTO LEGACCIO - vedere le spiegazioni sopra. ALLO STESSO TEMPO, quando rimane ancora da lavorare 1 costa a legaccio, diminuire 19-21-21-23-23-25 m a intervalli regolari sul diritto del lavoro - VEDERE IL SUGGERIMENTO PER GLI AUMENTI/DIMINUZIONI = 89-95-101-107-107-113 m. Lavorare l’ultimo ferro a dir sul rovescio del lavoro. Passare ai ferri circolari n° 5 e lavorare 2 ferri a maglia rasata con 2 m vivagno a punto legaccio da ciascun lato. Lavorare il ferro successivo come segue, sul diritto del lavoro: 2 m vivagno a punto legaccio, diagramma A.1A (= 3 m), ripetere il diagramma A.1B finché non rimangono 6 m (= 13-14-15-16-16-17 ripetizioni di 6 m), diagramma A.1C (= 4 m) e finire con 2 m vivagno a punto legaccio. Proseguire con il motivo in questo modo. RICORDARSI LA TENSIONE DEL LAVORO! Quando il lavoro misura 5-5-6-7-8-9 cm, avviare 7 nuove m per le maniche alla fine dei 2 ferri successivi = 103-109-115-121-121-127 m. Continuare con il diagramma A.1 lavorando le 3 m vivagno da ciascun lato a punto legaccio - ATTENZIONE: Assicurarsi che il motivo risulti sempre correttamente allineato - dopo aver avviato le nuove m ai lati, ci sono sufficienti m per lavorare 2 ripetizioni in più del diagramma A.1B. Quando il lavoro misura 51-55-58-61-64-67 cm, intrecciare 7 m all’inizio dei 2 ferri successivi = sui ferri rimangono 89-95-101-107-107-113 m. Continuare con il diagramma A.1 lavorando le 2 m vivagno a punto legaccio da ciascun lato finché il lavoro non misura 53-57-61-65-69-73 cm; assicurarsi che la lunghezza da dove sono state intrecciate le 7 m al ferro di lavoro sia la stessa della parte iniziale (da dove si iniziano a lavorare i diagrammi all’avvio delle m per le maniche – vedere anche il grafico con le misure) e che il ferro successivo venga lavorato sul diritto del lavoro. Lavorare 2 ferri a maglia rasata con 2 m vivagno a punto legaccio da ciascun lato. Passare ai ferri circolari n° 4 e lavorare 4 coste a legaccio avanti e indietro e, ALLO STESSO TEMPO, aumentare 19-21-21-23-23-25 m a intervalli regolari nel corso del 1° ferro – VEDERE IL SUGGERIMENTO PER GLI AUMENTI/DIMINUZIONI = 108-116-122-130-130-138 m. Terminate le coste a legaccio, intrecciare le m senza stringere troppo il filo, lavorando le m a dir sul diritto del lavoro. CONFEZIONE: Mettere il ferro di avvio delle m contro il ferro di chiusura delle m, rovescio del lavoro contro rovescio del lavoro. Cucire i lati e sotto le maniche - vedere la linea a puntini nel grafico – ATTENZIONE: i lati vengono cuciti bordo contro bordo nel filo esterno delle m per ottenere una cucitura piatta; le cuciture sotto la manica vengono fatte all’interno di 1 m vivagno sul bordo. |
||||||||||||||||
Spiegazioni del diagramma |
||||||||||||||||
|
||||||||||||||||
 |
||||||||||||||||
Avete terminato questo modello?Allora taggate le vostre foto con #dropspattern #alwayscuteshoulderpiece o inviatele alla #dropsfan gallery. Avete bisogno di aiuto con questo modello?Troverete 19 video tutorial, una sezione per i commenti/domande e molto altro guardando il modello su www.garnstudio.com © 1982-2026 DROPS Design A/S. Ci riserviamo tutti i diritti. Questo documento, compreso tutte le sue sotto-sezioni, è protetto dalle leggi sul copyright. Potete leggere quello che potete fare con i nostri modelli alla fine di ogni modello sul nostro sito. |
||||||||||||||||


Con oltre 40 anni di esperienza nel design di modelli di maglia e uncinetto, DROPS Design offre la più estesa collezione di modelli gratuiti su internet - tradotti in 17 lingue. Ad oggi vi possiamo fornire 324 cataloghi e 12290 modelli - 9561 dei quali sono tradotti in Italiano.
Ci stiamo impegnando molto per darvi il meglio che vi possiamo offrire in termini di maglia e uncinetto, ispirazioni e consigli così come filati di grande qualità ad un prezzo incredibile! Volete utilizzare i nostri modelli per qualcosa d'altro oltre al vostro uso personale? Potete leggere tutto ciò che è consentito nel testo sul Copyright in basso su tutte le pagine dei nostri modelli. Buon lavoro!
Lasciare un commento sul modello DROPS 169-14
Noi saremmo felici di ricevere i tuoi commenti e opinioni su questo modello!
Se vuoi fare una domanda, fai per favore attenzione a selezionare la categoria corretta nella casella qui sotto per velocizzare il processo di risposta. I campi richiesti sono indicati da *.