
Categorie popolari
State cercando un filato?


Commenti / Domande (139)
![]() Odette ha scritto:
Odette ha scritto:
Kann ich auch auf normale Stricknadeln stricken bis arm Höhe, danach alles auf ein Nadeln stricken , habe dann ein naht, ich kann leider nicht mit ein rundstricknadel stricken
16.07.2020 - 18:24DROPS Design ha risposto:
Liebe Odette, hier wird erklärt, wie man eine Anleitung für Hin- und Rück-Reihen anpasst. Viel Spaß beim stricken!
17.07.2020 - 08:03
![]() Joëlle ha scritto:
Joëlle ha scritto:
Beste, ik begrijp de raglan niet, zoals ik het lees en doe loopt het patroon van A3 altijd naar links aan beide kanten van de mouw, denk niet dat dit de bedoeling. I, brei elke 4de naald als volgt, na de markeerder, 1 rechts aflhalen, 2 St rechts breien en afgehaalde St overhalen, 1 omsl, dan raglan 1 r afh, 1r, afgeh St overhalen, verder breien tot 2 St voor de maarkeerder, 2 r samen breien, 1 omsl. Kunnen jullie mij verder helpen, alvast bedankt, Joëlle
05.06.2020 - 00:04DROPS Design ha risposto:
Dag Joëlle,
A.3 zit precies op de overgang van de mouw naar het pand en waar de pijl in A.3 staat (dus het midden van A.3) zit de markeerdraad. Je meerdert aan beide kanten van A.3 voor de raglan, dus aan de kant van de mouw en aan de kant van het pand. A.3 en de markeerdraad blijft in de hoogte steeds op dezelfde plek.
2 steken voordat A.3 begint brei je 2 steken samen, dan brei je A.3 en dan haal je 1 steek recht af, brei je 1 steek en haal je de afgehaalde steek over de gebreide steek. 18.06.2020 - 13:29
![]() Els Van Zantvliet ha scritto:
Els Van Zantvliet ha scritto:
Ik ben net begonnen en heb de eerste 8 cm gebreid. nu heb ik de steekmarkeerders geplaatst. Nu lees ik het volgende: TAILLE: Minder voor de taille bij de 4 markeerders. Minder als volgt na de 1e en 3e markeerder: 2 r samen. Minder als volgt als er 2 st over zijn voor de 2e en 4e markeerder: 1 r afh, 1 r, afgeh st overh. Dan klopt mijn telling toch niet? Ik brei maat xl. dan heb ik toch maar 14 steken geminderd ipv totaal 28? alvast bedankt. Groetjes Els
18.05.2020 - 08:28DROPS Design ha risposto:
Dag Els,
Voor de taille minder je telkens bij alle 4 de markeerders, dus je maakt 4 minderingen per mindernaald, waardoor je op 28 minderingen in totaal komt.
19.05.2020 - 13:26
![]() Richard ha scritto:
Richard ha scritto:
Brilliant. Thank you all very very much. Take care...
09.04.2020 - 19:19
![]() Richard ha scritto:
Richard ha scritto:
Hi, once again. Thank you for your last reply. My final question is:- Because I finish A5 at the beginning of left sleeve, do I CAST OFF?.....OR do I join new yarn in white to the mid back & then, knit as described up to 16 sts before the mid front marker?? Hopefully you can help me to complete the is garment. It is for a woman of 84. Thanks all.
09.04.2020 - 18:20DROPS Design ha risposto:
Dear Richard, no you don't need to cast off just work from the current begin of the rounds until 16 sts remain before marker on front piece, turn and work row back same way. You will work last row of the short rows to your beg of round again to work neck edge. Happy knitting!
09.04.2020 - 18:34
![]() Richard ha scritto:
Richard ha scritto:
Hi, again I don't understand, because the pattern states "When A5 has been worked, work an elevation in the back of neck. Insert 1 marker mid front. Beg mid back and K (with white) until 16 sts remain before the marker". Now, you are saying "you have to work to the mid back (find it as explained previously) and another one on the mid front". I'm so sorry, but how can this be? I really appreciate all your efforts to help me.
09.04.2020 - 17:25DROPS Design ha risposto:
Dear Richard, I'm sorry to have been confusing, you don't need marker on mid back here, so you just need to find the mid front (put the piece flat and insert a marker on mid front), and now work the short rows working until the given number of stitches remain before the marker on mid front (you will work more rows on the other stitches but always less stitches). Hope this is clearer now, sorry for confusion. Happy knitting!
09.04.2020 - 18:05
![]() Richard ha scritto:
Richard ha scritto:
Thank you, thank you... But please tell me, as I have finished A5 on the last stitch of the back, do I cut the yarn & then rejoin a new yarn (in white) as you say, at the mid-back. Then I would knit until 16 sts before the marker of the mid-front : then turn?? I am so near to finishing & will post a photo to the Drops Gallery, when I have done so. Thank you all, during this most difficult time.
09.04.2020 - 14:24DROPS Design ha risposto:
Dear Richard, you have to work to the mid back (find it as explained previously) and another one on the mid front. Now work from RS until 16 sts remain before marker on mid front, turn and work from WS until 16 sts remain before marker on mid front on the other side (= there are now 32 unworked sts on mid front), turn and continue working back & forth leaving then always more stitches before marker mid front at the end of each row both from RS and WS. Happy knitting!
09.04.2020 - 16:37
![]() Richard ha scritto:
Richard ha scritto:
Good morning. How do I get to work the elevation in the back of neck? I understand how this works, but if my piece finishes at the end of the back/beginning of left sleeve; how do I begin knitting from the mid-back? Do I cast off & then begin at the mid-back with a new yarn. Also, when I 'turn', do I 'knit' or 'purl'?? Sorry to trouble you at this difficult time. Richard.
08.04.2020 - 11:18DROPS Design ha risposto:
Dear Richard, elevation is worked in garter stitch: you will knit from RS and knit from WS. Happy knitting :)
09.04.2020 - 16:34
![]() Richard ha scritto:
Richard ha scritto:
Hi, everyone. I trust that you are all well, in this difficult time. Having completed A4, the remaining A5 does not present a problem. However, because I will finish at the beginning of the left sleeve, how do I get to work the elevation in the back of neck? The instructions are to insert 1 marker mid-front! How do I end the yarn between the back & the left sleeve? Do I join new yarn at mid neck, to continue. Thank you. Richard.
06.04.2020 - 10:59DROPS Design ha risposto:
Dear Richard, lie your work flat so that you can find the mid back of jumper, insert a marker ther and work to this marker, then start the elevation from this marker. Happy knitting!
09.04.2020 - 14:14
![]() Richard ha scritto:
Richard ha scritto:
OK. Thanks.
03.04.2020 - 11:50
|
|||||||||||||||||||
Nordic Summer#nordicsummersweater |
|||||||||||||||||||
 |
 |
||||||||||||||||||
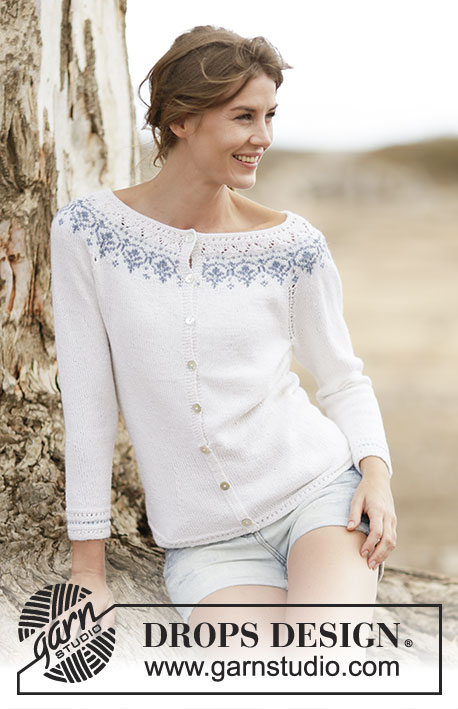
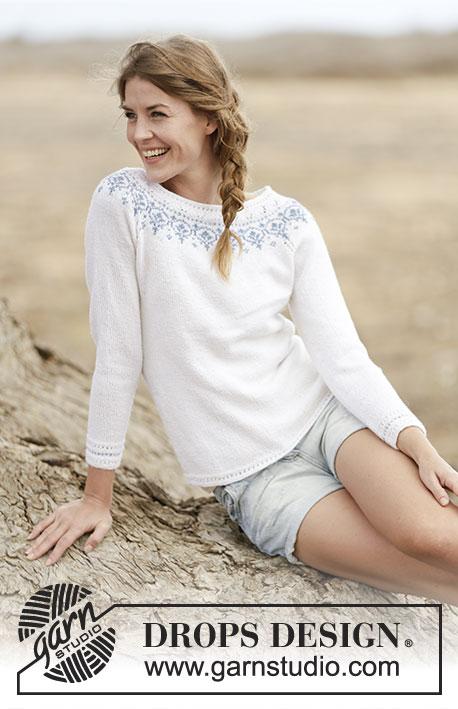
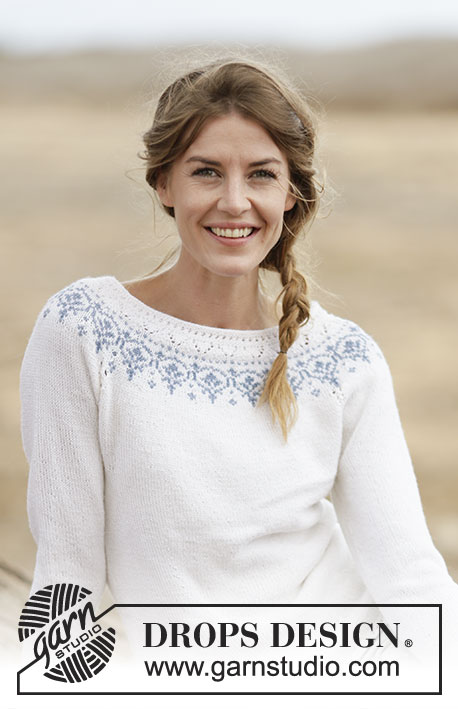
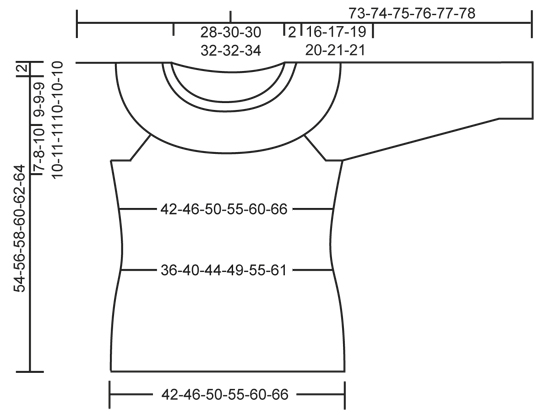
Maglione DROPS lavorato ai ferri con raglan e sprone rotondo in ”BabyMerino”. Taglie: S - XXXL.
DROPS 161-33 |
|||||||||||||||||||
|
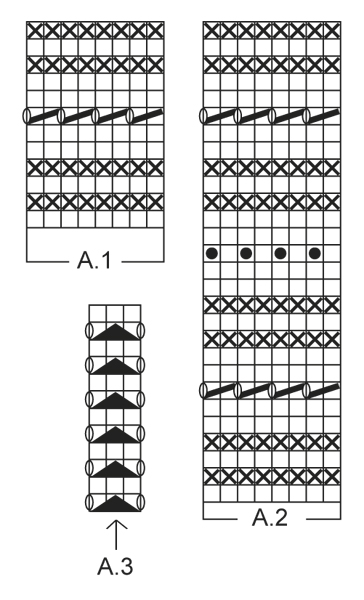
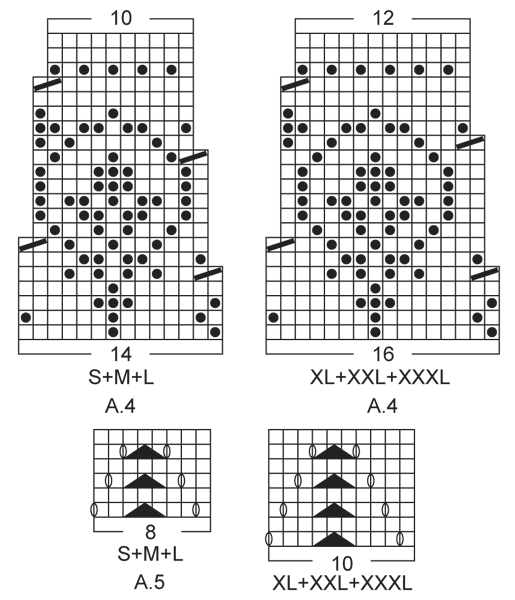
MOTIVO: Vedere i diagrammi A.1-A.5. VITA: Diminuire per la vita all'altezza dei 4 segnapunti. Diminuire come segue dopo il 1° e 3° segnapunti: 2 m insieme a dir. Diminuire come segue quando rimangono 2 m prima del 2° e 4° segnapunti: passare 1 m a dir senza lavorarla, 1 m dir, accavallare la m passata sopra quella appena lavorata. SUGGERIMENTO PER GLI AUMENTI: Aumentare per la vita all'altezza dei 4 segnapunti come segue: fare 1 gettato dopo il 1° e 3° segnapunti e prima del 2° e 4° segnapunti. Sul giro successivo lavorare i gettati a dir ritorto per evitare buchi. RAGLAN: Diminuire per il raglan a ogni lato di A.3 in ogni punto di passaggio tra le maniche e il corpo. Diminuire come segue dopo A.3: passare 1 m a dir senza lavorarla, 1 m dir, accavallare la m passata sopra quella appena lavorata. Diminuire come segue 2 m prima di A.3: lavorare 2 m insieme a dir. ---------------------------------------------------------- CORPO: Lavorato in tondo con i f circolari. Avviare 200-220-240-264-288-316 m con i f circolari n° 2,5 mm con il bianco. Lavorare il motivo secondo il diagramma A.1. Quando A.1 è stato lavorato 1 volta in verticale, passare ai f circolari n° 3 mm. Poi lavorare a m rasata. FARE ATTENZIONE ALLA TENSIONE DEL LAVORO! Quando il lavoro misura 8-8-8-8-10-10 cm, inserire 4 segnapunti nel lavoro come segue: Inserire il 1° segnapunti dopo le prime 24-28-31-36-42-48 m, il 2° segnapunti dopo le 52-54-58-60-60-62 m successive, il 3° segnapunti dopo le 48-56-62-72-84-96 m successive e il 4° segnapunti dopo le 52-54-58-60-60-62 m successive (24-28-31-36-42-48 m rimaste sul f dopo l'ultimo segnapunti). Poi diminuire per la VITA all'altezza dei 4 segnapunti – leggere la spiegazione sopra (= 4 diminuzioni). Ripetere le diminuzioni ogni 4 giri 7-7-7-7-6-6 volte in totale = 172-192-212-236-264-292 m. Quando il lavoro misura 22 cm per tutte le taglie, aumentare dopo il 1° e 3° segnapunti e prima del 2° e 4° segnapunti – LEGGERE IL SUGGERIMENTO PER GLI AUMENTI (= 4 aumenti). Ripetere gli aumenti ogni 4-4-6-6-8-8 giri 7-7-7-7-6-6 volte in totale = 200-220-240-264-288-316 m. Continuare a lavorare fino a quando il lavoro misura 38-39-39-40-41-43 cm. Lavorare il giro successivo come segue: intrecciare 5-5-5-6-6-6 m per lo scalfo, lavorare 90-100-110-120-132-146 m a m rasata (= davanti), intrecciare 10-10-10-12-12-12 m per lo scalfo, lavorare 90-100-110-120-132-146 m a m rasata (= dietro) e intrecciare le ultime 5-5-5-6-6-6 m per lo scalfo. Mettere il lavoro da parte e lavorare le maniche. MANICA: Lavorata in tondo con i ferri a doppia punta. Avviare 56-56-58-60-62-64 m con i ferri a doppia punta n° 2,5 mm con il bianco. Lavorare il motivo secondo il diagramma A.2. Quando A.2 è stato lavorato 1 volta in verticale, passare ai ferri a doppia punta n° 3 mm. Inserire 1 segnapunti all'inizio del giro (= centro sotto la manica) e lavorare a m rasata. Quando il lavoro misura 8 cm, aumentare 2 m al centro sotto la manica. Ripetere gli aumenti ogni 9-7-7-6-6-5 giri 12-14-14-16-16-17 volte in totale = 80-84-86-92-94-98 m. Quando il lavoro misura 41-40-39-38-38-38 cm (NOTA: misure più piccole nelle taglie più grandi a causa dell'arrotondamento della manica più lungo e della maggiore ampiezza delle spalle), intrecciare le 10-10-10-12-12-12 m centrali sotto la manica (cioè intrecciare 5-5-5-6-6-6 m a ogni lato del segnapunti) = 70-74-76-80-82-86 m rimaste sul f. Mettere il lavoro da parte e lavorare l'altra manica. SPRONE: Trasferire le maniche sullo stesso f circolare del corpo come segue: Continuare con il bianco e lavorare le m della 1° manica e ALLO STESSO TEMPO inserire 1 segnapunti nella 1° m e 1 segnapunti nell'ultima m della manica, lavorare le m del davanti, lavorare le m dell'altra manica e ALLO STESSO TEMPO inserire 1 segnapunti nella 1° m e 1 segnapunti nell'ultima m sulla manica e lavorare le m del dietro = 320-348-372-400-428-464 m sul f e 4 segnapunti nel lavoro. Poi lavorare a m rasata in tondo e ALLO STESSO TEMPO lavorare A.3 in ogni punto di passaggio tra il corpo e le maniche (la freccia nel diagramma dovrebbe combaciare con la m con il segnapunti). ALLO STESSO TEMPO diminuire per il RAGLAN a ogni lato di A.3 in ogni punto di passaggio tra il corpo e le maniche – leggere la spiegazione sopra (= 8 diminuzioni). Ripetere le diminuzioni per il raglan ogni 4 giri 6-7-8-8-9-9 volte in totale = 272-292-308-336-356-392 m. Dopo l'ultima diminuzione lavorare 1 giro dir e ALLO STESSO TEMPO distribuire 20-26-28-32-36-40 diminuzioni in modo uniforme = 252-266-280-304-320-352 m sul f. Poi lavorare il motivo in tondo seguendo il diagramma A.4 e ALLO STESSO TEMPO diminuire come indicato nel diagramma - scegliere il diagramma per la taglia corretta. Quando A.4 è stato lavorato 1 volta in verticale, ci sono 180-190-200-228-240-264 m sul f. Lavorare 1 giro con il bianco e ALLO STESSO TEMPO distribuire 4-6-8-28-30-44 diminuzioni in modo uniforme = 176-184-192-200-210-220 m. Ora lavorare il motivo seguendo il diagramma A.5 – scegliere il diagramma per la taglia corretta. Alla fine di A.5, lavorare un'alzata sul dietro del collo. Inserire 1 segnapunti al centro davanti. Iniziare al centro dietro e lavorare a dir (con il bianco) fino a quando rimangono 14-14-16-16-18-20 m prima del segnapunti. Girare, lavorare a dir fino a quando rimangono 14-14-16-16-18-20 m prima del segnapunti dall'altro lato. Girare, lavorare a dir fino a quando rimangono 30-30-34-34-38-42 m prima del segnapunti. Girare, lavorare a dir fino a quando rimangono 30-30-34-34-38-42 m prima del segnapunti dall'altro lato. Girare, lavorare a dir fino a quando rimangono 46-46-52-52-58-64 m prima del segnapunti. Girare, lavorare a dir fino a quando rimangono 46-46-52-52-58-64 m prima del segnapunti dall'altro lato. Girare, lavorare a dir fino a quando rimangono 62-62-70-70-76-86 m prima del segnapunti. Girare, lavorare a dir fino a quando rimangono 62-62-70-70-76-86 m prima del segnapunti dall'altro lato. Girare e lavorare a dir fino all'inizio del giro. BORDO DEL COLLO: Passare ai f circolari n° 2,5 mm e lavorare il motivo in tondo su tutte le m secondo il diagramma A.1, ALLO STESSO TEMPO distribuire 30-28-36-34-44-44 diminuzioni in modo uniforme = 146-156-156-166-166-176 m. Quando A.1 è stato lavorato 1 volta in modo verticale, intrecciare senza stringere a dir. CONFEZIONE: Cucire le aperture sotto le maniche. |
|||||||||||||||||||
Spiegazioni del diagramma |
|||||||||||||||||||
|
|||||||||||||||||||
 |
|||||||||||||||||||
 |
|||||||||||||||||||
 |
|||||||||||||||||||
Avete terminato questo modello?Allora taggate le vostre foto con #dropspattern #nordicsummersweater o inviatele alla #dropsfan gallery. Avete bisogno di aiuto con questo modello?Troverete 30 video tutorial, una sezione per i commenti/domande e molto altro guardando il modello su www.garnstudio.com © 1982-2026 DROPS Design A/S. Ci riserviamo tutti i diritti. Questo documento, compreso tutte le sue sotto-sezioni, è protetto dalle leggi sul copyright. Potete leggere quello che potete fare con i nostri modelli alla fine di ogni modello sul nostro sito. |
|||||||||||||||||||


Con oltre 40 anni di esperienza nel design di modelli di maglia e uncinetto, DROPS Design offre la più estesa collezione di modelli gratuiti su internet - tradotti in 17 lingue. Ad oggi vi possiamo fornire 324 cataloghi e 12290 modelli - 9561 dei quali sono tradotti in Italiano.
Ci stiamo impegnando molto per darvi il meglio che vi possiamo offrire in termini di maglia e uncinetto, ispirazioni e consigli così come filati di grande qualità ad un prezzo incredibile! Volete utilizzare i nostri modelli per qualcosa d'altro oltre al vostro uso personale? Potete leggere tutto ciò che è consentito nel testo sul Copyright in basso su tutte le pagine dei nostri modelli. Buon lavoro!
Lasciare un commento sul modello DROPS 161-33
Noi saremmo felici di ricevere i tuoi commenti e opinioni su questo modello!
Se vuoi fare una domanda, fai per favore attenzione a selezionare la categoria corretta nella casella qui sotto per velocizzare il processo di risposta. I campi richiesti sono indicati da *.