
Categorie popolari
State cercando un filato?

































Commenti / Domande (96)
 Jessica ha scritto:
Hello, Quick question about sleeves. Am I decreasing at the same time as working A2, or do I work A2 and then start to decrease at same time as A3? Thanks!
20.01.2021 - 12:31DROPS Design ha risposto:
Dear Jessica, work A.2 and start to decrease when working A.3. Happpy knitting!
20.01.2021 - 14:38
 Maria Del Mar ha scritto:
En las explicaciones del patrón pone que:"en las tallas S, L, XL, XXL, para el trabajo cuando queden 24 puntos(=1 repetición) antes de la última vuelta" No entiendo muy bien cómo lo tengo que tejer con esa explicación
12.12.2020 - 17:41DROPS Design ha risposto:
Hola Maria Del Mar, para las tallas mencionadas el inicio de la vuelta nueva se desplaza 24 puntos hacia atrás desde el final de la vuelta que estamos trabajando. Esto se necesita para cuadrar bien el dibujo cuando separemos la labor para las mangas y el cuerpo.
13.12.2020 - 11:50
 Berlanger Melinda ha scritto:
Bonjour Donc il y aura 24 mailles non tricotée. Ça ne va pas faire un décalage ? Merci Mélinda
14.11.2020 - 13:07DROPS Design ha risposto:
Bonjour Mme Berlanger, vous continuez le diagramme comme avant, mais le tour suivant doit commencer à ce niveau là pour que le motif soit centré lors de la division. Bon tricot!
16.11.2020 - 07:54
Berlanger ha scritto:
Bonjour, Je ne comprends pas très bien quand on a tricoté A1 1x, il faut tricoter 9 tours en Jersey, il faut arrêter 24 m. Comment faire ????? On tricoté pas les mailles ? , on doit déplacer l'anneau marqueur ? Les 9 tours se tricotent avant ou après ? J'avoue je suis bloqué Merci de votre aide À vous lire Excellente journée
06.11.2020 - 14:38DROPS Design ha risposto:
Bonjour Mme Berlanger, à la fin du 9ème tour, tricotez jusqu'à ce qu'il reste 24 mailles avant la dernière maille des tours précédent, autrement dit 1 motif complet avant la fin du tour. Décalez votre marqueur, les tours commencent désormais ici. Vous divisez maintenant l'ouvrage à partir dici (= les 46 premières mailles sont à tricoter pour le dos etc...). Bon tricot!
06.11.2020 - 15:58
Janine Audebert ha scritto:
Bonjour. Pour commencer A1, faut il faire les augmentations à chaque motif ? ( cela fait 2x13) ou uniquement sur les côtés ? Où faut il faire les augmentations de côté ? Où faut il placer les marqueurs ?
25.10.2020 - 07:59DROPS Design ha risposto:
Bonjour Mme Audebert, vous devez répéter 11 à 17 fois (cf taille) A.1 en largeur; les augmentations figurent dans A.1, lorsque vous tricotez le diagramme, vous devez répéter tous les rangs comme indiqué; vous pouvez mettre un marqueur entre chaque diagramme pour vous permettre de bien vérifier votre nombre de mailles à chaque fois. Le nombre de mailles de chaque A.1 doit être le même pour chaque A.1 de chaque tour et va augmenter en fonction des jetés à faire (3ème symbole). Bon tricot!
26.10.2020 - 08:17
Steph ha scritto:
I am currently knitting the body below the arms and got a little confused with the decrease instructions. I had 180 sts on my needles and just decreased the first round knitting two together on each side of the jumper below the arms, which leaves me with 178 stitches. The instructions now say to repeat the decrease every 2 cm 2 more times, which, to me, translates to: knit 2 cm, decrease, knit 2 cm, decrease. But that would leave me with 174 sts instead of 168? What am I missing?
03.09.2020 - 14:25DROPS Design ha risposto:
Dear Steph, you decrease 4 sts on every round: 1 stitch on each side of both markers under both sleeves (= 2 sts at each marker x 2 sides = 4 sts). There were 180 sts - 4 sts decreased a total of 3 times = 168 sts remain. Happy knitting!
03.09.2020 - 15:49
 Anne Stockholm Madsen ha scritto:
Hvornår skal jeg bruge rundpind 80 henholdvis 40 cm (str. nr. 3 og 4) i opskrift Drops 157-23. Kan ikke læse det ud af opskriften. Jeg strikker str. M.
20.03.2020 - 16:15DROPS Design ha risposto:
Hei Anne. Du bytter ved behov, når du har for mange masker på pinnen bytter du fra 40 cm til 80 cm. Du starter med pinne 3- 40 cm, etter halskant/vrangbord byttes det til pinne 4 - 40 cm og strikker til du har nok masker til å bruke 80 cm. God Fornøyelse!
23.03.2020 - 14:33
 Margriet ha scritto:
Is er nog een truukje om de draad achter 15 steken langs mee te nemen. Bedankt trouwens voor de mooie noorse patronen, groetjes margriet
21.11.2019 - 16:51DROPS Design ha risposto:
Dag Margriet,
Ja zeker dat kan. Als je het patroon breit met de draden in je linker hand kun je vrij makkelijk de draad die je niet gebruikt om de andere draad heen slaan, door de naald er afwisselend onderdoor of bovenlangs te steken tijdens het breien. Bij deze video is dat beschreven en kun je zien hoe je de draden in je linker hand kunt houden.
23.11.2019 - 16:48
 Charlotte Higgins ha scritto:
I am starting the sleeves. It says in YOKE: "58 [] sts on a stitch holder (= sleeve), cast on 10 new sts under sleeve, insert a marker []". Which leaves 10sts hanging between the sleeve and the body. In the SLEEVE: "There are now 58 [] sts for sleeve. Work 1 row in stocking st. Then cast on 10 sts under sleeve = 68 [] sts. Insert a marker []. " Does it mean to pick up the 10 sts that were cast on in the yoke step? Or cast on an additional 10st for a total of 20 new sts?
17.11.2019 - 14:29DROPS Design ha risposto:
Dear Mrs Higgins, at the end of yoke you cast on 10 sts over the 58 sts slipped on a thread for each sleeve, so that there are 10 sts on each side of body for under sleeve(armhole), then on sleeve you cast on 10 sts - you can also pick up 1 st in each of the 10 sts cast on on body, as you rather like to. See time code 07:00 in this video or this lesson from 9). Happy knitting!
18.11.2019 - 10:24
 Denise ha scritto:
Hi! Right after knitting A1 it says: "NOTE: In size S, L, XL, XXXL stop 24 sts (= 1 repetition) before last round is worked. This is now beg of the next rounds." My question is, why does it matter where the next rounds begin if the beginning shifts exactly 1 repetition? It just doesn't seem to matter at all to me? Couldn't I just leave the beginning where it is so that the rows of grey between A1 and A2 are the same troughout the whole piece? Thanks!
23.09.2019 - 22:31DROPS Design ha risposto:
Dear Denise, in these sizes you have to stop the last round 24 stitches before the previous beg of rounds so that the pattern will be properly placed when dividing piece for sleeves. Happy knitting!
24.09.2019 - 10:35
|
||||||||||
Silver Stag#silverstagsweater |
||||||||||
 |
 |
|||||||||
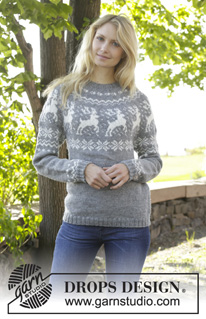
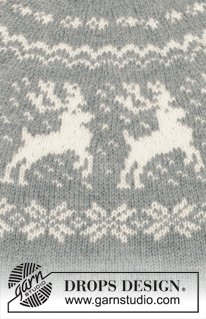
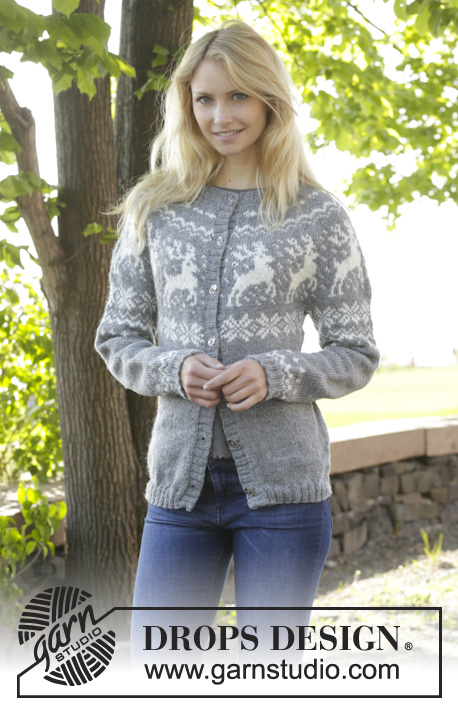
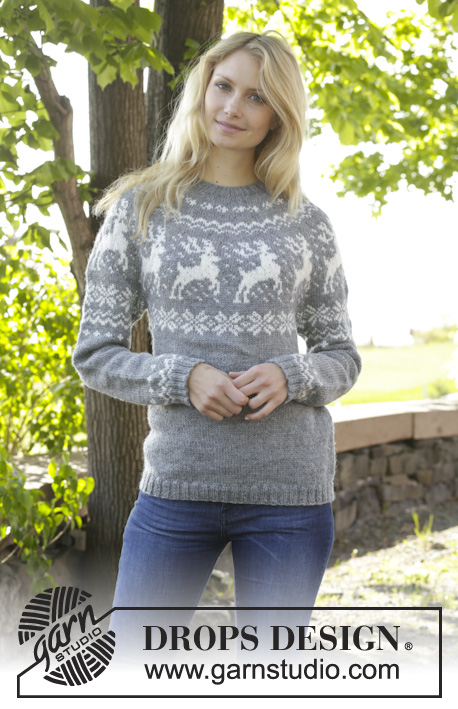
Maglione natalizio DROPS ai ferri, con sprone rotondo, motivo jacquard con renne, lavorato top down, in "Karisma". Taglie: Dalla S alla XXXL.
DROPS 157-23 |
||||||||||
|
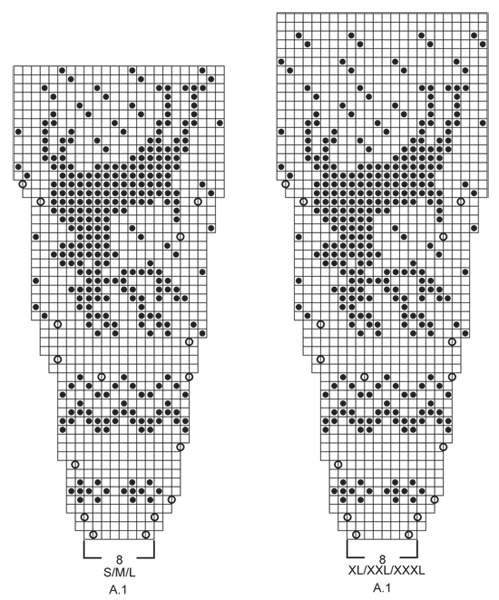
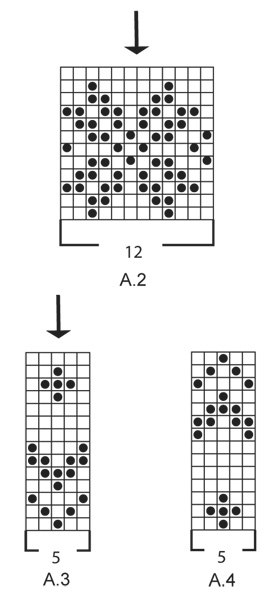
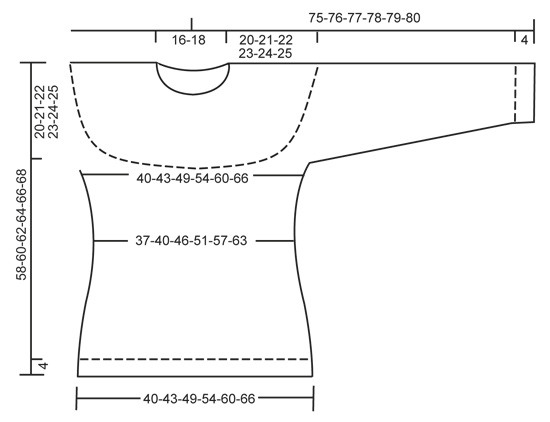
MOTIVO: Vedere i diagrammi da A.1 a A.4. I diagrammi mostrano tutti i ferri del motivo jacquard, visti sul diritto del lavoro. Lavorare i diagrammi a maglia rasata. SUGGERIMENTO PER LE DIMINUZIONI (per i lati e le maniche): Diminuire prima del segno e 1 m a dir come segue: lavorare 2 m insieme a dir. Diminuire dopo il segno e 1 m dir come segue: passare 1 m a dir senza lavorarla, 1 m dir, accavallare la m passata sulla m lavorata. SUGGERIMENTO PER GLI AUMENTI (per i lati): Aumentare in tutto 4 m sul giro: Lavorare finché non rimane 1 m prima del segno, 1 m gettata, 2 m a maglia rasata, 1 m gettata = 2 m aumentate. Nel corso del giro successivo, lavorare la m gettata a dir ritorto (quindi lavorare la m nel filo posteriore e non in quello anteriore) per evitare che si formi un buco. ---------------------------------------------------------- MAGLIONE: Si lavora in tondo sui ferri circolari, dall’alto verso il basso. Lavorare le maniche in tondo sui ferri a doppia punta. SPRONE: Avviare 88-92-96-100-104-108 m sui ferri circolari n° 3 con il colore grigio medio. Lavorare a coste 2 m rov / 2 m dir finché il lavoro non misura 3 cm. Passare ora ai ferri circolari n° 4 e lavorare 1 giro a maglia rasata, ALLO STESSO TEMPO, aumentare 0-4-8-20-24-28 m in modo uniforme = 88-96-104-120-128-136 m. Lavorare ora come segue: ripetere il diagramma A.1 (= 8 m) 11-12-13-15-16-17 volte in larghezza. RICORDARSI LA TENSIONE DEL LAVORO! Dopo aver lavorato il diagramma A.1 1 volta in verticale, ci sono 264-288-312-360-384-408 m sul giro. Lavorare ora 3-5-9-5-7-11 giri con il colore grigio medio. ATTENZIONE: Per le taglie S, L, XL, XXXL fermarsi 24 m (= 1 ripetizione del diagramma) prima dell’ultima m del giro. Questo è ora l’inizio dei giri successivi. Il motivo è ora correttamente posizionato sulle maniche e sul davanti / dietro. Lavorare il giro successivo come segue: Lavorare le prime 37-40-46-52-58-64 m (= metà dietro), mettere in attesa su un ferma maglie le 58-64-64-76-76-76 m successive (= manica), avviare 10 nuove m sotto la manica, inserire un segno al centro di queste 10 m, lavorare le 74-80-92-104-116-128 m successive (= davanti), mettere in attesa su un ferma maglie le 58-64-64-76-76-76 m successive (= manica), avviare 10 nuove m sotto la manica, inserire un segno al centro di queste 10 m, lavorare le rimanenti 37-40-46-52-58-64 m (= metà dietro). DAVANTI E DIETRO: Ci sono ora 168-180-204-228-252-276 m per il davanti e il dietro. Lavorare ora il diagramma A.2 (= 12 m) su tutte le m del giro. Proseguire in questo modo finché il diagramma A.2 non è stato lavorato 1 volta in verticale. Proseguire ora a maglia rasata con il colore grigio medio. Al giro successivo diminuire 1 m da ciascun lato di ogni segno ai lati del lavoro - VEDERE IL SUGGERIMENTO PER LE DIMINUZIONI. Ripetere queste diminuzioni ogni 2 cm altre 2 volte = 156-168-192-216-240-264 m. Quando il lavoro misura 12-13-14-15-16-17 cm dal segno sotto le maniche, aumentare 1 m da ciascun lato dei segni ai lati del lavoro – vedere il SUGGERIMENTO PER GLI AUMENTI. Ripetere questi aumenti ogni 2 cm altre 2 volte = 168-180-204-228-252-276 m. Quando il lavoro misura 56-58-60-62-64-66 cm, passare ai ferri circolari n° 3 e aumentare 20-24-24-28-28-32 m in modo uniforme = 188-204-228-256-280-308 m. Proseguire a lavorare a coste come segue: * 2 m dir, 2 m rov *, ripetere da *-*. Quando le coste misurano 4 cm, intrecciare le m lavorando a dir le m dir e a rov le m rov. MANICHE: Lavorare prima seguendo il motivo jacquard, poi proseguire con il colore grigio medio. Riportare sui ferri a doppia punta n° 4 le m messe in attesa sul ferma maglie. Ci sono ora 58-64-64-76-76-76 m per la manica. Lavorare 1 ferro a maglia rasata e avviare 10 m sotto la manica = 68-74-74-86-86-86 m. Inserire un segno al centro di queste nuove m. Proseguire la manica in tondo. Lavorare ora il diagramma A.2. ATTENZIONE: assicurarsi che le 2 m centrali del diagramma (vedere la freccia) siano le 2 m centrali della manica. Dopo aver completato il diagramma A.2, proseguire con il diagramma A.3. ATTENZIONE: assicurarsi che la m centrale del diagramma (vedere la freccia) sia una delle 2 m centrali della manica, ALLO STESSO TEMPO, iniziare a diminuire sotto la manica - vedere IL SUGGERIMENTO PER LE DIMINUZIONI. Ripetere queste diminuzioni ogni 3-2½-2½-2½-2½-2½ cm altre 9-12-12-12-12-12 volte = 48-48-48-60-60-60 m. Quando la manica misura 38 cm, lavorare il diagramma A.4. ATTENZIONE: Assicurarsi che la m centrale del diagramma (vedere la freccia) sia una delle 2 m centrali della manica. Dopo aver lavorato il diagramma A.4, passare ai ferri a doppia punta n° 3 e aumentare 4-8-8-0-4-4 m in modo uniforme = 52-56-56-60-64-64 m. Proseguire a coste (= 2 m dir / 2 m rov) per 3 cm. Intrecciare le m lavorando a dir le m dir e a rov le m rov. CONFEZIONE: Cucire le aperture sotto le maniche. |
||||||||||
Spiegazioni del diagramma |
||||||||||
|
||||||||||
 |
||||||||||
 |
||||||||||
 |
||||||||||
Avete terminato questo modello?Allora taggate le vostre foto con #dropspattern #silverstagsweater o inviatele alla #dropsfan gallery. Avete bisogno di aiuto con questo modello?Troverete 15 video tutorial, una sezione per i commenti/domande e molto altro guardando il modello su www.garnstudio.com © 1982-2026 DROPS Design A/S. Ci riserviamo tutti i diritti. Questo documento, compreso tutte le sue sotto-sezioni, è protetto dalle leggi sul copyright. Potete leggere quello che potete fare con i nostri modelli alla fine di ogni modello sul nostro sito. |
||||||||||






Con oltre 40 anni di esperienza nel design di modelli di maglia e uncinetto, DROPS Design offre la più estesa collezione di modelli gratuiti su internet - tradotti in 17 lingue. Ad oggi vi possiamo fornire 333 cataloghi e 12532 modelli - 9806 dei quali sono tradotti in Italiano.
Ci stiamo impegnando molto per darvi il meglio che vi possiamo offrire in termini di maglia e uncinetto, ispirazioni e consigli così come filati di grande qualità ad un prezzo incredibile! Volete utilizzare i nostri modelli per qualcosa d'altro oltre al vostro uso personale? Potete leggere tutto ciò che è consentito nel testo sul Copyright in basso su tutte le pagine dei nostri modelli. Buon lavoro!
Lasciare un commento sul modello DROPS 157-23
Noi saremmo felici di ricevere i tuoi commenti e opinioni su questo modello!
Se vuoi fare una domanda, fai per favore attenzione a selezionare la categoria corretta nella casella qui sotto per velocizzare il processo di risposta. I campi richiesti sono indicati da *.