
Categorie popolari
State cercando un filato?


Commenti / Domande (17)
![]() Debbie ha scritto:
Debbie ha scritto:
I am confused by the heel. Which video shows how this is done. Is it the one with the string?
28.08.2025 - 04:08DROPS Design ha risposto:
Dear Debbie, this is an old method of working the heel so we don't have any video available for this technique. But you can use the technique showed in the video you indicated, where you slip stitches onto a thread, instead of the one in the written instructions. Happy knitting!
31.08.2025 - 22:37
![]() Sandy Petterson ha scritto:
Sandy Petterson ha scritto:
Hi, I love this pattern but have a question concerning the A-3 pattern section. This section originally has 40 stitches which seems to work out fine in theory when you are starting this section with 1 st red and 1 st white, then 6 repeats of A-3 (36 stitches) and then ending it with 1 st white and 1 stitch red. When I increase a an extra stitch after the 18th stitch I end up with an extra stitch at the end of this section. What do I do with it? What color should it be? Thanks for your help.
02.11.2021 - 01:26DROPS Design ha risposto:
Dear Mrs Petterson, work the 40 sts as follows: 1 st red, 1 st off white, A.3 over the next 36 sts increasing 1 st = repeat 6 times the 6 sts in A.3 and increase 1 st worked as the first st in A.3 so that the pattern starts and ends the same way (= there are now 37 sts), 1 st off white, 1 st red = 2+37+2=41 sts for under foot. Happy knitting!
03.11.2021 - 07:57
![]() Sandrine ha scritto:
Sandrine ha scritto:
Bonjour, Aurait-on le même modèle avec des aiguilles circulaires au lieu des doubles pointes ? Eventuellement pourrait-on la faire avec 2 aiguilles normales ? Merci de me répondre à ces deux questions
22.08.2021 - 16:46DROPS Design ha risposto:
Bonjour Sandrine, vous pouvez tricoter ce modele avec des aiguilles circulaires en utilisant la technique MAGIC LOOP (a voir ICI). Deuxieme question: la reponse est non. Bon tricot!
22.08.2021 - 20:17
![]() Amy Lee ha scritto:
Amy Lee ha scritto:
I was struggling with the video for the heel and my first attempt was a disaster - but found this one was great: chilly dog yarn over short row heels video
26.01.2021 - 14:52
![]() Amy ha scritto:
Amy ha scritto:
Hi, I am really confused about the increased stitch to the underside foot after 18 stitches as this makes it 41 stitches. I can't work out what the extra stitch should be. There is a stitch of white and a stitch of red either side of the 6 stitch repeat, which makes 40 stitches, what do I do with the additional stitch each round - sorry if I am missing the obvious.
03.01.2021 - 20:52DROPS Design ha risposto:
Dear Amy, when working heel you are supposed to get back to the 40 sts after 2nd part of heel (see the technique for this heel in video there), so that there are again a total of 80 stitches on needle. Happy knitting!
05.01.2021 - 09:35
![]() Renee ha scritto:
Renee ha scritto:
For the heel after the 4th needle, should I repeat needles 3 and 4. Or needle 1-4. And in the exemplary video, the first stitches are knitted. While the pattern states you have to slip them. Is that correct? After reaching the 18 stitches in the middle and going back, do you then knit the first stitch of each needles or do you slip that first stitch
07.10.2020 - 20:37DROPS Design ha risposto:
Dear Renee, heel is worked over stitches which are on 4th + on 1st needle - the stitches on 2nd and 3rd needles won't be worked until heel is done. Work heel as explained in the pattern - video shows the technique but there always might be some variations. You first work 1 st less at the end of every row until 18 sts remain on needle, then work 1 st more at the end of every row until all the 40 sts have been worked again. Happy knitting!
08.10.2020 - 10:20
![]() Veronika ha scritto:
Veronika ha scritto:
Forstår jeg det riktig at denne strikkes ovenfra og ned?
21.01.2020 - 09:16DROPS Design ha risposto:
Hei Veronika, Ja det er strikket ovenfra og ned. God fornøyelse!
22.01.2020 - 07:49
![]() Guillermina Bejarano ha scritto:
Guillermina Bejarano ha scritto:
Buenas tardes. Es posible tejerlo todo con agujas circulares sin usar las de doble punta? Gracias
20.08.2017 - 18:59DROPS Design ha risposto:
Hola Guillermina. Puedes trabajar el patrón con una aguja circular corta o con dos agujas circulares
22.08.2017 - 20:26
![]() Katharina Louise Williamsen ha scritto:
Katharina Louise Williamsen ha scritto:
Ser her flere som sliter me hælen, det gjør nå også jeg... Har kommet dit hvor jeg skal begynne å strikke flere masker igjen, og ser at oppskrifta og videoen dere har lagt ut her viser to forskjellige ting.. har prøvd begge, plukke opp to masker før den nye, for så å strikke 3 sammen og løfte tråden før masken, sette den vridd på pinnen og strikke 2 sammen...men får hull uansett....hva gjør æ galt?
03.10.2015 - 19:00DROPS Design ha risposto:
Hej, Jo men det er helt rigtigt som du gør, men sørg for at stramme tråden. God fornøjelse!
06.10.2015 - 14:44
![]() Katharina Louise Williamsen ha scritto:
Katharina Louise Williamsen ha scritto:
Hei! Lurer på hullmønsteret... Om det strikkes på settp, og annenhver 2r sm, 1 kast, ender jeg opp med at siste maske på pinnen er ei kast maske? den holder seg jo ikke der uten at det strikkes ei maske utafor? Jeg får det i allefall ikke til. Gjør jeg noe feil? Enkleste ville jo vært å strikke det på rundpinner, hadde jeg hatt det, men har brukt settp hele veien.. Men dette kan ikke være feilen heller, for oppskriften sier jo at man skal bytte fra rundp til settp FØR hullene..
28.09.2015 - 05:11DROPS Design ha risposto:
Jo men du strikker også rundt på settp, så du fortsætter bare rundt rundt, så stemmer det! God fornøjelse!
01.10.2015 - 17:00
|
|||||||
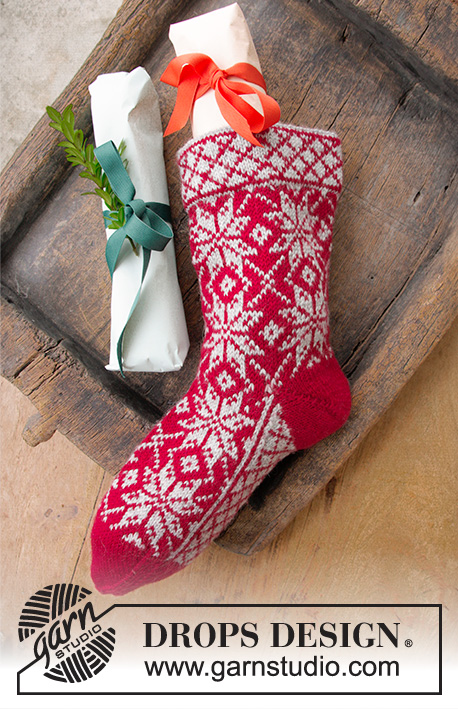
Mr. Kringle's Stocking |
|||||||
|
|
|||||||
Natale DROPS: Calza DROPS lavorata ai ferri con motivo norvegese in "Karisma".
DROPS Extra 0-986 |
|||||||
|
MOTIVO: Vedere i motivi A.1-A.3. Il motivo è lavorato a m rasata. TALLONE: Lavorato avanti e indietro a m rasata. 1° f (= diritto del lavoro): lavorare fino a quando rimane 1 m, girare il lavoro. 2° f (= rovescio del lavoro): passare la 1° m a rov senza lavorarla, tirare il filo e lavorare fino a quando rimane 1 m, girare il lavoro. 3° f (= diritto del lavoro): passare la 1° m a dir senza lavorarla, tirare il filo e lavorare fino a quando rimangono 2 m, girare il lavoro. 4° f (= rovescio del lavoro): passare la 1° m a rov senza lavorarla, tirare il filo e lavorare fino a quando rimangono 2 m, girare il lavoro. Continuare in questo modo fino a quando rimangono 18 m al centro del f. Continuare avanti e indietro ma ora lavorare 1 m in più per ogni f sul tallone. Per evitare buchi nel punto di passaggio, sollevare il filo prima della m che deve essere lavorata e trasferirlo ritorto sul f. Lavorare il filo insieme alla m. Lavorare in questo modo fino a quando sono state lavorate tutte le m del tallone. SUGGERIMENTO PER LE DIMINUZIONI: Diminuire come segue 3 m prima del segnapunti: 2 m insieme a dir, 1 m dir. Diminuire come segue dopo il segnapunti: 1 m dir, passare 1 m a dir senza lavorarla, 1 m dir, accavallare la m passata sopra quella appena lavorata. ---------------------------------------------------------- CALZA DI NATALE: Lavorata in tondo sui f. Avviare 80 m con i f circolari n° 2,5 mm con il rosso scuro. Lavorare a m rasata per 3 cm. Passare ai f a doppia punta n° 3,5 mm, lavorare 1 giro come segue: 2 m insieme a dir, 1 gettato. Lavorare 3 giri dir. Distribuire le m in modo che ci siano 20 m su ognuno dei 4 f a doppia punta. Lavorare A.1, poi continuare con A.2. FARE ATTENZIONE ALLA TENSIONE DEL LAVORO! Quando A.2 è stato lavorato 3 volte in totale in verticale (il lavoro misura circa 29 cm), tagliare i fili. Ora lavorare il tallone sulle m del 1° e 4° f (= 40 m), trasferire le altre 40 m (= sul sopra del piede) su un fermamaglie. Iniziare dal diritto del lavoro, lavorare 1 f con il rosso scuro e 1 f con il panna sulle 40 m del tallone, ALLO STESSO TEMPO lavorare il TALLONE - leggere la spiegazione sopra. Continuare a m rasata avanti e indietro con il rosso scuro, ALLO STESSO TEMPO lavorare il tallone. Lavorare fino a quando rimangono 2 f sul tallone. Poi lavorare 1 f con il panna e 1 f con il rosso scuro. Poi riportare 40 m dal fermamaglie sul f di lavoro e lavorare in tondo su tutte le 80 m con il rosso scuro come segue (iniziare il giro sul 2° f, cioè dopo il tallone): lavorare A.2 come prima sulle 40 m al centro sul sopra del piede, lavorare 1 m con il rosso scuro, 1 m con il panna, lavorare A.3 (= 6 m) sulle 36 m successive, ALLO STESSO TEMPO aumentare 1 m (dopo le prime 18 m) in modo che il motivo inizi e finisca nello stesso modo a ogni lato e finire con 1 m panna e 1 m rosso scuro. Lavorare il motivo A.2 2 volte in verticale dopo il tallone e finire con il penultimo f del motivo A.2 (mancano circa 4,5 cm alla fine). Inserire 1 segnapunti a ogni lato in modo che ci siano 40 m sul sopra del piede e 41 m sul sotto del piede. Continuare con 1 giro rosso scuro e 1 giro panna, poi lavorare a m rasata con il rosso scuro, ALLO STESSO TEMPO diminuire per la punta a ogni lato di ogni segnapunti come segue - LEGGERE IL SUGGERIMENTO PER LE DIMINUZIONI: diminuire a giri alterni per un totale di 6 volte, poi su ogni giro per un totale di 4 volte. Mettere la calza distesa e cucirla sul lato superiore della punta con dei punti sul lato inferiore a punto materasso. Chiudere e affrancare. Piegare il bordo superiore verso l’interno, cucire con piccoli punti sull’interno senza essere troppo tirati. Far passare un nastrino di seta sulla parte superiore del dietro della calza, viene usato come appendino. |
|||||||
Spiegazioni del diagramma |
|||||||
|
|||||||
 |
|||||||
Avete terminato questo modello?Allora taggate le vostre foto con #dropspattern o inviatele alla #dropsfan gallery. Avete bisogno di aiuto con questo modello?Troverete 21 video tutorial, una sezione per i commenti/domande e molto altro guardando il modello su www.garnstudio.com © 1982-2026 DROPS Design A/S. Ci riserviamo tutti i diritti. Questo documento, compreso tutte le sue sotto-sezioni, è protetto dalle leggi sul copyright. Potete leggere quello che potete fare con i nostri modelli alla fine di ogni modello sul nostro sito. |
|||||||


Con oltre 40 anni di esperienza nel design di modelli di maglia e uncinetto, DROPS Design offre la più estesa collezione di modelli gratuiti su internet - tradotti in 17 lingue. Ad oggi vi possiamo fornire 324 cataloghi e 12290 modelli - 9561 dei quali sono tradotti in Italiano.
Ci stiamo impegnando molto per darvi il meglio che vi possiamo offrire in termini di maglia e uncinetto, ispirazioni e consigli così come filati di grande qualità ad un prezzo incredibile! Volete utilizzare i nostri modelli per qualcosa d'altro oltre al vostro uso personale? Potete leggere tutto ciò che è consentito nel testo sul Copyright in basso su tutte le pagine dei nostri modelli. Buon lavoro!
Lasciare un commento sul modello DROPS Extra 0-986
Noi saremmo felici di ricevere i tuoi commenti e opinioni su questo modello!
Se vuoi fare una domanda, fai per favore attenzione a selezionare la categoria corretta nella casella qui sotto per velocizzare il processo di risposta. I campi richiesti sono indicati da *.