
Categorie popolari
State cercando un filato?


Commenti / Domande (91)
![]() Kathy Kinrade ha scritto:
Kathy Kinrade ha scritto:
I am having trouble with this pattern.When I am on the wrong side it is telling me to purl across , then on the right side purl across.Shouldn't be purl on one side then knit on the other?
29.03.2013 - 15:47DROPS Design ha risposto:
Dear Mrs Kinrade, Row 3 will be P from WS (and K when worked in the round = from RS), Row 4 will be K from WS (and P from RS when worked in the round). Happy knitting!
29.03.2013 - 16:12Sleepyhead ha scritto:
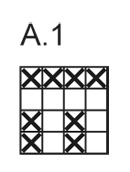
Started knitting this hat and would love someone would explain me if I need to make any change to the chart when it comes the point that I have to knit in the round : should I knit all empty squares as knits? and the crossed ones as purls? as I understand when I start knitting in the round is always from the right side...thanks in advance!
27.03.2013 - 16:08DROPS Design ha risposto:
Dear Sleepyhead, correct, worked in the round A1 will be worked : K all empty squares and P all crossed. Happy knitting!
29.03.2013 - 14:58
![]() Sayuri ha scritto:
Sayuri ha scritto:
Hi there My questions are: When I am going to cast off 6 sts in each side, do I have to k the other 50 sts to reach the other side to cast off 6 sys? When it said " Cast on 6 sts on circular needle size 5 mm / US 8, work sts from one piece back on needle, work sts from the other piece back on needle and cast on 6 sts at end of row = 112 sts."that mean cast 6 sys and then put back the 50 sys,50 sys and cast 6sts=112 sys? Thanks for your help
19.03.2013 - 02:28DROPS Design ha risposto:
Dear Mrs Sayuri, when piece measures 20 cm, you cast off the first 6 sts, work the other sts as before and cast off the last 6 sts. And then you are correct, you then cast on 6 sts, work both pieces ( 50 sts 2 times) and cast on 6 sts) = 112 sts. Happy knitting!
19.03.2013 - 10:08
![]() Sayuri ha scritto:
Sayuri ha scritto:
I am having trouble with the diagram. When it say "6 sts in GARTER ST - see explanation above, * K 2, P 2 *, repeat from *-*, finish with K 2 and 6 sts in garter st. Can anyone clarify what mean 6 sts in garter st. 6 sts in garter st = k k k k k k?
14.03.2013 - 23:10DROPS Design ha risposto:
Dear Sayuri, 6 sts in garter st are 6 sts you will work knitwise from RS as well as from WS. Happy knitting!
15.03.2013 - 09:46
![]() Graziana Corica ha scritto:
Graziana Corica ha scritto:
Sareste così gentili da fornirmi le spiegazioni per la realizzazione di questo modello da eseguire con i ferri normali e non con quelli circolari.Grazie infinite rimango in attesa di una vostra risposta . Graziana
13.03.2013 - 18:22DROPS Design ha risposto:
Buongiorno, lo scaldacollo è lavorato avanti e indietro sui f. circolari, non in tondo, per cui è possibile lavorarlo sui f. dritti seguendo le spiegazioni indicate. Per quanto riguarda il cappello, la prima parte è lavorata avanti e indietro, l'ultima in tondo, ma è a m. legaccio, quindi e possibile lavorarlo normalmente sui f. dritti, aggiungendo una cucitura alla fine. Buon lavoro!!
14.03.2013 - 13:26
![]() Oleco ha scritto:
Oleco ha scritto:
Hallo, ist es richtig, dass man bei der Mütze 1 re., 1 li. im wechsel auf der Rückreihe dann so wie sie erscheinen sstrickt? dann 1 reihe re. und darauf 1 reihe li.???? Ich finde das Musterbild ist sehr irritierend.
21.02.2013 - 11:40DROPS Design ha risposto:
Hallo, die ersten beiden R sind so, wie Sie es beschrieben haben, aber kommt es darauf an, ob Sie in Runden oder Reihen stricken, daher ist in der Legende zum Diagramm beides angegeben. In Runden stricken Sie 1 Rd re und 1 Rd li, in Reihen stricken Sie beide Reihen rechts, dann wieder 1 re/1 li im Wechsel etc.
22.02.2013 - 11:33
![]() Pueppchen ha scritto:
Pueppchen ha scritto:
Hallo, ich verstehe nicht wie man das Diagramm A1 strickt. Kann mir jemand helfen?
17.02.2013 - 22:10DROPS Design ha risposto:
Hallo , die Legende zum Diagramm ist unmittelbar darüber. Sie stricken das Diagramm von unten nach oben und es ist jede R abgebildet.
18.02.2013 - 09:48
![]() Christina ha scritto:
Christina ha scritto:
Hej! Jag stickar halsvärmare nr 140 40 och förstår inte riktigt hur jag skall göra följande; Lägg upp 6 m på rundst 5, sticka tillbaka m från den ena delen på st, sticka tillbaka m från den andra delen på st och lägg upp 6 m i slutet på v = 112 m. Sticka fram och tillbaka på st så här: 6 rätst m (kant), A.1 över de nästa 100 m, 6 rätst m (kant). Jag behöver ett förtydligande hur jag gör ovanstående tack!
11.02.2013 - 20:04DROPS Design ha risposto:
Efter de 6 m (lägg upp 6m) stickar du m från det första stycket du stickade (Hals) in på samma sticka osv.
03.04.2013 - 11:37
![]() Jonny ha scritto:
Jonny ha scritto:
Ich bräuchte bitte Hilfe und zwar was heißt: "mit A. 1"?! Danke :)
27.01.2013 - 15:30DROPS Design ha risposto:
Lieber Jonny, das heisst „im Muster A.1“.
27.01.2013 - 16:36
![]() Chiara ha scritto:
Chiara ha scritto:
Buonasera, dato che mi sono particolarmente innamorata dei vostri modelli vorrei sapere se i vostri anagrammi sono solo riferiti nei ferri di andata (quindi sul dritto del lavoro)e il rovescio lavorare le maglie come si presentano e continuare così. Ve lo chiedo semplicemenete perche sto provando a fare il modello n° ne-104 e non mi riesce far tornare il motivo del diagramma. grazie per la vostra attenzione, aspetto una vostra risposta
20.01.2013 - 21:54DROPS Design ha risposto:
Buongiorno, scusi per la risposta tardiva. I diagrammi dimostrano il diritto del lavoro, ma si rifersicono a sia quelli di andata che di ritorno. In questo caso: 1° f (sul diritto del lavoro): 1 dir, 1 rov, 1 dir, 1 rov. 2° f (rov del lavoro): 1 dir, 1 rov, 1 dir, 1 rov. 3° f (dir del lavoro): tutte le m dir. 4° f (rov del lavoro): tutte le m a dir (NOTA: Leggere attentamente le spiegazioni del diagramma)
27.01.2013 - 16:24
|
|||||||
Bliss#blissset |
|||||||
|
|
|||||||
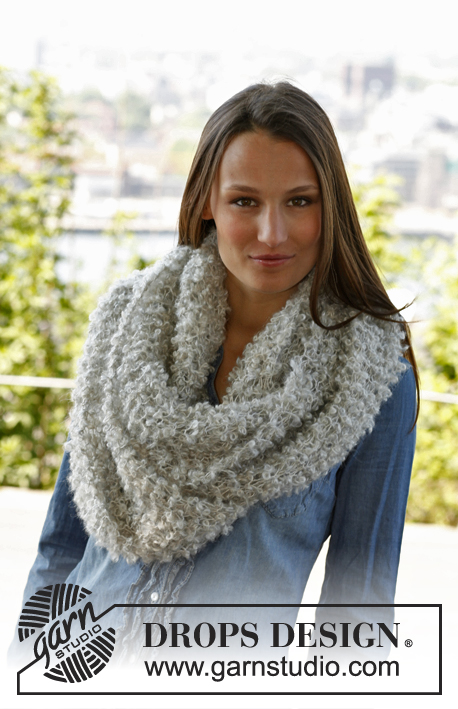
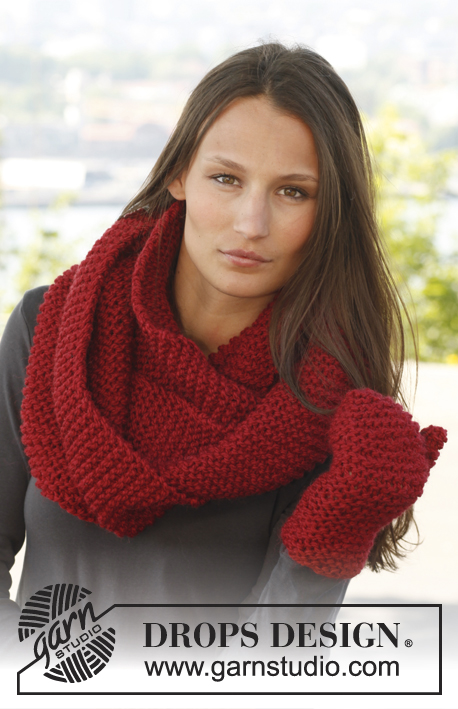
Scaldacollo e cappello DROPS lavorati ai ferri con motivo in "Nepal".
DROPS 140-40 |
|||||||
|
M. LEGACCIO (avanti e indietro sui f.): Lavorare tutti i f. a dir. 1 "costa" a m. legaccio = 2 f. dir. M. LEGACCIO (in tondo con i ferri circolari): 1 "costa" a m. legaccio = 2 giri * 1 giro a dir. e 1 giro a rov. *, ripetere *-*. MOTIVO: Vedere il diagramma A.1. Il diagramma mostra tutti i f. nel motivo sul diritto del lavoro. ---------------------------------------------------------- CAPPELLO: Lavorare prima avanti e indietro sui ferri circolari e poi lavorare in tondo. Avviare 86-94 m. con il filato Nepal con i ferri circolari n° 4 mm. Lavorare 1 f. a diritto sul rovescio del lavoro, poi lavorare come segue: 6 m. a MAGLIA LEGACCIO – leggere la spiegazione sopra, * 2 m. dir., 2 m. rov. *, ripetere *-*, finire con 2 m. dir. e 6 m. a m. legaccio. Continuare a coste e a m. legaccio da ogni lato fino a quando il lavoro misura 4 cm. Passare ai ferri circolari n° 5 mm. Ora lavorare come segue: 6 m. a m. legaccio, A.1 sopra le 74-82 m. successive e finire con 6 m. a m. legaccio. Quando il lavoro misura 8 cm, intrecciare le prime 6 m. sul f., quindi lavorare in tondo con A.1 sopra tutte le m. = 80-88 m. Quando il lavoro misura 20-21 cm, lavorare a M. LEGACCIO – leggere la spiegazione sopra – fino alla fine del lavoro. Lavorare a m. legaccio, ALLO STESSO TEMPO distribuire 12 diminuzioni in modo uniforme ogni 3 giri per un totale di 5 volte = 20-28 m. rimaste sul giro. Lavorare le m. rimaste insieme 2 e 2 alla volta, tagliare il filo e farlo passare attraverso le m. rimaste. Tirare forte e fissare il filo. Il cappello misura circa 25-26 cm in altezza. Attaccare 2 bottoni sull’aletta sulla parte inferiore del cappello, cucire attraverso entrambi gli strati. ---------------------------------------------------------- SCALDACOLLO: Lavorato avanti e indietro sui f. Avviare 62 m. con i ferri circolari n° 4 mm con il filato Nepal. Lavorare 1 f. a dir. sul rovescio del lavoro, poi lavorare come segue – sul diritto del lavoro: 6 m. a m. legaccio, 2 m. dir., * 2 m. rov., 2 m. dir. *, ripetere *-* e finire con 6 m. a m. legaccio. Continuare in questo modo. Quando il lavoro misura 4 cm, passare ai ferri circolari n° 5 mm e continuare come segue: 6 m. a m. legaccio, A.1 sulle 50 m. successive e finire con 6 m. a m. legaccio. Quando il lavoro misura 20 cm, intrecciare 6 m. da ogni lato = 50 m. Tagliare il filo. Mettere il lavoro da parte. Lavorare l’altra parte nello stesso modo. Avviare 6 m. con i ferri circolari n° 5 mm, lavorare le m. di una delle 2 parti, e lavorare le m. dell’altra parte e avviare 6 m. alla fine del f. = 112 m. Lavorare avanti e indietro come segue: 6 m. a m. legaccio (bordo), A.1 sulle 100 m. successive, 6 m. a m. legaccio (bordo). Continuare in questo modo fino a quando il lavoro misura 34 cm. Passare ai f. circolari n° 4 mm, quindi lavorare come segue – ALLO STESSO TEMPO sul 1° f. distribuire 2 aumenti in modo uniforme. 6 m. a m. legaccio, 2 m. dir, * 2 m. rov., 2 m. dir. *, ripetere *-* e finire con 6 m. a m. legaccio = 114 m. Lavorare 4 cm e intrecciare senza stringere con il dir sopra il dir e il rov sopra il rov. Mettere i bordi uno sull’altro e attaccare 4 bottoni attraverso entrambi gli strati. |
|||||||
Spiegazioni del diagramma |
|||||||
|
|||||||
 |
|||||||
Avete terminato questo modello?Allora taggate le vostre foto con #dropspattern #blissset o inviatele alla #dropsfan gallery. Avete bisogno di aiuto con questo modello?Troverete 7 video tutorial, una sezione per i commenti/domande e molto altro guardando il modello su www.garnstudio.com © 1982-2026 DROPS Design A/S. Ci riserviamo tutti i diritti. Questo documento, compreso tutte le sue sotto-sezioni, è protetto dalle leggi sul copyright. Potete leggere quello che potete fare con i nostri modelli alla fine di ogni modello sul nostro sito. |
|||||||


Con oltre 40 anni di esperienza nel design di modelli di maglia e uncinetto, DROPS Design offre la più estesa collezione di modelli gratuiti su internet - tradotti in 17 lingue. Ad oggi vi possiamo fornire 324 cataloghi e 12290 modelli - 9561 dei quali sono tradotti in Italiano.
Ci stiamo impegnando molto per darvi il meglio che vi possiamo offrire in termini di maglia e uncinetto, ispirazioni e consigli così come filati di grande qualità ad un prezzo incredibile! Volete utilizzare i nostri modelli per qualcosa d'altro oltre al vostro uso personale? Potete leggere tutto ciò che è consentito nel testo sul Copyright in basso su tutte le pagine dei nostri modelli. Buon lavoro!
Lasciare un commento sul modello DROPS 140-40
Noi saremmo felici di ricevere i tuoi commenti e opinioni su questo modello!
Se vuoi fare una domanda, fai per favore attenzione a selezionare la categoria corretta nella casella qui sotto per velocizzare il processo di risposta. I campi richiesti sono indicati da *.