
Categorie popolari
State cercando un filato?


Commenti / Domande (91)
Zillah ha scritto:
The chart really is confusing! I suggest you rewrite the pattern and only offer the chart for when knitting in the round. I really had to struggle with it and had to unpick it all after several mistakes.
12.08.2014 - 01:09
![]() Beate Wewezow ha scritto:
Beate Wewezow ha scritto:
Warum wird der Kragen nicht mit Knopflöchern gestrickt? So muss er doch über den Kopf / Frisur gezogen werden?! Hätte mir ohnehin eine Schemazeichnung für den gesamten Kragen gewünscht.
24.06.2014 - 15:38DROPS Design ha risposto:
Ja, es stimmt, der Kragen wird über den Kopf gezogen, so wie ein "normaler" Rundschal. Sie können ihn aber ganz leicht modifizieren, indem Sie beim oberen Teil, d.h. nach dem seitlichen Schlitz, an der einen Blende gleichmäßig verteilt Knopflöcher einarbeiten. Der obere Teil misst insg. 18 cm. (Der Kragen wird von unten nach oben gestrickt, der seitl. Schlitz, den Sie sehen, ist die Stelle, an der beide Teile auf eine Nadel gelegt werden und rechts und links 6 neue M angeschlagen werden.)
25.06.2014 - 11:55
![]() Lucia ha scritto:
Lucia ha scritto:
Gostaria que vocês publicassem o gráfico deste modelo de gola 140-40. este modelo é belíssimo, parabéns.
15.02.2014 - 13:40
![]() Helen Gladgo ha scritto:
Helen Gladgo ha scritto:
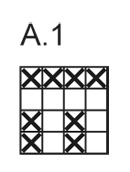
Confused on A-1 chart first row is the same a Purl row , second row a Knit and third row k,P,k,p,k,p,k,p then Fourth row k,P, k, p k,p,k,p
16.01.2014 - 18:46DROPS Design ha risposto:
Dear Mrs Gladgo, start reading diagram at the bottom corner on the right side towards the left on every RS row / on all rounds - from WS, read from left towards right. Rounds 1 & 2: K1,P1,K1,P1 - Round 3: K - Round 4 P (from RS i.e. in the round or as seen from RS). Happy knitting!
17.01.2014 - 09:56
![]() Shellee ha scritto:
Shellee ha scritto:
The only oart if this pattern not confusing is the chart! Love it. Question. Can you explain the neck warmer construction? Are bothe sides of the initial 8cm disconnect? If so the instruction only allows for buttons on one side. What happens with the loose flaps on the other side? Is there a 360 view of the neck warmer????? If not how is it worn on the side not showing in the photo? Is the area connecting the two sides worn under the arm? Or on the shoulder??????
22.12.2013 - 18:56DROPS Design ha risposto:
Dear Shelly, the neck warmer is worked first in 2 identical pieces until 20 cm high, then you put both pieces tog and finish piece. Just follow instructions step by step and you'll see your neck warmer take form. Happy knitting!
27.12.2013 - 13:14
![]() Rausis Laurence ha scritto:
Rausis Laurence ha scritto:
Après différentes tentatives, j'ai enfin compris: lorsque l'on tricote droit à l'endroit après les 6 mailles mousses on fait 1 endroit 1 envers ... et au retour (envers) on croise pour qu'il y ait une espèce de mini-côte. Puis 2 rangs tricotés à l'endroit. Quand on tricote en rond, c'est 1 end 1 env et au 2è rang pareil, puis 1 rang tout à l'endroit puis tout à l'envers. Si j'ai fait juste....
20.11.2013 - 20:29
![]() Petra ha scritto:
Petra ha scritto:
Ich habe Probleme mit den Abnahmen bei der Mütze. Sollen die Abnahmen immer an den gleichen Stellen (z.B. jede 6. und 7. Masche zusammenstricken, in der nächsten Reihe mit Abnahmen dann jede 5. und 6. Masche) vorgenommen werden und kann dies auch versetzt erfolgen?
20.11.2013 - 11:26DROPS Design ha risposto:
Liebe Petra, ich habe diese Mütze auch gestrickt und die Abnahmen immer an der gleichen Stelle gemacht. Es ist schön geworden, ich würde es also empfehlen.
21.11.2013 - 18:33
![]() Moraima ha scritto:
Moraima ha scritto:
I'm confused with the instruction about following the a.1 diagram for the pattern 104 neck warmer. Please help. Can you show on video?
18.10.2013 - 01:44DROPS Design ha risposto:
Dear Mrs Moraima, in the diag. 1square=1st x 1row. Start at the bottom corner on the right side, read it towards the left on RS rows (or every round when worked in the round), and from right towards the left on WS rows. Happy knitting!
18.10.2013 - 10:04
![]() Raisa Jaako ha scritto:
Raisa Jaako ha scritto:
Puuttuuko tästä ohjeesta tasona neulottaessa käytettävä mallineulepiirros:tasona neulottaessahan mallikerta on 1oikein,1nurin (neulottaessa oikealta vasemmalle) ja 1nurin,1oikein (neulottaessa vasemmalta oikealle),sitten neulotaan 2 kerrosta OIKEAA:oikealta vasemmalle ja vasemmalta oikealle?
09.09.2013 - 10:36DROPS Design ha risposto:
Ohjeen piirroksen merkkien selitykset käsittelevät silmukat sekä oikealta että nurjalta puolelta.
09.09.2013 - 13:45
![]() Bettina ha scritto:
Bettina ha scritto:
Die Mütze gefällt mir sehr gut. Vor allem die angenähten Knöpfe machen etwas her. Ich überlege, sie für diesen Winter zu stricken. Sehr schön.
08.09.2013 - 17:47
|
|||||||
Bliss#blissset |
|||||||
|
|
|||||||
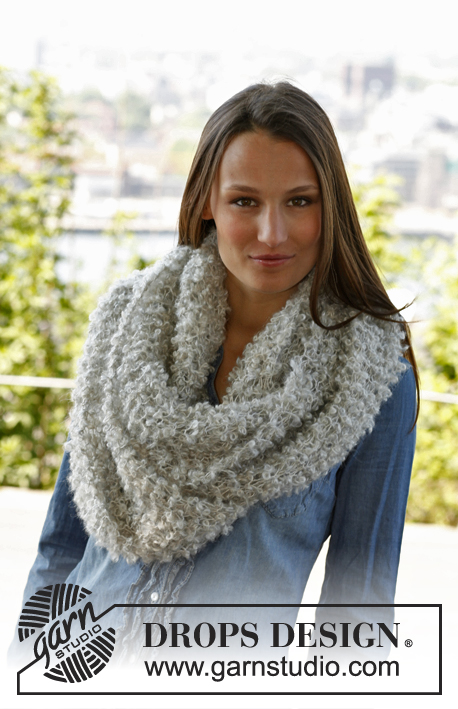
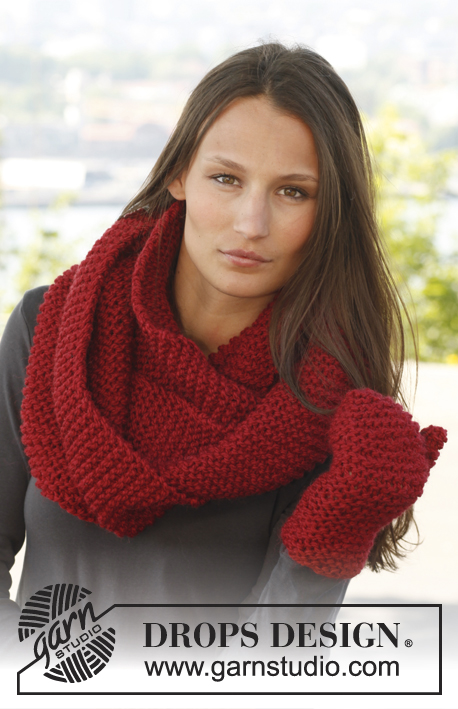
Scaldacollo e cappello DROPS lavorati ai ferri con motivo in "Nepal".
DROPS 140-40 |
|||||||
|
M. LEGACCIO (avanti e indietro sui f.): Lavorare tutti i f. a dir. 1 "costa" a m. legaccio = 2 f. dir. M. LEGACCIO (in tondo con i ferri circolari): 1 "costa" a m. legaccio = 2 giri * 1 giro a dir. e 1 giro a rov. *, ripetere *-*. MOTIVO: Vedere il diagramma A.1. Il diagramma mostra tutti i f. nel motivo sul diritto del lavoro. ---------------------------------------------------------- CAPPELLO: Lavorare prima avanti e indietro sui ferri circolari e poi lavorare in tondo. Avviare 86-94 m. con il filato Nepal con i ferri circolari n° 4 mm. Lavorare 1 f. a diritto sul rovescio del lavoro, poi lavorare come segue: 6 m. a MAGLIA LEGACCIO – leggere la spiegazione sopra, * 2 m. dir., 2 m. rov. *, ripetere *-*, finire con 2 m. dir. e 6 m. a m. legaccio. Continuare a coste e a m. legaccio da ogni lato fino a quando il lavoro misura 4 cm. Passare ai ferri circolari n° 5 mm. Ora lavorare come segue: 6 m. a m. legaccio, A.1 sopra le 74-82 m. successive e finire con 6 m. a m. legaccio. Quando il lavoro misura 8 cm, intrecciare le prime 6 m. sul f., quindi lavorare in tondo con A.1 sopra tutte le m. = 80-88 m. Quando il lavoro misura 20-21 cm, lavorare a M. LEGACCIO – leggere la spiegazione sopra – fino alla fine del lavoro. Lavorare a m. legaccio, ALLO STESSO TEMPO distribuire 12 diminuzioni in modo uniforme ogni 3 giri per un totale di 5 volte = 20-28 m. rimaste sul giro. Lavorare le m. rimaste insieme 2 e 2 alla volta, tagliare il filo e farlo passare attraverso le m. rimaste. Tirare forte e fissare il filo. Il cappello misura circa 25-26 cm in altezza. Attaccare 2 bottoni sull’aletta sulla parte inferiore del cappello, cucire attraverso entrambi gli strati. ---------------------------------------------------------- SCALDACOLLO: Lavorato avanti e indietro sui f. Avviare 62 m. con i ferri circolari n° 4 mm con il filato Nepal. Lavorare 1 f. a dir. sul rovescio del lavoro, poi lavorare come segue – sul diritto del lavoro: 6 m. a m. legaccio, 2 m. dir., * 2 m. rov., 2 m. dir. *, ripetere *-* e finire con 6 m. a m. legaccio. Continuare in questo modo. Quando il lavoro misura 4 cm, passare ai ferri circolari n° 5 mm e continuare come segue: 6 m. a m. legaccio, A.1 sulle 50 m. successive e finire con 6 m. a m. legaccio. Quando il lavoro misura 20 cm, intrecciare 6 m. da ogni lato = 50 m. Tagliare il filo. Mettere il lavoro da parte. Lavorare l’altra parte nello stesso modo. Avviare 6 m. con i ferri circolari n° 5 mm, lavorare le m. di una delle 2 parti, e lavorare le m. dell’altra parte e avviare 6 m. alla fine del f. = 112 m. Lavorare avanti e indietro come segue: 6 m. a m. legaccio (bordo), A.1 sulle 100 m. successive, 6 m. a m. legaccio (bordo). Continuare in questo modo fino a quando il lavoro misura 34 cm. Passare ai f. circolari n° 4 mm, quindi lavorare come segue – ALLO STESSO TEMPO sul 1° f. distribuire 2 aumenti in modo uniforme. 6 m. a m. legaccio, 2 m. dir, * 2 m. rov., 2 m. dir. *, ripetere *-* e finire con 6 m. a m. legaccio = 114 m. Lavorare 4 cm e intrecciare senza stringere con il dir sopra il dir e il rov sopra il rov. Mettere i bordi uno sull’altro e attaccare 4 bottoni attraverso entrambi gli strati. |
|||||||
Spiegazioni del diagramma |
|||||||
|
|||||||
 |
|||||||
Avete terminato questo modello?Allora taggate le vostre foto con #dropspattern #blissset o inviatele alla #dropsfan gallery. Avete bisogno di aiuto con questo modello?Troverete 7 video tutorial, una sezione per i commenti/domande e molto altro guardando il modello su www.garnstudio.com © 1982-2026 DROPS Design A/S. Ci riserviamo tutti i diritti. Questo documento, compreso tutte le sue sotto-sezioni, è protetto dalle leggi sul copyright. Potete leggere quello che potete fare con i nostri modelli alla fine di ogni modello sul nostro sito. |
|||||||


Con oltre 40 anni di esperienza nel design di modelli di maglia e uncinetto, DROPS Design offre la più estesa collezione di modelli gratuiti su internet - tradotti in 17 lingue. Ad oggi vi possiamo fornire 324 cataloghi e 12290 modelli - 9561 dei quali sono tradotti in Italiano.
Ci stiamo impegnando molto per darvi il meglio che vi possiamo offrire in termini di maglia e uncinetto, ispirazioni e consigli così come filati di grande qualità ad un prezzo incredibile! Volete utilizzare i nostri modelli per qualcosa d'altro oltre al vostro uso personale? Potete leggere tutto ciò che è consentito nel testo sul Copyright in basso su tutte le pagine dei nostri modelli. Buon lavoro!
Lasciare un commento sul modello DROPS 140-40
Noi saremmo felici di ricevere i tuoi commenti e opinioni su questo modello!
Se vuoi fare una domanda, fai per favore attenzione a selezionare la categoria corretta nella casella qui sotto per velocizzare il processo di risposta. I campi richiesti sono indicati da *.