
Categorie popolari
State cercando un filato?


Commenti / Domande (35)
![]() Leena Hanhinen ha scritto:
Leena Hanhinen ha scritto:
Hei. Malli nro u-677 ohjeessa lukee neulo kaikki kerrokset oikein. Malli siis kudotaan sileänä neuleena. Miten onnistuu? Minä en saa, vaan pitää kutoa nurjapuoli nurin ja oikea oikein. Katsoin kyllä teidän videon?
16.10.2025 - 05:47DROPS Design ha risposto:
Hei, kun neulot sileää neuletta, neulo oikeaa oikealta puolelta ja nurjaa nurjalta puolelta. Työssä neulotaan myös ainaoikeaa, jolloin kyseiset silmukat neulotaan jokaisella kerroksella oikein.
16.10.2025 - 17:26
![]() Marjo ha scritto:
Marjo ha scritto:
I don't know how to slip the 3mm knit stitches to the 4mm of the garment. Where do I start . At the begining of the 5 slipped stitches which would be the outer edge. Possibly a diagram would help,
22.09.2025 - 02:44DROPS Design ha risposto:
Hi Marjo, When changing needles, the easiest method is to work the stitches from the 3 mm needles using the 4 mm needles. In this pattern the next row is stocking stitch so recommend you begin from the right side and knit the first row using the 4 mm needles and decrease the number of stitches evenly on this row as stated for your size. Regards, Drops Team.
22.09.2025 - 06:08
![]() Birgit ha scritto:
Birgit ha scritto:
Hallo, wie ist das gemeint, ab 36cm für die Armausschnitte 10M abketten? 36 cm ab dem Bündchen, oder 8cm Bündchen plus 36cm stricken?
04.11.2024 - 16:10DROPS Design ha risposto:
Liebe Birgit, die 36 cm in XXXL messen Sie ab Anschlagskante. Viel Spaß beim Stricken!
05.11.2024 - 09:08
![]() Kirstin ha scritto:
Kirstin ha scritto:
I know others have asked this but I don't understand the answer!! Please explain work next to last st on row as first st in A1 but do not dec in this st. Does this mean no matter where I am up to in the pattern when I get to the 2nd last st, always knit what would be first stitch in A1? Won't this look weird if it's out of kilter with the pattern? And do I just skip the dec if it falls due in this st? Thank you!!
20.03.2022 - 07:17DROPS Design ha risposto:
Dear Kirstin, this stitch is worked as the first stitch in A.1 so that the pattern is symmetrical. In some rows, there should be a decrease in that stitch; in this case you just work the stitch in the corresponding color (according to A.1) without working 2tog. Happy knitting!
20.03.2022 - 17:50
![]() Susan Browder ha scritto:
Susan Browder ha scritto:
I don’t understand how to slip the sleeve edges onto the same circular needle as the body. Do I slip one sleeve edge on each side of the body?
13.03.2022 - 05:57DROPS Design ha risposto:
Dear Susan, first, you slip the stitches from one of the fronts, then you introduce the stitches from one sleeve edge over the stitches cast off for the armhole in the body, then you add the stitches for the back, then the other sleeve edge, and finally the stitches of the other front. All of the stitches in the garment should be on the same side (Right side). Happy knitting!
13.03.2022 - 22:34
![]() Sissi ha scritto:
Sissi ha scritto:
Liebes Team, für die Zunahme der Seitenschrägung im Rumpfteil heißt es bei einer Gesamtlänge 10 cm. Wird das Bündchen (8cm) mitgemessen? Oder nach Bündchen 10 cm messen und dann die jeweiligen Zunahme stricken? Vielen 💜 Dank💜 🙏im Vorraus🙇
09.01.2020 - 18:34DROPS Design ha risposto:
Liebe Sissi, diese 10 cm werden von der Anschlagskante gesmessen. Viel Spaß beim stricken!
10.01.2020 - 08:36
![]() Vera ha scritto:
Vera ha scritto:
Hallo liebes Drops Team Sind im Diagramm nur die Hinreihen eingezeichnet oder wird das Muster schon in der Rückreihe erweitert ? Das habe ich nicht verstanden. LG Vera Bartkowiak
03.03.2019 - 12:36DROPS Design ha risposto:
Liebe Vera, alle Reihen sind im Diagram gezeigt, dh die Hin- sowie die Rückreihen. Hier lesen Sie wie man Strick-Diagramme liest. Viel Spaß beim stricken!
04.03.2019 - 10:09
![]() Stephanie ha scritto:
Stephanie ha scritto:
I have just finished the sleeves and am ready to work on the yoke. The directions say to slip the sleeves onto the same needle as the body and then purl 1 row. Do I add both sleeves to the end (not where I stopped knitting before)? But, the sleeves would be knitted together???? Please clarify. Thank you!
03.06.2018 - 08:49DROPS Design ha risposto:
Dear Stephanie, this video shows how to slip both sleeves above sts bound off for armholes on the sides. You will then work a total of 1-3-5 rows (see size) and now start A.1 including decrease for circular yoke. Happy knitting!
04.06.2018 - 09:16
![]() Mette Pedersen ha scritto:
Mette Pedersen ha scritto:
Hej:) Jeg kan ikke se hvor langt oppe på vesten, at jeg skal starte med mønstret. På forhånd tak for hjælpen.
14.02.2018 - 10:27DROPS Design ha risposto:
Hei Mette. Hei. Når du er ferdig med bærestykket og har strikket begge ermkantene og satt disse sammen med bærestykket, strikkes det 1 pinne vrang fra vrangen samtidig som det felles 1-5-13-9-9-5 m jevnt fordelt = 275-291-307-339-371-403 m. Deretter strikkes 0-2-4-0-2-4 pinner til med vinrød og glstrikk. Så starter du med diagram A.1 (se diagram for din størrelse). God Fornøyelse!
14.02.2018 - 13:18
![]() Hildegard Brake ha scritto:
Hildegard Brake ha scritto:
Hallo, kann ich die Weste auch als Pullover stricken? Wie geht das? Kann ich die jeweils angegebenen Maschenzahlen nehmen und alles auf einer Rundstricknadel im Kreis stricken? MfG Hildegard Brake
27.11.2017 - 15:09DROPS Design ha risposto:
Liebe Frau Brake, so können Sie wahrscheinlich stricken, passen Sie mal auf, daß die Farbenmuster mit den gesamten Maschenanzahl passt. Viel Spaß beim stricken!
27.11.2017 - 15:21
|
||||||||||||||||
Sweet Scarborough#sweetscarboroughcardigan |
||||||||||||||||
 |
 |
|||||||||||||||
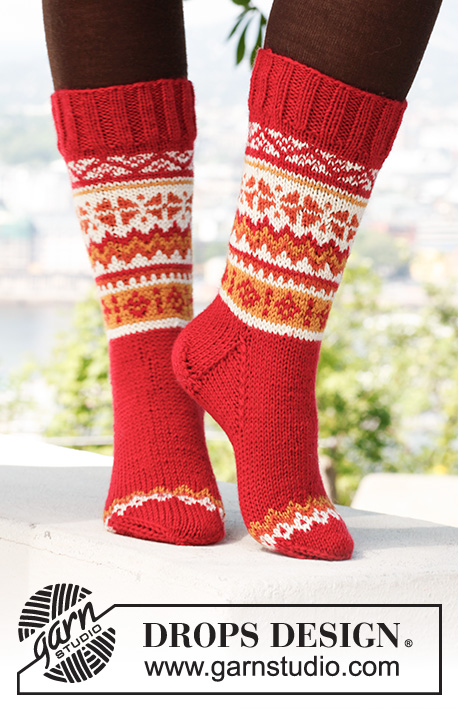
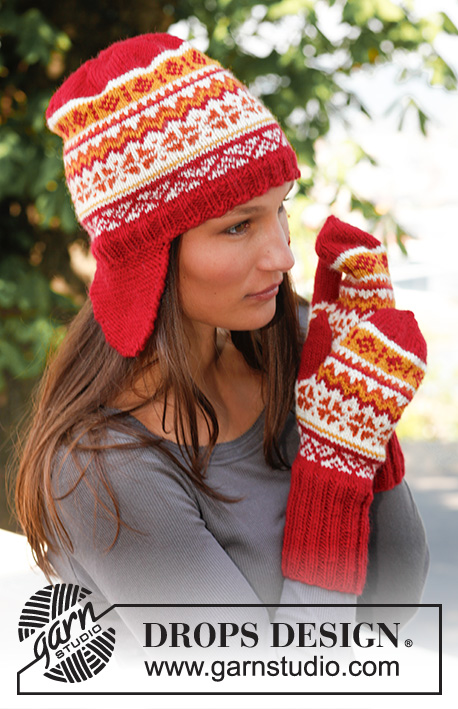
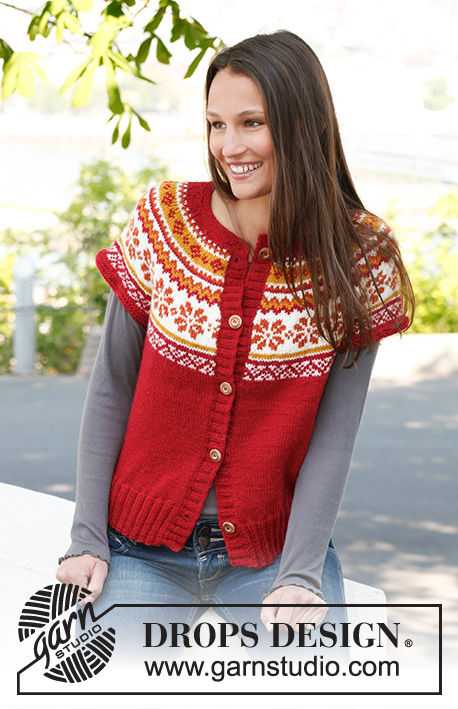
Gilet DROPS con sprone arrotondato e motivo norvegese in "Karisma".
DROPS 140-10 |
||||||||||||||||
|
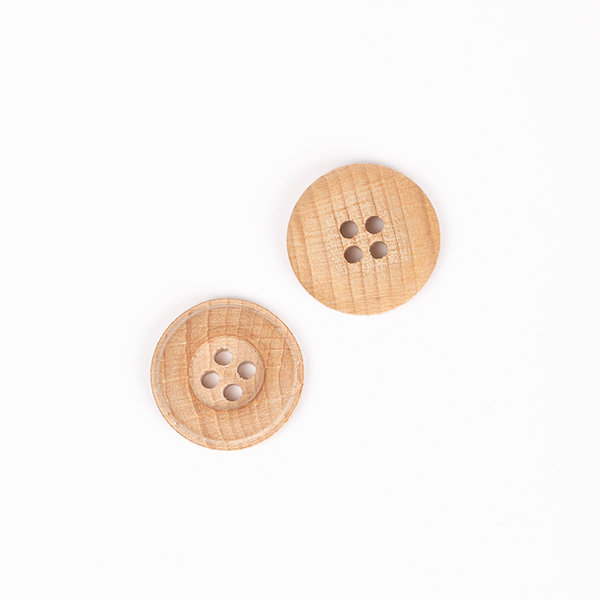
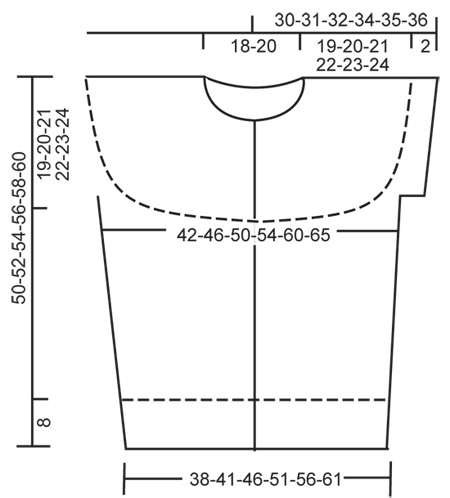
M. LEGACCIO (avanti e indietro sui f. circolari): lavorare tutti i f. a dir. 1 “costa” a legaccio = 2 f. dir. MOTIVO: Vedere il diagramma A-1. Il diagramma è lavorato a m. rasata – 1° f. = diritto del lavoro. ---------------------------------------------------------- CORPO: Lavorato avanti e indietro sui f. circolari dal centro davanti. Avviare 184-200-220-240-268-292 m. con i ferri circolari n° 3 mm con il rosso scuro. Lavorare a coste come segue (1° f. = diritto del lavoro): 1 m. di vivagno a M. LEGACCIO – leggere la spiegazione sopra - * 2 m. dir./2 m. rov. *, ripetere *-* fino a quando rimangono 3 m., 2 m. dir. e 1 m. di vivagno a m. legaccio. Quando il lavoro misura 8 cm, passare ai f. circolari n° 4 mm, lavorare 1 f. a m. rasata e allo stesso tempo distribuire 24-24-28-28-32-36 diminuzioni in modo uniforme = 160-176-192-212-236-256 m. Inserire 2 segnapunti nel lavoro; all’interno di 40-44-48-53-59-64 m. da ogni lato (= 80-88-96-106-118-128 m. tra i segnapunti sul dietro). Continuare a m. rasata con 1 m. di vivagno a m. legaccio da ogni lato. FARE ATTENZIONE ALLA TENSIONE DEL LAVORO! Quando il lavoro misura 10 cm in totale, aumentare 1 m. a ogni lato dei segnapunti ai lati. Ripetere gli aumenti ogni 5 cm altre 3 volte = 176-192-208-228-252-272 m. Quando il lavoro misura 31-32-33-34-35-36 cm, lavorare il f. successivo come segue dal diritto del lavoro: 39-43-47-52-58-63 m. (= davanti destro), intrecciare 10 m. per lo scalfo, lavorare 78-86-94-104-116-126 m. (= dietro), intrecciare 10 m. per lo scalfo, lavorare il resto del f. (= 39-43-47-52-58-63 m. sul davanti sinistro), non tagliare il filo. Mettere il lavoro da parte e lavorare i bordi delle maniche. BORDI DELLE MANICHE: Lavorati avanti e indietro sui f. circolari n° 3 mm. Avviare 70-72-76-80-84-88 m. con il rosso scuro. Lavorare 5 f. a dir. (1° f. = rovescio del lavoro), lavorare il f. successivo come segue: intrecciare le prime 5 m., lavorare 60-62-66-70-74-78 m. e intrecciare le ultime 5 m., tagliare il filo. Mettere il lavoro da parte e lavorare l’altro bordo della manica. SPRONE: Trasferire i bordi delle maniche sullo stesso f. circolare n°4 del corpo = 276-296-320-348-380-408 m. (non lavorarli quando li trasferite sul f.). Lavorare 1 f. a rov. dal rovescio del lavoro e allo stesso tempo distribuire 1-5-13-9-9-5 diminuzioni in modo uniforme = 275-291-307-339-371-403 m. Lavorare altri 0-2-4-0-2-4 f. con il rosso scuro a m. rasata. Continuare con il diagramma A-1 (vedere il diagramma per la vostra taglia) con 1 m. di vivagno da ogni lato a m. legaccio, lavorare la penultima m. sul f. come la prima m. in A-1 ma non diminuire in questa m. Alla fine di tutte le diminuzioni ci sono 88-93-98-108-118-128 m. sul f. e il lavoro misura circa 50-52-54-56-58-60 cm fino alla spalla. Poi lavorare un’alzata sul dietro del collo con il rosso scuro come segue (1° f. = diritto del lavoro): 51-54-56-61-66-71 m. dir., girare, 14-15-14-14-14-14 m. rov., girare, 21-22-21-21-21-21 m. dir., girare, 28-29-28-28-28-28 m. rov., continuare in questo modo lavorando 7 m. in più a ogni giro fino ad un totale di 70-71-70-84-84-84 m. lavorate, girare e lavorare il resto del f., tagliare il filo. Inserire 1 segnapunti, il bordo del collo è lavorato dopo i bordi. BORDO SINISTRO: Riprendere circa 105-125 m. all’interno della m. di vivagno lungo il davanti sinistro con i f. circolari n° 3 mm con il rosso scuro. Lavorare 1 f. a dir. dal rovescio del lavoro, poi lavorare 1 f. a dir. dal diritto del lavoro e allo stesso tempo aumentare il n° di m. in modo uniforme a 128-132-136-140-144-148 m. Lavorare a coste come segue (1° f. = rovescio del lavoro): 1 m. di vivagno a m. legaccio, * 2 m. rov./2 m. dir. *, ripetere *-* e finire con 2 m. rov. e 1 m. di vivagno a m. legaccio. Continuare con dir. su dir. e rov. su rov. fino a quando le coste misurano 3 cm, intrecciare senza stringere. BORDO DESTRO: Lavorare come per il bordo sinistro ma dopo 1 cm, intrecciare per 5-5-6-6-6-6 asole in modo uniforme (le asole sono intrecciate nelle sezioni a rov. visto dal diritto del lavoro). 1 ASOLA = lavorare 2 m. insieme a rov. e fare 1 gettato – l’asola più in alto dovrebbe essere nella prima sezione a rov. dall’alto e l’asola più in basso a circa 5-6 cm dal bordo inferiore. BORDO DEL COLLO: Il bordo del collo è lavorato con il rosso scuro con i ferri circolari n° 3 mm come segue: riprendere 6 m. sul bordo destro (all’interno della m. di vivagno), lavorare le 88-93-98-108-118-128 m. dal fermamaglie attorno al collo sul f. e riprendere 6 m. sul bordo sinistro = 100-105-110-120-130-140 m. Lavorare 1 f. a dir. dal rovescio del lavoro e allo stesso tempo diminuire in modo uniforme a 90-94-98-102-106-110 m. Continuare con 4 f. a dir. avanti e indietro, quindi intrecciare. CONFEZIONE: Cucire insieme i bordi delle maniche margine a margine nel filo davanti delle m. più esterne. Cucire le aperture sotto le maniche e attaccare i bottoni. |
||||||||||||||||
Spiegazioni del diagramma |
||||||||||||||||
|
||||||||||||||||
 |
||||||||||||||||
 |
||||||||||||||||
Avete terminato questo modello?Allora taggate le vostre foto con #dropspattern #sweetscarboroughcardigan o inviatele alla #dropsfan gallery. Avete bisogno di aiuto con questo modello?Troverete 12 video tutorial, una sezione per i commenti/domande e molto altro guardando il modello su www.garnstudio.com © 1982-2026 DROPS Design A/S. Ci riserviamo tutti i diritti. Questo documento, compreso tutte le sue sotto-sezioni, è protetto dalle leggi sul copyright. Potete leggere quello che potete fare con i nostri modelli alla fine di ogni modello sul nostro sito. |
||||||||||||||||


Con oltre 40 anni di esperienza nel design di modelli di maglia e uncinetto, DROPS Design offre la più estesa collezione di modelli gratuiti su internet - tradotti in 17 lingue. Ad oggi vi possiamo fornire 324 cataloghi e 12290 modelli - 9561 dei quali sono tradotti in Italiano.
Ci stiamo impegnando molto per darvi il meglio che vi possiamo offrire in termini di maglia e uncinetto, ispirazioni e consigli così come filati di grande qualità ad un prezzo incredibile! Volete utilizzare i nostri modelli per qualcosa d'altro oltre al vostro uso personale? Potete leggere tutto ciò che è consentito nel testo sul Copyright in basso su tutte le pagine dei nostri modelli. Buon lavoro!
Lasciare un commento sul modello DROPS 140-10
Noi saremmo felici di ricevere i tuoi commenti e opinioni su questo modello!
Se vuoi fare una domanda, fai per favore attenzione a selezionare la categoria corretta nella casella qui sotto per velocizzare il processo di risposta. I campi richiesti sono indicati da *.