
Categorie popolari
State cercando un filato?


Commenti / Domande (221)
![]() Nicola ha scritto:
Nicola ha scritto:
Hi. With regard to the back piece, I have 56 stitches and now decreasing for the armholes. It says dec 1st every other row from RS a total of 6 times = 44 st. How does that work (56 - 6 = 50) ... am I decreasing each side? Thanks for any help, Nicola
13.06.2025 - 01:32DROPS Design ha risposto:
Hi Nicola, Yes, you decrease on each side of the back piece for the armholes, 1 stitch x 6 = 12 stitches in total. Regards, Drops team.
13.06.2025 - 06:07
![]() Nicola ha scritto:
Nicola ha scritto:
Hi. With regard to the back piece, I have 56 stitches and now decreasing for the armholes. It says dec 1st every other row from RS a total of 6 times = 44 st. How does that work (56 - 6 = 50) ... am I decreasing each side? Thanks for any help, Nicola
12.06.2025 - 23:20DROPS Design ha risposto:
Dear Nicola, correct on back piece you will increase for armholes on both sides, ie at the beginning + at the end of a row from right side as explained under DEC FOR V-NECK AND ARMHOLES IN DOUBLE MOSS ST:; when you will work front pieces later you will decrease only towards armhole (just 1 stitch on each front piece). So on back piece decrease 2 sts a total of 6 times= 56 sts - (2 sts x 6 times) = 44 sts remain. Happy knitting!
13.06.2025 - 07:39
![]() Lemaire ha scritto:
Lemaire ha scritto:
Je ne comprends pas comment faire les poches Et les diminutions du début Merci pour votre aide
04.06.2025 - 10:44DROPS Design ha risposto:
Bonjour Mme Lemaire, pour les diminutions à répartir à intervalles réguliers, prenez votre nombre de mailles total, retirez les mailles de bordure des devants (10 m) et divisez par le nombre de diminutions à faire - ou bien utilisez le calculateur dont vous trouverez le lien sous "Explications" ou bien en utilisant la petite calculatrice que vous pourrez voir en bas à droite de la fenêtre. Pour la bordure des poches, notez que vous tricotez d'abord les mailles des poches avant de les mettre en attente: tricotez le nombre de mailles indiqué puis placé le nombre de mailles indiqué pour la poche en attente (les dernières que vous avez tricotées). Bon tricot!
04.06.2025 - 13:34
![]() Anneke ha scritto:
Anneke ha scritto:
Is dit patroon ook zonder rondbreinaald te maken? En zo ja, hoe? Bedankt voor uw reactie.
09.05.2025 - 10:23DROPS Design ha risposto:
Dag Anneke,
Om een patroon aan te passen om op rechte naalden te breien hebben we een instructie gemaakt. Deze vind je hier.
11.05.2025 - 20:01
![]() Maryse ha scritto:
Maryse ha scritto:
MÊME TEMPS, à 16-17-19 (20-22) cm de hauteur totale, tricoter 4 rangs point mousse au-dessus des 18-20-20 (20-20) m centrales sur les côtés (soit 9-10-10 (10-10) m de chaque côté de chaque marqueur)je ne comprends pas cette partie Merci de m'éclaircir
22.04.2025 - 22:10DROPS Design ha risposto:
Bonjour Maryse, vous devez ici tricoter la bordure des emmanchures, tricotez les 18-20 m (cf taille) sous chaque emmanchure (soit 9 ou 10 m de chaque côté de chacun des marqueurs) au point mousse (à l'endroit sur l'endroit et sur l'envers) et en même temps, tricotez les autres mailles comme avant. Tricotez ainsi pendant 4 rangs = 2 côtes mousse sous les emmanchures. Bon tricot!
23.04.2025 - 07:53
![]() Inger Bengtsson ha scritto:
Inger Bengtsson ha scritto:
Detta mönster stämmer inte. Strl 5-9 mån. När jag har stickat fram och bakstycke och gjort avmaskning för ärmhål ska det vara 52 maskor kvar till bakstycket, men det är bara 42. Jag har stickat exakt som det står i beskrivningen.
22.03.2025 - 15:10
![]() Lisa ha scritto:
Lisa ha scritto:
Inte lätt för nybörjaren att följa och förstå denna beskrivning! Den upplevs mycket ”rörig” och ostrukturerad. I det ”gemensamma” stycket står att det skall maskas av 1 m på va varv 16 ggr för V-hals. Det stämmer inte med att det då på framstyckena skall vara 12 kvar (stl 12-18 mån) Borde stå 8 ggr i så fall.
20.03.2025 - 15:09
![]() Lisa ha scritto:
Lisa ha scritto:
Inte lätt för nybörjaren att följa och förstå denna beskrivning! Den upplevs mycket ”rörig” och ostrukturerad. I det ”gemensamma” stycket står att det skall maskas av 1 m på va varv 16 ggr för V-hals. Det stämmer inte med att det då på framstyckena skall vara 12 kvar (stl 12-18 mån) Borde stå 8 ggr i så fall.
20.03.2025 - 14:07
![]() Anneli Holmgren ha scritto:
Anneli Holmgren ha scritto:
Förstår inte hur jag ska maska av tillV-halsen,Står maska av 1m vartannat varv totalt 16 ggr, men vart ska maskan maskas av? Bara 1 maska eller 1 maska på varje sida? Alltså 2 per varv? Mvh Anneli
24.11.2024 - 15:28DROPS Design ha risposto:
Hej Anneli, du maskar av från rätsidan i varje sida mot mitt fram (alltså både på höger och vänster framstycke mot V-halsen)
27.11.2024 - 14:19
![]() Nina Kudsk ha scritto:
Nina Kudsk ha scritto:
Hej Jeg undre mig, når jeg skal strikke venstre og højre forstykke. Tar jeg ind i begge sider på eks. venstre forstykke på hver 2. pind? Synes nemlig at det ser forkert ud (har lige prøvet at strikke det) - synes at ærmgabet bliver for "skråt" i forhold til billedet?
14.11.2024 - 17:27DROPS Design ha risposto:
Hej Nina, du starter med indtagningen til V-hals først og så lukker du af til ærmegab og først efter det starter indtagningen til ærmegab :)
19.11.2024 - 10:54
|
|
Junior#juniorvest |
|
 |
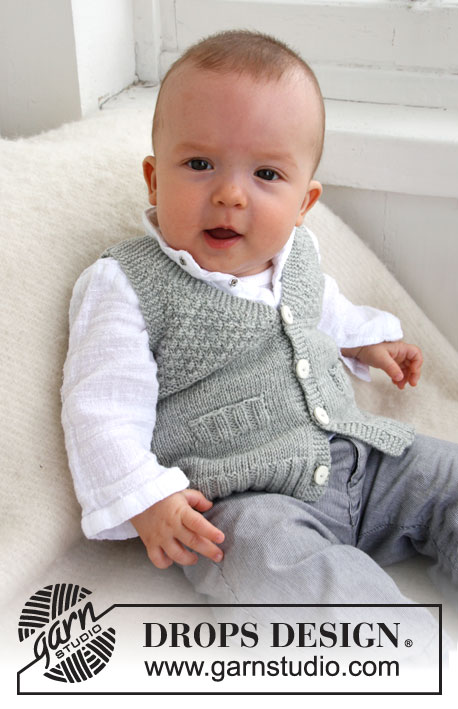 |
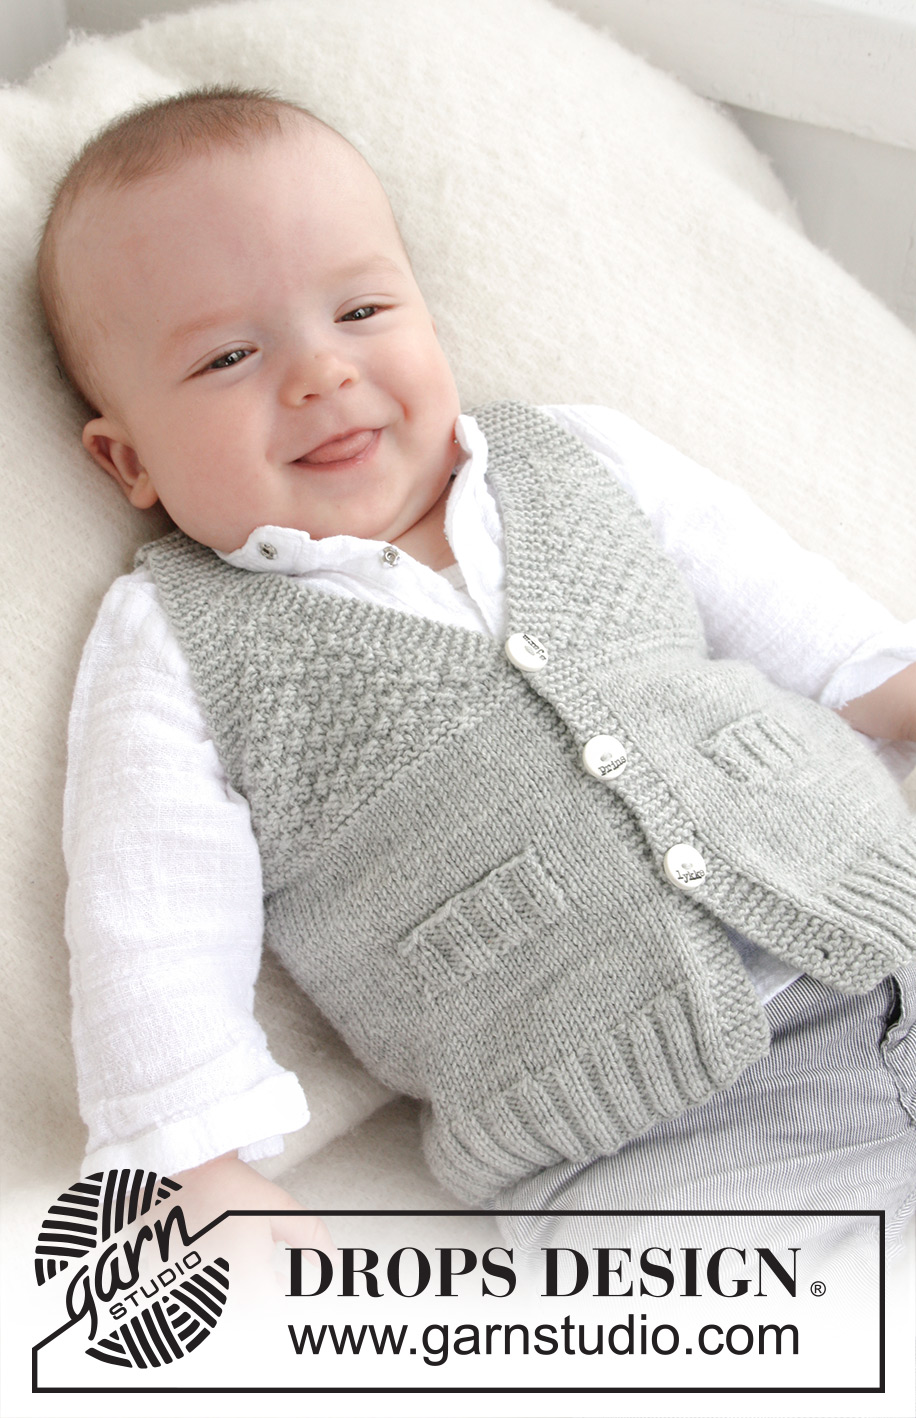
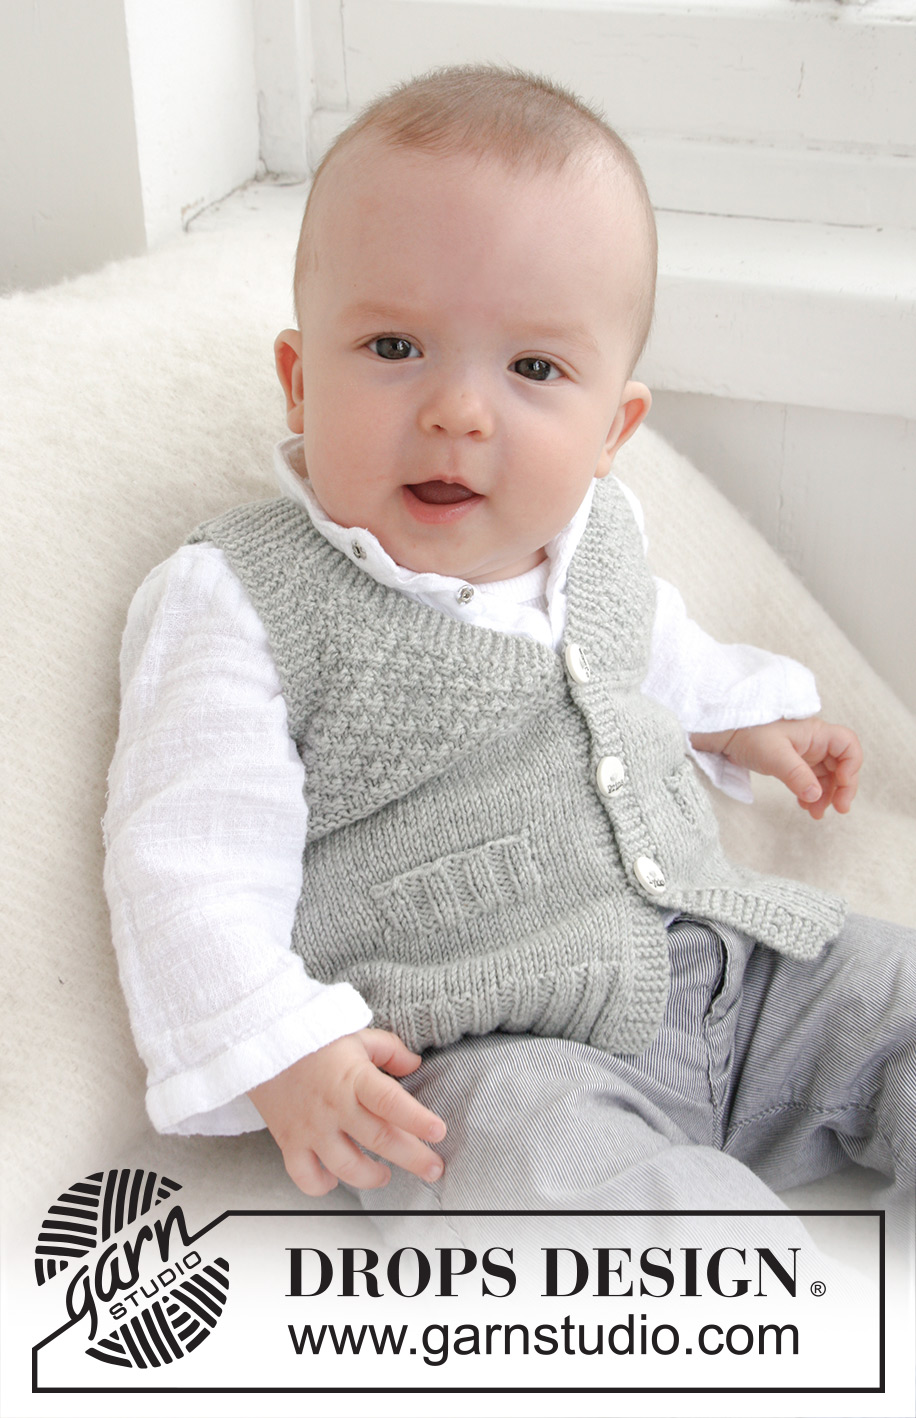
Gilet lavorato ai ferri con collo a V e motivo a punto fantasia per neonati e bambini in DROPS BabyMerino oppure in DROPS BabyAlpaca Silk.
DROPS Baby 21-8 |
|
|
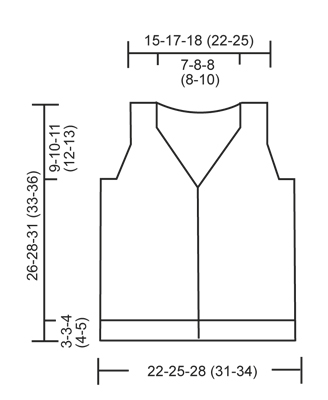
-------------------------------------------------------- M. A LEGACCIO (avanti e indietro sui ferri): Lavorare a dir. tutti i f. M. A GRANA DI RISO DOPPIA: 1° ferro: * 2 dir., 2 rov. *, ripetere da *-*. 2° ferro: dir. su dir. e rov. su rov. 3° ferro: rov. su dir. e dir. su rov. 4° ferro: come il 2° ferro. Ripetere i ferri 1-4. ASOLE: Intrecciare per le asole sul bordo destro 1 asola = lavorare insieme a dir. la seconda e la terza m. dal bordo e fare 1 gettato. Intrecciare per le asole quando il lavoro misura: TAGLIA 1/3 MESI: 2, 6, 10 e 14 cm. TAGLIA 6/9 MESI: 2, 7, 11 e 16 cm. TAGLIA 12/18 MESI: 2, 7, 12 e 17 cm. TAGLIA 2 ANNI: 2, 8, 13 e 19 cm. TAGLIA 3/4 ANNI: 2, 8, 14 e 20 cm. DIMINUIRE PER IL COLLO A V E PER GLI SCALFI A M. A GRANA DI RISO DOPPIA: Tutte le diminuzioni sono fatte da diritto del lavoro! DIMINUIRE COME SEGUE PRIMA DEL BORDO/BORDO DELLA MANICA: Quando l'ultima m. è a dir.: lavorare 2 m. insieme a dir. Quando l’ultima m. è un rov.: lavorare 2 m. insieme a rov. DIMINUIRE COME SEGUE DOPO IL BORDO/BORDO DELLA MANICA: Quando la prima m. è a dir.: passare la m. a dir., 1 dir., accavallare la m. passata sopra quella appena lavorata. Quando la prima m. è un rov.: lavorare 2 m. insieme a rov. ritorto (cioè lavorarle nel filo dietro anziché in quello davanti). -------------------------------------------------------- -------------------------------------------------------- CORPO: Lavorato avanti e indietro sui ferri circolari dal centro davanti. Con i ferri circolari n° 2,5 mm e il filato Baby Merino avviare 148-168-184 (204-224) m. Lavorare il 1° f. come segue sul diritto del lavoro: 5 m. a M. LEGACCIO (= bordo) – leggere la spiegazione sopra, * 2 m. dir., 2 m. rov. *, ripetere da *-* fino a quando non rimangono 7 m., finire con 2 m. dir. e 5 m. a M. LEGACCIO (= bordo). Continuare a coste in questo modo con 5 m. a m. legaccio da ogni lato fino a quando il lavoro non misuri 3-3-4 (4-5) cm – RICORDARSI DELLE ASOLE sul bordo – leggere la spiegazione sopra. Passare ai ferri circolari n°3 mm e lavorare a m. rasata ma continuare i bordi a m. legaccio come prima. ALLO STESSO TEMPO sul 1° f. dopo le coste, distribuire 32-36-40 (44-52) diminuzioni in modo uniforme (non diminuire sui bordi) = 116-132-144 (160-172) m. Inserire un segnapunti a 31-35-39 (43-45) m. a partire da ogni lato (= 54-62-66 (74-82) m. tra i segnapunti sul dietro). FARE ATTENZIONE ALLA TENSIONE DEL LAVORO! Quando il lavoro misura 7-7½-8 (9-10) cm, lavorare il f. successivo come segue sul diritto del lavoro: 5 m. a m. legaccio, 21-21-27 (27-31) m. a m. rasata, trasferire le ultime 16-16-20 (20-24) m. che sono state lavorate su un ferro ausiliario per la fessura della tasca, lavorare fino a quando non rimangono 10-10-12 (12-12) m. sul ferro, trasferire le ultime 16-16-20 (20-24) m. che sono state lavorate su un ferro ausiliario per la fessura della tasca, lavorare 5-5-7 (7-7) m. a m. rasata e finire con 5 m. a m. legaccio. Sul f. successivo avviare 16-16-20 (20-24) nuove m. su ognuno dei 2 ferri ausiliari con le m. = 116-132-144 (160-172) m. Continuare a m. rasata e a m. legaccio fino a quando il lavoro non misuri 13-14-16 (16-18) cm. Ora lavorare 4 f. a dir. su tutte le m. (= 2 creste di legaccio). Poi lavorare a MAGLIA A GRANA DI RISO DOPPIA – leggere la spiegazione sopra (continuare i bordi a m. legaccio come prima). LEGGERE TUTTA LA SEZIONE SEGUENTE PRIMA DI CONTINUARE! Quando il lavoro misura 15-17-18 (20-21) cm, lavorare 2 f. a m. legaccio sulle prime 5 m. sul ferro (non lavorare le altre m. sul ferro), poi lavorare 1 f. su tutte le m. prima di lavorare 2 f. a m. legaccio sulle prime 5 m. sul f. dall’altro lato del lavoro (per fare in modo che il collo a V sia carino). Quindi diminuire per il collo a V – leggere la spiegazione sopra: diminuire 1 m. ogni 2 ferri (cioè ogni f. sul dir. del lavoro) per un totale di 12-13-16 (16-16) volte. ALLO STESSO TEMPO quando il lavoro misura 16-17-19 (20-22) cm, lavorare 4 f. a m. legaccio sulle 18-20-20 (20-20) m. centrali da ogni lato (cioè su 9-10-10 (10-10) m. su ogni lato di entrambi i segnapunti) – lavorare le altre m. come prima. Sul f. successivo, intrecciare le 8-10-10 (10-10) m. centrali da ogni lato per lo scalfo e finire il davanti e il dietro in modo separato. DIETRO: = 46-52-56 (64-72) m. Lavorare a m. a grana di riso doppia con 5 m. a m. legaccio da ogni lato (= bordo della manica). ALLO STESSO TEMPO diminuire per gli scalfi – leggere la spiegazione sopra: diminuire 1 m. ogni 2 ferri (cioè su ogni f. sul diritto del lavoro) per un totale di 5-6-6 (6-6) volte = 36-40-44 (52-60) m. Continuare a m. a grana di riso doppia e m. legaccio fino a quando il lavoro non misuri 24-26-29 (31-34) cm. Ora lavorare a m. legaccio su tutte le m. fino alla lunghezza finale. ALLO STESSO TEMPO quando il lavoro misura 25-27-30 (32-35) cm, intrecciare le 16-18-20 (20-24) m. centrali per il collo = 10-11-12 (16-18) m. rimaste su ogni spalla. Ora finire ogni spalla in modo separato. Continuare con la m. legaccio fino a quando il lavoro misura 26-28-31 (33-36) cm, intrecciare. DAVANTI SINISTO: Continuare con la m. a grana di riso doppia e la m. legaccio e ALLO STESSO TEMPO diminuire per lo scalfo a lato come per il dietro e continuare a diminuire per il collo a V come prima. Alla fine dell’ultima diminuzione, rimangono 10-11-12 (16-18) m. sul ferro. Lavorare a m. legaccio su tutte le m. fino a quando il lavoro non misuri 26-28-31 (33-36) cm e intrecciare. DAVANTI DESTRO: Lavorare come il davanti sinistro ma al contrario. FESSURA PER LA TASCA: Trasferire le 16-16-20 (20-24) m. dal ferro ausiliario su uno dei davanti sui ferri n° 2,5 mm. Lavorare a coste con 1 m. a m. legaccio e 2 m. dir. a ogni lato (visto sul diritto del lavoro). Quando la fessura per la tasca misura 2½-2½-3 (3-3) cm, intrecciare senza stringere con dir. su dir. e rov. su rov. Cucire la fessura per la tasca al davanti con punti maglia da ogni lato. Cucire l’apertura della tasca alla parte inferiore della fessura della tasca (dove le m. sono state messe sul f. ausiliario) sul dietro. Lavorare l’altra fessura per la tasca nello stesso modo sull’altro davanti. CONFEZIONE: Cucire i margini delle spalle. Attaccare i bottoni. |
|
 |
|
Avete terminato questo modello?Allora taggate le vostre foto con #dropspattern #juniorvest o inviatele alla #dropsfan gallery. Avete bisogno di aiuto con questo modello?Troverete 13 video tutorial, una sezione per i commenti/domande e molto altro guardando il modello su www.garnstudio.com © 1982-2026 DROPS Design A/S. Ci riserviamo tutti i diritti. Questo documento, compreso tutte le sue sotto-sezioni, è protetto dalle leggi sul copyright. Potete leggere quello che potete fare con i nostri modelli alla fine di ogni modello sul nostro sito. |
|


Con oltre 40 anni di esperienza nel design di modelli di maglia e uncinetto, DROPS Design offre la più estesa collezione di modelli gratuiti su internet - tradotti in 17 lingue. Ad oggi vi possiamo fornire 325 cataloghi e 12298 modelli - 9569 dei quali sono tradotti in Italiano.
Ci stiamo impegnando molto per darvi il meglio che vi possiamo offrire in termini di maglia e uncinetto, ispirazioni e consigli così come filati di grande qualità ad un prezzo incredibile! Volete utilizzare i nostri modelli per qualcosa d'altro oltre al vostro uso personale? Potete leggere tutto ciò che è consentito nel testo sul Copyright in basso su tutte le pagine dei nostri modelli. Buon lavoro!
Lasciare un commento sul modello DROPS Baby 21-8
Noi saremmo felici di ricevere i tuoi commenti e opinioni su questo modello!
Se vuoi fare una domanda, fai per favore attenzione a selezionare la categoria corretta nella casella qui sotto per velocizzare il processo di risposta. I campi richiesti sono indicati da *.