
Categorie popolari
State cercando un filato?


Commenti / Domande (214)
![]() Vanessa ha scritto:
Vanessa ha scritto:
"...über die mittleren 18-20-20 (20-20) M. 2 Krausrippe stricken (d.h. auf beiden Seiten der Markierung je 9-10-10 (10-10) M.). Bei der nächsten R. auf beiden Seiten je die mittleren 8-10-10 (10-10) M. für das Armloch abk. Die Teile separat fertig stricken." Für Größe 80/86: Mir erschließt sich nicht ganz, warum ich erst je 10M auf jeder Seite der Markierung Krausrippe stricken soll (gesamt 20M pro Ärmel), wenn ich nachher insgesamt nur 10M pro Ärmel abkette? Denkfehler meinerseits?
12.02.2016 - 07:41DROPS Design ha risposto:
Liebe Vanessa, wenn Sie in der Anleitung weiterlesen, sehen Sie, dass neben den abgeketteten Maschen je 5 M in Krausrippe gestrickt werden. Das sind die zusätzlichen 10 M Krausrippe.
15.03.2016 - 18:32
![]() Mariajo ha scritto:
Mariajo ha scritto:
Buenas tardes. Tengo varias preguntas que no me permiten continuar. Pregunta 1: las disminuciones se hacen sobre el punto de arroz doble o sobre los 5 p en p. musgo? Pregunta 2: Es recomendable separar los puntos en DELANTERO DCHO- ESPALDA - DEL. IZQU.? Pregunta 3: en las explicaciones (Talla 1/3 meses) dice cuando la pieza mida 16-17-19 (20-22) cm, tejer 4 vtas en pt musgo ... 16cm desde donde? Desde que se han empezado las disminuciones? Gracias por su ayuda.
06.02.2016 - 18:57DROPS Design ha risposto:
Hola Mariajo, pregunta 1: las dism se trabajan sobre el pt arroz doble, NO sobre las cenefas. pregunta 2: a partir del cierre para la sisa, las 3 partes se trabajan por separado. pregunta 3: las mediciones se hacen a partir de la fila de montaje de pts salvo que se indique un nuevo punto en el patrón (ej: "ahora medir desde aquí...")
07.02.2016 - 20:55Aamna ha scritto:
Hey your pattern is great .. i am halfway but confused now ,, as not getting whats written over here .. its too much confusion .. Q1. will the double seed stitch will start from wrong side?? Q2. if someone please simplify what to do after 2 lines of garter stitch ? (Then work DOUBLE SEED ST - see explanation .......... finish front and back piece separately. ) this para thanks in advance ..
01.02.2016 - 07:50DROPS Design ha risposto:
Dear Aama, Q1: you start double seed st from RS - Q2: after the 2 ridges, work as follows: 5 sts in garter st as before, work in double seed sts on the next sts until 5 sts remain, work the last 5 sts in garter st. Then when piece measures 15-21 cm, start dec for neckline and when piece measures 16-22 cm you bind off sts for armholes on the side and work each front piece and back piece separately. Happy knitting!
01.02.2016 - 11:11
![]() Lana ha scritto:
Lana ha scritto:
I'm at the point where I'm decreasing for the V-neck. What do I do when I'm coming back around on the wrong side and now have 1 purl stitch? Doesn't that throw it off when it's time to decrease again? I've re-read the instructions several times but don't understand how that works. Beautiful pattern. I also appreciate everyone's comments, questions and the videos are excellent.
25.01.2016 - 02:09DROPS Design ha risposto:
Dear Lana, you dec for neck from RS: after band sts (beg of row) and before band sts (end of row) so that you keep double seed st - see "DEC for V-neck and armholes in double seed st". On next row from WS, work K over K and P over P in seed-stitch as before. Happy knitting!
25.01.2016 - 13:51Judith Grunfeld ha scritto:
Hi, i'm in the middle of this vest, love the pattern! My question: i'm up to the decrease by the V neck. Pattern says to decrease 1 stich every other row. Where exactly should I make the decrease, right after the edge band? Does it mean 1 decrease per row or 1 decrease each side? Pls help!
19.10.2015 - 22:59DROPS Design ha risposto:
Dear Mrss Grunfeld, dec for neck are done inside band sts from RS: at beg of row from RS work band sts, dec 1 st (K2 tog/P2 tog), continue to the end of row until band sts + 2 sts remain, and dec 1 st, finish with band sts (see also "dec for V-neck and armholes in double moss st" at the beg of the pattern. Work 1 row without dec. Repeat these 2 rows (= 1 row with dec from RS, 1 row without dec from WS) as many times as stated for your size. Happy knitting!
20.10.2015 - 10:36
![]() Marie ha scritto:
Marie ha scritto:
Je veux faire ce modèle pour une grandeur large adulte (je l'ai fait pour bébé et papa a trop aimé!!). Avez vous des indications pour moi ou un modele semblable pour me guider. Merci beaucoup pour votre aide!
05.10.2015 - 13:17DROPS Design ha risposto:
Bonjour Marie, vous pouvez ajuster un modèle adulte dans la tension souhaitée en l'adaptant à ce modèle. Contactez votre magasin DROPS pour toute aide/assistance complémentaire. Bon tricot!
05.10.2015 - 16:25
![]() Hilde ha scritto:
Hilde ha scritto:
Moet er geen steken opgenomen worden hals rugpand?
25.09.2015 - 14:58DROPS Design ha risposto:
Hoi Hilde. Nee, je eindigt hier ook met ribbelst voordat je afkant voor de hals.
28.09.2015 - 12:08Sue ha scritto:
I really love the look of this pattern. I'm at the point where I've done 2 rows in garter stitch over the 5 stitch band on both sides of the front. I now would be knitting on the wrong side but the V-neck decrease is only made from the right side. Do I just do another row of the moss stitch and then decrease on the next row? Thanks for your help.
25.09.2015 - 01:21
![]() Mélanie ha scritto:
Mélanie ha scritto:
Bonjour je voudrais savoir le nombre de pelote de laine pour une taille 2ans. Merci d'avance de votre réponse. Cordialement Mélanie
19.09.2015 - 16:52DROPS Design ha risposto:
Bonjour Mélanie, la quantité requise pour chaque taille est indiquée, au poids, à droite de la photo: 100 g Baby Merino ou 150 g BabyAlpacaSilk en taille 2 ans - chacune de ces qualités fait 50 g pour 1 pelote, il vous faudra ainsi 2 pelotes Baby Merino ou 3 pelotes BabyAlpacaSilk. Bon tricot!
21.09.2015 - 08:46
![]() Helena ha scritto:
Helena ha scritto:
Het spencertje is hartstikke leuk geworden ..alleen begrijp ik de toegevoegde waarde van de rondbrei nld niet! Dit maakt het breien extra lastig ... Mijn inzien had het ook op een rechte nld gekund ... Compliment voor het patroon.
01.09.2015 - 10:35
|
|
Junior#juniorvest |
|
 |
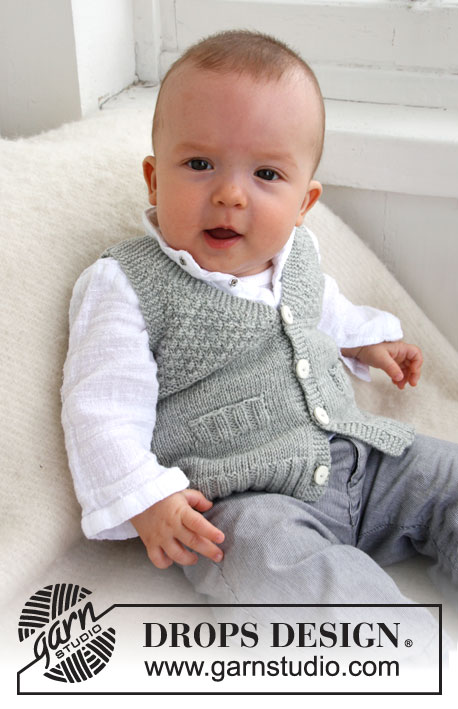 |
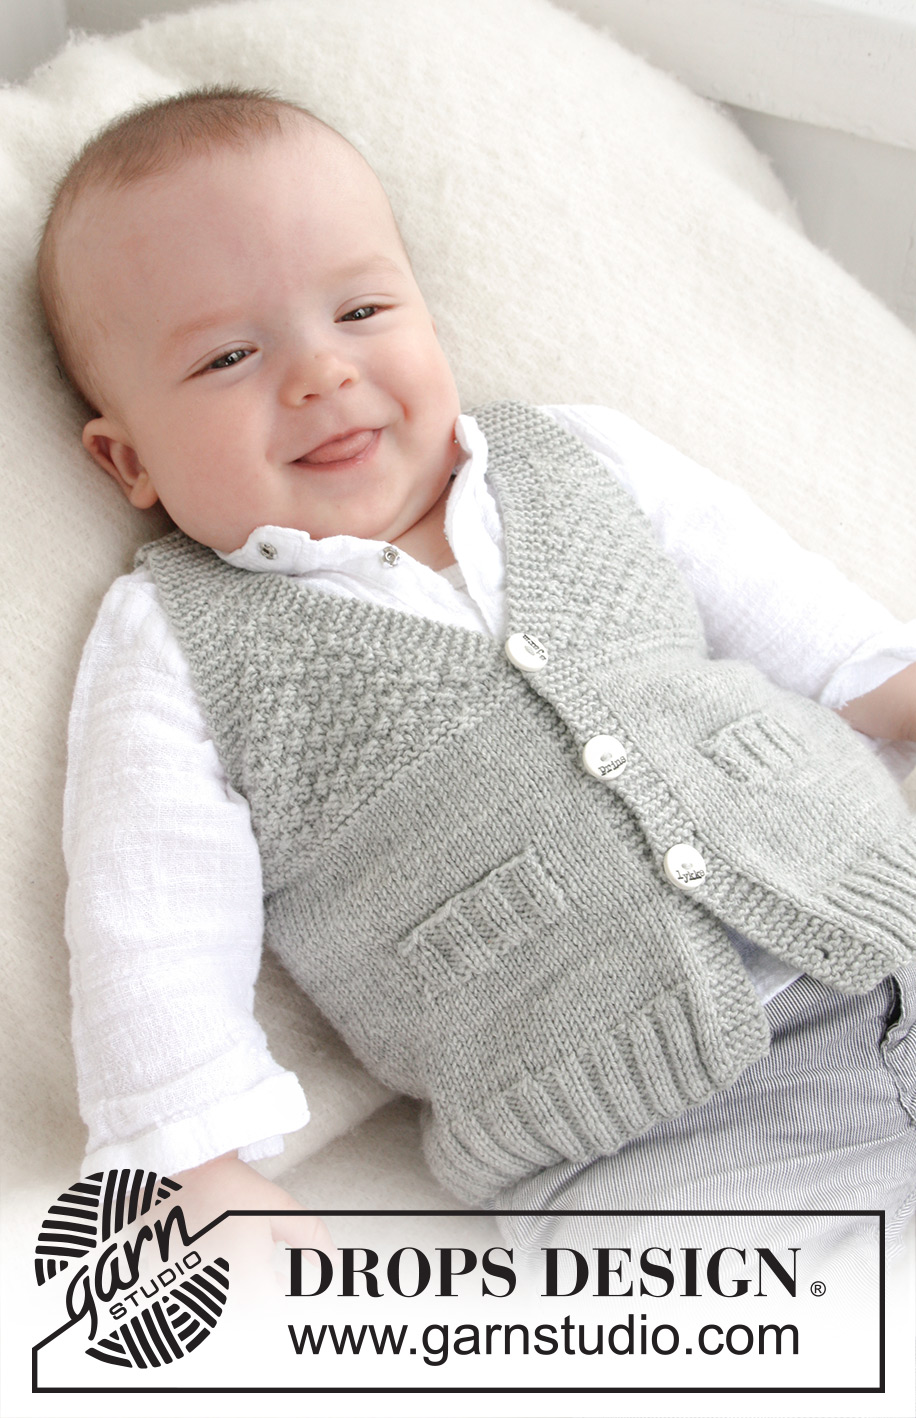
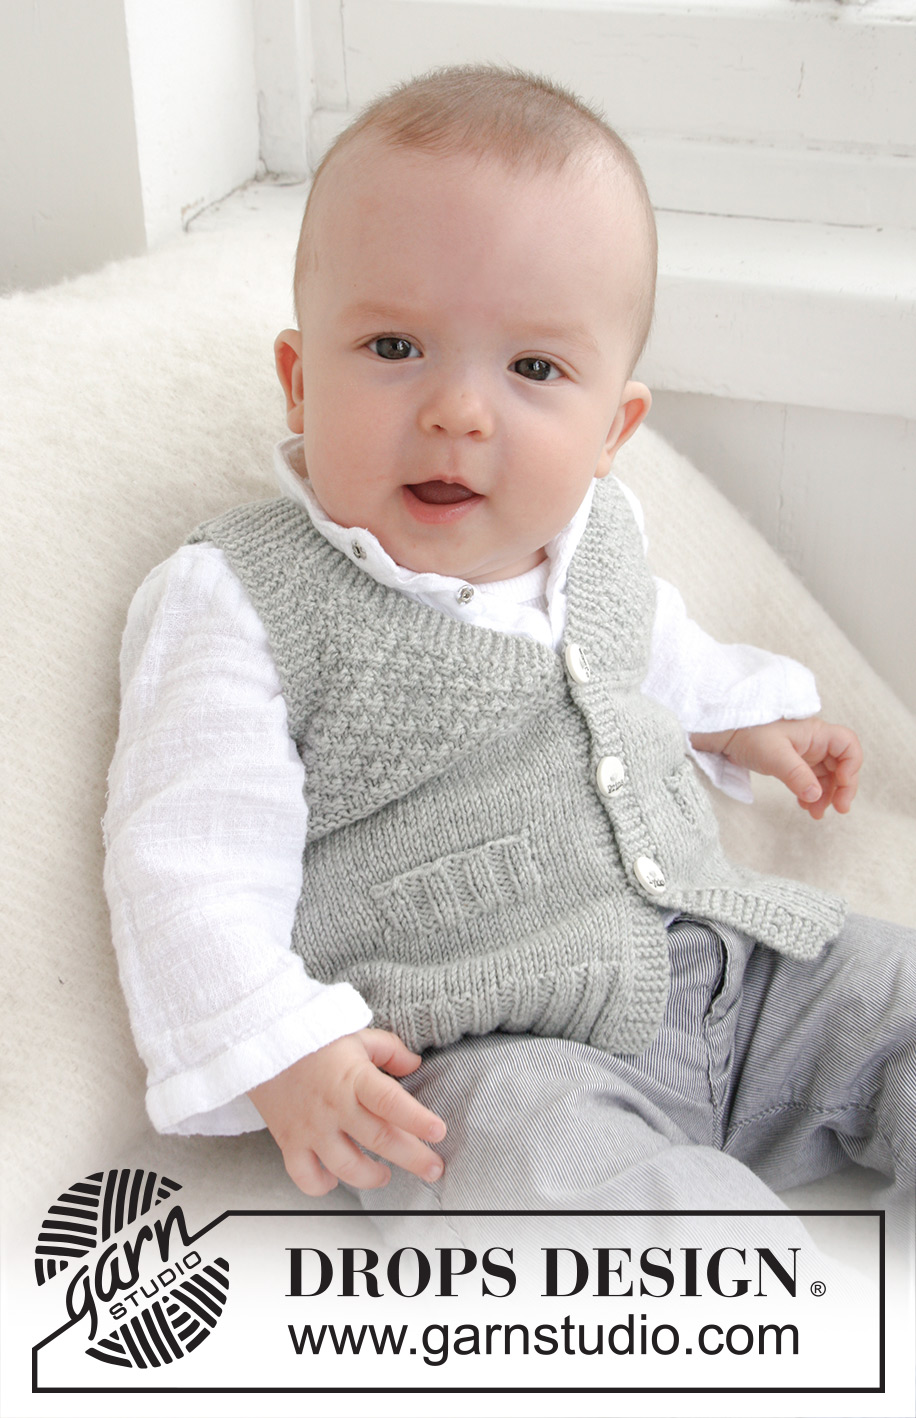
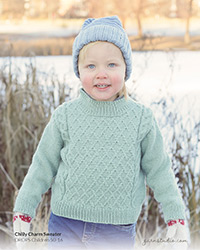
Gilet lavorato ai ferri con collo a V e motivo a punto fantasia per neonati e bambini in DROPS BabyMerino oppure in DROPS BabyAlpaca Silk.
DROPS Baby 21-8 |
|
|
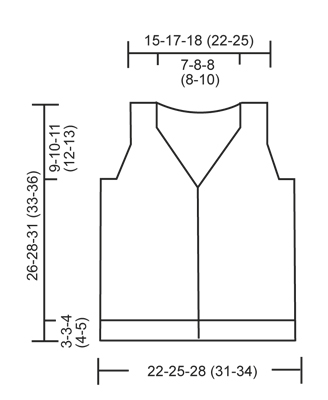
-------------------------------------------------------- M. A LEGACCIO (avanti e indietro sui ferri): Lavorare a dir. tutti i f. M. A GRANA DI RISO DOPPIA: 1° ferro: * 2 dir., 2 rov. *, ripetere da *-*. 2° ferro: dir. su dir. e rov. su rov. 3° ferro: rov. su dir. e dir. su rov. 4° ferro: come il 2° ferro. Ripetere i ferri 1-4. ASOLE: Intrecciare per le asole sul bordo destro 1 asola = lavorare insieme a dir. la seconda e la terza m. dal bordo e fare 1 gettato. Intrecciare per le asole quando il lavoro misura: TAGLIA 1/3 MESI: 2, 6, 10 e 14 cm. TAGLIA 6/9 MESI: 2, 7, 11 e 16 cm. TAGLIA 12/18 MESI: 2, 7, 12 e 17 cm. TAGLIA 2 ANNI: 2, 8, 13 e 19 cm. TAGLIA 3/4 ANNI: 2, 8, 14 e 20 cm. DIMINUIRE PER IL COLLO A V E PER GLI SCALFI A M. A GRANA DI RISO DOPPIA: Tutte le diminuzioni sono fatte da diritto del lavoro! DIMINUIRE COME SEGUE PRIMA DEL BORDO/BORDO DELLA MANICA: Quando l'ultima m. è a dir.: lavorare 2 m. insieme a dir. Quando l’ultima m. è un rov.: lavorare 2 m. insieme a rov. DIMINUIRE COME SEGUE DOPO IL BORDO/BORDO DELLA MANICA: Quando la prima m. è a dir.: passare la m. a dir., 1 dir., accavallare la m. passata sopra quella appena lavorata. Quando la prima m. è un rov.: lavorare 2 m. insieme a rov. ritorto (cioè lavorarle nel filo dietro anziché in quello davanti). -------------------------------------------------------- -------------------------------------------------------- CORPO: Lavorato avanti e indietro sui ferri circolari dal centro davanti. Con i ferri circolari n° 2,5 mm e il filato Baby Merino avviare 148-168-184 (204-224) m. Lavorare il 1° f. come segue sul diritto del lavoro: 5 m. a M. LEGACCIO (= bordo) – leggere la spiegazione sopra, * 2 m. dir., 2 m. rov. *, ripetere da *-* fino a quando non rimangono 7 m., finire con 2 m. dir. e 5 m. a M. LEGACCIO (= bordo). Continuare a coste in questo modo con 5 m. a m. legaccio da ogni lato fino a quando il lavoro non misuri 3-3-4 (4-5) cm – RICORDARSI DELLE ASOLE sul bordo – leggere la spiegazione sopra. Passare ai ferri circolari n°3 mm e lavorare a m. rasata ma continuare i bordi a m. legaccio come prima. ALLO STESSO TEMPO sul 1° f. dopo le coste, distribuire 32-36-40 (44-52) diminuzioni in modo uniforme (non diminuire sui bordi) = 116-132-144 (160-172) m. Inserire un segnapunti a 31-35-39 (43-45) m. a partire da ogni lato (= 54-62-66 (74-82) m. tra i segnapunti sul dietro). FARE ATTENZIONE ALLA TENSIONE DEL LAVORO! Quando il lavoro misura 7-7½-8 (9-10) cm, lavorare il f. successivo come segue sul diritto del lavoro: 5 m. a m. legaccio, 21-21-27 (27-31) m. a m. rasata, trasferire le ultime 16-16-20 (20-24) m. che sono state lavorate su un ferro ausiliario per la fessura della tasca, lavorare fino a quando non rimangono 10-10-12 (12-12) m. sul ferro, trasferire le ultime 16-16-20 (20-24) m. che sono state lavorate su un ferro ausiliario per la fessura della tasca, lavorare 5-5-7 (7-7) m. a m. rasata e finire con 5 m. a m. legaccio. Sul f. successivo avviare 16-16-20 (20-24) nuove m. su ognuno dei 2 ferri ausiliari con le m. = 116-132-144 (160-172) m. Continuare a m. rasata e a m. legaccio fino a quando il lavoro non misuri 13-14-16 (16-18) cm. Ora lavorare 4 f. a dir. su tutte le m. (= 2 creste di legaccio). Poi lavorare a MAGLIA A GRANA DI RISO DOPPIA – leggere la spiegazione sopra (continuare i bordi a m. legaccio come prima). LEGGERE TUTTA LA SEZIONE SEGUENTE PRIMA DI CONTINUARE! Quando il lavoro misura 15-17-18 (20-21) cm, lavorare 2 f. a m. legaccio sulle prime 5 m. sul ferro (non lavorare le altre m. sul ferro), poi lavorare 1 f. su tutte le m. prima di lavorare 2 f. a m. legaccio sulle prime 5 m. sul f. dall’altro lato del lavoro (per fare in modo che il collo a V sia carino). Quindi diminuire per il collo a V – leggere la spiegazione sopra: diminuire 1 m. ogni 2 ferri (cioè ogni f. sul dir. del lavoro) per un totale di 12-13-16 (16-16) volte. ALLO STESSO TEMPO quando il lavoro misura 16-17-19 (20-22) cm, lavorare 4 f. a m. legaccio sulle 18-20-20 (20-20) m. centrali da ogni lato (cioè su 9-10-10 (10-10) m. su ogni lato di entrambi i segnapunti) – lavorare le altre m. come prima. Sul f. successivo, intrecciare le 8-10-10 (10-10) m. centrali da ogni lato per lo scalfo e finire il davanti e il dietro in modo separato. DIETRO: = 46-52-56 (64-72) m. Lavorare a m. a grana di riso doppia con 5 m. a m. legaccio da ogni lato (= bordo della manica). ALLO STESSO TEMPO diminuire per gli scalfi – leggere la spiegazione sopra: diminuire 1 m. ogni 2 ferri (cioè su ogni f. sul diritto del lavoro) per un totale di 5-6-6 (6-6) volte = 36-40-44 (52-60) m. Continuare a m. a grana di riso doppia e m. legaccio fino a quando il lavoro non misuri 24-26-29 (31-34) cm. Ora lavorare a m. legaccio su tutte le m. fino alla lunghezza finale. ALLO STESSO TEMPO quando il lavoro misura 25-27-30 (32-35) cm, intrecciare le 16-18-20 (20-24) m. centrali per il collo = 10-11-12 (16-18) m. rimaste su ogni spalla. Ora finire ogni spalla in modo separato. Continuare con la m. legaccio fino a quando il lavoro misura 26-28-31 (33-36) cm, intrecciare. DAVANTI SINISTO: Continuare con la m. a grana di riso doppia e la m. legaccio e ALLO STESSO TEMPO diminuire per lo scalfo a lato come per il dietro e continuare a diminuire per il collo a V come prima. Alla fine dell’ultima diminuzione, rimangono 10-11-12 (16-18) m. sul ferro. Lavorare a m. legaccio su tutte le m. fino a quando il lavoro non misuri 26-28-31 (33-36) cm e intrecciare. DAVANTI DESTRO: Lavorare come il davanti sinistro ma al contrario. FESSURA PER LA TASCA: Trasferire le 16-16-20 (20-24) m. dal ferro ausiliario su uno dei davanti sui ferri n° 2,5 mm. Lavorare a coste con 1 m. a m. legaccio e 2 m. dir. a ogni lato (visto sul diritto del lavoro). Quando la fessura per la tasca misura 2½-2½-3 (3-3) cm, intrecciare senza stringere con dir. su dir. e rov. su rov. Cucire la fessura per la tasca al davanti con punti maglia da ogni lato. Cucire l’apertura della tasca alla parte inferiore della fessura della tasca (dove le m. sono state messe sul f. ausiliario) sul dietro. Lavorare l’altra fessura per la tasca nello stesso modo sull’altro davanti. CONFEZIONE: Cucire i margini delle spalle. Attaccare i bottoni. |
|
 |
|
Avete terminato questo modello?Allora taggate le vostre foto con #dropspattern #juniorvest o inviatele alla #dropsfan gallery. Avete bisogno di aiuto con questo modello?Troverete 13 video tutorial, una sezione per i commenti/domande e molto altro guardando il modello su www.garnstudio.com © 1982-2026 DROPS Design A/S. Ci riserviamo tutti i diritti. Questo documento, compreso tutte le sue sotto-sezioni, è protetto dalle leggi sul copyright. Potete leggere quello che potete fare con i nostri modelli alla fine di ogni modello sul nostro sito. |
|


Con oltre 40 anni di esperienza nel design di modelli di maglia e uncinetto, DROPS Design offre la più estesa collezione di modelli gratuiti su internet - tradotti in 17 lingue. Ad oggi vi possiamo fornire 320 cataloghi e 12110 modelli - 9379 dei quali sono tradotti in Italiano.
Ci stiamo impegnando molto per darvi il meglio che vi possiamo offrire in termini di maglia e uncinetto, ispirazioni e consigli così come filati di grande qualità ad un prezzo incredibile! Volete utilizzare i nostri modelli per qualcosa d'altro oltre al vostro uso personale? Potete leggere tutto ciò che è consentito nel testo sul Copyright in basso su tutte le pagine dei nostri modelli. Buon lavoro!
Lasciare un commento sul modello DROPS Baby 21-8
Noi saremmo felici di ricevere i tuoi commenti e opinioni su questo modello!
Se vuoi fare una domanda, fai per favore attenzione a selezionare la categoria corretta nella casella qui sotto per velocizzare il processo di risposta. I campi richiesti sono indicati da *.