
Categorie popolari
State cercando un filato?


Commenti / Domande (210)
![]() Marion ha scritto:
Marion ha scritto:
Aus diesem Muster lässt sich auch eine passende Puppenjacke stricken. Das Vorder- und Rückenteil wird über 6 Mustersätze gestrickt, und die Ärmel jeweils über 2 Mustersätze. Da die Passe wesentlich kürzer ist, habe ich nur die M2 Musterreihen gestrickt in denen abgenommen wird. Für die Knopfleiste habe ich nur 4 Maschen gestrickt, und jeweils nur 2 Knopflöcher (das erste ca. 1 cm nachdem die Ärmel eingesetzt werden, und das 2. Knopfloch in der letzten Reihe des M2). Happy knitting!!
11.06.2013 - 05:18
![]() Fecanas ha scritto:
Fecanas ha scritto:
Thanks very much for taking time to reply. i was the video once in youtube but after that i wasnt able to find it anymore. thanks so much!
10.06.2013 - 17:23
![]() Valeria ha scritto:
Valeria ha scritto:
Non sono un'esperta, quindi volevo sapere se questo modello si può eseguire solo con i ferri circolari oppure anche con i ferri normali eseguendo il davanti e il dietro separatamente per poi unirli alla fine. Se si può, mi inviereste le spiegazioni per eseguirlo con i ferri normali? Grazie mille per l'attenzione.
26.05.2013 - 11:52DROPS Design ha risposto:
Buongiorno. Il modello si lavora avanti e indietro, quindi si può eseguire sui i ferri diritti. L'unica cosa è che ci saranno tantissime maglie e il lavoro sarà un po' pesante alla fine.
27.05.2013 - 10:40
![]() Donna ha scritto:
Donna ha scritto:
I love this pattern, but after reading the Comments and before ordering yearn, I am wondering if sizes 3-4 and 5/7 have any errors. Why are so may people having problems with the sleeves? I'm an intermediate knitter - is this doable for me?
19.05.2013 - 14:10DROPS Design ha risposto:
Dear Donna, a correction has been made - see tab "corrections" - please print the online pattern if you bought the catalogue so that you are sure to have an updated text. Should you have any question, please feel free to check our videos and to request help from your Drops retailer or any knitting forum. Happy knitting!
21.05.2013 - 08:57
![]() Marge Monaghan ha scritto:
Marge Monaghan ha scritto:
Beautiful cardigan - this one area is confusing to me - right sleeve-continue M1-begin the 11th-1st-4th-7th sts in diagram
21.04.2013 - 21:47DROPS Design ha risposto:
Dear Mrs Monaghan, in order that sleeves fits in pattern on yoke, you will have to start pattern and diagram on different places : first size starts with 11th st in the diagram etc... Happy knitting!
22.04.2013 - 09:04
![]() Sabine ha scritto:
Sabine ha scritto:
Tolle Anleitung, hat auch gut geklappt! Nur bei den Ärmeln muß man schauen welche Machen abgekettet sind, damit das Muster stimmt. Man kann sich nicht auf die Anleitung verlassen
03.03.2013 - 20:30
![]() Lisbet ha scritto:
Lisbet ha scritto:
Hvad betyder stolpem - det er fra model 22-22 i Children No.22 side 46 -47
12.02.2013 - 10:58DROPS Design ha risposto:
Stolpemasker er kanten hvor du syr knapper paa / laver knaphuller. Det er her de 5 kantm i hver side som du strikker i retstrik.
12.02.2013 - 11:38
![]() Gwen ha scritto:
Gwen ha scritto:
Kan iemand de patronen M1 en M2 ook in woorden uitschrijven? Zoals boven de instructievideo? Ik kom er zo niet uit... Je hebt 13 steken, start 2x2st samen en dan??
04.02.2013 - 21:49DROPS Design ha risposto:
Na de 2 keer 2 st samen heb je (M.1): 1 r, 1 omslag, 1 r, 1 omslag en zo voort. Eindig met nogmaals 2 keer 2 st samen. Op deze manier blijft het aantal st hetzelfde. Dit geldt ook voor M.2
06.02.2013 - 15:41
![]() Gwen ha scritto:
Gwen ha scritto:
Kunnen de mouwtjes ook op een rondbreinaald gebreid worden?
04.02.2013 - 11:25DROPS Design ha risposto:
Ja, dat kan. Op een hele korte of probeer de magic-loop techniek (zie onze video's).
04.02.2013 - 12:37
![]() Diana Lia ha scritto:
Diana Lia ha scritto:
Bonjour je tricot ce modèl (age = 3/4ans) j'ai terminer les manches mais je n'arrive pas à justifier le motif pour l'empiècement. il n'y a pas de coresspondance? j'espère que ma question est claire et merci d'avance
30.01.2013 - 09:39DROPS Design ha risposto:
Bonjour Diana Lia, les manches doivent s'insérer parfaitement dans la continuité du motif : on commence la manche par la 11ème m (tricotée à l'end au début du tour puis ens à l'end avec la dernière m du tour), puis on rabat les 6 premières m = le motif pourra suivre les mailles du devant. Bon tricot !
30.01.2013 - 10:24
|
|||||||||||||
Wonder Wave#wonderwavecardigan |
|||||||||||||
|
|
|||||||||||||
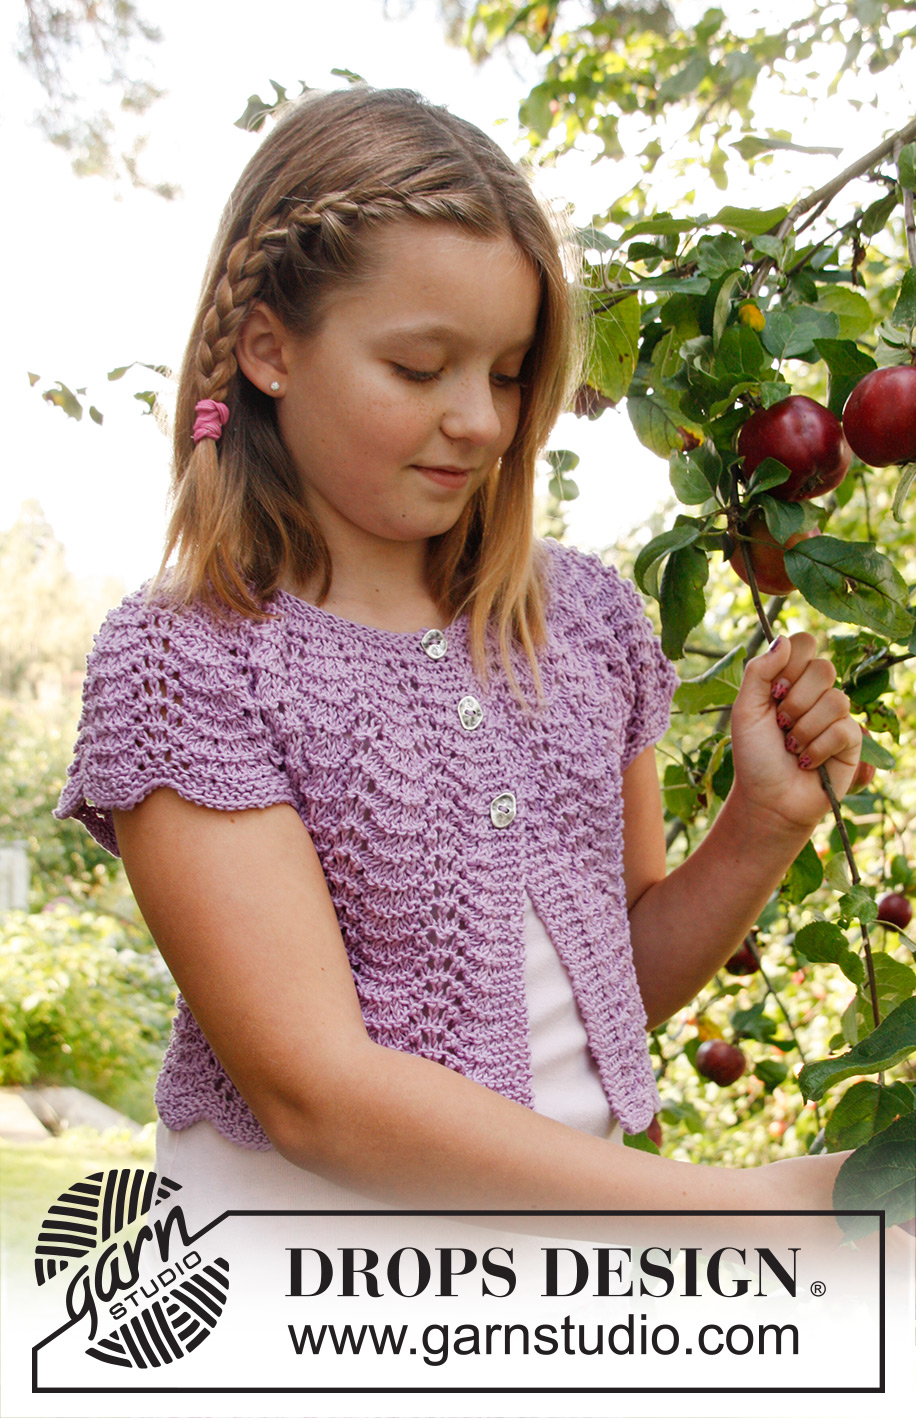
Giacchino DROPS lavorato ai ferri, a maniche corte, con motivo a onde e sprone in "Muskat".
DROPS Children 22-22 |
|||||||||||||
|
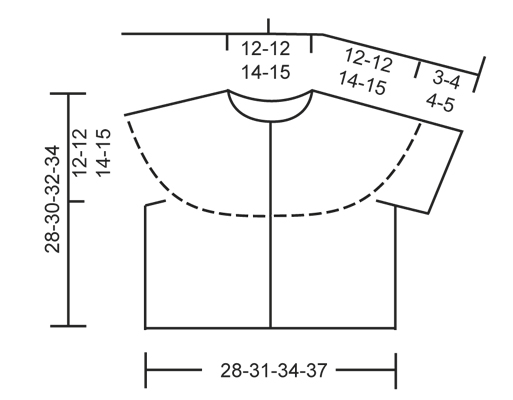
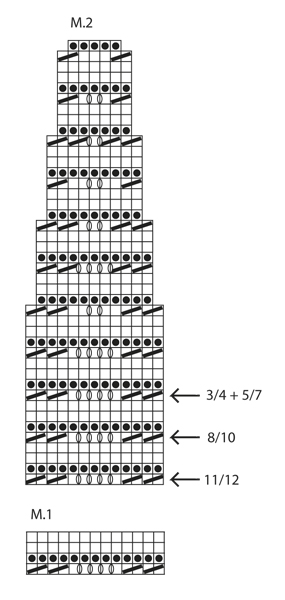
--------------------------------------------------------- MOTIVO A ONDE: Vedere i diagrammi M.1 e M.2. I diagrammi mostrano il motivo sul diritto del lavoro. M. A LEGACCIO (in tondo con i ferri a doppia punta/ferri circolari): 1 cresta = 2 giri * lavorare 1 giro a dir. e 1 giro a rov. *, ripetere da *-*. ASOLE: Intrecciare per le asole sul bordo davanti dx sul diritto del lavoro. 1 asola = intrecciare la 3° m. dal bordo, sul f. successivo avviare 1 nuova m. sulla m. intrecciata. Intrecciare per le asole quando il lavoro misura: TAGLIA 3/4 anni: 18, 23 e 27 cm TAGLIA 5/7 anni: 20, 25 e 29 cm TAGLIA 8/10 anni: 21, 27 e 31 cm TAGLIA 10/12 anni: 23, 29 e 33 cm NOTA: L’ultima asola è intrecciata sul f. alla fine del diagramma M.2. --------------------------------------------------------- CORPO: Lavorato avanti e indietro sui ferri circolari dal centro davanti. Con i ferri circolari misura 4 mm e il filato Muskat avviare 152-166-180-194 m. (comprese 5 m. per il bordo da ogni lato). Lavorare il 1° f. come segue sul diritto del lavoro: * 10 dir., 2 m. insieme a dir. *, ripetere da *-* fino a quando rimangono 8-10-12-14 m., lavorarle a dir. = 140-153-166-179 m. Poi lavorare 3 f. a dir. avanti e indietro. Continuare con il diagramma M.1 con 5 m. per il bordo da ogni lato a m. legaccio fino alla lunghezza finale. FARE ATTENZIONE ALLA TENSIONE DEL LAVORO! Quando il lavoro misura circa 16-18-18-19 cm (aggiustarlo in modo che rimanga 1 f. del diagramma M.1), lavorare il f. successivo come segue (= rovescio del lavoro): lavorare 34-37-41-44 m., intrecciare senza stringere 7-7-6-6 m. per lo scalfo, lavorare 58-65-72-79 m. intrecciare senza stringere 7-7-6-6 m. per lo scalfo e lavorare il resto del f. (= 34-37-41-44 m.). Mettere il lavoro da parte e lavorare le maniche. MANICA DX: Lavorata in tondo con i ferri a doppia punta. Con i ferri a doppia punta misura 4 mm e il filato Muskat avviare 59-59-74-74 m. Lavorare il primo giro come segue: * 6 dir., lavorare 2 m. insieme a dir. *, ripetere da *-* fino a quando rimangono 3-3-2-2 m., lavorarle a dir. = 52-52-65-65 m. Poi lavorare 1 giro a rov., 1 giro a dir. e 1 giro a rov. Inserire un segnapunti all’inizio del giro. Continuare con il diagramma M.1 – iniziare nella 11°-1°-4°-7° m. sul diagramma, contare da dx. (nelle taglie 3/4 e 8/10 anni, lavorare a dir. la 1° m., e alla fine del giro lavorare a dir. questa m. insieme all’ultima m. sul giro). Continuare a lavorare in questo modo fino a quando il lavoro misura circa 3-4-4-5 cm (aggiustarlo in modo che rimanga 1 giro del diagramma M.1). Sul giro successivo intrecciare le PRIME 6-6-7-7 m., lavorare il resto del giro = 46-46-58-58 m. MANICA SX: Avviare e lavorare come per la manica dx., ma quando il lavoro misura 3-4-4-5 cm, intrecciare in questo modo: Taglia 3/4 + 8/10: intrecciare le PRIME 6-7 m. sul giro e Taglia 5/7 e 11/12 anni: intrecciare le ULTIME 6-7 m. sul giro (è importante per fare il motivo corretto sullo sprone). SPRONE: Trasferire le maniche sullo stesso ferro circolare del corpo dove sono state intrecciate le m. per gli scalfi = 218-231-270-283 m. NOTA: E’ molto importante che la manica dx. sia inserita nel lato dx. e la manica sx. sia inserita nel lato sx. in modo che lo schema corrisponda da qui in avanti. Continuare con il diagramma M.2 – iniziare a livello della freccia per la taglia corretta – con 5 m. di bordo davanti a maglia legaccio ad ogni lato (= 16-17-20-21 ripetizioni sul giro). ALLO STESSO TEMPO quando il lavoro misura 18-20-21-23 cm, intrecciare per le ASOLE – leggere la spiegazione sopra. Dopo che M.2 è stato lavorato in altezza, rimangono 90-95-110-115 m. sul ferro. Lavorare il f. successivo come segue sul diritto del lavoro: lavorare 5 m. a dir. (e allo stesso tempo intrecciare per l’ultima asola), * 2 m. insieme a dir., 1 dir. *, ripetere da *-* fino a quando rimangono 7-6-6-5 m., lavorarle a dir. = 64-67-77-80 m. Lavorare 3-3-5-5 f. a dir. avanti e indietro, poi intrecciare a dir. sul diritto del lavoro. CONFEZIONE: Cucire le aperture sotto le maniche e attaccare i bottoni. |
|||||||||||||
Spiegazioni del diagramma |
|||||||||||||
|
|||||||||||||
 |
|||||||||||||
 |
|||||||||||||
Avete terminato questo modello?Allora taggate le vostre foto con #dropspattern #wonderwavecardigan o inviatele alla #dropsfan gallery. Avete bisogno di aiuto con questo modello?Troverete 13 video tutorial, una sezione per i commenti/domande e molto altro guardando il modello su www.garnstudio.com © 1982-2026 DROPS Design A/S. Ci riserviamo tutti i diritti. Questo documento, compreso tutte le sue sotto-sezioni, è protetto dalle leggi sul copyright. Potete leggere quello che potete fare con i nostri modelli alla fine di ogni modello sul nostro sito. |
|||||||||||||


Con oltre 40 anni di esperienza nel design di modelli di maglia e uncinetto, DROPS Design offre la più estesa collezione di modelli gratuiti su internet - tradotti in 17 lingue. Ad oggi vi possiamo fornire 324 cataloghi e 12290 modelli - 9561 dei quali sono tradotti in Italiano.
Ci stiamo impegnando molto per darvi il meglio che vi possiamo offrire in termini di maglia e uncinetto, ispirazioni e consigli così come filati di grande qualità ad un prezzo incredibile! Volete utilizzare i nostri modelli per qualcosa d'altro oltre al vostro uso personale? Potete leggere tutto ciò che è consentito nel testo sul Copyright in basso su tutte le pagine dei nostri modelli. Buon lavoro!
Lasciare un commento sul modello DROPS Children 22-22
Noi saremmo felici di ricevere i tuoi commenti e opinioni su questo modello!
Se vuoi fare una domanda, fai per favore attenzione a selezionare la categoria corretta nella casella qui sotto per velocizzare il processo di risposta. I campi richiesti sono indicati da *.