
Categorie popolari
State cercando un filato?


Commenti / Domande (210)
![]() Clawur ha scritto:
Clawur ha scritto:
Hübsche Weste, auch nicht sonderlich schwierig zu stricken, außer wenn die Maschen dazu aufgenommen werden wird es etwas knifflig.
28.10.2015 - 21:16
![]() Thea Wieffering ha scritto:
Thea Wieffering ha scritto:
Dank je wel het zijn de laatsre 6 st op de pen kwartje valt
07.05.2015 - 12:58
![]() Thea Wieffering ha scritto:
Thea Wieffering ha scritto:
Ik brei maat5 7 ik heb de pas recht gebreid zonder patroon ik heb het laatste knoopschat gebreid ik snap niet hoe ik 6 st overhoud over hoeveel st gaat dit niet over de hele pen denk ik want ik moet er 67 0verhouden
02.05.2015 - 12:34DROPS Design ha risposto:
Hoi Thea. Je herhaalt heel eenvoudig de 2 r samen, 1 r tot je 6 st over hebt op de nld. Je begint met 95, brei 5 r (hier maak je ook het knoopsgat in), dan brei je 2 r samen, 1 r tot er 6 st over zijn op de nld (Je hebt dan 28 keer 2 st r samen / 1 r gebreid) en hebt 6 st over. Dan klopt het ook met 67 st over = 5 + 56 + 6 st 67 st
04.05.2015 - 16:25
![]() Luanne ha scritto:
Luanne ha scritto:
Ok I figured out the first row...k5 at beg and end are incl in first row but tell me how to get a 13 stitch pattern to fit into an 11 stitch base row? Now I know these don't add up!
26.04.2015 - 00:44Margot ha risposto:
Luanne, you dec. from 194 to 179 in first row, 10 st for borders: leaves 169 st. 13 X 13= 169
26.04.2015 - 12:35
![]() Luanne ha scritto:
Luanne ha scritto:
Please help me with the math. If I cast on 194 stitches and work first row as, k5(for front band) then *k10,k2tog* across I end up with 16 stitches. The last 5 stitches are for the front band that leaves 11 stitches that I knit? 194st - 10band st=184, then 184/12=15.33333. Does not work and then when I go to the M1 I also have 2 extra st and the wave does not line up with the k2tog on the first row. I have tried 3 times and cannot get it to work. Please help!
25.04.2015 - 20:55DROPS Design ha risposto:
Dear Luanne, work as follows over 194 sts: repeat (K10, K2 tog) a total of 15 times (= over 180 sts), 14 sts remain at the end of row, K the last 14 sts = 179 sts remain. Then work M1 as follows: 5 sts garter st, repeat 13 times diagram M1 in width (13 x 13 sts), 5 sts garter st = 179 sts. Happy knitting!
27.04.2015 - 10:22
![]() Thea Wieffering ha scritto:
Thea Wieffering ha scritto:
Ik ben het vestje muscat aan het breien ,maar heb problemen het de hals breien ik heb gebreit tot 95 st over dan staat er brei 2 st r samen 1 st recht herhaal tot er 7 over zijn over hoeveel st gaat dit ik neem aan dat dit voor het voorpand is is de rug gewoon recht of zit daar een halslijn in ,wel volgens de tekening ik hoop dat u mij verder kunt helpen bvb dank
23.04.2015 - 15:06DROPS Design ha risposto:
Hoi Thea. Je hebt de pas gebreid, dus dat is voorpand-rugpand-voorpand. Je hebt 95 st over in totaal. Je breit eerst 5 st r (en maakt hier ook het laatste knoopsgat), vervolgens brei je 2 st recht samen, 1 st r tot er 6 st over zijn = 95-5-6 = je breit dus de 2 r samen/1 r over 84 st. Brei de laatste 6 st r
30.04.2015 - 16:03
![]() Thea Wieffering ha scritto:
Thea Wieffering ha scritto:
Kunt u mij uitleggen hoe de hals gebreid word ik kom er niet uit met het patroon bvb dank
19.04.2015 - 12:48DROPS Design ha risposto:
Hoi Thea. Bedoel je het ronde pas met het motief? Welke maat maak je? Dan kan ik sneller kijken en hulp bieden.
20.04.2015 - 13:12
![]() Ann Britt Bergström ha scritto:
Ann Britt Bergström ha scritto:
Åh vilka fina små tröjor det blev. Den första var lite svår att få till ärmarnas mönster på, men den andra tröjan var jättelätt. Man måste vara noga med avmaskningarna på ärmarna och sätta in dem på rätt sida i tröjan! Tänk också på att ärmarna stickas runt och att det räta varvet på mönstret (andra varvet) då måste stickas avigt!
14.03.2015 - 12:02
![]() SILVANA VITALI ha scritto:
SILVANA VITALI ha scritto:
Come posso realizzare la manica sul ferro diritto?
05.03.2015 - 17:50DROPS Design ha risposto:
Buongiorno Silvana. Per lavorare le maniche sui ferri dritti, può avviare lo stesso numero di m indicato, aggiungendo 1 m vivagno ai lati. Lavora il primo ferro come indicato e poi altri 3 ferri a dir. Ponga molta attenzione a come dispone il motivo; valuti fin dall’inizio quante m intreccerà per gli scalfi. Quando riporterà le m delle maniche sugli stessi ferri del davanti / dietro per lavorare lo sprone, il motivo sulle maniche dovrà inserirsi correttamente con il motivo sul davanti/dietro. Buon lavoro!
06.03.2015 - 12:04
![]() Saroj ha scritto:
Saroj ha scritto:
Your pattern is bit difficult to understand. I was wondering if I can knit the sleeves straight instead of round needles and join them into the body, and then knit the yoke. Then in the end I can sew the sleeve length wise and around under arms.
04.03.2015 - 04:20DROPS Design ha risposto:
Dear Mrs Saroj, you can choose to knit sleeve back and forth, add 1 edge st each side for seams and remember to start pattern as stated for your size as well as bind off the correct sts on row for armhole so that pattern will then match for yoke (both sleeves are different). Happy knitting!
04.03.2015 - 09:24
|
|||||||||||||
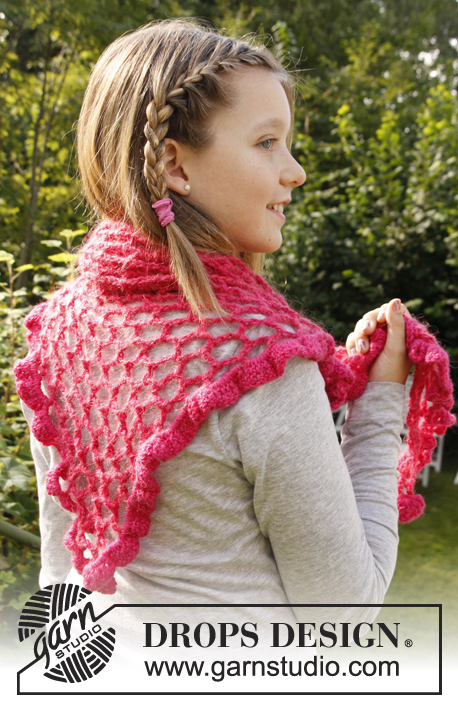
Wonder Wave#wonderwavecardigan |
|||||||||||||
|
|
|||||||||||||
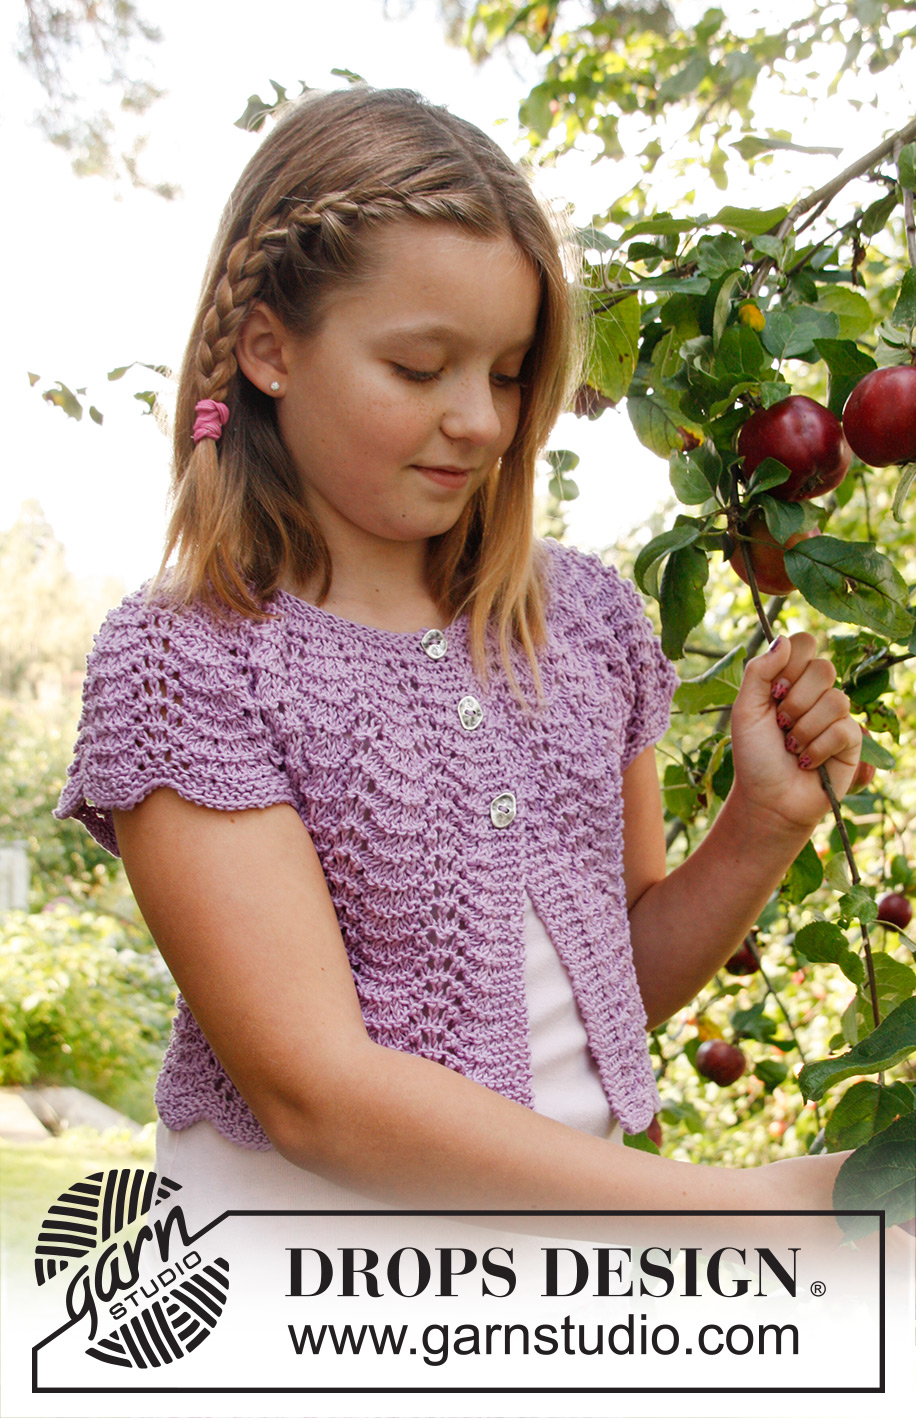
Giacchino DROPS lavorato ai ferri, a maniche corte, con motivo a onde e sprone in "Muskat".
DROPS Children 22-22 |
|||||||||||||
|
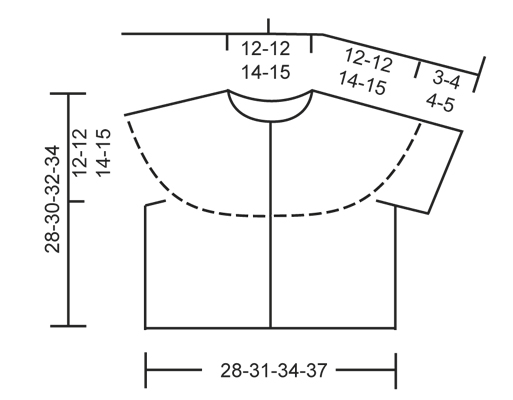
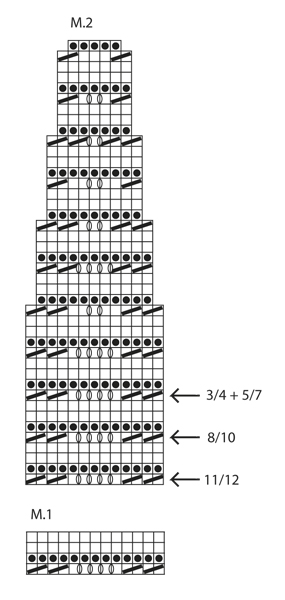
--------------------------------------------------------- MOTIVO A ONDE: Vedere i diagrammi M.1 e M.2. I diagrammi mostrano il motivo sul diritto del lavoro. M. A LEGACCIO (in tondo con i ferri a doppia punta/ferri circolari): 1 cresta = 2 giri * lavorare 1 giro a dir. e 1 giro a rov. *, ripetere da *-*. ASOLE: Intrecciare per le asole sul bordo davanti dx sul diritto del lavoro. 1 asola = intrecciare la 3° m. dal bordo, sul f. successivo avviare 1 nuova m. sulla m. intrecciata. Intrecciare per le asole quando il lavoro misura: TAGLIA 3/4 anni: 18, 23 e 27 cm TAGLIA 5/7 anni: 20, 25 e 29 cm TAGLIA 8/10 anni: 21, 27 e 31 cm TAGLIA 10/12 anni: 23, 29 e 33 cm NOTA: L’ultima asola è intrecciata sul f. alla fine del diagramma M.2. --------------------------------------------------------- CORPO: Lavorato avanti e indietro sui ferri circolari dal centro davanti. Con i ferri circolari misura 4 mm e il filato Muskat avviare 152-166-180-194 m. (comprese 5 m. per il bordo da ogni lato). Lavorare il 1° f. come segue sul diritto del lavoro: * 10 dir., 2 m. insieme a dir. *, ripetere da *-* fino a quando rimangono 8-10-12-14 m., lavorarle a dir. = 140-153-166-179 m. Poi lavorare 3 f. a dir. avanti e indietro. Continuare con il diagramma M.1 con 5 m. per il bordo da ogni lato a m. legaccio fino alla lunghezza finale. FARE ATTENZIONE ALLA TENSIONE DEL LAVORO! Quando il lavoro misura circa 16-18-18-19 cm (aggiustarlo in modo che rimanga 1 f. del diagramma M.1), lavorare il f. successivo come segue (= rovescio del lavoro): lavorare 34-37-41-44 m., intrecciare senza stringere 7-7-6-6 m. per lo scalfo, lavorare 58-65-72-79 m. intrecciare senza stringere 7-7-6-6 m. per lo scalfo e lavorare il resto del f. (= 34-37-41-44 m.). Mettere il lavoro da parte e lavorare le maniche. MANICA DX: Lavorata in tondo con i ferri a doppia punta. Con i ferri a doppia punta misura 4 mm e il filato Muskat avviare 59-59-74-74 m. Lavorare il primo giro come segue: * 6 dir., lavorare 2 m. insieme a dir. *, ripetere da *-* fino a quando rimangono 3-3-2-2 m., lavorarle a dir. = 52-52-65-65 m. Poi lavorare 1 giro a rov., 1 giro a dir. e 1 giro a rov. Inserire un segnapunti all’inizio del giro. Continuare con il diagramma M.1 – iniziare nella 11°-1°-4°-7° m. sul diagramma, contare da dx. (nelle taglie 3/4 e 8/10 anni, lavorare a dir. la 1° m., e alla fine del giro lavorare a dir. questa m. insieme all’ultima m. sul giro). Continuare a lavorare in questo modo fino a quando il lavoro misura circa 3-4-4-5 cm (aggiustarlo in modo che rimanga 1 giro del diagramma M.1). Sul giro successivo intrecciare le PRIME 6-6-7-7 m., lavorare il resto del giro = 46-46-58-58 m. MANICA SX: Avviare e lavorare come per la manica dx., ma quando il lavoro misura 3-4-4-5 cm, intrecciare in questo modo: Taglia 3/4 + 8/10: intrecciare le PRIME 6-7 m. sul giro e Taglia 5/7 e 11/12 anni: intrecciare le ULTIME 6-7 m. sul giro (è importante per fare il motivo corretto sullo sprone). SPRONE: Trasferire le maniche sullo stesso ferro circolare del corpo dove sono state intrecciate le m. per gli scalfi = 218-231-270-283 m. NOTA: E’ molto importante che la manica dx. sia inserita nel lato dx. e la manica sx. sia inserita nel lato sx. in modo che lo schema corrisponda da qui in avanti. Continuare con il diagramma M.2 – iniziare a livello della freccia per la taglia corretta – con 5 m. di bordo davanti a maglia legaccio ad ogni lato (= 16-17-20-21 ripetizioni sul giro). ALLO STESSO TEMPO quando il lavoro misura 18-20-21-23 cm, intrecciare per le ASOLE – leggere la spiegazione sopra. Dopo che M.2 è stato lavorato in altezza, rimangono 90-95-110-115 m. sul ferro. Lavorare il f. successivo come segue sul diritto del lavoro: lavorare 5 m. a dir. (e allo stesso tempo intrecciare per l’ultima asola), * 2 m. insieme a dir., 1 dir. *, ripetere da *-* fino a quando rimangono 7-6-6-5 m., lavorarle a dir. = 64-67-77-80 m. Lavorare 3-3-5-5 f. a dir. avanti e indietro, poi intrecciare a dir. sul diritto del lavoro. CONFEZIONE: Cucire le aperture sotto le maniche e attaccare i bottoni. |
|||||||||||||
Spiegazioni del diagramma |
|||||||||||||
|
|||||||||||||
 |
|||||||||||||
 |
|||||||||||||
Avete terminato questo modello?Allora taggate le vostre foto con #dropspattern #wonderwavecardigan o inviatele alla #dropsfan gallery. Avete bisogno di aiuto con questo modello?Troverete 13 video tutorial, una sezione per i commenti/domande e molto altro guardando il modello su www.garnstudio.com © 1982-2026 DROPS Design A/S. Ci riserviamo tutti i diritti. Questo documento, compreso tutte le sue sotto-sezioni, è protetto dalle leggi sul copyright. Potete leggere quello che potete fare con i nostri modelli alla fine di ogni modello sul nostro sito. |
|||||||||||||


Con oltre 40 anni di esperienza nel design di modelli di maglia e uncinetto, DROPS Design offre la più estesa collezione di modelli gratuiti su internet - tradotti in 17 lingue. Ad oggi vi possiamo fornire 324 cataloghi e 12290 modelli - 9561 dei quali sono tradotti in Italiano.
Ci stiamo impegnando molto per darvi il meglio che vi possiamo offrire in termini di maglia e uncinetto, ispirazioni e consigli così come filati di grande qualità ad un prezzo incredibile! Volete utilizzare i nostri modelli per qualcosa d'altro oltre al vostro uso personale? Potete leggere tutto ciò che è consentito nel testo sul Copyright in basso su tutte le pagine dei nostri modelli. Buon lavoro!
Lasciare un commento sul modello DROPS Children 22-22
Noi saremmo felici di ricevere i tuoi commenti e opinioni su questo modello!
Se vuoi fare una domanda, fai per favore attenzione a selezionare la categoria corretta nella casella qui sotto per velocizzare il processo di risposta. I campi richiesti sono indicati da *.