
Categorie popolari
State cercando un filato?


Commenti / Domande (210)
Christine Weir ha scritto:
Hello.....i'm having trouble with the sleeves ....i'm doing the 9/10....i ubderstand having to knit the 1st stitch then knitting 2 together at the end of the row ...but the pattern doesnt line up....what am i doing wrong?
13.05.2017 - 01:26DROPS Design ha risposto:
Dear Mrs Weir, in size 9/10 you are starting diagram on 4th st, ie K1 at the beg of round, but at the end of row work K2 tog (= 1st st on round = 4th st in diagram). Happy knitting!
15.05.2017 - 08:48
![]() Kirsten ha scritto:
Kirsten ha scritto:
Hej højre ærme der er mønster forkert i str 8 /10 jeg kan ikke få det til at passe lige meget hvor mange jeg har prøvet vil gerne have den strikket. Vil du ikke lige prøve selv om du kan få det til at passe
25.04.2017 - 19:19DROPS Design ha risposto:
Hej Kirsten, jo det stemmer, når du har taget ind til 65 m så strikkes diagrammet som går over 13m 5 gange. Du starter diagrammet i 4.m fra højre (1 ret), fortsætter mod venstre og strikker de sidste 9 m af diagrammet, strikker diagrammet 4 hele gange og afslutter med de 3 første m i diagrammet og strikker den sidste m sammen med første m på omgangen. God fornøjelse!
03.05.2017 - 10:59
![]() Katy ha scritto:
Katy ha scritto:
Buonasera. Ho provato a realizzare il modello con i ferri n. 3,5 per la taglia 5-7 anni ma il lavoro risultava molto grande. Così ho montato le maglie per la misura 3-4. Le taglie norvegesi vestono più grande rispetto alle nostre? Perché vanno eseguite le diminuzioni durante il primo ferro? A cosa servono? Grazie! :-)
18.02.2017 - 18:18DROPS Design ha risposto:
Buonasera Katy, deve utilizzare la misura di ferri che le consente di ottenere il campione indicato, in questo modo le misure corrisponderanno a quelle del modello. Le taglie indicate corrispondo a quelle italiane, anche le misure in cm. Le diminuzioni sul 1° ferro servono a sagomare il bordo inferiore. Buon lavoro!
18.02.2017 - 19:13
![]() Mona ha scritto:
Mona ha scritto:
Jeg forstår ikke hvordan jeg skal strikke ermene, har prøvd flere ganger. Jeg strikker str 8/10 og starter derfor M1 i den 4 m. Jeg strikker denne rett, men på slutten av første omgang av mønsteret strikker jeg denne rett sammen med siste maske. Stemmer fortsatt, men skal de sammenstrikkede maskene være på slutten av omgangen eller på begynnelsen? Når jeg så er ferdig med første rapport (4 omganger) av M1, så må jeg starte i den 2. m i mønster M1 for å få mønsteret til å stemme. Er dette riktig?
30.09.2016 - 22:15DROPS Design ha risposto:
Hej Mona. Du strikker saadan her: 1 m r, saa begynder du efter fjerde m i M.1, dvs, du strikker de 9 sidste masker i A.1. Saa gentager du hele M.1 (13 m) 4 gange. Du har nu strikket 62 m, saa der er 3 m til overs. Strik disse som start af M.1, dvs, 2 m r samen, og saa den sidste m ret sammen med 1e m paa pinden.
12.10.2016 - 15:53
![]() Dania Ragnarsson ha scritto:
Dania Ragnarsson ha scritto:
I højre lrme str. 8/10 står der at man skal starte i 4 maske i diagrammet. Den fjerde maske er den ene af to der skal strikkes ret sammen. Hvordan starter man den første omgan i mønsteret? Det giver slet ikke mening at man skal stikke 1 ret og så fjerde madke i diagrammet- skal den også strikkes ret??
17.08.2016 - 19:11DROPS Design ha risposto:
Hej Dania. Det er ikke 4. m, det er 4. pind. Du starter med de 5 stolpemasker og saa er det start af mönster (4e pind): 2 r sammen, 2 r sammen, 1 r, slaa om, 1 r, slaa om osv.
08.09.2016 - 13:03
![]() Fran Miller ha scritto:
Fran Miller ha scritto:
In the directions for the body it states to do M1 till a specific length and to adjust pattern so only 1 row remains of pattern. How do you adjust it? Do you just skip rows and do last row?
31.05.2016 - 14:37DROPS Design ha risposto:
Dear Mrs Miller, you repeat M.1 in height adjusting the measurement to the size so that the next row (when binding off for armhole) will be worked from WS. So that when you will work yoke, you can continue from RS. Happy knitting!
31.05.2016 - 15:13
![]() Suzy Attwood ha scritto:
Suzy Attwood ha scritto:
I would love to see a top down version of this little sweater.
22.05.2016 - 16:34DROPS Design ha risposto:
Dear Mrs Attwood, please find here the top down version for adult to this pattern, this may inspire you to adjust/adapt. Happy knitting!
23.05.2016 - 10:23
![]() Suzy Attwood ha scritto:
Suzy Attwood ha scritto:
I would love to see a top down version of this little sweater.
22.05.2016 - 16:34
![]() Karin ha scritto:
Karin ha scritto:
Ik heb bij de mouwen van dit vestje het begin aangehouden van het voor/achterpand, dus de eerste naalden na het opzetten recht gebreid i.p.v. 1 recht, 1 averecht. Het ziet er dan meer uit zoals op de foto.
09.04.2016 - 10:08
![]() Elinor ha scritto:
Elinor ha scritto:
I think I understand the sleeves but on the right sleeve in size 5/7 working on 52 sts in pattern M1 on row 1 of pattern, I have 4 sts at the end and I'm not sure whether to just knit them or k2tog and then yo k1 to still have 52 sts in the row. Help?
26.03.2016 - 01:01DROPS Design ha risposto:
Dear Elinor, in size 5/7 you repeat a total of 4 times the 13 sts in M.1 in width, ie 4 x 13=52 sts. Happy knitting!
29.03.2016 - 08:54
|
|||||||||||||
Wonder Wave#wonderwavecardigan |
|||||||||||||
|
|
|||||||||||||
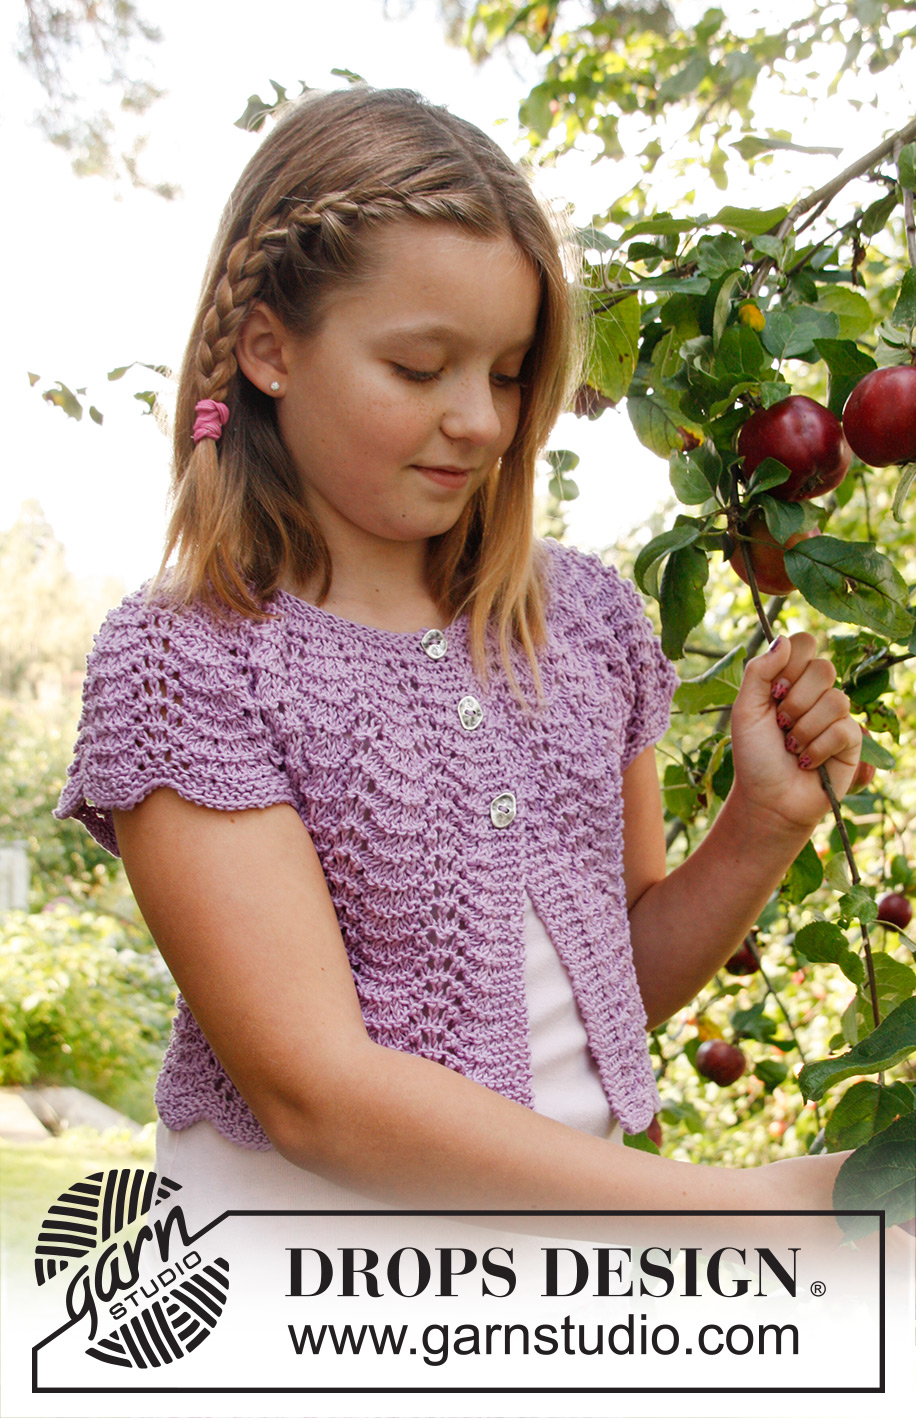
Giacchino DROPS lavorato ai ferri, a maniche corte, con motivo a onde e sprone in "Muskat".
DROPS Children 22-22 |
|||||||||||||
|
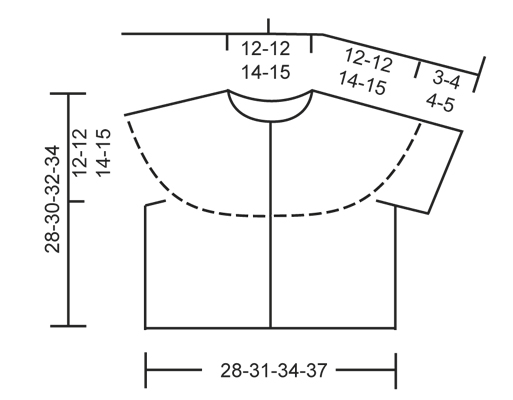
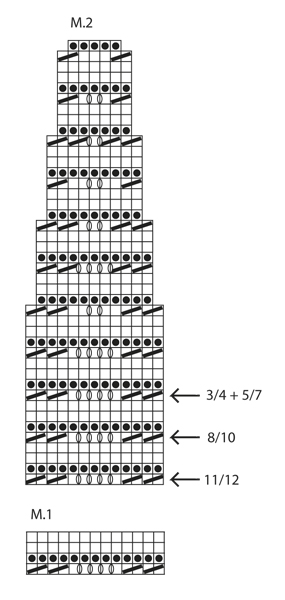
--------------------------------------------------------- MOTIVO A ONDE: Vedere i diagrammi M.1 e M.2. I diagrammi mostrano il motivo sul diritto del lavoro. M. A LEGACCIO (in tondo con i ferri a doppia punta/ferri circolari): 1 cresta = 2 giri * lavorare 1 giro a dir. e 1 giro a rov. *, ripetere da *-*. ASOLE: Intrecciare per le asole sul bordo davanti dx sul diritto del lavoro. 1 asola = intrecciare la 3° m. dal bordo, sul f. successivo avviare 1 nuova m. sulla m. intrecciata. Intrecciare per le asole quando il lavoro misura: TAGLIA 3/4 anni: 18, 23 e 27 cm TAGLIA 5/7 anni: 20, 25 e 29 cm TAGLIA 8/10 anni: 21, 27 e 31 cm TAGLIA 10/12 anni: 23, 29 e 33 cm NOTA: L’ultima asola è intrecciata sul f. alla fine del diagramma M.2. --------------------------------------------------------- CORPO: Lavorato avanti e indietro sui ferri circolari dal centro davanti. Con i ferri circolari misura 4 mm e il filato Muskat avviare 152-166-180-194 m. (comprese 5 m. per il bordo da ogni lato). Lavorare il 1° f. come segue sul diritto del lavoro: * 10 dir., 2 m. insieme a dir. *, ripetere da *-* fino a quando rimangono 8-10-12-14 m., lavorarle a dir. = 140-153-166-179 m. Poi lavorare 3 f. a dir. avanti e indietro. Continuare con il diagramma M.1 con 5 m. per il bordo da ogni lato a m. legaccio fino alla lunghezza finale. FARE ATTENZIONE ALLA TENSIONE DEL LAVORO! Quando il lavoro misura circa 16-18-18-19 cm (aggiustarlo in modo che rimanga 1 f. del diagramma M.1), lavorare il f. successivo come segue (= rovescio del lavoro): lavorare 34-37-41-44 m., intrecciare senza stringere 7-7-6-6 m. per lo scalfo, lavorare 58-65-72-79 m. intrecciare senza stringere 7-7-6-6 m. per lo scalfo e lavorare il resto del f. (= 34-37-41-44 m.). Mettere il lavoro da parte e lavorare le maniche. MANICA DX: Lavorata in tondo con i ferri a doppia punta. Con i ferri a doppia punta misura 4 mm e il filato Muskat avviare 59-59-74-74 m. Lavorare il primo giro come segue: * 6 dir., lavorare 2 m. insieme a dir. *, ripetere da *-* fino a quando rimangono 3-3-2-2 m., lavorarle a dir. = 52-52-65-65 m. Poi lavorare 1 giro a rov., 1 giro a dir. e 1 giro a rov. Inserire un segnapunti all’inizio del giro. Continuare con il diagramma M.1 – iniziare nella 11°-1°-4°-7° m. sul diagramma, contare da dx. (nelle taglie 3/4 e 8/10 anni, lavorare a dir. la 1° m., e alla fine del giro lavorare a dir. questa m. insieme all’ultima m. sul giro). Continuare a lavorare in questo modo fino a quando il lavoro misura circa 3-4-4-5 cm (aggiustarlo in modo che rimanga 1 giro del diagramma M.1). Sul giro successivo intrecciare le PRIME 6-6-7-7 m., lavorare il resto del giro = 46-46-58-58 m. MANICA SX: Avviare e lavorare come per la manica dx., ma quando il lavoro misura 3-4-4-5 cm, intrecciare in questo modo: Taglia 3/4 + 8/10: intrecciare le PRIME 6-7 m. sul giro e Taglia 5/7 e 11/12 anni: intrecciare le ULTIME 6-7 m. sul giro (è importante per fare il motivo corretto sullo sprone). SPRONE: Trasferire le maniche sullo stesso ferro circolare del corpo dove sono state intrecciate le m. per gli scalfi = 218-231-270-283 m. NOTA: E’ molto importante che la manica dx. sia inserita nel lato dx. e la manica sx. sia inserita nel lato sx. in modo che lo schema corrisponda da qui in avanti. Continuare con il diagramma M.2 – iniziare a livello della freccia per la taglia corretta – con 5 m. di bordo davanti a maglia legaccio ad ogni lato (= 16-17-20-21 ripetizioni sul giro). ALLO STESSO TEMPO quando il lavoro misura 18-20-21-23 cm, intrecciare per le ASOLE – leggere la spiegazione sopra. Dopo che M.2 è stato lavorato in altezza, rimangono 90-95-110-115 m. sul ferro. Lavorare il f. successivo come segue sul diritto del lavoro: lavorare 5 m. a dir. (e allo stesso tempo intrecciare per l’ultima asola), * 2 m. insieme a dir., 1 dir. *, ripetere da *-* fino a quando rimangono 7-6-6-5 m., lavorarle a dir. = 64-67-77-80 m. Lavorare 3-3-5-5 f. a dir. avanti e indietro, poi intrecciare a dir. sul diritto del lavoro. CONFEZIONE: Cucire le aperture sotto le maniche e attaccare i bottoni. |
|||||||||||||
Spiegazioni del diagramma |
|||||||||||||
|
|||||||||||||
 |
|||||||||||||
 |
|||||||||||||
Avete terminato questo modello?Allora taggate le vostre foto con #dropspattern #wonderwavecardigan o inviatele alla #dropsfan gallery. Avete bisogno di aiuto con questo modello?Troverete 13 video tutorial, una sezione per i commenti/domande e molto altro guardando il modello su www.garnstudio.com © 1982-2026 DROPS Design A/S. Ci riserviamo tutti i diritti. Questo documento, compreso tutte le sue sotto-sezioni, è protetto dalle leggi sul copyright. Potete leggere quello che potete fare con i nostri modelli alla fine di ogni modello sul nostro sito. |
|||||||||||||


Con oltre 40 anni di esperienza nel design di modelli di maglia e uncinetto, DROPS Design offre la più estesa collezione di modelli gratuiti su internet - tradotti in 17 lingue. Ad oggi vi possiamo fornire 324 cataloghi e 12290 modelli - 9561 dei quali sono tradotti in Italiano.
Ci stiamo impegnando molto per darvi il meglio che vi possiamo offrire in termini di maglia e uncinetto, ispirazioni e consigli così come filati di grande qualità ad un prezzo incredibile! Volete utilizzare i nostri modelli per qualcosa d'altro oltre al vostro uso personale? Potete leggere tutto ciò che è consentito nel testo sul Copyright in basso su tutte le pagine dei nostri modelli. Buon lavoro!
Lasciare un commento sul modello DROPS Children 22-22
Noi saremmo felici di ricevere i tuoi commenti e opinioni su questo modello!
Se vuoi fare una domanda, fai per favore attenzione a selezionare la categoria corretta nella casella qui sotto per velocizzare il processo di risposta. I campi richiesti sono indicati da *.