
Categorie popolari
State cercando un filato?


Commenti / Domande (59)
![]() Kayla ha scritto:
Kayla ha scritto:
It looks like there's a typo in the dimensions. Instead of 16 1/2", should it not say 46 1/2"?
04.04.2014 - 22:42DROPS Design ha risposto:
Dear Kayla, you are correct, this will be updated asap. Thank you. Happy knitting!
05.04.2014 - 10:08
![]() Melanie ha scritto:
Melanie ha scritto:
I'm starting row 34, a WS row, in M.1 and I am confused about moving the thread forward and back as directed. Since it's a WS row I should be purling and slipping every other stitch but the part about placing thread towards me, it's already there because I'm purling the stitch before and then place it away from me after I slip the stitch, but the next stitch is a purl so it needs to be in front again and nothing is accomplished? Also, should the stitches be slipped knitwise or purlwise?
05.09.2013 - 15:41DROPS Design ha risposto:
Dear Melanie, text to this last symbol has been edited so that you should slip 1 st as if to P. Thank you, happy knitting!
06.09.2013 - 09:45Nashwaahmed ha scritto:
Sorry again but the video u posted is for sleeves knitted back and forth in a needle, this pattern calls for sleeves knitted in the round so when i do what u shown in the video those bounded off stitches "in the round" kinda tighten the work while knitting and they are not smooth in that specific part of the jacket so kindly i need a way to make the knitting smoother at this area thanks :)
26.08.2013 - 19:46DROPS Design ha risposto:
Dear Mrs Nashwaahmed, sorry for bad video in last answer, the correct one has been added under the tab "videos" on the right side of the picture. To help you on the first rows, you may like to let sts for sleeves on another circular needle or dpn and let them then take all on the same after some more rows. Happy knitting!
28.08.2013 - 10:43
![]() Sara ha scritto:
Sara ha scritto:
This would be easier as a seamless top-down construction.
10.08.2013 - 05:32Nashwaahmed ha scritto:
I want to ask a question about the M.1 pattern there is a symbol for p2tog which is an X over two squares if i worked on the right side does this mean if i worked on the wrong side it will be K2tog?
08.08.2013 - 22:51DROPS Design ha risposto:
Dear Mrs Nashwaahmed, you are correct, from WS it should be K2 tog, diagram text has been edited, thank you. Happy knitting!
09.08.2013 - 11:04Nashwaahmed ha scritto:
In the body piece, when i cast off for the arm hole for the small size, 34 sts left for the left front part, and 36 sts were left for the right front part is that ok or there is something wrong and i didn't cast off right ?
04.08.2013 - 23:33DROPS Design ha risposto:
Dear Mrs Nashwaahmed, in the small size you should have before binding off for armhole : 39 sts for each front piece + 69 sts for back piece (=147 sts), and after binding off for armhole : 35 sts for each front piece + 61 sts for back piece = a total of 131 sts. Happy knitting !
05.08.2013 - 09:27
![]() Debbie Russell ha scritto:
Debbie Russell ha scritto:
In the key for pattern #113-17 there is a symbol that means "work 2 stitches in 1 stich." Is this a knit front and back? Or a make 1? And if not, can anyone tell me how you're supposed to work it? Thanks!
07.01.2013 - 21:26DROPS Design ha risposto:
Dear Mrs Russel, you are correct, it means to work st first in front loop then in back loop. Happy knitting!
08.01.2013 - 08:43
![]() Vicki ha scritto:
Vicki ha scritto:
In drops pattern 113-17 does 'wk 2sts in one' mean the same as increase 1st? Thanks
11.09.2012 - 01:48
![]() Nancy Beamer ha scritto:
Nancy Beamer ha scritto:
I have just completed the sleeves and I'm not sure how the bind off is done. I am doing the magic loop.
22.08.2012 - 23:46
![]() Ballardtoad ha scritto:
Ballardtoad ha scritto:
Oh! Thank you so much for the help and for responding so quickly!! Best wishes -
14.07.2012 - 17:36
|
||||||||||||||||||||||||||||||||||
Avery#averycardigan |
||||||||||||||||||||||||||||||||||
|
|
||||||||||||||||||||||||||||||||||
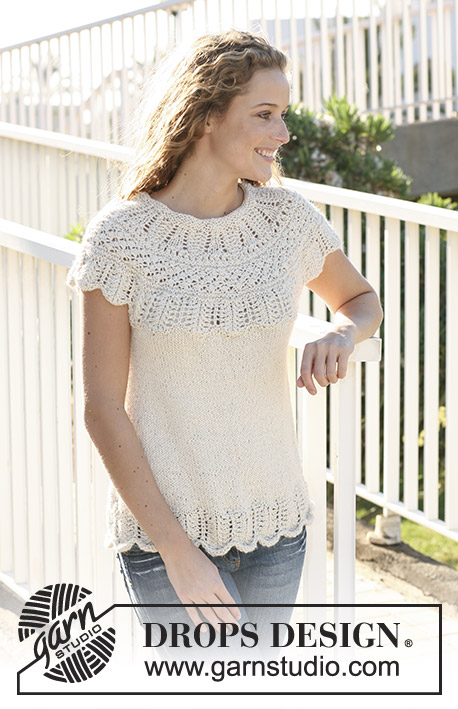
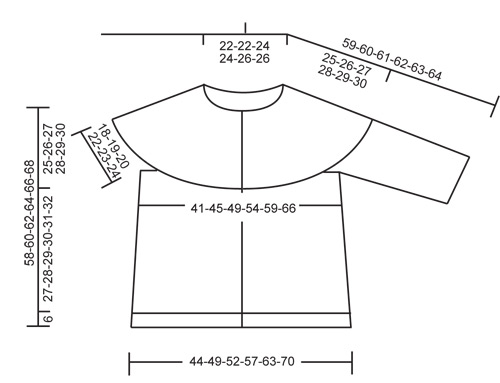
Giacchino DROPS con sprone rotondo e motivo sullo sprone in "Silke Alpaca". Taglie: dalla S alla XXXL.
DROPS 113-17 |
||||||||||||||||||||||||||||||||||
|
MAGLIA A GRANA DI RISO:
Ferro 1: * 1 rov., 1 dir. *, ripetere da *-* e finire con 1 rov. Ferro 2: dir. su rov. e rov. su dir. Ripetere il ferro 2. MAGLIA A LEGACCIO (avanti e indietro sul ferro): lavorare a dir. tutti i f. MAGLIA A LEGACCIO (in tondo): Lavorare 1 giro a dir., 1 giro a rov. SUGGERIMENTO PER LE MISURAZIONI: A causa del peso del filato tutte le misurazioni dovrebbero essere fatte con l’indumento appeso. ASOLE: Fare le asole sul bordo davanti dx. 1 asola = intrecciare la 3° m. dal centro davanti e avviare 1 nuova m. sul f. di ritorno. Fare le asole quando il lavoro misura: TAGLIA S: 7, 16, 26, 36, 46 e 56 cm. TAGLIA M: 7, 15, 23, 31, 40, 49, e 58 cm. TAGLIA L: 7, 15, 24, 33, 42, 51 e 60 cm. TAGLIA XL: 7, 16, 25, 34, 43, 52 e 62 cm. TAGLIA XXL: 7, 15, 23, 31, 39, 47, 55 e 64 cm. TAGLIA XXXL: 7, 15, 23, 31, 39, 47, 55 e 64 cm. MOTIVO: Vedere il diagramma M.1 Il diagramma mostra il motivo dal diritto del lavoro. Vedere il diagramma per la vostra taglia. ---------------------------------------------------------- CORPO: Lavorato avanti e indietro sui ferri circolari. Con i ferri circolari misura 4,5 mm e il filato Silke Alpaca avviare 159-173-187-203-223-245 m. (comprese 5 m. per il bordo frontale a ogni lato verso il centro davanti). Lavorare 1 f. a rov. dal rovescio del lavoro e continuare a M. A GRANA DI RISO – leggere sopra – con 5 m. per il bordo frontale a ogni lato a M. LEGACCIO – leggere sopra. I bordi frontali sono lavorati a m. legaccio per tutto il lavoro. Quando il lavoro misura 6 cm continuare a m. rasata con la m. per il bordo frontale come prima. Inserire 2 segnapunti nel lavoro, 42-45-49-53-58-63 m. all’interno di ogni lato (dietro = 75-83-89-97-107-119 m.) Ricordarsi delle ASOLE sul bordo frontale dx. – leggere sopra. Quando il lavoro misura 10 cm diminuire 1 m. a ogni lato di entrambi i segnapunti (= 4 diminuzioni per f.) e ripetere le diminuzioni ogni 9-9,5-10-10,5-11-11,5 cm per un totale di 3 volte = 147-161-175-191-211-233 m. Diminuire lavorando 2 m. insieme a dir. Continuare fino a quando il lavoro misura 33-34-35-36-37-38 cm – LEGGERE IL SUGGERIMENTO PER LE MISURAZIONI! Ora intrecciare 8 m. per ogni lato (= 4 m. a ogni lato del segnapunti) = 131-145-159-175-195-217 m. rimaste sul ferro. Mettere il lavoro da parte e lavorare le maniche. MANICA: Lavorata in tondo con i ferri a doppia punta. Con i ferri a doppia punta misura 4,5 mm e il filato Silke Alpaca avviare 49-51-51-55-57-59 m. Lavorare 6 giri a m. legaccio – leggere sopra. Inserire un segnapunti all’inizio del giro (= centro sotto il braccio). Quando il lavoro misura 10 cm aumentare 1 m. a ogni lato del segnapunti e ripetere gli aumenti ogni 9-4,5-2-1,5-1,5-1 cm per un totale di 2-3-5-6-7-8 volte = 53-57-61-67-71-75 m. Quando il lavoro misura 23-23-22-22-21-21 cm (meno per le taglie più grandi a causa delle spalle più larghe) intrecciare 4 m. a ogni lato del segnapunti per lo scalfo = 45-49-53-59-63-67 m. Mettere il lavoro da parte e lavorare l’altra manica. SPRONE: Trasferire le m. sullo stesso ferro circolare misura 4,5 mm del corpo, dove sono state intrecciate le m. per gli scalfi = 221-243-265-293-321-351 m. Lavorare 1 f. a dir. dal diritto del lavoro (con i bordi frontali come prima), ALLO STESSO TEMPO distribuire 11-13-15-3-11-21 diminuzioni in modo uniforme = 210-230-250-290-310-330 m. Lavorare 1 f. a dir. dal rovescio del lavoro e continuare secondo M.1 dal diritto del lavoro (vedere il diagramma per la vostra taglia) con 5 m. a m. legaccio a ogni lato. Dopo una ripetizione verticale di M.1 ci sono 100-109-118-122-130-138 m. sul f. Lavorare 1 f. a dir dal diritto del lavoro, ALLO STESSO TEMPO distribuire 8-17-20-24-24-32 diminuzioni in modo uniforme = 92-92-98-98-106-106 m. Lavorare 5 f. su tutte le m. e intrecciare senza stringere. CONFEZIONE: Cucire le aperture sotto le braccia. Attaccare i bottoni. |
||||||||||||||||||||||||||||||||||
Spiegazioni del diagramma |
||||||||||||||||||||||||||||||||||
|
||||||||||||||||||||||||||||||||||
 |
||||||||||||||||||||||||||||||||||
 |
||||||||||||||||||||||||||||||||||
Avete terminato questo modello?Allora taggate le vostre foto con #dropspattern #averycardigan o inviatele alla #dropsfan gallery. Avete bisogno di aiuto con questo modello?Troverete 25 video tutorial, una sezione per i commenti/domande e molto altro guardando il modello su www.garnstudio.com © 1982-2026 DROPS Design A/S. Ci riserviamo tutti i diritti. Questo documento, compreso tutte le sue sotto-sezioni, è protetto dalle leggi sul copyright. Potete leggere quello che potete fare con i nostri modelli alla fine di ogni modello sul nostro sito. |
||||||||||||||||||||||||||||||||||


Con oltre 40 anni di esperienza nel design di modelli di maglia e uncinetto, DROPS Design offre la più estesa collezione di modelli gratuiti su internet - tradotti in 17 lingue. Ad oggi vi possiamo fornire 324 cataloghi e 12290 modelli - 9561 dei quali sono tradotti in Italiano.
Ci stiamo impegnando molto per darvi il meglio che vi possiamo offrire in termini di maglia e uncinetto, ispirazioni e consigli così come filati di grande qualità ad un prezzo incredibile! Volete utilizzare i nostri modelli per qualcosa d'altro oltre al vostro uso personale? Potete leggere tutto ciò che è consentito nel testo sul Copyright in basso su tutte le pagine dei nostri modelli. Buon lavoro!
Lasciare un commento sul modello DROPS 113-17
Noi saremmo felici di ricevere i tuoi commenti e opinioni su questo modello!
Se vuoi fare una domanda, fai per favore attenzione a selezionare la categoria corretta nella casella qui sotto per velocizzare il processo di risposta. I campi richiesti sono indicati da *.