
Categorie popolari
State cercando un filato?


Commenti / Domande (59)
![]() Glenna Blomquist ha scritto:
Glenna Blomquist ha scritto:
I don't understand this correction - the symbols are not numbered? This pattern has been corrected. Click here to see the correction/s. Updated online: 17.04.2009 Chart text: Symbol 4 and 5 has been exchanged. M.1 S+M+L: New row 19
25.02.2024 - 21:25DROPS Design ha risposto:
Dear Mrs Blomquist, the online pattern has already been updated, this means the' correction applies only if you printed the pattern before that day, if you did, you might have to print it again to be sure you get all informations right. Happy knitting!
26.02.2024 - 09:48
![]() Elizabeth Dolan ha scritto:
Elizabeth Dolan ha scritto:
Is there a stitch count listed somewhere for this pattern? I am at the end of the second pattern section of M1 chart and seem to be out 3 stitches after decreasing (k2tog. K14 row). Would love to know how many stitches I should have on needles for this row. I am knitting the largest size.
25.07.2020 - 08:36DROPS Design ha risposto:
Dear Mrs Dolan, do not hesitate to add markers between each repeat this will help you to check the number of stitches on each row as in diagram - Diagram is repeated 16 times in total in size XXXL. Happy knitting!
29.07.2020 - 08:50
![]() Elizabeth Dolan ha scritto:
Elizabeth Dolan ha scritto:
I have the correct St count for XXXL (330) starting M1 chart. I am doing kf&b as the increase but I cannot get the increases to work out with the chart. Do I do the increase on the 10th stitch? I wish there was a row by row stitch count.
22.07.2020 - 09:17DROPS Design ha risposto:
Dear Mrs Dolan, on first row in M.1 you will work diagram like this: (knit front and back 1st stitch, knit next 9 sts), repeat from (to) for 1 repeat in M.1 (= adding markers between each repeat can help). and repeat to the end of the row. You will first increase stitches then work and decrease as shown in diagram - read more about diagrams here). Happy knititng!
29.07.2020 - 08:47Kira ha scritto:
Hello, it said my comment was too long so again: Chart M1 is there a decrease between row 11 and 12 as the row gets shorter in the graphic? Also row 13, p2tog purl 16, so a repeat of 18 st or p2tog at the start of row and then purl the rest of row? Same for row 15, k 15 st slip 1 stitch, repeat all 17 stitches? Or only a final slip 1 stitch at very end of row? Thank You!
18.10.2018 - 14:57DROPS Design ha risposto:
Dear Kira, when working M.1 you will repeat the sts in M.1 as shown in diagram (you can insert a marker to separate each diagram on your needle so that you can always check the number of sts). You will then increase 2 sts in each M.1 on the first row. Then, on row 11 you will decrease 8 times but work only 4 yo's = you will decrease 4 sts in each repeat. On row 13, work: *P2 tog, P16*and repeat from *-* over each repeat. And so on for each row in M.1. Happy knitting!
18.10.2018 - 16:01
![]() Dominique ha scritto:
Dominique ha scritto:
Bonjour, pour l\'empiècement, avant de commencer le diagramme il reste pour la taille L 250 mailles, les 10 mailles de bordure sont elles comprises dans ces 150 mailles merci pour votre réponse cordialement
06.06.2018 - 08:28DROPS Design ha risposto:
Bonjour Dominique, les 10 m de bordure devant sont comprises dans les 250 mailles, mais vous ne devez pas diminuer au-dessus des 5 m de chaque côté, tricotez-les simplement comme avant. Bon tricot!
06.06.2018 - 10:08
![]() Rebecca ha scritto:
Rebecca ha scritto:
Would you be able to tell me the measurements for the sleeves if I wanted them long, to my wrists and not 3/4 length? Thank you!
16.01.2018 - 04:27DROPS Design ha risposto:
Dear Rebecca, we are unfortunately not able to adjust every pattern to each individual request but you can adjust sleeve length to your own measurements getting help from similar patterns with same tension. Happy knitting!
16.01.2018 - 09:19
![]() Anja ha scritto:
Anja ha scritto:
Kan ik dit patroon ook breien van BRUSHED ALPACA SILK?
12.04.2016 - 15:42DROPS Design ha risposto:
Hoi Anja. Ja, dat kan. Je kan hier lezen hoe je de hoeveelheid materiaal berekent en vergeet niet om een proeflapje te breien.
13.04.2016 - 16:40Véro ha scritto:
Bonjour, Je trouve ce modèle très joli. Existe-t-il en français car moi et l'anglais ... heum heum ! Merci d'avance de la réponse. Véro
07.04.2016 - 19:32DROPS Design ha risposto:
Bonjour Vero, changez la langue du modèle en cliquant sur le menu déroulant sous la photo "Choose your language:English" et sélectionnez "Français". Bon tricot!
08.04.2016 - 08:32Jessica ha scritto:
Bonjour, Je suis bloquée dès le début. Je ne comprend pas si les 223 mailles montées (je fais le xxl) comprennent le 5 mailles bordures ou je dois les rajouter ? Merci de votre réponse
02.09.2015 - 22:14DROPS Design ha risposto:
Bonjour Jessica, les mailles de bordure des devants de chaque côté sont comprises dans le nombre de mailles à monter. Bon tricot!
03.09.2015 - 09:18
![]() Celine ha scritto:
Celine ha scritto:
Bonjour,quelques questions : une maille envers sur l'envers =une maille envers ? une maille envers sur l'endroit =une maille envers? une maille endroit sur l'endroit =1 maille endroit? et enfin 1 maille endroit sur l'envers= 1 maille envers? Merci de votre aide !
25.04.2014 - 20:18DROPS Design ha risposto:
Bonjour Céline, 1 case blanche = 1 m jersey end (à tricoter à l'end sur l'end et à l'env sur l'env), 1 case avec une x = 1 m jersey env (à tricoter à l'env sur l'end et à l'end sur l'env). Ainsi, au 1er rang, tricotez les m à l'end, au 2ème rang, tricotez les m à l'end également (car rang sur l'env, ainsi elles apparaîtront à l'env sur l'end). Bon tricot!
26.04.2014 - 09:58
|
||||||||||||||||||||||||||||||||||
Avery#averycardigan |
||||||||||||||||||||||||||||||||||
|
|
||||||||||||||||||||||||||||||||||
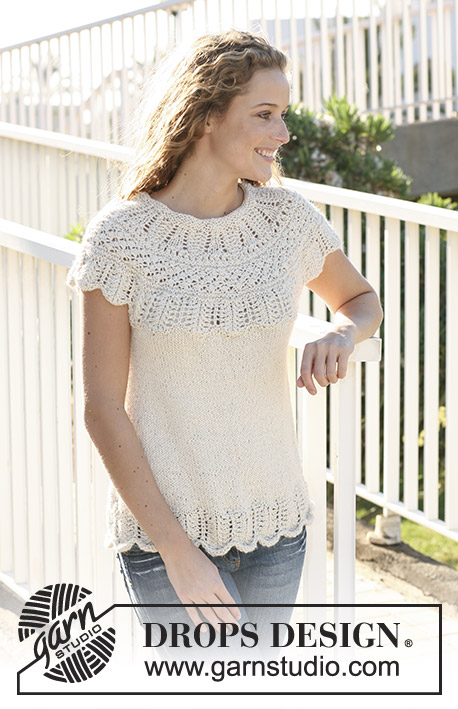
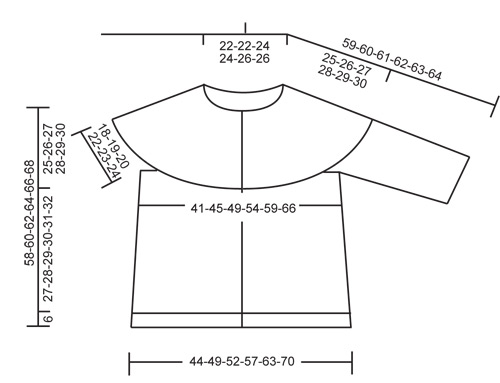
Giacchino DROPS con sprone rotondo e motivo sullo sprone in "Silke Alpaca". Taglie: dalla S alla XXXL.
DROPS 113-17 |
||||||||||||||||||||||||||||||||||
|
MAGLIA A GRANA DI RISO:
Ferro 1: * 1 rov., 1 dir. *, ripetere da *-* e finire con 1 rov. Ferro 2: dir. su rov. e rov. su dir. Ripetere il ferro 2. MAGLIA A LEGACCIO (avanti e indietro sul ferro): lavorare a dir. tutti i f. MAGLIA A LEGACCIO (in tondo): Lavorare 1 giro a dir., 1 giro a rov. SUGGERIMENTO PER LE MISURAZIONI: A causa del peso del filato tutte le misurazioni dovrebbero essere fatte con l’indumento appeso. ASOLE: Fare le asole sul bordo davanti dx. 1 asola = intrecciare la 3° m. dal centro davanti e avviare 1 nuova m. sul f. di ritorno. Fare le asole quando il lavoro misura: TAGLIA S: 7, 16, 26, 36, 46 e 56 cm. TAGLIA M: 7, 15, 23, 31, 40, 49, e 58 cm. TAGLIA L: 7, 15, 24, 33, 42, 51 e 60 cm. TAGLIA XL: 7, 16, 25, 34, 43, 52 e 62 cm. TAGLIA XXL: 7, 15, 23, 31, 39, 47, 55 e 64 cm. TAGLIA XXXL: 7, 15, 23, 31, 39, 47, 55 e 64 cm. MOTIVO: Vedere il diagramma M.1 Il diagramma mostra il motivo dal diritto del lavoro. Vedere il diagramma per la vostra taglia. ---------------------------------------------------------- CORPO: Lavorato avanti e indietro sui ferri circolari. Con i ferri circolari misura 4,5 mm e il filato Silke Alpaca avviare 159-173-187-203-223-245 m. (comprese 5 m. per il bordo frontale a ogni lato verso il centro davanti). Lavorare 1 f. a rov. dal rovescio del lavoro e continuare a M. A GRANA DI RISO – leggere sopra – con 5 m. per il bordo frontale a ogni lato a M. LEGACCIO – leggere sopra. I bordi frontali sono lavorati a m. legaccio per tutto il lavoro. Quando il lavoro misura 6 cm continuare a m. rasata con la m. per il bordo frontale come prima. Inserire 2 segnapunti nel lavoro, 42-45-49-53-58-63 m. all’interno di ogni lato (dietro = 75-83-89-97-107-119 m.) Ricordarsi delle ASOLE sul bordo frontale dx. – leggere sopra. Quando il lavoro misura 10 cm diminuire 1 m. a ogni lato di entrambi i segnapunti (= 4 diminuzioni per f.) e ripetere le diminuzioni ogni 9-9,5-10-10,5-11-11,5 cm per un totale di 3 volte = 147-161-175-191-211-233 m. Diminuire lavorando 2 m. insieme a dir. Continuare fino a quando il lavoro misura 33-34-35-36-37-38 cm – LEGGERE IL SUGGERIMENTO PER LE MISURAZIONI! Ora intrecciare 8 m. per ogni lato (= 4 m. a ogni lato del segnapunti) = 131-145-159-175-195-217 m. rimaste sul ferro. Mettere il lavoro da parte e lavorare le maniche. MANICA: Lavorata in tondo con i ferri a doppia punta. Con i ferri a doppia punta misura 4,5 mm e il filato Silke Alpaca avviare 49-51-51-55-57-59 m. Lavorare 6 giri a m. legaccio – leggere sopra. Inserire un segnapunti all’inizio del giro (= centro sotto il braccio). Quando il lavoro misura 10 cm aumentare 1 m. a ogni lato del segnapunti e ripetere gli aumenti ogni 9-4,5-2-1,5-1,5-1 cm per un totale di 2-3-5-6-7-8 volte = 53-57-61-67-71-75 m. Quando il lavoro misura 23-23-22-22-21-21 cm (meno per le taglie più grandi a causa delle spalle più larghe) intrecciare 4 m. a ogni lato del segnapunti per lo scalfo = 45-49-53-59-63-67 m. Mettere il lavoro da parte e lavorare l’altra manica. SPRONE: Trasferire le m. sullo stesso ferro circolare misura 4,5 mm del corpo, dove sono state intrecciate le m. per gli scalfi = 221-243-265-293-321-351 m. Lavorare 1 f. a dir. dal diritto del lavoro (con i bordi frontali come prima), ALLO STESSO TEMPO distribuire 11-13-15-3-11-21 diminuzioni in modo uniforme = 210-230-250-290-310-330 m. Lavorare 1 f. a dir. dal rovescio del lavoro e continuare secondo M.1 dal diritto del lavoro (vedere il diagramma per la vostra taglia) con 5 m. a m. legaccio a ogni lato. Dopo una ripetizione verticale di M.1 ci sono 100-109-118-122-130-138 m. sul f. Lavorare 1 f. a dir dal diritto del lavoro, ALLO STESSO TEMPO distribuire 8-17-20-24-24-32 diminuzioni in modo uniforme = 92-92-98-98-106-106 m. Lavorare 5 f. su tutte le m. e intrecciare senza stringere. CONFEZIONE: Cucire le aperture sotto le braccia. Attaccare i bottoni. |
||||||||||||||||||||||||||||||||||
Spiegazioni del diagramma |
||||||||||||||||||||||||||||||||||
|
||||||||||||||||||||||||||||||||||
 |
||||||||||||||||||||||||||||||||||
 |
||||||||||||||||||||||||||||||||||
Avete terminato questo modello?Allora taggate le vostre foto con #dropspattern #averycardigan o inviatele alla #dropsfan gallery. Avete bisogno di aiuto con questo modello?Troverete 25 video tutorial, una sezione per i commenti/domande e molto altro guardando il modello su www.garnstudio.com © 1982-2026 DROPS Design A/S. Ci riserviamo tutti i diritti. Questo documento, compreso tutte le sue sotto-sezioni, è protetto dalle leggi sul copyright. Potete leggere quello che potete fare con i nostri modelli alla fine di ogni modello sul nostro sito. |
||||||||||||||||||||||||||||||||||


Con oltre 40 anni di esperienza nel design di modelli di maglia e uncinetto, DROPS Design offre la più estesa collezione di modelli gratuiti su internet - tradotti in 17 lingue. Ad oggi vi possiamo fornire 324 cataloghi e 12290 modelli - 9561 dei quali sono tradotti in Italiano.
Ci stiamo impegnando molto per darvi il meglio che vi possiamo offrire in termini di maglia e uncinetto, ispirazioni e consigli così come filati di grande qualità ad un prezzo incredibile! Volete utilizzare i nostri modelli per qualcosa d'altro oltre al vostro uso personale? Potete leggere tutto ciò che è consentito nel testo sul Copyright in basso su tutte le pagine dei nostri modelli. Buon lavoro!
Lasciare un commento sul modello DROPS 113-17
Noi saremmo felici di ricevere i tuoi commenti e opinioni su questo modello!
Se vuoi fare una domanda, fai per favore attenzione a selezionare la categoria corretta nella casella qui sotto per velocizzare il processo di risposta. I campi richiesti sono indicati da *.