
Categorie popolari
State cercando un filato?


Commenti / Domande (184)
![]() Ute ha scritto:
Ute ha scritto:
Hallo, das Diagramm zeigt das Muster von der Vorderseite. Wie stricke ich die Rückreihen? Links oder lese ich das Diagramm dann von links nach rechts? Vielen Dank im Voraus Liebe Grüße Ute
01.04.2026 - 18:01DROPS Design ha risposto:
Liebe Ute, die Rücikreihen lesen Sie links nacch rechts, die kreuzchen stricken Sie rechts bei den Rückreihen und links bei den Hinreihen; die leere Kästchen stricken Sie glattrechts (rechts bei den Hinreihen und links bei den Rückreihen); Viel Spaß beim Stricken!
07.04.2026 - 16:35
![]() Maria ha scritto:
Maria ha scritto:
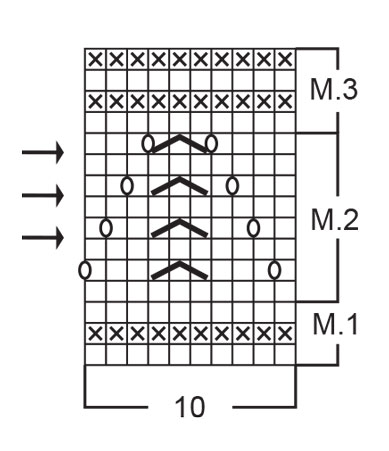
Ciao, per il cappellini non mi è chiaro come procedere con l'ultima ripetizione di M2. Come faccio a rispettare il diagramma diminuendo contemporaneamente le maglie tra i segnapunti? Grazie
18.03.2026 - 09:23DROPS Design ha risposto:
Buonasera Maria, con le diminuzioni, ci saranno meno maglie e i diagrammi si avvicineranno. Buon lavoro!
15.04.2026 - 22:46
![]() Eva-Lena ha scritto:
Eva-Lena ha scritto:
Hej, Ska det vara samma antal maskor 189 hela M2? Jag får ibland fler på ett varv. Tacksam för svar
06.03.2026 - 16:36DROPS Design ha risposto:
Hei Eva-Lena. Du skal ha samme maskeantall hele tiden når du strikker M.2. Har du for mange, har du kanskje økt, men ikke strikket 2 masker sammen når du har strikket hulmønstret? mvh DROPS Design
23.03.2026 - 11:22
![]() Weronika ha scritto:
Weronika ha scritto:
Do kapelusza: do których rzędów należą strzałki dotyczące zwężania? Są one pomiędzy rzędami, dlatego nie wiem, w których rzędach robić zmniejszenia.
15.09.2025 - 10:56DROPS Design ha risposto:
Witaj Weroniko, zmniejszania rób w rzędach na prawo. Pozdrawiamy!
29.09.2025 - 08:55
![]() Marianne Palm ha scritto:
Marianne Palm ha scritto:
Är det rätstickning tills M3 är klart och sedan slätstickning,?
31.08.2025 - 10:10DROPS Design ha risposto:
Hej. Se svar under. Mvh DROPS Design
01.09.2025 - 07:46
![]() Marianne ha scritto:
Marianne ha scritto:
Är det rätstickning till M 3 är färdigt Sedan slätstickning?
31.08.2025 - 10:07DROPS Design ha risposto:
Hej Marianne. Du stickar först enligt diagram och när M.3 är klart stickar du i slätstickning. Mvh DROPS Design
01.09.2025 - 07:45
![]() Sylvie Cloutier ha scritto:
Sylvie Cloutier ha scritto:
Bonjour, le M1 vous dite une maille env sur l\'endroit et une maille end sur envers. Mais part les 4 mailles au point mousse il n\'y a rien de fait. Esce plûtot un rang envers sur endroit et un rang endroit sur envers
14.06.2025 - 01:39
![]() Susan ha scritto:
Susan ha scritto:
I am having an issue with the stitch gauge. I can’t get 6 stitches per inch on 3mm needles with this yarn. I will need to use a 3.75 mm or 4 mm to get close to the gauge. My question is how will the larger needles affect the drape of the dress?
11.06.2025 - 00:05DROPS Design ha risposto:
Dear Susan, as long as you get the correct tension in both width and height you should get the finished measurements as in the chart. Read more about tension here. Happy knitting!
11.06.2025 - 08:09
![]() Yulia ha scritto:
Yulia ha scritto:
Dear Drops Team, does the pattern show only right side rows or wrong side also? If M2 is knitted all in knit rows including the wrong side, we will end up with garter stichels and not stocking.
17.05.2025 - 21:37DROPS Design ha risposto:
Dear Yulia, the charts show all rows (from both the right side and wrong side) as seen from the right side. That means that, from the bottom up, the even rows are worked opposite from what's shown; if we see knit stitches from the right side, we need to purl them from the wrong side, and viceversa; if we see purl stitches from the right side we need to knit them from the wrong side. So in M.1 we have garter stitch and in M.2 we have stocking stitch. Remember that these wrong side rows are read from left to right. Happy knitting!
18.05.2025 - 12:52
![]() Jennifer Long ha scritto:
Jennifer Long ha scritto:
I am confused about the bind off at neck for left front please explain
09.05.2025 - 21:21DROPS Design ha risposto:
Dear Jennifer, after casting off the mid-front stitches for the neck, you will start decreasing stitches at the begginning of rows starting from the mid front. So you will work: 4 sts in garter stitch, decrease the next stitch, work the rest of the row in stocking stitch. Work back from the side. In the next row, decrease the 1st stitch after the 4 sts in garter stitch as before. Continue decreasing like this until you have decreased 4 stitches in total by the neck. Happy knitting!
11.05.2025 - 00:32
|
||||||||||||||||
Beach Baby#beachbabydress |
||||||||||||||||
 |
 |
|||||||||||||||
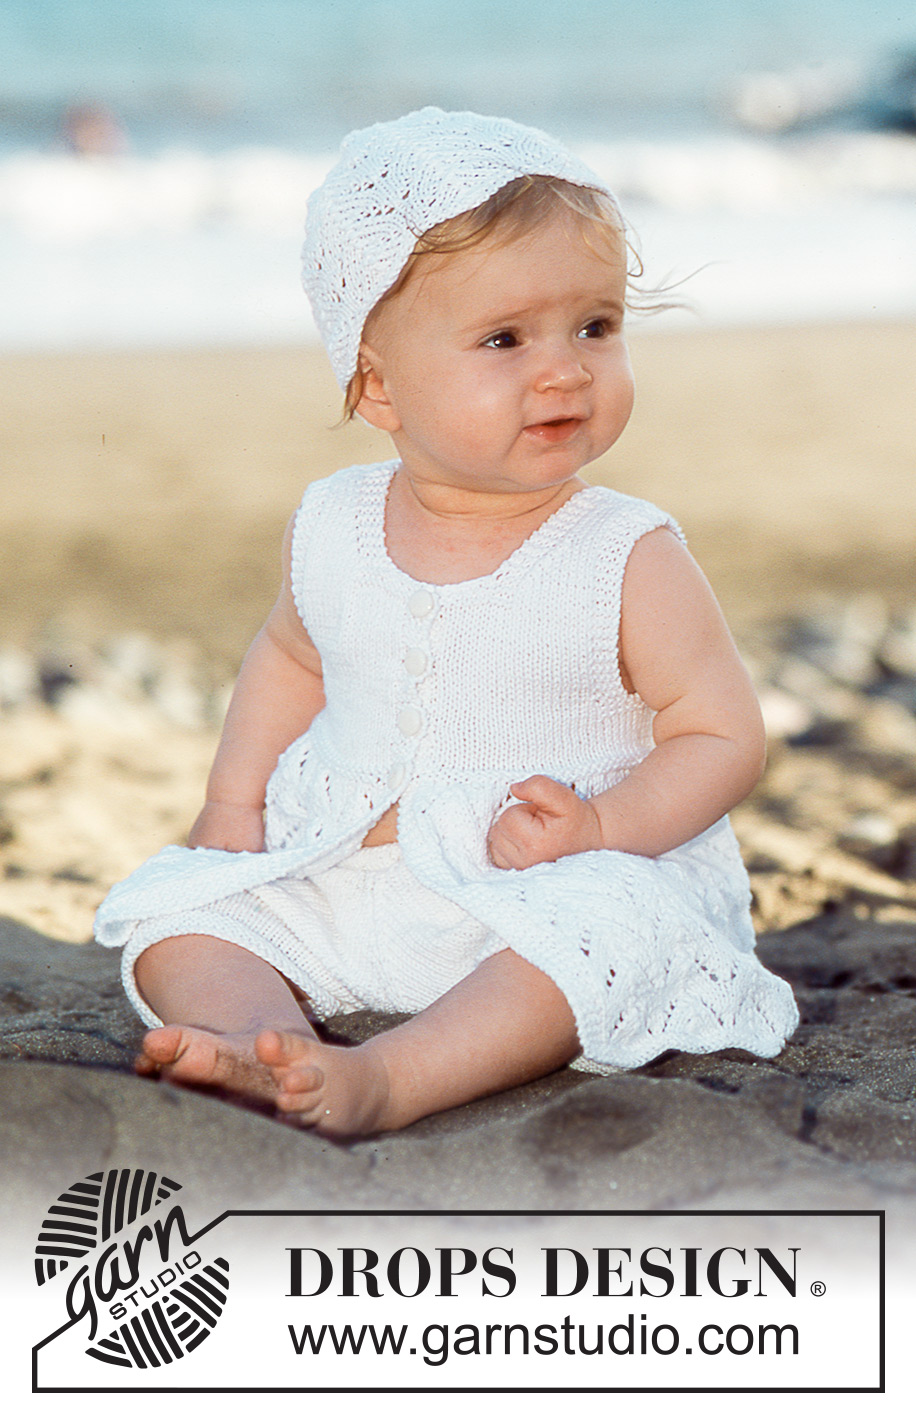
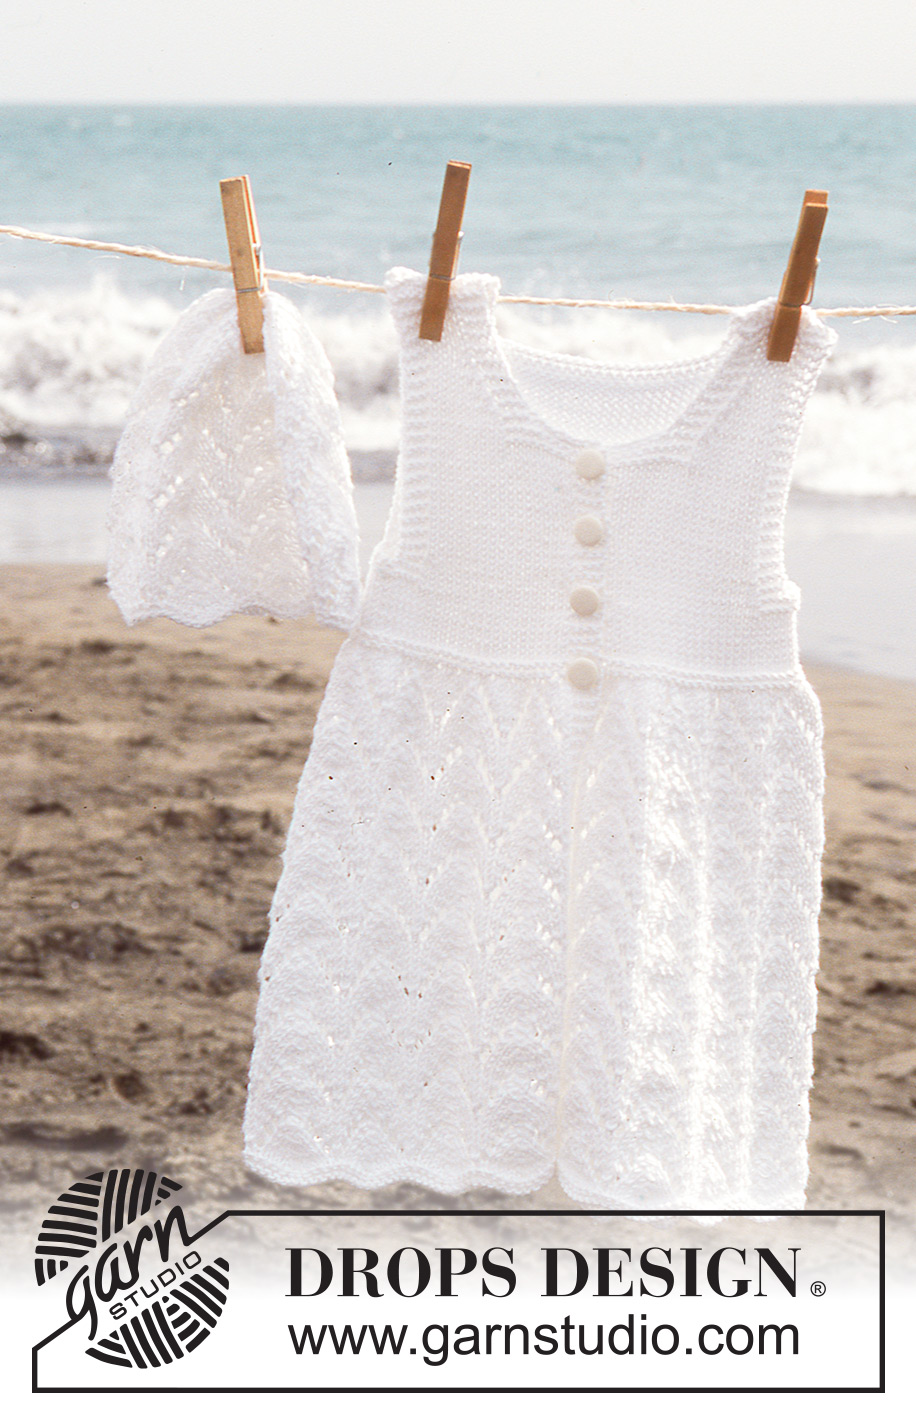
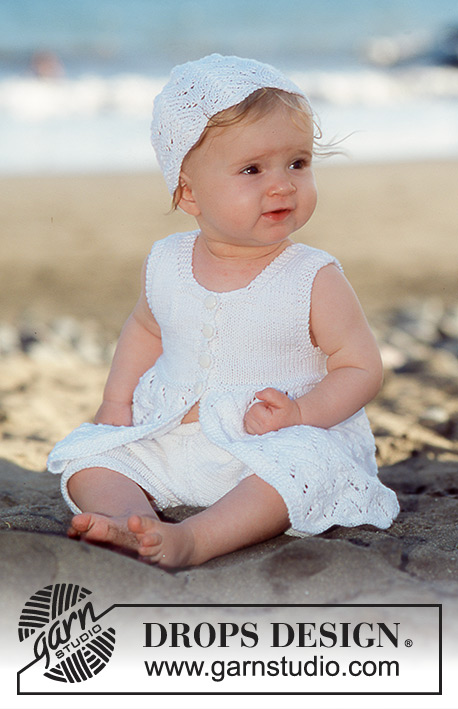
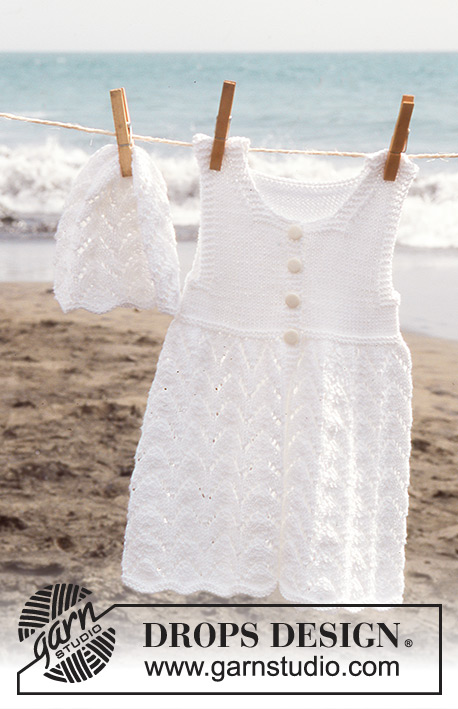
Vestito a maniche corte e cappello in "Safran"
DROPS Baby 10-7 |
||||||||||||||||
|
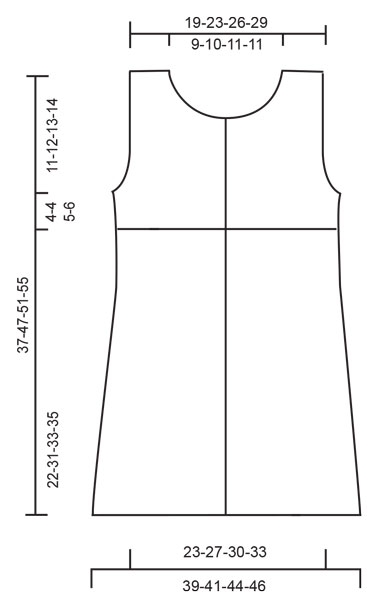
Campione: 24 m. x 32 f. con i f. n° 3 mm a m. rasata = 10 x 10 cm. legaccio (avanti e indietro sui f.): lavorare tutti i f. a dir. Motivo: vedere i diagrammi M.1-M.3. Il diagramma mostra il motivo dal diritto del lavoro. Asole: fare le asole sul bordo davanti destro sullo sprone dal diritto del lavoro come segue: intrecciare la terza m. dal bordo e fare un gettato sulla m. intrecciata sul f. di ritorno. Fare le asole come segue: Taglia 6/9 mesi: 22, 25, 28 e 31 cm Taglia 12/18 mesi: 31, 34,5, 38 e 41 cm Taglia 2 anni: 33, 37, 40,5 e 44 cm Taglia 3/4 anni: 36, 39,5, 44 e 48 cm Suggerimento per le diminuzioni (applicato allo scalfo e al collo): Tutte le diminuzioni vengono fatte dal diritto del lavoro: Diminuire come segue prima delle 4 m. a m. legaccio: 2 m. insieme a dir. Diminuire come segue dopo le 4 m. a m. legaccio: passare 1 m. a dir. senza lavorarla, 1 m. dir., accavallare la m. passata sopra quella appena lavorata VESTITO: Il vestito è lavorato avanti e indietro sui f. circolari dal centro davanti. Avviare 189-199-209-219 m. (comprese 4 m. di vivagno a ogni lato = centro davanti, lavorate a m. legaccio per tutto il lavoro) con i f. n° 3 mm. Lavorare M.1 e continuare in M.2. Quando il lavoro misura 22-31-33-35 cm lavorare M.3, allo stesso tempo distribuire 79-69-65-61 diminuzioni in modo uniforme sul primo f. (non diminuire sulle m. di vivagno a ogni lato) = 110-130-144-158 m. Alla fine di M.3 finire il lavoro a m. rasata – le m. di vivagno a m. legaccio e ricordarsi delle asole sul bordo davanti destro, leggere sopra. Quando il lavoro misura 25-34-37-40 cm inserire 2 segnapunti, all’interno di 28-33-37-40 m. da ogni lato = 54-64-70-78 m. tra i segnapunti = dietro. Continuare con 4 f. a m. legaccio sulle 6 m. a ogni lato di entrambi i segnapunti (le m. rimaste a m. rasata) = 12 m. a m. legaccio a ogni lato. Sul f. successivo intrecciare le 4 m. centrali di queste 12 m. per lo scalfo e finire ogni parte in modo separato. Davanti sinistro: = 26-31-35-38 m. Continuare a m. rasata con 4 m. a m. legaccio verso il centro davanti e verso lo scalfo. Intrecciare per lo scalfo a lato a f. alterni: 1 m. 2-2-2-2 volte = 24-29-33-36 m. (continuare con 4 m. a m. legaccio verso lo scalfo). Quando il lavoro misura 31-41-44-48 cm lavorare 4 f. a m. legaccio su 12-13-14-15 m. al centro davanti (le m. rimaste a m. rasata). Sul f. successivo intrecciare 8-9-10-11 m. al centro davanti per il collo, continuare con 4 m. a m. legaccio verso il centro davanti e diminuire per modellare la scollatura a f. alterni: 1 m. 4 volte = 12-16-19-21 m. rimaste sulla spalla. Intrecciare quando il lavoro misura 37-47-51-55 cm. Davanti destro: come il davanti sinistro, ma a specchio. Ricordarsi delle asole sul bordo davanti. Dietro: = 50-60-66-74 m. Intrecciare per lo scalfo a ogni lato come descritto per il davanti = 46-56-62-70 m. Quando il lavoro misura 35-45-49-53 cm lavorare 4 f. a m. legaccio sulle 30-32-32-36 m. centrali (le m. rimaste a m. rasata). Sul f. successivo intrecciare le 22-24-24-28 m. centrali per il collo = 12-16-19-21 m. rimaste su ogni spalla. Continuare con 4 m. a m. legaccio a ogni lato fino a quando il lavoro misura 37-47-51-55 cm e intrecciare. Confezione: cucire i margini delle spalle e attaccare i bottoni. -------------------------------------------------------- CAPPELLO: Taglie: 6/12 mesi – 2/4 anni Per adattarsi alla circonferenza della testa di: 42-46 cm Avviare 90-100 m. con i f. circolari piccoli n° 3 mm. Lavorare 4 f. a m. legaccio e continuare in M.2. Lavorare 5-6 ripetizioni verticali di M.2 e ora inserire un segnapunti nella prima m. in ogni ripetizione orizzontale = 9-10 segnapunti. Lavorare un’altra ripetizione verticale di M.2 e diminuire sui f. indicati con la freccia nel diagramma. Diminuire come segue: passare la m. prima della m. con il segnapunti a dir. senza lavorarla, lavorare insieme a dir. la m. con il segnapunti e la m. successiva, accavallare la m. passata sopra quelle appena lavorate. Ripetere questa diminuzione in tutte le ripetizioni orizzontali sulle 3 frecce nel diagramma, cioè un totale di 54-60 diminuzioni = 36-40 m. rimaste sul f. Dopo l’ultimo giro di M.2 lavorare 1 giro a m. rasata, allo stesso tempo lavorare tutte le m. insieme 2 a 2 a dir. = 18-20 m. rimaste. Tagliare il filo e farlo passare attraverso le m. rimaste. Affrancare. |
||||||||||||||||
Spiegazioni del diagramma |
||||||||||||||||
|
||||||||||||||||
 |
||||||||||||||||
 |
||||||||||||||||
Avete terminato questo modello?Allora taggate le vostre foto con #dropspattern #beachbabydress o inviatele alla #dropsfan gallery. Avete bisogno di aiuto con questo modello?Troverete 22 video tutorial, una sezione per i commenti/domande e molto altro guardando il modello su www.garnstudio.com © 1982-2026 DROPS Design A/S. Ci riserviamo tutti i diritti. Questo documento, compreso tutte le sue sotto-sezioni, è protetto dalle leggi sul copyright. Potete leggere quello che potete fare con i nostri modelli alla fine di ogni modello sul nostro sito. |
||||||||||||||||


Con oltre 40 anni di esperienza nel design di modelli di maglia e uncinetto, DROPS Design offre la più estesa collezione di modelli gratuiti su internet - tradotti in 17 lingue. Ad oggi vi possiamo fornire 324 cataloghi e 12290 modelli - 9561 dei quali sono tradotti in Italiano.
Ci stiamo impegnando molto per darvi il meglio che vi possiamo offrire in termini di maglia e uncinetto, ispirazioni e consigli così come filati di grande qualità ad un prezzo incredibile! Volete utilizzare i nostri modelli per qualcosa d'altro oltre al vostro uso personale? Potete leggere tutto ciò che è consentito nel testo sul Copyright in basso su tutte le pagine dei nostri modelli. Buon lavoro!
Lasciare un commento sul modello DROPS Baby 10-7
Noi saremmo felici di ricevere i tuoi commenti e opinioni su questo modello!
Se vuoi fare una domanda, fai per favore attenzione a selezionare la categoria corretta nella casella qui sotto per velocizzare il processo di risposta. I campi richiesti sono indicati da *.