
Categorie popolari
State cercando un filato?


Commenti / Domande (17)
![]() Monika ha scritto:
Monika ha scritto:
Dzień dobry, nie widzę informacji o miejscu otworów na dziurki po prawej stronie robótki?
24.02.2026 - 10:24DROPS Design ha risposto:
Witaj Moniko, nie wykonujemy tutaj dziurek na guziki, za dziurki na guziki posłużą otwory w ażurowych rzędach. Pozdrawiamy!
24.02.2026 - 22:23
![]() Samantha ha scritto:
Samantha ha scritto:
Hello! Are the measurements in the size chart the ones you're supposed to get after blocking the garment or are they from before you do that? I knitted this cardigan in size L and it says that the neck is supposed to be 19cm, but mine turned out to be 25cm! The rest of the measurements stayed roughly the same as in the chart. I'm planning on making your Seaside Watcher sweater and am hoping I can avoid this unwanted neck widening from happening again as that is my biggest concern. Thank you!
09.02.2026 - 20:11
![]() Samantha ha scritto:
Samantha ha scritto:
For the 1 1/2 cm do i start measuring from the first decrease row i make after the sleeve reaches 4cm or the row after it? Thank you!
12.10.2024 - 14:36DROPS Design ha risposto:
Dear Samantha, please see the answer below. Happy knitting!
13.10.2024 - 23:18
![]() Samantha ha scritto:
Samantha ha scritto:
Hello! When the sleeve measures 4cm do I make the decreases on the row that makes the sleeve be 4cm or the next row? For the other decreases, does the 1 1/2 cm need to be between the last and next decrease row or should i make the decrease on the row that makes the sleeve 1 1/2 cm longer? And do i count the decrease i make after it reaches 4cm to the 11 total decreases i need to make or not?
12.10.2024 - 12:47DROPS Design ha risposto:
Dear Samantha, the measurements are approximates; it may be difficult to estimate in which row it measures exactly 4cm. However, start decreasing when you already have 4cm, not less. The same with the decreases; between the first and the second decrease there should be 1 1/2 cm. The 11 total decreases includes the very first one, at 4cm. So, from that one, you count 10 more decreases. Happy knitting!
13.10.2024 - 23:14
![]() Samantha ha scritto:
Samantha ha scritto:
Hello! Can you explain to me more thoroughly the part of the yoke where it says that the piece needs to be 6cm with the next RS row? My piece measures 6cm after I've done a WS row & w/ the next RS row it's 6.3cm. In the next sentence it says to do A.1 and knit etc. & if I keep the RS row the next one I need to do is a WS one but A.1 is done at the start of a RS row not a WS one. And do I just knit the sts or do them like the rib? Also does the RS become the WS & vice versa when we do this row?
17.07.2024 - 22:44DROPS Design ha risposto:
Dear Samantha, the piece should measure approx. 6cm and you should be ending on a WS row so that the next one, where you start A.1, A.2 and the increases, is a RS row ("with the next row from the right side"). This means that the charts are started correctly in a RS row. Happy knitting!
21.07.2024 - 19:51
![]() Susana Araujo ha scritto:
Susana Araujo ha scritto:
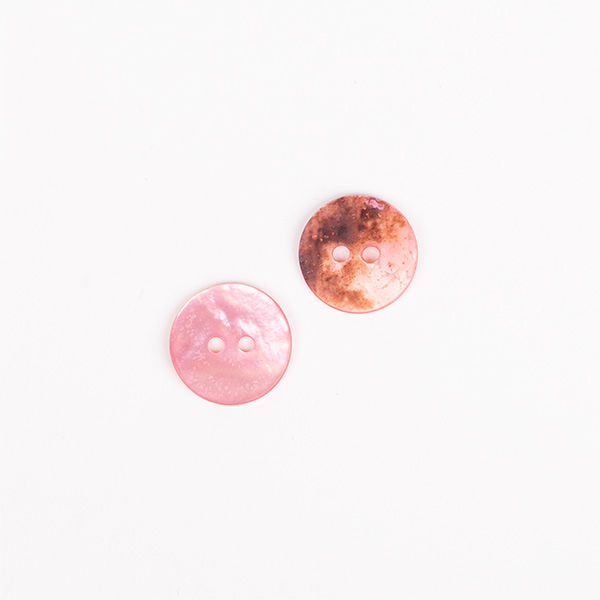
Hi there, do you have any video to learn how to sew buttons? Thank you very much for this amazing pattern. My final product is gorgeous!
09.10.2023 - 22:24DROPS Design ha risposto:
Dear Susana, unfortunately we have no videos on how to sew buttons. Depending on the button type they are sewn differently. With a sewing thread, if you use the same buttons as here, pass the thread through both holes in the button and weave in the tail by twisting the thread several times right under the button, so that the button is slightly separated from the garment and the edge won't wear that easily as time goes by. Happy knitting!
15.10.2023 - 23:38
![]() Susana Araujo ha scritto:
Susana Araujo ha scritto:
Hi there. Thanks a lot for your free patterns. On the last part for the yoke it says: "cast on X stitches under the sleeve" but I am confused... If I had just place the stitches for the sleeve on a thread then I won't have a sleeve as yet done at all. Is this just to cast on X number as I would normally cast on any normal stitch but maybe put a mark or remember that that will be the under arm? Thanks for the help!
26.08.2023 - 22:38DROPS Design ha risposto:
Dear Susana, these new cast on stitches are for the armholes in the body and replace the sleeves' position when working the body. You cast on these stitches on the body as normal. When you start the body, you will insert a thread in the middle of these stitches, so you will know that these stitches correspond to the armholes and that you will join the sleeve to the body here. Happy knitting!
28.08.2023 - 00:50
![]() Susana Araujo ha scritto:
Susana Araujo ha scritto:
On the "yoke" part when it says to continue the rib until piece measures 4cm is this to keep doing the A1 pattern on the band while we knit 1 and purl 2 on the rib? Or shall i just knit 7 on those 7 stitches from the band at all times?
12.08.2023 - 08:55DROPS Design ha risposto:
Dear Mrs Arauajo, repeat the first 2 rows from RS starting with A.1 and ending with A.2 and from WS starting with A.2 and ending with A.1, ie work diagrams on each side and rib in between. Happy knitting!
14.08.2023 - 09:08
![]() Susana ha scritto:
Susana ha scritto:
When doing A1 and A2 pattern for the band, the part where we are meant to knit 2 together and yarn over happens to be on my wrong side. Do I still do this even on the wrong side or do I have to purl instead? The subtitles don't mention to do something different depending on the side but I just want to check before I do something wrong.
08.08.2023 - 23:06DROPS Design ha risposto:
Dear Susanna, that's correct like this, this row will be worked from wrong side, this means you will work diagrams from WS reading from the left towards the right, ex. A.2. from WS - K1, (YO, K2 tog)x3 and A.1: (K2 tog, YO)x3, K1. Happy knitting!
09.08.2023 - 08:20
![]() Susana ha scritto:
Susana ha scritto:
Hi there, in the beginning of the yoke it says" increase every 2nd purl-1 to purl-2 - read increase tip= 155-160, etc. What is this purl-1 to purl-2??
08.08.2023 - 21:56DROPS Design ha risposto:
Hi Susana, Half-way through the rib at the top of the yoke, you change the ribbing to knit 1, purl 2 by increasing 1 stitch in each purled stitch. The easiest method is to purl 2 in each purled stitch, or you can make 1 yarn over which is then purled twisted on the next round to avoid a hole. Hope this helps and happy knitting!
09.08.2023 - 07:20
|
|||||||||||||||||||
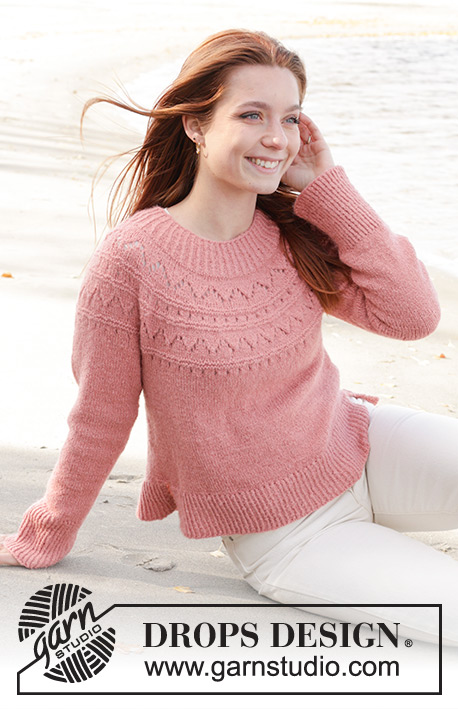
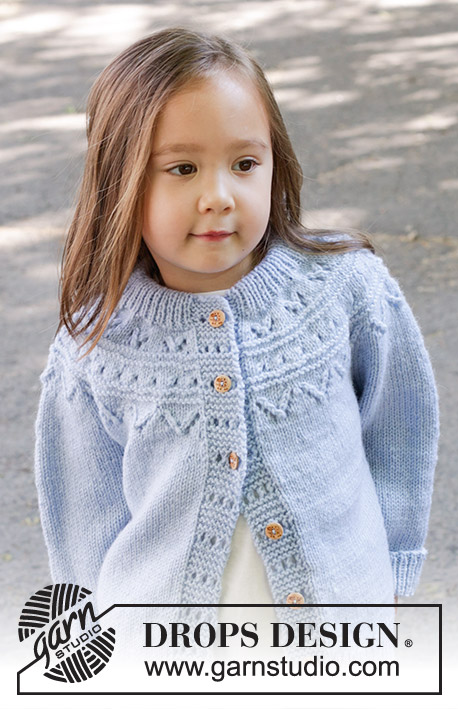
Blushing Rose Cardigan#blushingrosecardigan |
|||||||||||||||||||
 |
 |
||||||||||||||||||
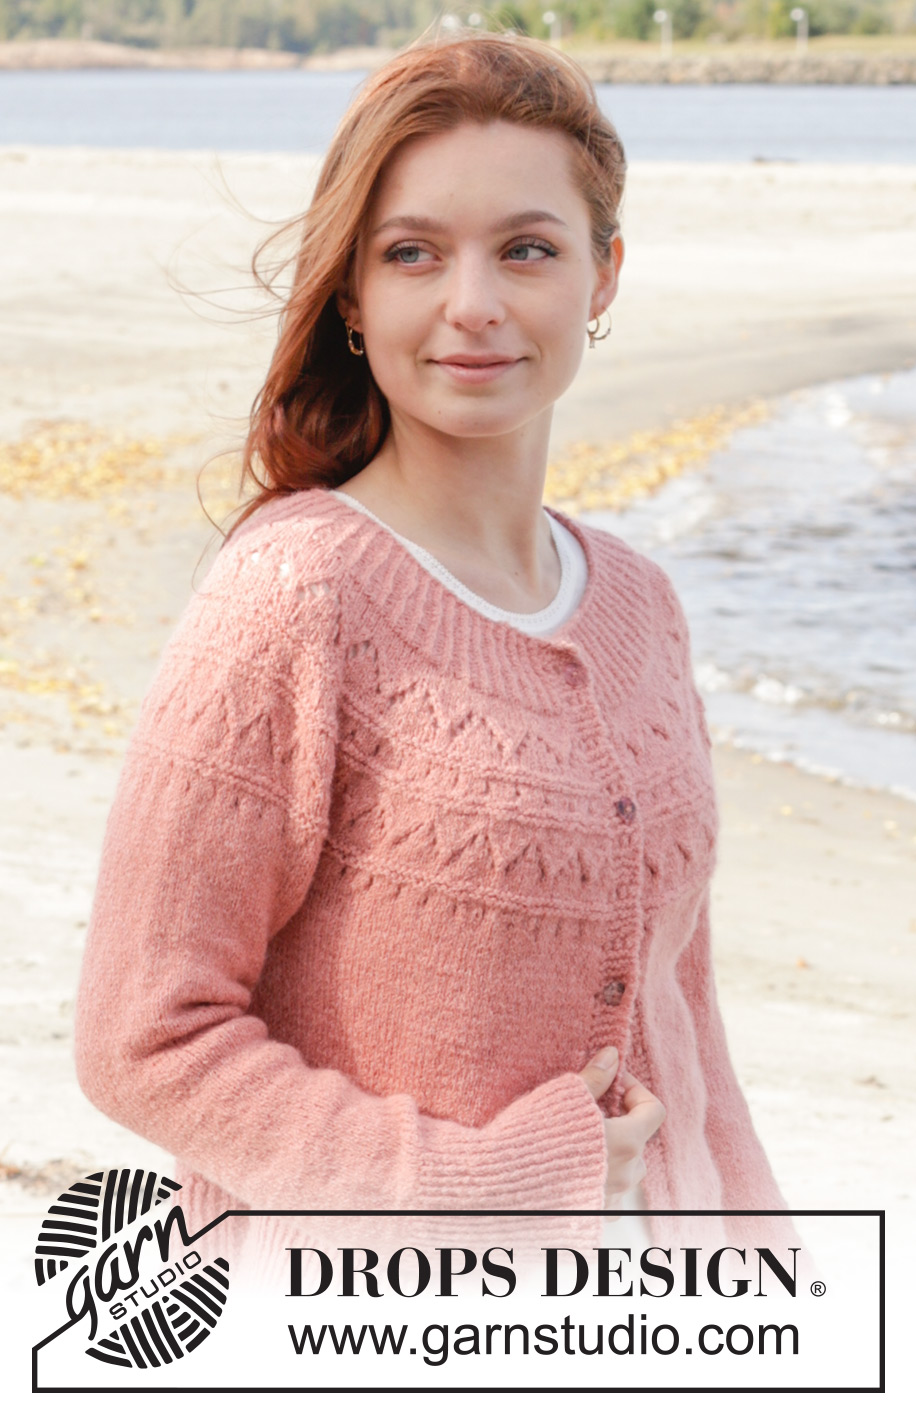
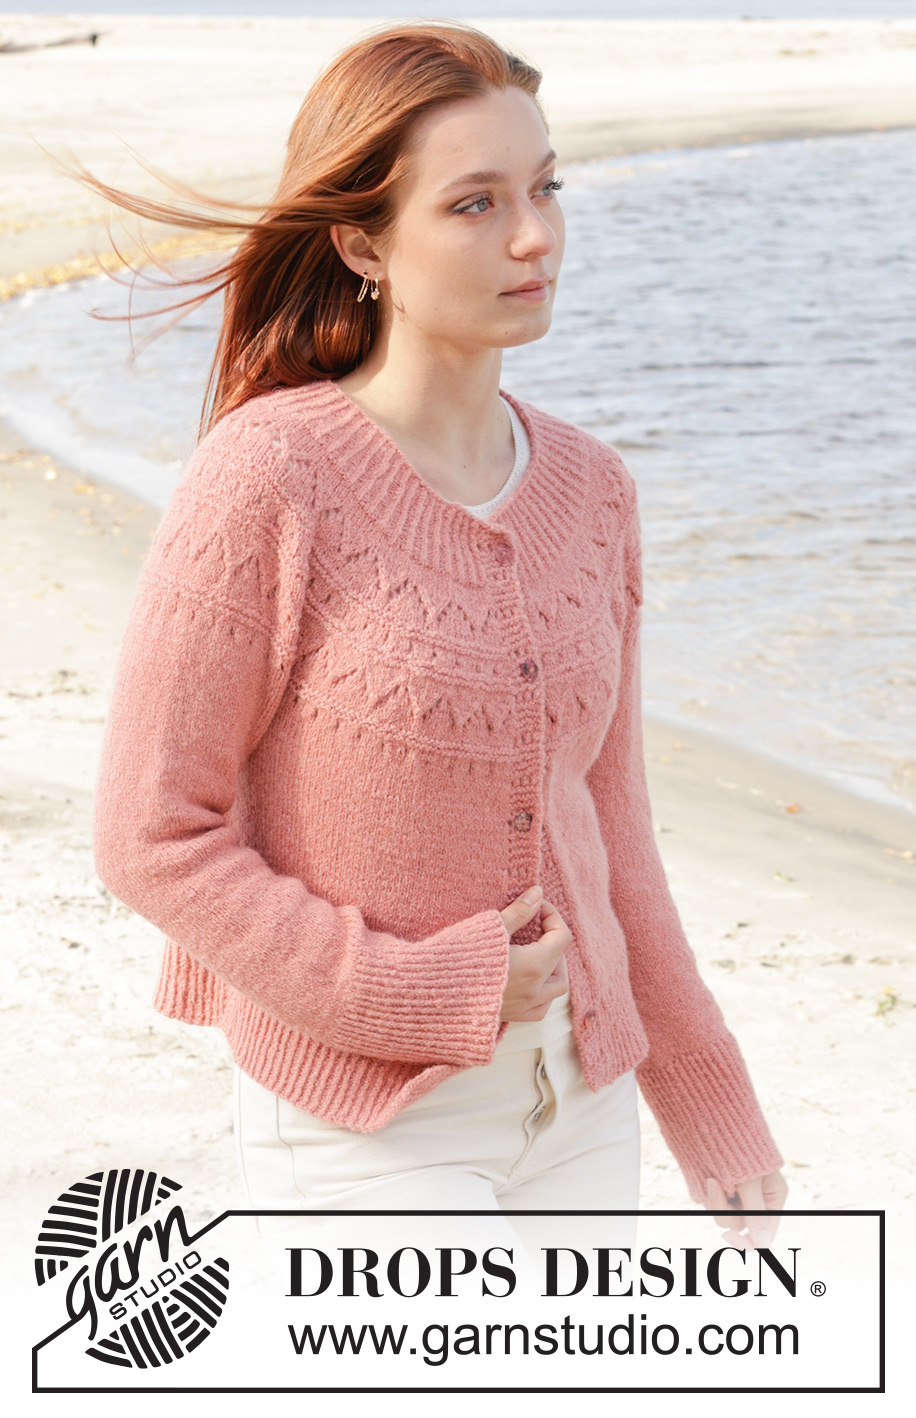
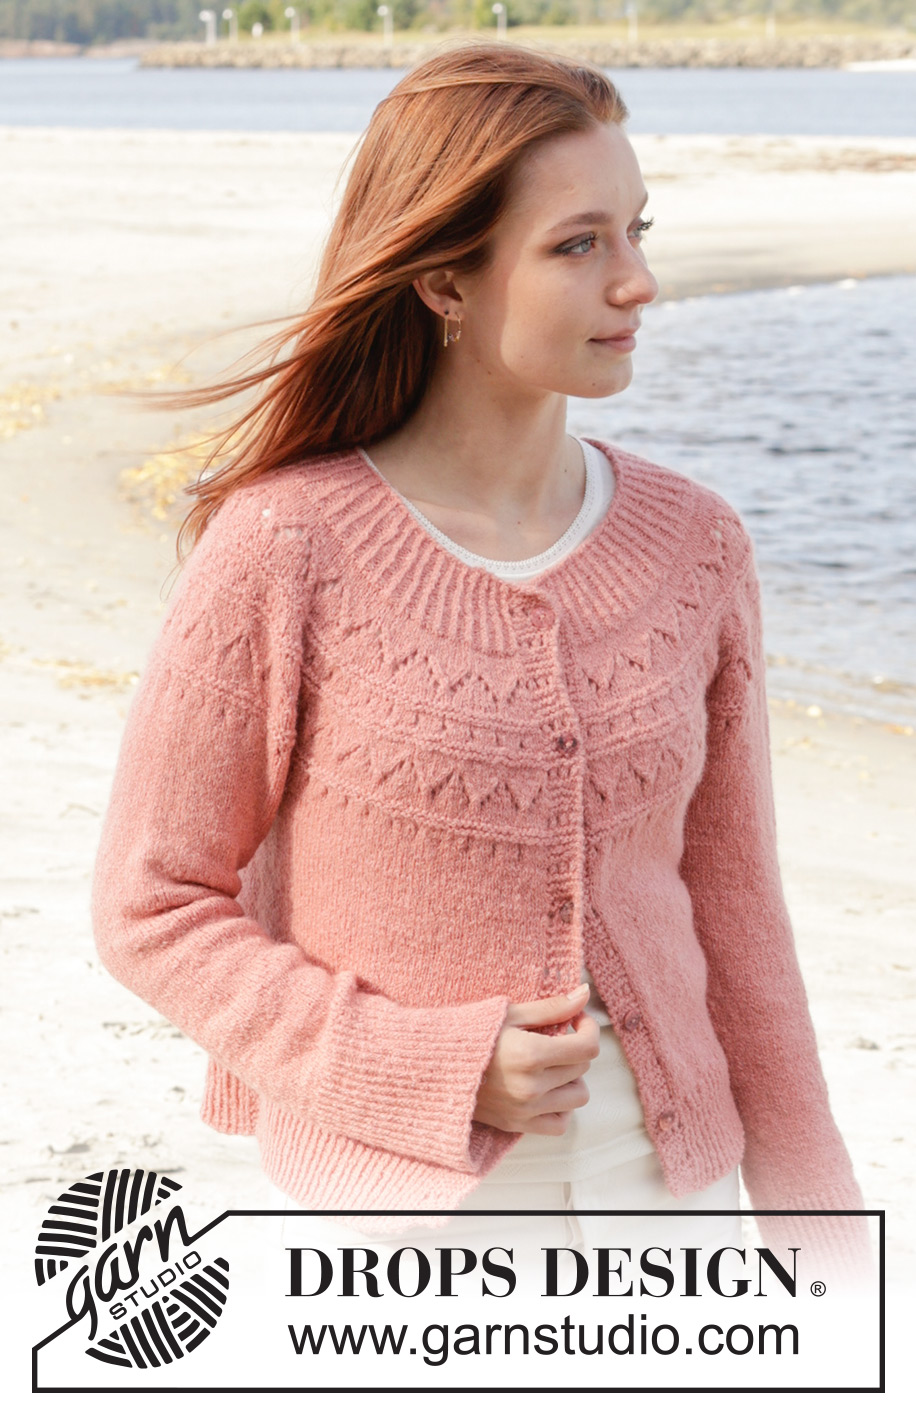
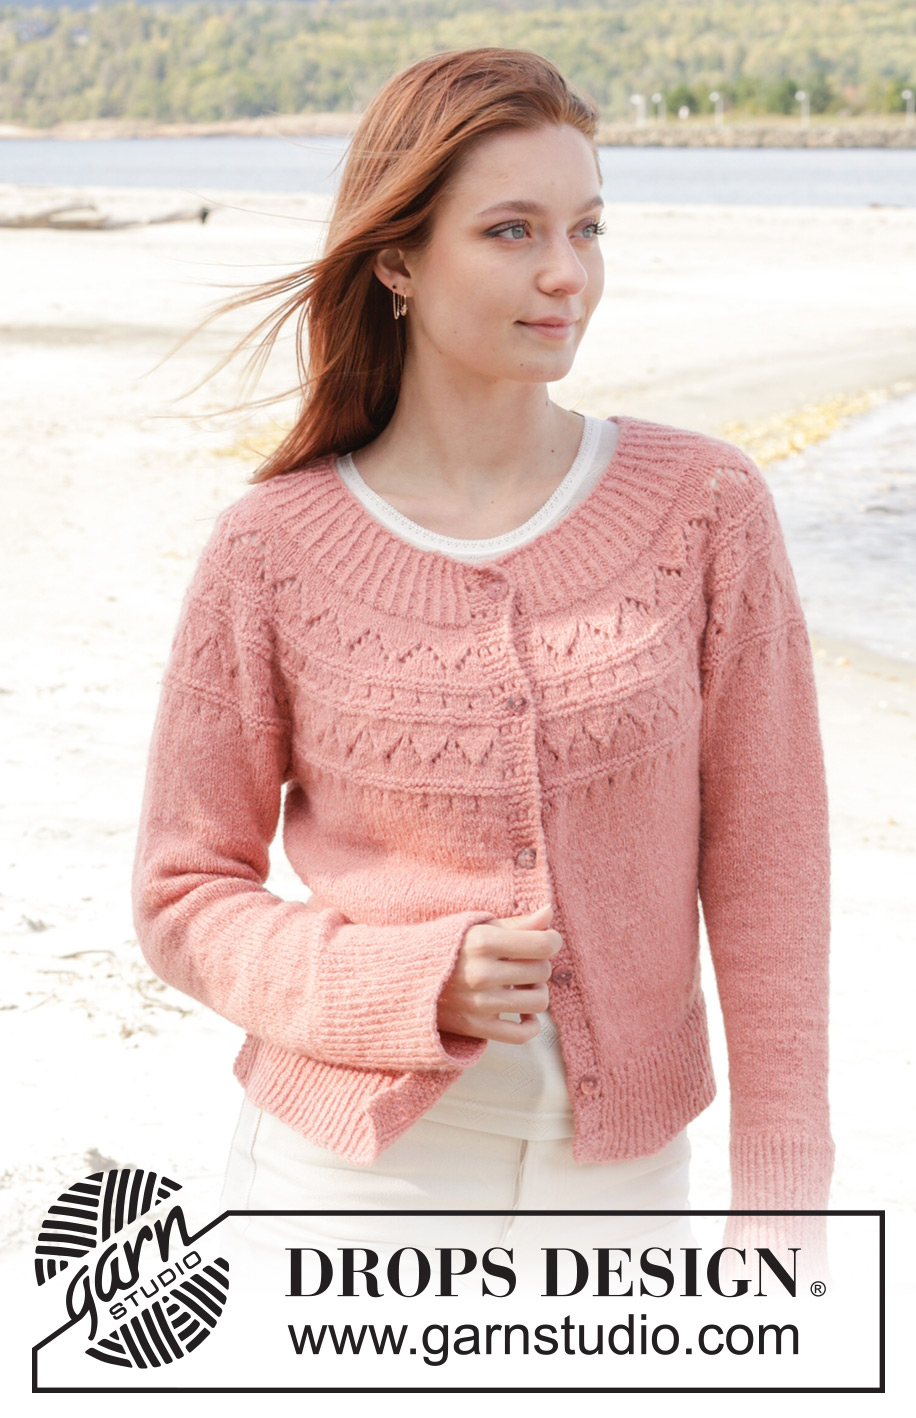
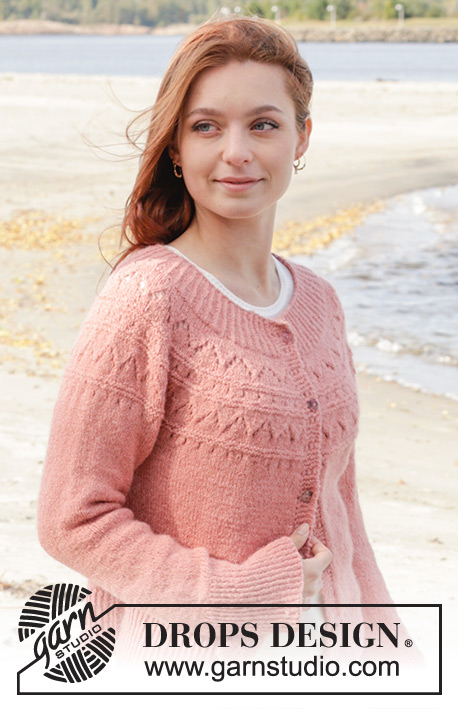
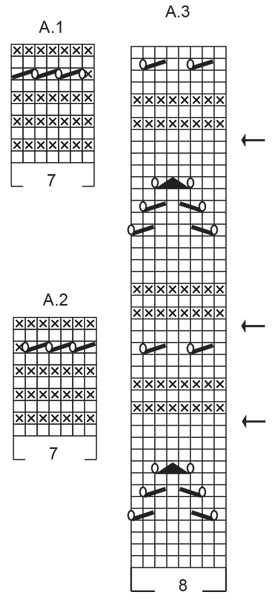
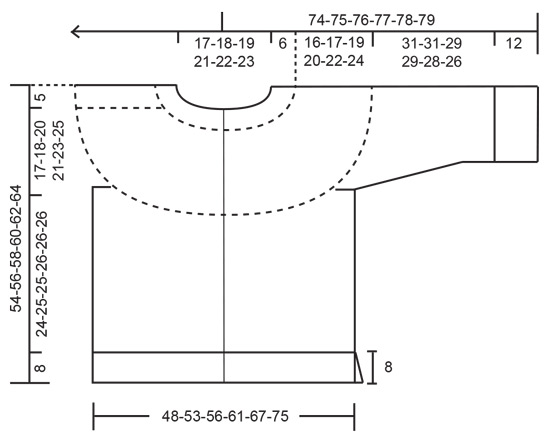
Cardigan lavorato ai ferri in DROPS Sky. Lavorato dall’alto in basso con sprone rotondo, motivo traforato e spacchi laterali. Taglie: S - XXXL.
DROPS 240-21 |
|||||||||||||||||||
|
------------------------------------------------------- TECNICHE IMPIEGATE: ------------------------------------------------------- COSTA/MAGLIA LEGACCIO (avanti e indietro): Lavorare tutti i ferri a diritto. 1 costa in altezza = 2 ferri diritto. MOTIVO: Vedere i diagrammi A.1 - A.3. I diagrammi mostrano tutti i ferri del motivo visti dal diritto del lavoro. SUGGERIMENTO PER GLI AUMENTI: Aumentare 1 maglia facendo 1 gettato, che viene lavorato a ritorto sul ferro successivo per evitare un buco. SUGGERIMENTO PER LE DIMINUZIONI (applicato alle maniche): Diminuire 1 maglia a ogni lato del segnapunti come segue: Lavorare fino a quando rimangono 3 maglie prima del segnapunti, 2 maglie insieme a diritto, 2 maglie diritto (il segnapunti è al centro di queste 2 maglie), passare 1 maglia a diritto senza lavorarla, 1 maglia diritto, accavallare la maglia passata sopra quella appena lavorata. ------------------------------------------------------- INIZIO DEL LAVORO: ------------------------------------------------------- CARDIGAN – BREVE RIASSUNTO DEL LAVORO: Lavorare il collo e lo sprone in piano con i ferri circolari, dall’alto in basso, fino agli scalfi. Dividere lo sprone per il corpo e le maniche e continuare il corpo in piano con i ferri circolari. Lavorare le maniche in tondo con i ferri circolari corti/ferri a doppia punta, dall’alto in basso. Non ci sono asole; i bottoni vengono allacciati in un ferro traforato sul bordo. SPRONE: Avviare 127-131-135-143-147-151 maglie con i ferri circolari n° 3 mm e DROPS Sky. Lavorare 1 ferro rovescio dal rovescio del lavoro. Lavorare a coste dal diritto del lavoro come segue: lavorare A.1 su 7 maglie (bordo), lavorare a coste (1 maglia diritto ritorto, 1 maglia rovescio) fino a quando rimangono 8 maglie, 1 maglia diritto ritorto e lavorare A.2 sulle ultime 7 maglie (bordo). Lavorare le coste dal rovescio del lavoro come segue: A.2 su 7 maglie, coste (1 maglia rovescio ritorto/ 1 maglia diritto) fino a quando rimangono 8 maglie, 1 maglia rovescio e A.1. Lavorare queste coste per 2 cm. Aumentare ogni 2° sezione con 1 maglia rovescio a 2 maglie rovescio – leggere il SUGGERIMENTO PER GLI AUMENTI = 155-160-165-175-180-185 maglie. Continuare le nuove coste fino a quando il lavoro misura 4 cm. Ora aumentare le sezioni con 1 maglia rovescio rimaste e 2 maglie rovescio – ricordarsi del SUGGERIMENTO PER GLI AUMENTI = 183-189-195-207-213-219 maglie. Continuare i bordi e le coste (1 maglia diritto ritorto, 2 maglie rovescio) fino a quando il lavoro misura 6 cm con il ferro successivo dal diritto del lavoro. Lavorare A.1, 169-175-181-193-199-205 maglie diritto e aumentare 24-26-28-24-26-28 maglie in modo uniforme su queste maglie, lavorare A.2 = 207-215-223-231-239-247 maglie. Passare ai ferri circolari n° 4 mm. Lavorare A.2, lavorare a rovescio fino a quando rimangono 7 maglie, A.1. FARE ATTENZIONE ALLA TENSIONE DEL LAVORO! Lavorare A.1, lavorare A.3 fino a quando rimangono 8 maglie sul ferro, lavorare la 1° maglia di A.3 e lavorare A.2. Continuare questo motivo. Sul ferro indicato con la 1° freccia di A.3 aumentare 32-40-48-56-56-72 maglie in modo uniforme sulle maglie di A.3 = 239-255-271-287-295-319 maglie. Sul ferro indicato con la 2° freccia in A.3 aumentare 32-48-48-56-56-72 maglie in modo uniforme sulle maglie di A.3 = 271-303-319-343-351-391 maglie. Sul ferro indicato con la 3° freccia in A.3 aumentare 40-40-48-48-72-72 maglie in modo uniforme sulle maglie di A.3 = 311-343-367-391-423-463 maglie. Alla fine di A.3, continuare a maglia rasata, A.1 e A.2 come prima fino alla fine del lavoro. Quando il lavoro misura 22-23-25-26-28-30 cm dal bordo di avvio, dividere il lavoro per il corpo e le maniche dal diritto del lavoro come segue: lavorare le prime 52-57-60-65-70-78 maglie come prima (davanti sinistro), mettere in sospeso le 58-64-70-72-78-82 maglie successive senza lavorarle (manica), avviare 10-10-12-12-14-14 maglie sotto la manica, 90-100-106-116-126-142 maglie diritto (dietro), mettere in sospeso le 58-64-70-72-78-82 maglie successive senza lavorarle (manica), avviare 10-10-12-12-14-14 maglie sotto la manica, lavorare le ultime 53-58-61-66-71-79 maglie come prima (davanti destro). Ora misurare il lavoro da qui! CORPO: = 215-235-251-271-295-327 maglie. Inserire un segnapunti al centro delle 10-10-12-12-14-14 maglie avviate sotto ogni manica e lasciare che i segnapunti seguano il lavoro (verranno usati durante la divisione per lo spacco). Continuare in piano come prima per altri 24-25-25-26-26-26 cm e il ferro successivo è dal diritto del lavoro. Ora dividerlo per lo spacco a ogni lato. Lasciare le prime 57-62-66-71-77-85 maglie sul ferro, mettere in sospeso le 100-110-118-128-140-156 maglie successive per il dietro e mettere le ultime 58-63-67-72-78-86 maglie su un altro fermamaglie per il davanti destro. Finire ogni parte in modo separato. DAVANTI SINISTRO: = 57-62-66-71-77-85 maglie. Lavorare A.1 come prima, lavorare a diritto le maglie rimaste e aumentare 20-23-27-26-26-24 maglie in modo uniforme = 77-85-93-97-103-109 maglie. Passare ai ferri circolari n° 3 mm. Lavorare a coste come segue dal rovescio del lavoro: 3 maglie a maglia legaccio, * 1 maglia rovescio ritorto, 1 maglia diritto *, lavorare *-* fino a quando rimangono 8 maglie, 1 maglia rovescio ritorto, A.1. Lavorare a coste come segue dal diritto del lavoro: A.1 su 7 maglie, * 1 maglia diritto ritorto, 1 maglia rovescio *, lavorare *-* fino a quando rimangono 4 maglie, 1 maglia diritto ritorto e 3 maglie a maglia legaccio. Continuare queste coste per 8 cm. Intrecciare con diritto su diritto e rovescio su rovescio. Il cardigan misura circa 54-56-58-60-62-64 cm dalla spalla. DAVANTI DESTRO: Riportare le 58-63-67-72-78-86 maglie del davanti destro sui ferri circolari n° 4 mm. Iniziare dal diritto del lavoro, lavorare le prime 51-56-60-65-71-79 maglie e aumentare 19-22-26-25-25-23 maglie in modo uniforme, lavorare A.2 come prima sulle ultime 7 maglie = 77-85-93-97-103-109 maglie. Passare ai ferri circolari n° 3 mm. Lavorare a coste come segue dal rovescio del lavoro: A.2 su 7 maglie, * 1 maglia rovescio ritorto, 1 maglia diritto *, lavorare *-* fino a quando rimangono 4 maglie, 1 maglia rovescio ritorto e 3 maglie a maglia legaccio. Lavorare a coste come segue dal diritto del lavoro: 3 maglie a maglia legaccio, * 1 maglia diritto ritorto, 1 maglia rovescio *, lavorare *-* fino a quando rimangono 8 maglie, 1 maglia rovescio ritorto, A.2. Continuare queste coste per 8 cm. Intrecciare con diritto su diritto e rovescio su rovescio. Il cardigan misura circa 54-56-58-60-62-64 cm dalla spalla. DIETRO: Riportare le 100-110-118-128-140-156 maglie del dietro sui ferri circolari n° 4 mm. Iniziare dal diritto del lavoro, aumentando 21-21-23-27-29-31 maglie in modo uniforme = 121-131-141-155-169-187 maglie. Passare ai ferri circolari n° 3 mm. Lavorare a coste come segue dal rovescio del lavoro: 3 maglie a maglia legaccio, * 1 maglia rovescio ritorto, 1 maglia diritto *, lavorare *-* fino a quando rimangono 4 maglie, 1 maglia rovescio ritorto e 3 maglie a maglia legaccio. Lavorare a coste come segue dal diritto del lavoro: 3 maglie a maglia legaccio, * 1 maglia diritto ritorto, 1 maglia rovescio *, lavorare *-* fino a quando rimangono 4 maglie, 1 maglia diritto ritorto, 3 maglie a maglia legaccio. Continuare queste coste per 8 cm. Intrecciare con diritto su diritto e rovescio su rovescio. Il cardigan misura circa 54-56-58-60-62-64 cm dalla spalla. MANICHE: Riportare le 58-64-70-72-78-82 maglie in sospeso a un lato del lavoro sui ferri circolari corti/ferri a doppia punta n° 4 mm e riprendere 1 maglia in ognuna delle nuove maglie avviate sotto la manica = 68-74-82-84-92-96 maglie. Inserire un segnapunti al centro delle nuove maglie avviate sotto la manica e lasciare che segua il lavoro. Lavorare a maglia rasata in tondo. Quando la manica misura 4 cm diminuire 1 maglia a ogni lato del segnapunti – leggere il SUGGERIMENTO PER LE DIMINUZIONI. Diminuire in questo modo ogni 3½-2½-1½-1½-1-1 cm per un totale di 6-8-11-10-13-14 volte = 56-58-60-64-66-68 maglie. Continuare a lavorare fino a quando la manica misura 31-31-29-29-28-26 cm dalla divisione. Mancano circa 12 cm prima della fine, provare il cardigan e lavorare fino alla lunghezza desiderata. Lavorare 1 giro diritto e aumentare 18-18-20-20-20-20 maglie in modo uniforme = 74-76-80-84-86-88 maglie. Passare ai ferri a doppia punta n° 3 mm e lavorare a coste (1 maglia diritto ritorto, 1 maglia rovescio) per 12 cm. Intrecciare con diritto su diritto e rovescio su rovescio. Lavorare l’altra manica nello stesso modo. CONFEZIONE: Attaccare i bottoni sul bordo sinistro, posizionandoli in modo che si possano allacciare nei ferri traforati sul bordo destro. |
|||||||||||||||||||
Spiegazioni del diagramma |
|||||||||||||||||||
|
|||||||||||||||||||
 |
|||||||||||||||||||
 |
|||||||||||||||||||
Avete terminato questo modello?Allora taggate le vostre foto con #dropspattern #blushingrosecardigan o inviatele alla #dropsfan gallery. Avete bisogno di aiuto con questo modello?Troverete 35 video tutorial, una sezione per i commenti/domande e molto altro guardando il modello su www.garnstudio.com © 1982-2026 DROPS Design A/S. Ci riserviamo tutti i diritti. Questo documento, compreso tutte le sue sotto-sezioni, è protetto dalle leggi sul copyright. Potete leggere quello che potete fare con i nostri modelli alla fine di ogni modello sul nostro sito. |
|||||||||||||||||||


Con oltre 40 anni di esperienza nel design di modelli di maglia e uncinetto, DROPS Design offre la più estesa collezione di modelli gratuiti su internet - tradotti in 17 lingue. Ad oggi vi possiamo fornire 325 cataloghi e 12298 modelli - 9569 dei quali sono tradotti in Italiano.
Ci stiamo impegnando molto per darvi il meglio che vi possiamo offrire in termini di maglia e uncinetto, ispirazioni e consigli così come filati di grande qualità ad un prezzo incredibile! Volete utilizzare i nostri modelli per qualcosa d'altro oltre al vostro uso personale? Potete leggere tutto ciò che è consentito nel testo sul Copyright in basso su tutte le pagine dei nostri modelli. Buon lavoro!
Lasciare un commento sul modello DROPS 240-21
Noi saremmo felici di ricevere i tuoi commenti e opinioni su questo modello!
Se vuoi fare una domanda, fai per favore attenzione a selezionare la categoria corretta nella casella qui sotto per velocizzare il processo di risposta. I campi richiesti sono indicati da *.