DROPS Sky
DROPS Sky
74% Alpaca, 18% Polyamide, 8% Wool
from 5.40 € /50g
Get the yarn to make this pattern from 32.40€.

The yarn cost is calculated from the pattern’s smallest size and the yarn’s cheapest product type. Looking for an even better price? You might find it on the DROPS Deals!

DROPS SS24

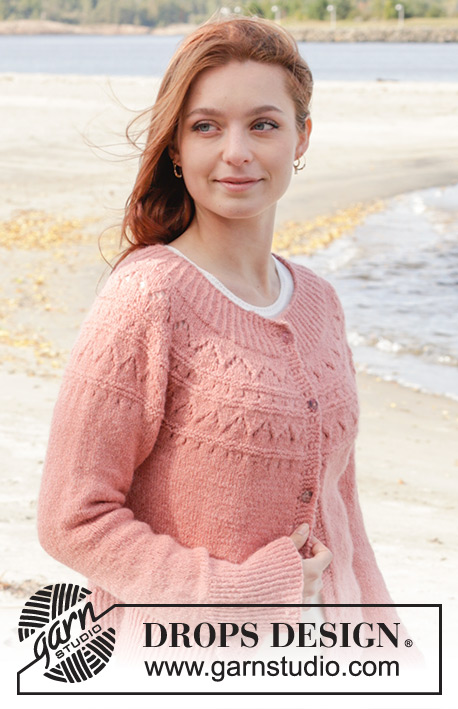
Blushing Rose Cardigan

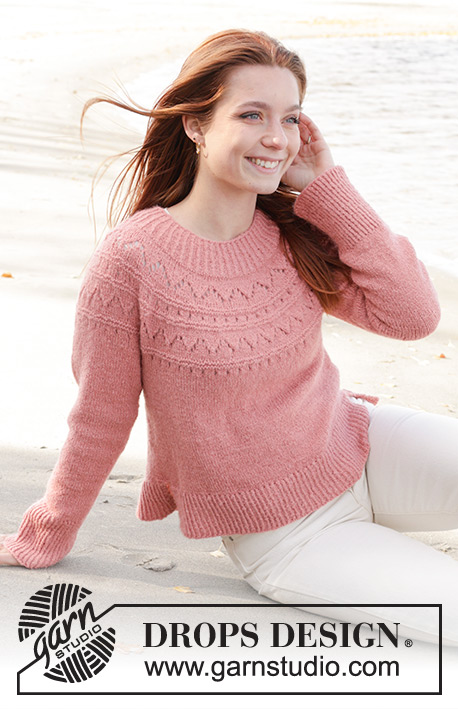
Knitted jacket in DROPS Sky. The piece is worked top down with round yoke, lace pattern and split in the sides. Sizes S - XXXL.

DROPS 240-21
DROPS Design: Pattern sk-180
Yarn group B
-------------------------------------------------------

SIZES:
S - M - L - XL - XXL - XXXL

YARN:
DROPS SKY from Garnstudio (belongs to yarn group B)
300-350-400-400-450-500 g colour 19, peach

NEEDLES:
DROPS CIRCULAR NEEDLE SIZE 4 MM: Length 40 cm and 80 cm.
DROPS CIRCULAR NEEDLE SIZE 3 MM: Length 40 cm and 80 cm.
DROPS DOUBLE POINTED NEEDLES SIZE 4 MM.
DROPS DOUBLE POINTED NEEDLES SIZE 3 MM.
The technique MAGIC LOOP can be used – you then only need circular needle of 80 cm in each size.

BUTTONS:
DROPS BUTTONS NO 622: 5-5-5-6-6-6 items.

KNITTING TENSION:
21 stitches in width and 28 rows in height with stocking stitch = 10 x 10 cm.
NOTE: Needle size is only a guide. If you get too many stitches on 10 cm, change to a larger needle size. If you get too few stitches on 10 cm, change to a smaller needle size.

-------------------------------------------------------

Alternative Yarn – See how to change yarns here
Yarn Groups A to F – Use the same pattern and change the yarn here
Yarn usage using an alternative yarn – Use our yarn converter here

-------------------------------------------------------

DROPS Sky
DROPS Sky
74% Alpaca, 18% Polyamide, 8% Wool
from 5.40 € /50g
Get the yarn to make this pattern from 32.40€.

The yarn cost is calculated from the pattern’s smallest size and the yarn’s cheapest product type. Looking for an even better price? You might find it on the DROPS Deals!

Pattern instructions

-------------------------------------------------------

EXPLANATIONS FOR THE PATTERN:
-------------------------------------------------------

RIDGE/GARTER STITCH (worked back and forth):
Knit all rows.
1 ridge = knit 2 rows.

PATTERN:
See diagrams A.1 to A.3. The diagrams show all rows in the pattern from the right side.

INCREASE TIP:
Increase 1 stitch by making 1 yarn over, which is worked twisted on the next row to avoid a hole.

DECREASE TIP (for sleeves):
Decrease 1 stitch on either side of the marker-thread as follows: Work until there are 3 stitches left before the marker-thread, knit 2 together, knit 2 (marker-thread sits between these 2 stitches), slip 1 stitch as if to knit, knit 1 and pass the slipped stitch over the knitted stitch.

-------------------------------------------------------

START THE PIECE HERE:

-------------------------------------------------------

JACKET – SHORT OVERVIEW OF THE PIECE.
The neck and yoke are worked back and forth with circular needle, top down, as far as the armholes. The yoke is divided for body and sleeves and the body continued back and forth with circular needle. The sleeves are worked in the round with short circular needle/double pointed needles, top down. There are no buttonholes; the buttons are buttoned through a row of holes on the band.

YOKE:
Cast on 127-131-135-143-147-151 stitches with circular needle size 3 mm and DROPS Sky.
Purl 1 row from the wrong side.
Work rib from the right side as follows: Work A.1 over 7 stitches (band), work rib (knit 1 twisted, purl 1) until there are 8 stitches left, knit 1 twisted and work A.2 over the last 7 stitches (band).
Work the rib from the wrong side as follows: A.2 over 7 stitches, rib (purl 1 twisted/ knit 1) until there are 8 stitches left, purl 1 twisted and A.1.
Work this rib for 2 cm.
Increase every 2nd purl-1 to purl-2 – read INCREASE TIP = 155-160-165-175-180-185 stitches. Continue the new rib until the piece measures 4 cm. Now increase the remaining purl-1 to purl-2 – remember INCREASE TIP = 183-189-195-207-213-219 stitches.
Continue the bands and rib (knit 1 twisted, purl 2) until the piece measures 6 cm with the next row from the right side. Work A.1, knit 169-175-181-193-199-205 and increase 24-26-28-24-26-28 stitches evenly over these stitches, work A.2 = 207-215-223-231-239-247 stitches.
Change to circular needle size 4 mm. Work A.2, purl until there are 7 stitches left, A.1.
REMEMBER THE KNITTING TENSION!
Work A.1, work A.3 until there are 8 stitches left on the row, work the first stitch in A.3 and work A.2.
Continue this pattern. On the row marked with the first arrow in A.3 increase 32-40-48-56-56-72 stitches evenly spaced over the stitches in A.3 = 239-255-271-287-295-319 stitches.

On the row marked with the second arrow in A.3 increase 32-48-48-56-56-72 stitches evenly spaced over the stitches in A.3 = 271-303-319-343-351-391 stitches.

On the row marked with the third arrow in A.3 increase 40-40-48-48-72-72 stitches evenly spaced over the stitches in A.3 = 311-343-367-391-423-463 stitches.

When A.3 is finished, continue with stocking stitch, A.1 and A.2 as before to finished length. When the piece measures 22-23-25-26-28-30 cm from the cast-on edge, divide for the body and sleeves from the right side as follows: Work the first 52-57-60-65-70-78 stitches as before (left front piece), place the next 58-64-70-72-78-82 stitches on a thread without working them (sleeve), cast on 10-10-12-12-14-14 stitches under the sleeve, knit 90-100-106-116-126-142 (back piece), place the next 58-64-70-72-78-82 stitches on a thread without working them (sleeve), cast on 10-10-12-12-14-14 stitches under the sleeve, work the last 53-58-61-66-71-79 stitches as before (right front piece). The piece is now measured from here!

BODY:
= 215-235-251-271-295-327 stitches. Insert a marker-thread in the middle of the 10-10-12-12-14-14 stitches cast on under each sleeve and allow the threads to follow your work onwards (they are used when dividing for the split). Continue back and forth as before for a further 24-25-25-26-26-26 cm and the next row from the right side. Now divide for the split in each side. Leave the first 57-62-66-71-77-85 stitches on the needle, place the next 100-110-118-128-140-156 stitches on a thread for the back piece and place the last 58-63-67-72-78-86 stitches on another thread for the right front piece.
Each piece is finished separately.

LEFT FRONT PIECE:
= 57-62-66-71-77-85 stitches.
Work A.1 as before, knit the remaining stitches and increase 20-23-27-26-26-24 stitches evenly spaced = 77-85-93-97-103-109 stitches.
Change to circular needle size 3 mm.
Work rib as follows from the wrong side: 3 garter stitches, * purl 1 twisted, knit 1 *, work from *-* until there are 8 stitches left, purl 1 twisted, A.1.
Work rib as follows from the right side: A.1 over 7 stitches, * knit 1 twisted, purl 1 *, work from *-* until there are 4 stitches left, knit 1 twisted and 3 garter stitches.
Continue this rib for 8 cm. Cast off with knit over knit and purl over purl. The jacket measures approx. 54-56-58-60-62-64 cm from the shoulder.

RIGHT FRONT PIECE:
Place the 58-63-67-72-78-86 right front piece stitches on circular needle size 4 mm. Start from the right side, knit the first 51-56-60-65-71-79 stitches and increase 19-22-26-25-25-23 evenly spaced, work A.2 as before over the last 7 stitches = 77-85-93-97-103-109 stitches. Change to circular needle size 3 mm.
Work rib as follows from the wrong side: A.2 over 7 stitches, * purl 1 twisted, knit 1 *, work from *-* until there are 4 stitches left, purl 1 twisted and 3 garter stitches.
Work rib as follows from the right side: 3 garter stitches, * knit 1 twisted, purl 1 *, work from *-* until there are 8 stitches left, purl 1 twisted, A.2.
Continue this rib for 8 cm. Cast off with knit over knit and purl over purl. The jacket measures approx. 54-56-58-60-62-64 cm from the shoulder.

BACK PIECE:
Place the 100-110-118-128-140-156 stitches for the back piece on circular needle size 4 mm.
Start from the right side and knit 1 row, increasing 21-21-23-27-29-31 stitches evenly spaced = 121-131-141-155-169-187 stitches. Change to circular needle size 3 mm.
Work rib as follows from the wrong side: 3 garter stitches, * purl 1 twisted, knit 1 *, work from *-* until there are 4 stitches left, purl 1 twisted and 3 garter stitches.
Work rib as follows from the right side: 3 garter stitches, * knit 1 twisted, purl 1 *, work from *-* until there are 4 stitches left, knit 1 twisted, 3 garter stitches.
Continue this rib for 8 cm. Cast off with knit over knit and purl over purl. The jacket measures approx. 54-56-58-60-62-64 cm from the shoulder.

SLEEVES:
Place the 58-64-70-72-78-82 stitches from the thread on the one side of the piece on short circular needle/double pointed needles size 4 mm and knit up 1 stitch in each of the new stitches cast on under the sleeve = 68-74-82-84-92-96 stitches. Insert a marker-thread in the middle of the new stitches under the sleeve and allow it to follow your work onwards.
Work stocking stitch in the round
When the sleeve measures 4 cm decrease 1 stitch on each side of the marker-thread – read DECREASE TIP. Decrease like this every 3½-2½-1½-1½-1-1 cm a total of 6-8-11-10-13-14 times = 56-58-60-64-66-68 stitches. Continue working until the sleeve measures 31-31-29-29-28-26 cm from the division. Approx. 12 cm remain before finished measurements, you can try jacket on and work to desired length. Knit 1 round and increase 18-18-20-20-20-20 stitches evenly spaced = 74-76-80-84-86-88 stitches. Change to double pointed needles size 3 mm and work rib (knit 1 twisted, purl 1) for 12 cm. Cast off with knit over knit and purl over purl. Work the other sleeve in the same way.

ASSEMBLY:
Sew the buttons onto the left band, positioned so they can be buttoned through the row of holes on the right band.

Diagram

symbols = knit from right side, purl from wrong side
symbols = purl from right side, knit from wrong side
symbols = between 2 stitches make 1 yarn over which is knitted on the next row to leave a hole
symbols = knit 2 together
symbols = slip 1 stitch as if to knit, knit 1 and pass the slipped stitch over the knitted stitch
symbols = slip 2 stitches as if to knit together, knit 1 and pass the slipped stitches over the knitted stitch
diagram
diagram

Each of our patterns has specific tutorial videos to help you.

Do you have a question? See a list of frequently asked questions (FAQ)

Knitting tension is what determines the final measurements of your work, and is usually measured per 10 x 10 cm. It is provided like so: number of stitches in width x number of rows in height - eg: 19 stitches x 26 rows = 10 x 10 cm.

The knitting tension is very individual; some people knit/crochet loosely while others work tightly. You adjust the knitting tension with the needle size, which is why the suggested needle size is only meant as a guide! You need to adjust this (up or down) to ensure that YOUR knitting tension matches the knitting tension provided in the pattern. If you work with a different knitting tension than provided you will have a different yarn consumption, and your work will have different measurements than what the pattern suggests.

The knitting tension also determines which yarns can replace each other. As long as you achieve the same knitting tension you can replace one yarn with another.

See DROPS lesson: How to measure your tension/gauge

See DROPS video: How to make a gauge tension swatch

The required amount of yarn is provided in grams, eg: 450 g. To calculate how many balls you’ll need you first need to know how many grams are in 1 ball (25g, 50g or 100g). This information is available if you click on the individual yarn quality on our pages. Divide the amount required with the amount of each ball. For example, if each ball is 50g (the most common amount), the calculation will be as follows: 450 / 50 = 9 balls.

The important thing when changing from one yarn to another is that the knitting/crochet tension remains the same. This is so that the measurements of the finished piece will be the same as on the sketch provided. It is easier to achieve the same knitting tension using yarns from the same yarn group. It is also possible to work with multiple strands of a thinner yarn to achieve the knitting tension of a thicker one. Please try our yarn converter. We recommend you to always work a test swatch.

Please NOTE: when changing yarn the garment might have a different look and feel to the garment in the photo, due to individual properties and qualities of each yarn.

See DROPS lesson: Can I use a different yarn than the one mentioned in the pattern?

All our yarns are categorised into yarn groups (from A to F) according to thickness and knitting tension – group A contains the thinnest yarns and group F the thickest. This makes it easier for you to find alternative yarns to our patterns, should you wish to switch yarn. All yarns within the same group have a similar knitting tension and can easily replace each other. However, different yarn qualities have different structures and properties which will give the finished work a unique look and feel.

Click here for an overview of the yarns in each yarn group

At the top of all our patterns you’ll find a link to our yarn calculator, which is a helpful tool should you wish to use a different yarn than suggested. By filling in the yarn quality you wish to replace, the amount (in your size) and number of strands, the calculator will present good alternative yarns with the same knitting tension. Additionally it will tell you how much you’ll require in the new qualities and whether you’ll need to work with multiple strands. Most skeins are 50g (some are 25g or 100g).

If the pattern is worked with multiple colours, every colour will have to be calculated separately. Similarly, if the pattern is worked with several strands of different yarns (for example 1 strand Alpaca and 1 strand Kid-Silk) you will have to find alternatives for each, individually.

Click here to see our yarn calculator

Since different yarns have different qualities and textures we have chosen to keep the original yarn in our patterns. However, you can easily find options among our available qualities by using our yarn calculator, or simply pick a yarn from the same yarn group.

It is possible that some retailers still have discontinued yarns in stock, or that someone has a few skeins at home that they would like to find patterns for.

The yarn calculator will provide both alternative yarn as well as required amount in the new quality.

If you think it's hard to decide what size to make, it can be a good idea to measure a garment you own already and like the size of. Then you can pick the size by comparing those measures with the ones available in the pattern's size chart.

You'll find the size chart at the bottom of the pattern.

See DROPS lesson: How to read size chart

The needle size provided in the pattern serves only as a guide, the important thing is to follow the knitting tension. And since knitting tension is very individual, you will have to adjust the needle size to ensure that YOUR tension is the same as in the pattern – maybe you’ll have to adjust 1, or even 2 needle sizes, up or down to achieve the correct tension. For this, we recommend that you work test swatches.

Should you work with a different knitting tension than the one provided, the measurements of the finished garment might deviate from the measurement sketch.

See DROPS lesson: How to measure your tension/gauge

See DROPS video: How to make a tension/gauge swatch

Working a garment top-down provides more flexibility and room for personal adjustment. For example it is easier to try the garment on while working, as well as making adjustments to length of yoke and shoulder caps.

The instructions are carefully explaining every step, in the correct order. Diagrams are adjusted to the knitting direction and are worked as usual.

The diagram depicts all rows/rounds, and every stitch seen from the right side. It is read from bottom to top, from right to left. 1 square = 1 stitch.

When working back and forth, every other row is worked from the right side and every other row is worked from the wrong side. When working from the wrong side, the diagram will have to be worked reversed: from left to right, knit stitches are purled, purl stitches are knit etc.

When working in the round every round is worked from the right side and the diagram are worked from right to left on all rounds.

See DROPS lesson: How to read knitting diagrams

The diagram depicts all rows/rounds, and every stitch seen from the right side. It is worked from bottom to top, from right to left.

When working back and forth every other row is worked from the right side: from right to left and every other row is worked from the wrong side: from left to right.

When working in the round, every row in the diagram are worked from the right side, from right to left.

When working a circular diagram you start in the middle and work your way outwards, counter clockwise, row by row.

The rows usually start with a given number of chain stitches (equivalent to the height of the following stitch), this will either be depicted in the diagram or explained in the pattern.

See DROPS lesson: How to read crochet diagrams

Instructions for working several diagrams after each other on the same row/round, will often be written like so: “work A.1, A.2, A.3 a total of 0-0-2-3-4 times". This means you work A.1 once, then A.2 is worked once, and A.3 is repeated (in width) the number of times provided for your size – in this case like so: S = 0 times, M = 0 times, L=2 times, XL= 3 times and XXL = 4 times.

The diagrams are worked as usual: begin with the first row in A.1, then work the first row in A.2 etc.

See DROPS lesson: How to read knitting diagrams

See DROPS lesson: How to read crochet diagrams

The total width of the garment (from wrist-to-wrist) will be larger in the larger sizes, despite the actual sleeves being shorter. The larger sizes have longer sleeve caps and wider shoulders, so there will be a good fit in all sizes.

The measurement sketch/schematic drawing provides information regarding the full length of the garment. If it’s a jumper or a jacket the length is measured from the highest point on the shoulder closest to the neckline, and straight down to the bottom of the garment. It is NOT measured from the tip of shoulder. Similarly, the length of yoke is measured from the highest point on the shoulder and down to where yoke is split into body and sleeves.

On a jacket measures are never taken along bands, unless specifically stated. Always measure inside band stitches when measuring the length.

See DROPS lesson: How to read a schematic drawing

Diagrams are often repeated on the round or in height. 1 repeat is the diagram the way it appears in the pattern. If it says to work 5 repeats of A.1 in the round, then you work A.1 a total of 5 times after/next to each other in the round. If it says to work 2 repeats of A.1 vertically/in height you work the entire diagram once, then begin again at the start and work the entire diagram one more time.

Chain stitches are slightly narrower than other stitches and to avoid working the cast-on edge too tight, we simply chain more stitches to begin with. The stitch count will be adjusted on the following row to fit the pattern and measurement sketch.

The rib edge is more elastic and will contract slightly compared to, for example, stocking stitch. By increasing before the rib edge, you avoid a visible difference in width between the rib edge and the rest of the body.

It’s very easy to cast off too tightly, and by making yarn overs while casting off (and simultaneously casting these off) you avoid a too tight cast off edge.

See DROPS video: How to bind off with yarn overs (yo)

To achieve an even increase (or decrease) you can increase on, for example: every 3rd and 4th row alternately, like so: work 2 rows and increase on the 3rd row, work 3 rows and increase on the 4th. Repeat this until the increase is complete.

See DROPS lesson: Increase or decrease 1 st on every 3rd and 4th row alternately

Should you prefer to work in the round instead of back and forth, you may of course adjust the pattern. You’ll need to add steeks mid-front (usually 5 stitches), and follow the instructions. When you would normally turn and work from the wrong side, simply work across the steek and continue in the round. At the end you’ll cut the piece open, pick up stitches to work bands, and cover the cut edges.

See DROPS video: How to knit steeks and cut open

Should you prefer to work back and forth instead of in the round, you may of course adjust the pattern so you work the pieces separately and then assemble them at the end. Divide the stitches for the body in 2, add 1 edge stitch in each side (for sewing) and work the front and back pieces separately.

See DROPS lesson: Can I adapt a pattern for circular needles into straight needles?

Pattern repeats can vary slightly in the different sizes, in order to get the correct proportions. If you’re not working the exact same size as the garment in the photo, yours might deviate slightly. This has been carefully developed and adjusted so that the complete impression of the garment is the same in all sizes.

Make sure to follow instructions and diagrams for your size!

If you have found a pattern you like which is available in women’s size it’s not very difficult to convert it to men’s size. The biggest difference will be the length of sleeves and body. Start working on the women size that you think would fit across the chest. The additional length will be worked right before you cast off for the armhole/sleeve cap. If the pattern is worked top-down you can add the length right after the armhole or before the first decrease on sleeve.

Regarding additional yarn amount, this will depend on how much length you add, but it is better with a skein too many than too few.

All yarns will have excess fibres (from production) that might come off as lint or shedding. Brushed yarns (ie hairier yarns) have more of these loose, excess fibres, causing more shedding.

Shedding also depends on what is worn under or over the garment, and whether this pulls at the yarn fibres. It’s therefore not possible to guarantee that there will be no shedding

Below are some tips on how to get the best result when working with hairier yarns:

1. When the garment is finished (before you wash it) shake it vigorously so the looser hairs come off. NOTE: do NOT use a lint roller, brush or any method that pulls at the yarn.

2. Place the garment in a plastic bag and put it in your freezer - the temperature will cause the fibres to become less attached to each other, and excess fibres will come off easier.

3. Leave in the freezer for a few hours before taking it out and shaking it again.

4. Wash the garment according to the instructions on the yarn label.

Pilling is a natural process that happens to even the most exclusive of fibers. It's a natural sign of wear and tear that is hard to avoid, and that is most visible in high friction areas of your garment like a sweater's arms and cuffs.

You can make your garment look as new by removing the pilling, using a fabric comb or a pill/lint remover.

Still can't find the answer you need? Then scroll down and leave your question so one of our experts can try to help you. This will be done normally within 5 to 10 working days.
In the meantime, you can read the questions and answers that others have left to this pattern or join the DROPS Workshop on Facebook to get help from fellow knitters/crocheters!

You might also like...

Post a comment to pattern DROPS 240-21

We would love to hear what you have to say about this pattern!

If you want to leave a question, please make sure you select the correct category in the form below, to speed up the answering process. Required fields are marked *.

Comments / Questions (12)

country flag Susana Araujo wrote:

Hi there, do you have any video to learn how to sew buttons? Thank you very much for this amazing pattern. My final product is gorgeous!

09.10.2023 - 22:24

DROPS Design answered:

Dear Susana, unfortunately we have no videos on how to sew buttons. Depending on the button type they are sewn differently. With a sewing thread, if you use the same buttons as here, pass the thread through both holes in the button and weave in the tail by twisting the thread several times right under the button, so that the button is slightly separated from the garment and the edge won't wear that easily as time goes by. Happy knitting!

15.10.2023 - 23:38

country flag Susana Araujo wrote:

Hi there. Thanks a lot for your free patterns. On the last part for the yoke it says: "cast on X stitches under the sleeve" but I am confused... If I had just place the stitches for the sleeve on a thread then I won't have a sleeve as yet done at all. Is this just to cast on X number as I would normally cast on any normal stitch but maybe put a mark or remember that that will be the under arm? Thanks for the help!

26.08.2023 - 22:38

DROPS Design answered:

Dear Susana, these new cast on stitches are for the armholes in the body and replace the sleeves' position when working the body. You cast on these stitches on the body as normal. When you start the body, you will insert a thread in the middle of these stitches, so you will know that these stitches correspond to the armholes and that you will join the sleeve to the body here. Happy knitting!

28.08.2023 - 00:50

country flag Susana Araujo wrote:

On the "yoke" part when it says to continue the rib until piece measures 4cm is this to keep doing the A1 pattern on the band while we knit 1 and purl 2 on the rib? Or shall i just knit 7 on those 7 stitches from the band at all times?

12.08.2023 - 08:55

DROPS Design answered:

Dear Mrs Arauajo, repeat the first 2 rows from RS starting with A.1 and ending with A.2 and from WS starting with A.2 and ending with A.1, ie work diagrams on each side and rib in between. Happy knitting!

14.08.2023 - 09:08

country flag Susana wrote:

When doing A1 and A2 pattern for the band, the part where we are meant to knit 2 together and yarn over happens to be on my wrong side. Do I still do this even on the wrong side or do I have to purl instead? The subtitles don't mention to do something different depending on the side but I just want to check before I do something wrong.

08.08.2023 - 23:06

DROPS Design answered:

Dear Susanna, that's correct like this, this row will be worked from wrong side, this means you will work diagrams from WS reading from the left towards the right, ex. A.2. from WS - K1, (YO, K2 tog)x3 and A.1: (K2 tog, YO)x3, K1. Happy knitting!

09.08.2023 - 08:20

country flag Susana wrote:

Hi there, in the beginning of the yoke it says" increase every 2nd purl-1 to purl-2 - read increase tip= 155-160, etc. What is this purl-1 to purl-2??

08.08.2023 - 21:56

DROPS Design answered:

Hi Susana, Half-way through the rib at the top of the yoke, you change the ribbing to knit 1, purl 2 by increasing 1 stitch in each purled stitch. The easiest method is to purl 2 in each purled stitch, or you can make 1 yarn over which is then purled twisted on the next round to avoid a hole. Hope this helps and happy knitting!

09.08.2023 - 07:20

country flag Susana Araujo wrote:

Hi there, for the knitting tension do I need to wet my swatch or shall I measure with a dry swatch? Thank you very much for your help 😊

08.08.2023 - 09:07

DROPS Design answered:

Dear Mrs Araujo, you don't need to, except if you think it might be a good idea depending on your tension. Happy knitting!

08.08.2023 - 16:13

country flag Ina wrote:

Drops 240-21 , uważam, że schemat A3 nie zgadza się z pokazanym na zdjeciu sweterkiem. Na zdjeciu zaczyna sie schemat A3 od miejsca zaznaczonego strzałką. Robiąc według pokazanego schematu powstaje zupełnie inny wzòr.Bardzo proszę o odpowiedź. Proszę o

24.03.2023 - 19:17

DROPS Design answered:

Witaj Ino, proszę o wybieranie kraju zgodnie z używanym językiem, wtedy od razu widzę pytania i mogę szybko odpowiedzieć :) Co do schematu A.3- jest od przerabiany jak zwykle od prawego dolnego rogu do góry (nie od strzałki). W rzędach oznaczonych strzałkami (części schematu przerabiane na prawo, bez ażuru) są dodawane oczka na formowanie okrągłego karczku. Pozdrawiamy!

12.04.2023 - 08:28

country flag Carol McMillan wrote:

The decrease in the SLEEVE only gives the distance between decreases for 5 of the six sizes (see below). Decrease like this every 3½-2½-1½-1½-1 cm = 1 1/4"-1"-1/2"-1/2"-3/8" a total of 6-8-11-10-13-14 times = 56-58-60-64-66-68 stitches. What should it actually be?

21.03.2023 - 17:55

DROPS Design answered:

Dear Mrs McMillan, the US pattern will be edited asap, it should be 3½-2½-1½-1½-1-1 cm. Happy knitting!

22.03.2023 - 08:39

country flag Joanna wrote:

Sweet valley

19.01.2023 - 14:14

country flag Julie wrote:

Rosy hues

19.01.2023 - 01:17