
Categorie popolari
State cercando un filato?


Commenti / Domande (28)
![]() Mary ha scritto:
Mary ha scritto:
I am sorry, I have tried many times to work this without success. Can you please just tell me what I should do between the 1st and the 2nd marker in the second raglan? Maybe in this way, I can understand the logic. But if you do not specify the bit between these 2 markers, I am lost. Many thanks in advance!
11.02.2023 - 10:45DROPS Design ha risposto:
Dear Mary, Work as follows: marker 1, k1 (=raglan line), 1YO, k7 (= sleeve), 1 YO, k1, 2nd marker, k1 (=raglan line), 1 YO, A.1, A.2, A.3 (for the front), 1 YO, k1, 3rd marker, k1 (= raglan line), e.t.c. Happy knitting!
13.02.2023 - 00:02
![]() Mary ha scritto:
Mary ha scritto:
Can you please specify which are the stitches included within the first 2 stitch markers? My understanding was that "knit 1, 1 yarn over, knit 7, 1 yarn over, knit 1, insert 1 marker here (transition between right sleeve and front piece), knit 1, 1 yarn over" is within the first 2 stitch markers but if I do what you told me above for the second raglan, I go over the second stitch marker and I think it's wrong, I think I should stay within the 2 stitch markers.
07.02.2023 - 13:28DROPS Design ha risposto:
Dear Mary, the round starts between the first 2 raglan stitches, reason why you start with K1 (and end with K1) - then you are right, the next marker is between the 2 knitted stitches at the end of sleeve before front piece. You should have K2 on each raglan lines (K1, marker, K1) and you will increase on either side of these K2. Happy knitting!
07.02.2023 - 16:58
![]() Mary ha scritto:
Mary ha scritto:
Sorry, I am still not clear. In the first Raglan, I have this bit "knit 1, 1 yarn over, knit 7, 1 yarn over, knit 1, insert 1 marker here". Now, for the second raglan, which is the bit that correspond to this one?
07.02.2023 - 12:15DROPS Design ha risposto:
Dear Mary, on the 2nd raglan increase, work; K1 (raglan stitch), YO (new raglan increase for sleeve), K9 (the K7 from 1st round + the 2 raglan increases), YO (new raglan increase for sleeve), K2 (raglan stitches), YO (new raglan increase for body), diagrams etc.. On 3rd raglan increase you will start with K1, YO, K11 (the K9 + the 2 sts increased the 2nd time), YO, K2, etc..Can this help?
07.02.2023 - 13:20
![]() Mary ha scritto:
Mary ha scritto:
Hi, always following to the last answer I got. So "this means for the 2nd increase, you will work: K1 (raglan st), YO (new increase for raglan), K9 (= K7 + 2 previous inc), YO..." does this mean that the difference between the first raglan and any additional one is that I have to add 2 more K per each increase?
07.02.2023 - 10:59DROPS Design ha risposto:
Dear Mary, yes, you need to knit the increases in the next round. So you will have 2 more knitted stitches per increases in each round. Happy knitting!
07.02.2023 - 11:45
![]() Mary ha scritto:
Mary ha scritto:
Hi, once I have finished the first raglan, the instructions say: "Continue this pattern and increase to raglan every 2nd round.." but does this mean I have to shift to the diagram? I think this passage is not clear at all. If I redo this: "knit 1, 1 yarn over, knit 7, 1 yarn over, knit 1, insert 1 marker here (transition between right sleeve and front piece), knit 1, 1 yarn over, A.1 over the next 5-5-5-6-6-6 stitches, A.." it doe snot work as I have more stitches now. What am I missing?
07.02.2023 - 00:34DROPS Design ha risposto:
Dear Mary, the increases for the raglan are worked as explained under RAGLAN at the beginning of the written pattern, this means for the 2nd increase, you will work: K1 (raglan st), YO (new increase for raglan), K9 (= K7 + 2 previous inc), YO (new inc for raglan), K2 (raglan sts), YO (inc for raglan), work row 3 diagrams A.1, A.2,A.3 as before, etc..; Happy knitting!
07.02.2023 - 10:25
![]() Lotekky ha scritto:
Lotekky ha scritto:
How am I supposed to work two yarn overs right next to each other? Is it supposed to make two holes side by side? If not, won’t the stitch count be off?
05.09.2022 - 20:44DROPS Design ha risposto:
Dear Lotekky, there will always be at least 1 knit stitch between 2 yarn overs. Happy knitting!
06.09.2022 - 09:37
![]() Alyssa ha scritto:
Alyssa ha scritto:
I’m knitting size M. I don’t understand the part that says that (on the yoke) once 16 increases have finished the piece will measure 23 cm. Continue without further increases until the piece measures 23 cm. Am I misunderstanding something?
13.06.2022 - 05:50DROPS Design ha risposto:
Dear Alyssa, when you have done all raglan increases, continue working the lace pattern as before but do not increase anymore - just make sure you will have enough room to work every decrease compensated by a yarn over in the lace pattern to keep correct number of stitches; if there are not enough stitches for the lace pattern, knit these stitches . Happy knitting!
13.06.2022 - 11:35
![]() Sara ha scritto:
Sara ha scritto:
Buonasera, vorrei sapere se possibile a quanti millimetri corrisponde lo spessore del filo del filato snow qui usato. Grazie.
31.08.2021 - 17:00DROPS Design ha risposto:
Buonasera Sara, per un'assistenza così personalizzata può rivolgersi al suo rivenditore DROPS di fiducia. Buon lavoro!
02.09.2021 - 19:04
![]() Berit Terjesen ha scritto:
Berit Terjesen ha scritto:
Hei og takk for hjelpen hittil. Fremdeles lurer jeg på om disse 13 maskene under armene skal strikkes rett helt ned til vrangbord? slik at det dannes en "stripe "under hver arm og som deler front og bakside?
18.05.2021 - 15:36DROPS Design ha risposto:
Hei Berit. Ja, det stemmer. Blir en bred "stripe" med glattstrikk under ermene. mvh DROPS design
19.05.2021 - 10:17
![]() Margaret ha scritto:
Margaret ha scritto:
Hi, this pattern looks lovely. Is it possible to knit this on two needles? Thank you.
12.05.2021 - 17:00DROPS Design ha risposto:
Dear Margaret, please see THIS lesson about adapting our patterns for straight needles. Happy Knitting!
12.05.2021 - 17:09
|
|||||||||||||||||||
Diamonds in the Sky#diamondsintheskysweater |
|||||||||||||||||||
 |
 |
||||||||||||||||||
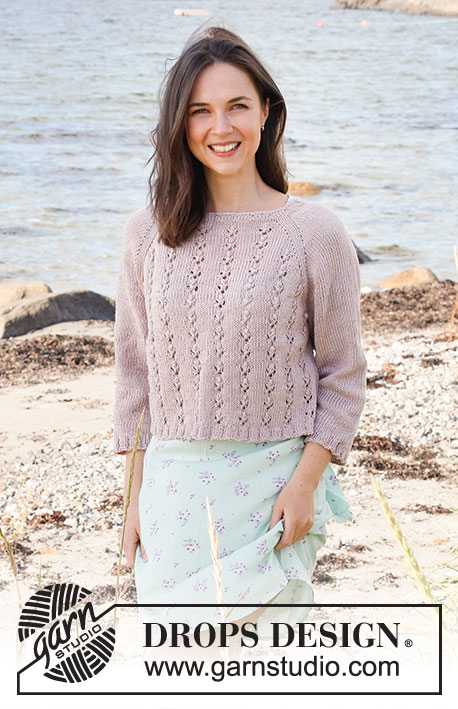
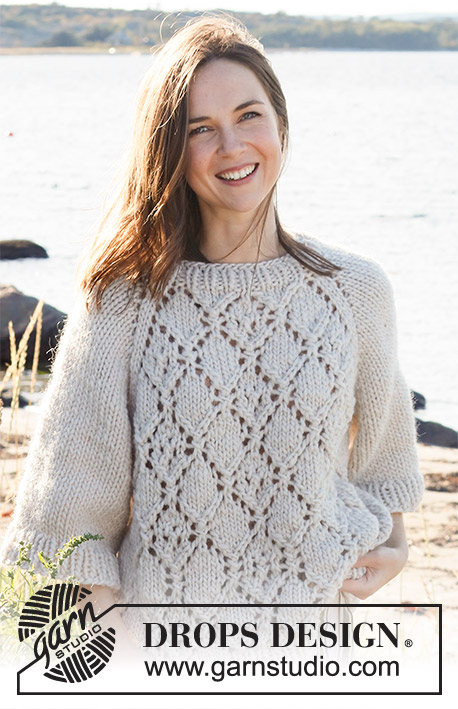
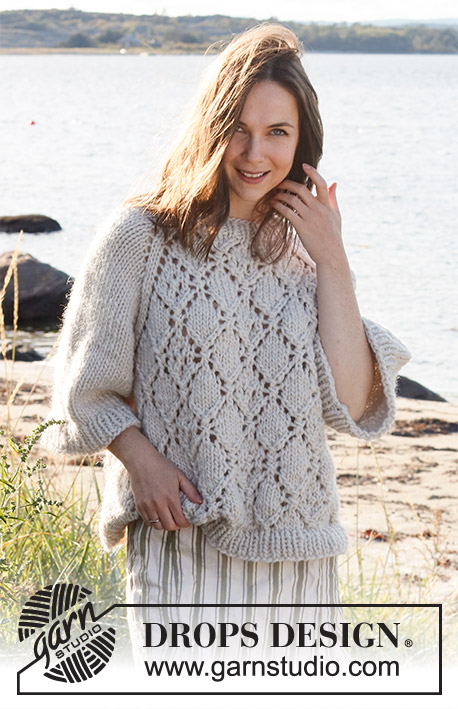
Maglione lavorato ai ferri in DROPS Snow o DROPS Wish. Lavorato dall’alto in basso con raglan, motivo traforato e maniche ampie a ¾. Taglie: S - XXXL.
DROPS 221-29 |
|||||||||||||||||||
|
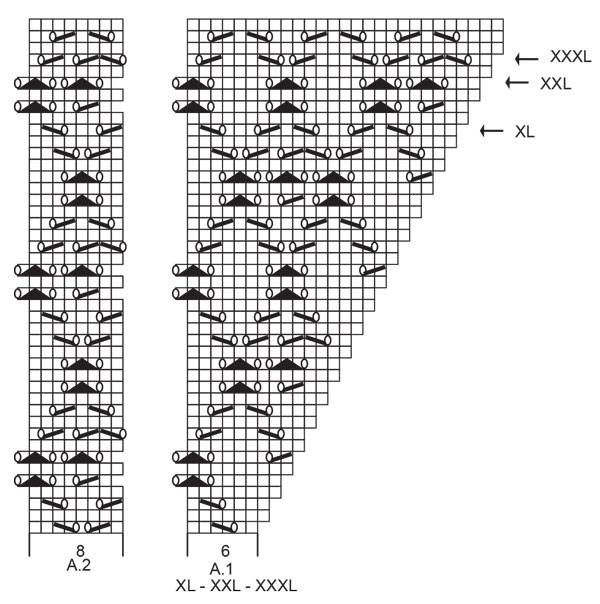
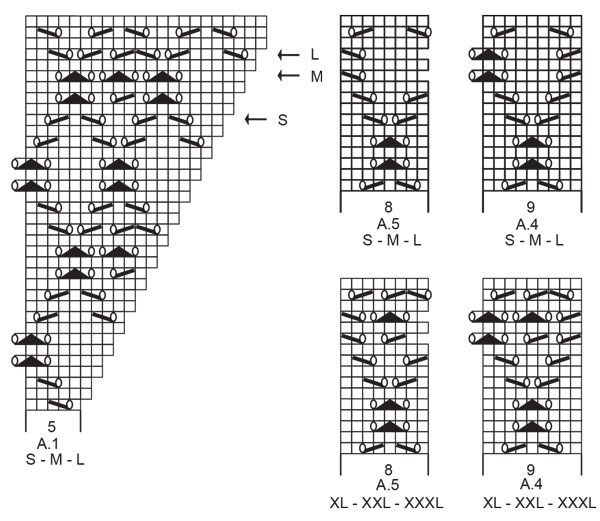
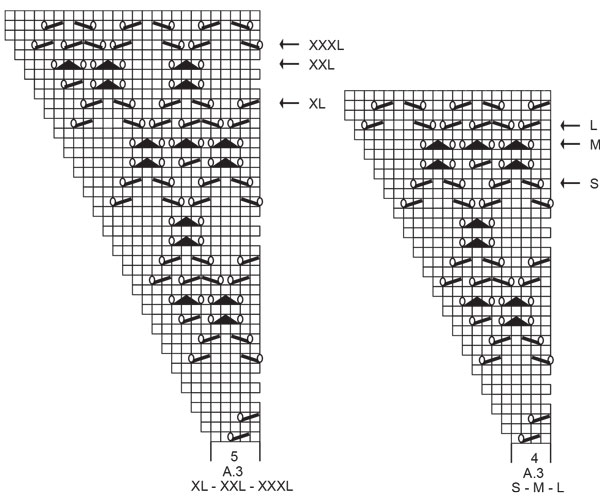
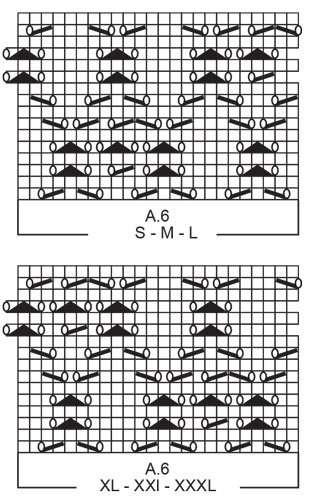
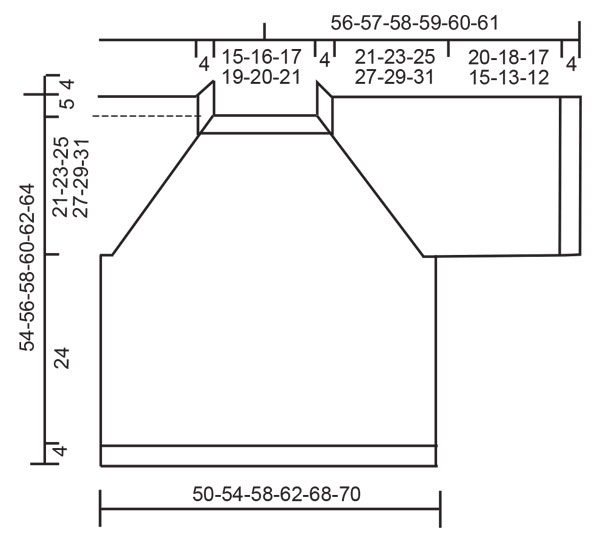
------------------------------------------------------- TECNICHE IMPIEGATE: ------------------------------------------------------- MOTIVO: Vedere i diagrammi A.1 - A.6. Scegliere i diagrammi per la vostra taglia. SUGGERIMENTO PER GLI AUMENTI-1 (distribuiti in modo uniforme): Per stabilire ogni quanto aumentare in modo uniforme, prendere il n° totale di maglie sul ferro (ad esempio 46 maglie) e dividerlo per il n° di aumenti da fare (ad esempio 10) = 4,6. In questo esempio, aumentare facendo 1 gettato in modo alternato dopo ogni 4° e 5° maglia. Sul giro successivo lavorare i gettati a ritorto per evitare buchi RAGLAN: Aumentare per il raglan facendo 1 gettato a ogni lato di 2 maglie (il segnapunti è al centro di queste 2 maglie) nei punti di passaggio tra il corpo e le maniche, come segue (per un totale di 8 aumenti). Aumentare 1 maglia facendo 1 gettato. Sul giro successivo lavorare i gettati a diritto per creare buchi. Poi lavorare le nuove maglie con il motivo sul davanti e dietro e a maglia rasata sulle maniche. SUGGERIMENTO PER LA CHIUSURA: Per evitare che il bordo di chiusura sia tirato potete intrecciare con un ferro di una misura più grande. Se il bordo risulta ancora tirato, fare 1 gettato dopo circa 4 maglie durante la chiusura e intrecciare i gettati come maglie normali. ------------------------------------------------------- INIZIO DEL LAVORO: ------------------------------------------------------- MAGLIONE – BREVE RAISSUNTO DEL LAVORO: Lavorare il collo e lo sprone in tondo con i ferri circolari, dall’alto in basso. Dividere lo sprone e poi continuare il corpo e le maniche in tondo in modo separato con i ferri circolari, dall’alto in basso. COLLO: Avviare 46-48-50-54-56-58 maglie con i ferri circolari n° 8 mm e Snow o Wish. Lavorare 1 giro diritto. Poi lavorare a coste (1 maglia diritto, 1 maglia rovescio) in tondo per 4 cm. Lavorare 1 giro diritto in cui aumentare 10-8-6-6-4-2 maglie in modo uniforme – leggere il SUGGERIMENTO PER GLI AUMENTI = 56-56-56-60-60-60 maglie. Lavorare 1 giro diritto. Passare ai ferri circolari n° 9 mm. Inserire 1 segnapunti dopo 20-20-20-21-21-21 maglie (= circa centro davanti), misurare lo sprone da questo segnapunti! SPRONE: Ora lavorare il motivo e inserire 4 segnapunti come segue: Inserire 1 segnapunti all’inizio del giro (= passaggio tra il dietro e la manica destra), 1 maglia diritto, 1 gettato, 7 maglie diritto, 1 gettato, 1 maglia diritto, inserire qui 1 segnapunti (passaggio tra la manica destra e il davanti), 1 maglia diritto, 1 gettato, A.1 sulle 5-5-5-6-6-6 maglie successive, A.2 sulle 8 maglie successive, A.3 sulle 4-4-4-5-5-5 maglie successive, 1 gettato, maglia diritto, inserire qui 1 segnapunti (passaggio tra il davanti e la manica sinistra), maglia diritto, 1 gettato, 7 maglie diritto, 1 gettato, 1 maglia diritto, inserire qui 1 segnapunti (passaggio tra la manica sinistra e il dietro), maglia diritto, 1 gettato, A.1 sulle 5-5-5-6-6-6 maglie successive, A.2 sulle 8 maglie successive, A.3 sulle 4-4-4-5-5-5 maglie successive, 1 gettato, maglia diritto. FARE ATTENZIONE ALLA TENSIONE DEL LAVORO! Il 1° aumento per il RAGLAN – leggere la descrizione sopra, adesso è finito. Continuare questo motivo e aumentare per il raglan ogni 2 giri per un totale di 14-16-17-18-20-21 volte = 168-184-192-204-220-228 maglie. Dopo l’ultimo aumento, il lavoro misura circa 20-23-24-26-29-30 cm dal segnapunti sul collo. Continuare a lavorare senza ulteriori aumenti fino a quando il lavoro misura 21-23-25-27-29-31 cm dal segnapunti, (lavorare le maglie del motivo quante ce ne stanno verso il raglan, facendo in modo che i gettati e le diminuzioni si equivalgano in modo che il n° di maglie rimanga lo stesso – lavorare le altre maglie a maglia rasata). Sul giro successivo (un giro a diritto) – aggiustare il lavoro in modo che il giro ora inizi 1 maglia prima, lavorare come segue: Mettere in sospeso le prime 39-43-45-47-51-53 maglie per la manica, avviare 5-5-7-7-9-9 nuove maglie sul ferro (= a lato sotto la manica), lavorare le 45-49-51-55-59-61 maglie successive come prima (= davanti), mettere le 39-43-45-47-51-53 maglie successive in sospeso per la manica, avviare 5-5-7-7-9-9 nuove maglie sul ferro (= a lato sotto la manica), lavorare le ultime 45-49-51-55-59-61 maglie come prima (= dietro). Finire il corpo e le maniche in modo separato. ORA MISURARE IL LAVORO DA QUI. CORPO: = 100-108-116-124-136-140 maglie. Lavorare fino alla maglia centrale avviata sotto la manica. Ora il giro inizia qui. Continuare il motivo dallo sprone sul corpo – facendo in modo di continuare con il ferro coretto del diagramma dopo lo sprone. Lavorare il motivo e a maglia rasata ai lati come segue: * 1-3-5-3-6-7 maglie diritto, A.4 sulle 9 maglie successive (scegliere il diagramma per la vostra taglia), lavorare A.6 sulle 24 maglie successive (scegliere il diagramma per la vostra taglia), lavorare le prime 8-8-8-16-16-16 maglie di A.6, lavorare A.5 sulle 8 maglie successive (scegliere il diagramma per la vostra taglia) 0-2-4-2-5-6 maglie diritto *, lavorare *-* un’altra volta sul giro. Quando il lavoro misura 24 cm, lavorare 1 giro diritto in cui aumentare 10-10-12-12-14-14 maglie in modo uniforme = 110-118-128-136-150-154 maglie. Passare ai ferri circolari n° 8 mm e lavorare a coste (1 maglia diritto, 1 maglia rovescio 1) per 4 cm. Intrecciare con diritto su diritto e rovescio su rovescio. Il maglione misura circa 54-56-58-60-52-64 cm dalla spalla in giù. MANICHE: Riportare le 39-43-45-47-51-53 maglie in sospeso a un lato del lavoro sui ferri circolari corti n° 9 mm e riprendere 1 maglia in ognuna delle 5-5-7-7-9-9 maglie avviate sotto la manica = 44-48-52-54-60-62 maglie. Lavorare a maglia rasata in tondo. Quando la manica misura 20-18-17-15-13-12 cm, aumentare 4-4-4-4-6-6 maglie in modo uniforme = 48-52-56-58-70-68 maglie. Passare ai ferri circolari n° 8 mm. Lavorare a coste (1 maglia diritto, 1 maglia rovescio 1) per 4 cm. Intrecciare con diritto su diritto e rovescio su rovescio. La manica misura circa 24-22-21-19-17-16 cm dalla divisione. Lavorare l’altra manica nello stesso modo. |
|||||||||||||||||||
Spiegazioni del diagramma |
|||||||||||||||||||
|
|||||||||||||||||||
 |
|||||||||||||||||||
 |
|||||||||||||||||||
 |
|||||||||||||||||||
 |
|||||||||||||||||||
 |
|||||||||||||||||||
Avete terminato questo modello?Allora taggate le vostre foto con #dropspattern #diamondsintheskysweater o inviatele alla #dropsfan gallery. Avete bisogno di aiuto con questo modello?Troverete 25 video tutorial, una sezione per i commenti/domande e molto altro guardando il modello su www.garnstudio.com © 1982-2026 DROPS Design A/S. Ci riserviamo tutti i diritti. Questo documento, compreso tutte le sue sotto-sezioni, è protetto dalle leggi sul copyright. Potete leggere quello che potete fare con i nostri modelli alla fine di ogni modello sul nostro sito. |
|||||||||||||||||||


Con oltre 40 anni di esperienza nel design di modelli di maglia e uncinetto, DROPS Design offre la più estesa collezione di modelli gratuiti su internet - tradotti in 17 lingue. Ad oggi vi possiamo fornire 324 cataloghi e 12290 modelli - 9561 dei quali sono tradotti in Italiano.
Ci stiamo impegnando molto per darvi il meglio che vi possiamo offrire in termini di maglia e uncinetto, ispirazioni e consigli così come filati di grande qualità ad un prezzo incredibile! Volete utilizzare i nostri modelli per qualcosa d'altro oltre al vostro uso personale? Potete leggere tutto ciò che è consentito nel testo sul Copyright in basso su tutte le pagine dei nostri modelli. Buon lavoro!
Lasciare un commento sul modello DROPS 221-29
Noi saremmo felici di ricevere i tuoi commenti e opinioni su questo modello!
Se vuoi fare una domanda, fai per favore attenzione a selezionare la categoria corretta nella casella qui sotto per velocizzare il processo di risposta. I campi richiesti sono indicati da *.