
Categorie popolari
State cercando un filato?


Commenti / Domande (28)
![]() R N ha scritto:
R N ha scritto:
Hei! Teen XL kokoa. Ohjeissa on virhe kun kainaloista lähdetään jatkamaan alaspäin. Kuviot eivät täsmää. Voitteko auttaa?
05.07.2024 - 10:56DROPS Design ha risposto:
Hei, etu-/takakappaleessa neulotaan mallineuletta piirroksen A.4 mukaisesti ja mallineule jatkuu siitä, mihin se kaarrokkeessa jäi. Mikäli neuletiheys täsmää, kaarroke on valmis, kun olet neulonut ylös piirrokseen kokosi nuolella merkittyyn kerrokseen.
05.07.2024 - 17:08
![]() Mary ha scritto:
Mary ha scritto:
But that’s precisely the problem! If I start the third line A4 from the underarm (the first stitch of the new round is basically the third stitch from the underarm) I get the mismatch because the triangle will be stitched earlier: I can’t understand where I am going wrong
09.04.2023 - 14:12DROPS Design ha risposto:
Dear Mary, you need to adjust the stitches before starting the triangle. In this case, you need to simply knit stitches (not just the amount indicated in the pattern) so that the triangle won't be mismatched. The pattern under the arm may get slightly mismatched initially but that isn't important, since it will later on match correctly. Happy knitting!
10.04.2023 - 13:34
![]() Mary ha scritto:
Mary ha scritto:
Yes, I can see that the pattern is the same. But if I follow the instructions from A4 third line, I should start the "triangle" after 3 stitches of the body, while according to the stitches I have after the line with the arrow, A1, I should start the triangle after 5 stitches but this means that it will be "anticipated" hence the mismatch. Does it mean that I have not divided the garment accordingly? Many thanks and Happy Easter!
09.04.2023 - 11:09DROPS Design ha risposto:
Dear Mary, take into account that you should have adjusted the start of the round in the body; you adjust so that the beginning of the round is in the middle stitch cast on under the sleeve. This should help adjust the pattern so that the triangle in A.4 won't get mismatched with the pattern in the yoke in A.1. Happy knitting!
09.04.2023 - 13:30
![]() Mary ha scritto:
Mary ha scritto:
Thanks! But I am still confused: the instructions say that the yoke is finished when I have 168 stitches (S size). If I had not knit the last row (the one with the arrow), I would not have got 168 stitches. In any case, once I have knit the row with the arrow, if I then start A4 from the third line I still get a mismatch in the pattern and I do not know where I get it wrong. Well, I know that I do something wrong while shifting from the yoke to the body but I can't figure out what.
07.04.2023 - 10:25DROPS Design ha risposto:
Dear Mary, after having worked the row with the arrow, you should have knitted round, where you separated the stitches for each part of the garment. Then, you should start the body with the third row of A.4. There shouldn't be a mismatch there. You can check that the third row of A.4 is exactly like the third row in A.1 after the row with the arrow, so they should be matching. Hope this helps!
08.04.2023 - 20:58
![]() Mary ha scritto:
Mary ha scritto:
Thanks! But I am still confused: the instructions say that the yoke is finished when I have 168 stitches (S size). If I had not knit the last row (the one with the arrow), I would not have got 168 stitches. In any case, once I have knit the row with the arrow, if I then start A4 from the third line I still get a mismatch in the pattern and I do not know where I get it wrong. Well, I know that I do something wrong while shifting from the yoke to the body but I can't figure out what.
07.04.2023 - 10:20DROPS Design ha risposto:
Dear Mary, after having worked the row with the arrow, you should have knitted round, where you separated the stitches for each part of the garment. Then, you should start the body with the third row of A.4. There shouldn't be a mismatch there. You can check that the third row of A.4 is exactly like the third row in A.1 after the row with the arrow, so they should be matching. Hope this helps!
08.04.2023 - 20:59
![]() Mary ha scritto:
Mary ha scritto:
Sorry, I am still unclear: I have finished the yoke knitting the A1-A3-A5 line with the arrow. Then I divided the work and I went for a knitted round. Now which line should I knit first and from which diagram?
05.04.2023 - 09:04DROPS Design ha risposto:
Dear Mary, the arrows in the chart mean that, if the gauge is correct, you should finish the raglan/yoke when you reach the arrow for your size (before working it). If you have worked this row, then you will need to start the new part by working the third row of the new chart (A.4). Happy knitting!
06.04.2023 - 23:29
![]() Mary ha scritto:
Mary ha scritto:
Hi! "Continue the pattern from yoke on body – making sure to continue with the correct row in the diagram after the yoke. " Does this mean that if I finish A1 (S size) with the line with the arrow, the next line for the body in A4 is in fact the thirs one of the diagram?
04.04.2023 - 08:59DROPS Design ha risposto:
Hi Mary, Yes, if you finished the diagram before separating for the body and sleeves, you continue with the first row in the diagram. Happy Easter!
05.04.2023 - 07:01
![]() Mary ha scritto:
Mary ha scritto:
"Knit as far as the middle stitch cast on under the sleeve. The round now starts here." Does it mean that the round starts after the second or after the third stitch under the sleeve? Many thanks!
08.03.2023 - 16:03DROPS Design ha risposto:
Dear Mary, yes correct: work the first 2 of the 5 stitches cast on under 1st sleeve, the rounds will now start here, before the middle of the new stitches. Happy knitting!
08.03.2023 - 16:08
![]() Mary ha scritto:
Mary ha scritto:
Following from your last answer: "...you will start the next round 1 stitch eariler. So, you need to not work the last stitch of the previous round". I interpret this as moving the stitch marker one stitch behind and working that stitch as the first one of the next round rather than the last one of the previous round. Is this correct? So it is basically just a matter of moving the stitch marker?
07.03.2023 - 12:16DROPS Design ha risposto:
Dear Mary, you will now work the dividing round, this means you don't need the markers anymore, you start working the dividing round when the last stitch on previous round remain on left needle, slip the next 39 sts (starting with the last stitch previous round + the first 38 sts next round). Happy knitting!
07.03.2023 - 14:37
![]() Mary ha scritto:
Mary ha scritto:
Hi, I have just finished all the increases on the raglan and I have 168 stitches (S size). I'll go now go for a knitted round but what does it mean " adjust so the round now starts 1 stitch earlier"? Plus, the 39 stitches I habe to put aside, correspond to the stiches that are within the first and the second marker?
04.03.2023 - 10:25DROPS Design ha risposto:
Dear Mary, after finishing the increases and reaching the indicated length (21cm from the marker), you will start the next round 1 stitch eariler. So, you need to not work the last stitch of the previous round. On the other hand, the first marker was inserted in the transition between the back and the sleeve and the second marker between the sleeve and the front. Since you have to put aside the stitches which correspond to the sleeve, these stitches are all in between the first and 2nd marker. Happy knitting!
05.03.2023 - 20:45
|
|||||||||||||||||||
Diamonds in the Sky#diamondsintheskysweater |
|||||||||||||||||||
 |
 |
||||||||||||||||||
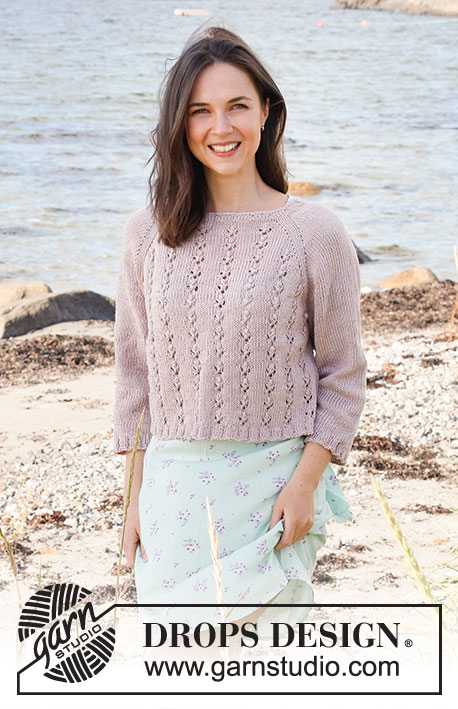
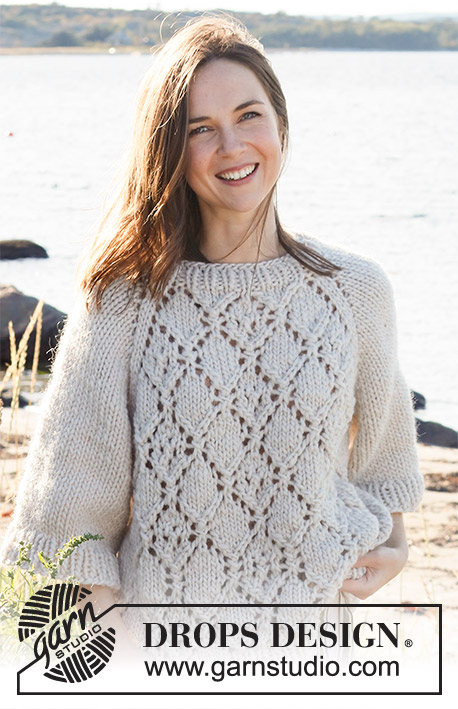
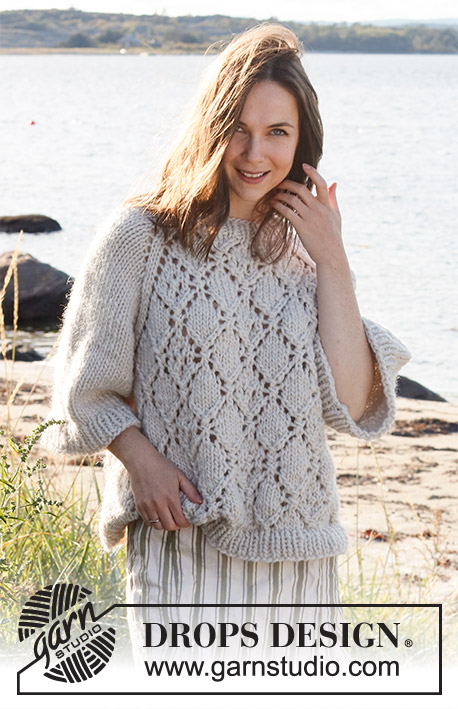
Maglione lavorato ai ferri in DROPS Snow o DROPS Wish. Lavorato dall’alto in basso con raglan, motivo traforato e maniche ampie a ¾. Taglie: S - XXXL.
DROPS 221-29 |
|||||||||||||||||||
|
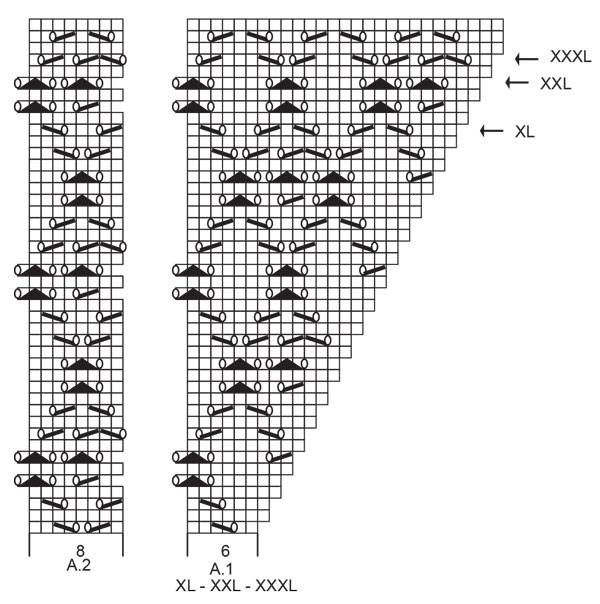
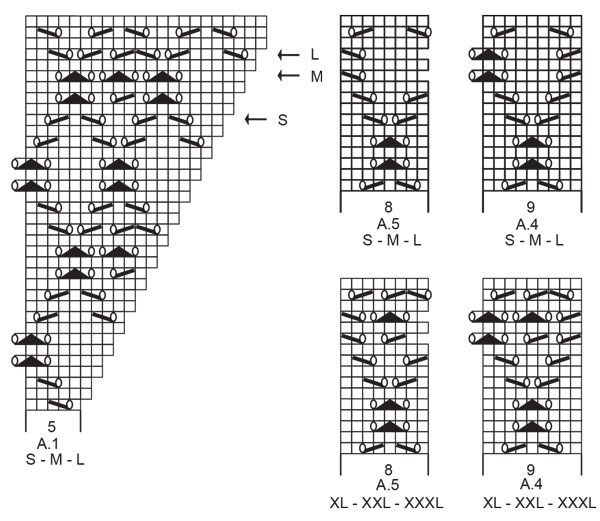
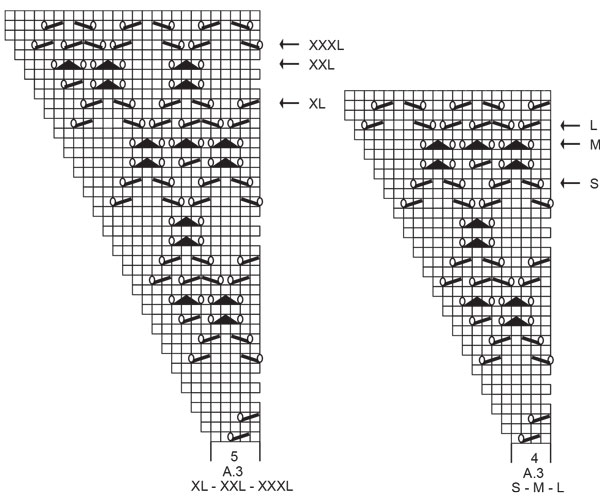
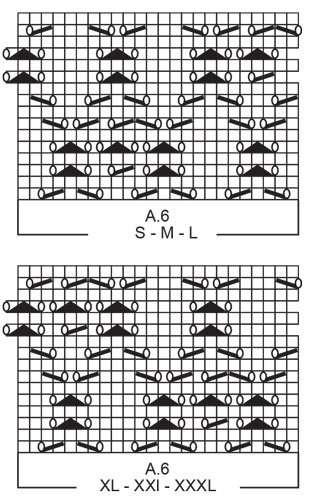
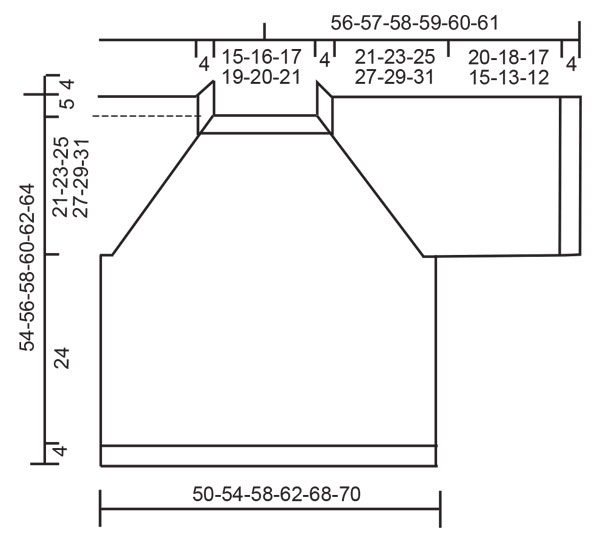
------------------------------------------------------- TECNICHE IMPIEGATE: ------------------------------------------------------- MOTIVO: Vedere i diagrammi A.1 - A.6. Scegliere i diagrammi per la vostra taglia. SUGGERIMENTO PER GLI AUMENTI-1 (distribuiti in modo uniforme): Per stabilire ogni quanto aumentare in modo uniforme, prendere il n° totale di maglie sul ferro (ad esempio 46 maglie) e dividerlo per il n° di aumenti da fare (ad esempio 10) = 4,6. In questo esempio, aumentare facendo 1 gettato in modo alternato dopo ogni 4° e 5° maglia. Sul giro successivo lavorare i gettati a ritorto per evitare buchi RAGLAN: Aumentare per il raglan facendo 1 gettato a ogni lato di 2 maglie (il segnapunti è al centro di queste 2 maglie) nei punti di passaggio tra il corpo e le maniche, come segue (per un totale di 8 aumenti). Aumentare 1 maglia facendo 1 gettato. Sul giro successivo lavorare i gettati a diritto per creare buchi. Poi lavorare le nuove maglie con il motivo sul davanti e dietro e a maglia rasata sulle maniche. SUGGERIMENTO PER LA CHIUSURA: Per evitare che il bordo di chiusura sia tirato potete intrecciare con un ferro di una misura più grande. Se il bordo risulta ancora tirato, fare 1 gettato dopo circa 4 maglie durante la chiusura e intrecciare i gettati come maglie normali. ------------------------------------------------------- INIZIO DEL LAVORO: ------------------------------------------------------- MAGLIONE – BREVE RAISSUNTO DEL LAVORO: Lavorare il collo e lo sprone in tondo con i ferri circolari, dall’alto in basso. Dividere lo sprone e poi continuare il corpo e le maniche in tondo in modo separato con i ferri circolari, dall’alto in basso. COLLO: Avviare 46-48-50-54-56-58 maglie con i ferri circolari n° 8 mm e Snow o Wish. Lavorare 1 giro diritto. Poi lavorare a coste (1 maglia diritto, 1 maglia rovescio) in tondo per 4 cm. Lavorare 1 giro diritto in cui aumentare 10-8-6-6-4-2 maglie in modo uniforme – leggere il SUGGERIMENTO PER GLI AUMENTI = 56-56-56-60-60-60 maglie. Lavorare 1 giro diritto. Passare ai ferri circolari n° 9 mm. Inserire 1 segnapunti dopo 20-20-20-21-21-21 maglie (= circa centro davanti), misurare lo sprone da questo segnapunti! SPRONE: Ora lavorare il motivo e inserire 4 segnapunti come segue: Inserire 1 segnapunti all’inizio del giro (= passaggio tra il dietro e la manica destra), 1 maglia diritto, 1 gettato, 7 maglie diritto, 1 gettato, 1 maglia diritto, inserire qui 1 segnapunti (passaggio tra la manica destra e il davanti), 1 maglia diritto, 1 gettato, A.1 sulle 5-5-5-6-6-6 maglie successive, A.2 sulle 8 maglie successive, A.3 sulle 4-4-4-5-5-5 maglie successive, 1 gettato, maglia diritto, inserire qui 1 segnapunti (passaggio tra il davanti e la manica sinistra), maglia diritto, 1 gettato, 7 maglie diritto, 1 gettato, 1 maglia diritto, inserire qui 1 segnapunti (passaggio tra la manica sinistra e il dietro), maglia diritto, 1 gettato, A.1 sulle 5-5-5-6-6-6 maglie successive, A.2 sulle 8 maglie successive, A.3 sulle 4-4-4-5-5-5 maglie successive, 1 gettato, maglia diritto. FARE ATTENZIONE ALLA TENSIONE DEL LAVORO! Il 1° aumento per il RAGLAN – leggere la descrizione sopra, adesso è finito. Continuare questo motivo e aumentare per il raglan ogni 2 giri per un totale di 14-16-17-18-20-21 volte = 168-184-192-204-220-228 maglie. Dopo l’ultimo aumento, il lavoro misura circa 20-23-24-26-29-30 cm dal segnapunti sul collo. Continuare a lavorare senza ulteriori aumenti fino a quando il lavoro misura 21-23-25-27-29-31 cm dal segnapunti, (lavorare le maglie del motivo quante ce ne stanno verso il raglan, facendo in modo che i gettati e le diminuzioni si equivalgano in modo che il n° di maglie rimanga lo stesso – lavorare le altre maglie a maglia rasata). Sul giro successivo (un giro a diritto) – aggiustare il lavoro in modo che il giro ora inizi 1 maglia prima, lavorare come segue: Mettere in sospeso le prime 39-43-45-47-51-53 maglie per la manica, avviare 5-5-7-7-9-9 nuove maglie sul ferro (= a lato sotto la manica), lavorare le 45-49-51-55-59-61 maglie successive come prima (= davanti), mettere le 39-43-45-47-51-53 maglie successive in sospeso per la manica, avviare 5-5-7-7-9-9 nuove maglie sul ferro (= a lato sotto la manica), lavorare le ultime 45-49-51-55-59-61 maglie come prima (= dietro). Finire il corpo e le maniche in modo separato. ORA MISURARE IL LAVORO DA QUI. CORPO: = 100-108-116-124-136-140 maglie. Lavorare fino alla maglia centrale avviata sotto la manica. Ora il giro inizia qui. Continuare il motivo dallo sprone sul corpo – facendo in modo di continuare con il ferro coretto del diagramma dopo lo sprone. Lavorare il motivo e a maglia rasata ai lati come segue: * 1-3-5-3-6-7 maglie diritto, A.4 sulle 9 maglie successive (scegliere il diagramma per la vostra taglia), lavorare A.6 sulle 24 maglie successive (scegliere il diagramma per la vostra taglia), lavorare le prime 8-8-8-16-16-16 maglie di A.6, lavorare A.5 sulle 8 maglie successive (scegliere il diagramma per la vostra taglia) 0-2-4-2-5-6 maglie diritto *, lavorare *-* un’altra volta sul giro. Quando il lavoro misura 24 cm, lavorare 1 giro diritto in cui aumentare 10-10-12-12-14-14 maglie in modo uniforme = 110-118-128-136-150-154 maglie. Passare ai ferri circolari n° 8 mm e lavorare a coste (1 maglia diritto, 1 maglia rovescio 1) per 4 cm. Intrecciare con diritto su diritto e rovescio su rovescio. Il maglione misura circa 54-56-58-60-52-64 cm dalla spalla in giù. MANICHE: Riportare le 39-43-45-47-51-53 maglie in sospeso a un lato del lavoro sui ferri circolari corti n° 9 mm e riprendere 1 maglia in ognuna delle 5-5-7-7-9-9 maglie avviate sotto la manica = 44-48-52-54-60-62 maglie. Lavorare a maglia rasata in tondo. Quando la manica misura 20-18-17-15-13-12 cm, aumentare 4-4-4-4-6-6 maglie in modo uniforme = 48-52-56-58-70-68 maglie. Passare ai ferri circolari n° 8 mm. Lavorare a coste (1 maglia diritto, 1 maglia rovescio 1) per 4 cm. Intrecciare con diritto su diritto e rovescio su rovescio. La manica misura circa 24-22-21-19-17-16 cm dalla divisione. Lavorare l’altra manica nello stesso modo. |
|||||||||||||||||||
Spiegazioni del diagramma |
|||||||||||||||||||
|
|||||||||||||||||||
 |
|||||||||||||||||||
 |
|||||||||||||||||||
 |
|||||||||||||||||||
 |
|||||||||||||||||||
 |
|||||||||||||||||||
Avete terminato questo modello?Allora taggate le vostre foto con #dropspattern #diamondsintheskysweater o inviatele alla #dropsfan gallery. Avete bisogno di aiuto con questo modello?Troverete 25 video tutorial, una sezione per i commenti/domande e molto altro guardando il modello su www.garnstudio.com © 1982-2026 DROPS Design A/S. Ci riserviamo tutti i diritti. Questo documento, compreso tutte le sue sotto-sezioni, è protetto dalle leggi sul copyright. Potete leggere quello che potete fare con i nostri modelli alla fine di ogni modello sul nostro sito. |
|||||||||||||||||||


Con oltre 40 anni di esperienza nel design di modelli di maglia e uncinetto, DROPS Design offre la più estesa collezione di modelli gratuiti su internet - tradotti in 17 lingue. Ad oggi vi possiamo fornire 324 cataloghi e 12290 modelli - 9561 dei quali sono tradotti in Italiano.
Ci stiamo impegnando molto per darvi il meglio che vi possiamo offrire in termini di maglia e uncinetto, ispirazioni e consigli così come filati di grande qualità ad un prezzo incredibile! Volete utilizzare i nostri modelli per qualcosa d'altro oltre al vostro uso personale? Potete leggere tutto ciò che è consentito nel testo sul Copyright in basso su tutte le pagine dei nostri modelli. Buon lavoro!
Lasciare un commento sul modello DROPS 221-29
Noi saremmo felici di ricevere i tuoi commenti e opinioni su questo modello!
Se vuoi fare una domanda, fai per favore attenzione a selezionare la categoria corretta nella casella qui sotto per velocizzare il processo di risposta. I campi richiesti sono indicati da *.