
Popular categories
Looking for a yarn?


Comments / Questions (33)
![]() Linda wrote:
Linda wrote:
Please help. I cannot get passed A1. I have 18 stitches and a three chain on the hook. Whatever I do, the spaces between each diamond do not line up. Does the three chain count as one double crochet or not. I have tried it both ways. When I get to the last stitch on A3 which is a 2 chain, am I then trying to join the 2 chain into the third stitch of the 3 chain? Or am I joining the last double crochet of A3 into the 3 chain at the beginning? Pls explain end of A3 and start of A2
29.03.2026 - 16:47DROPS Design answered:
Dear Linda, over these 18 stitches, work first A.2 one time over the first 3 stitches at the beginning of the round then repeat the 3 stitches A.3 a total of 5 times to the end of the round, so that you will have a total of 6 petals; A.2 just shows how to start and and the round. Happy crocheting!
07.04.2026 - 13:19
![]() Laura wrote:
Laura wrote:
Hello, I am following the pattern with help from the comments, however I am lost at row 7. After the diamond of double crochets, chain two, … where do the single crochet stitches that punctuate the 4 chain stitches go? Are there written instructions available anywhere? Thank you
24.07.2025 - 02:14DROPS Design answered:
Dear Laura, the sc at the end of A.2/A.3 is worked in the 2-chain-space from previous round, ie at the end of each repeat. Happy c rocheting!
25.07.2025 - 10:15
![]() Helena Lord-Fraker wrote:
Helena Lord-Fraker wrote:
How can I get the pattern to make these?
05.05.2025 - 12:00DROPS Design answered:
Dear Mrs Lord-Fraker, you will find the English pattern using American crochet terminology here. Happy crocheting!
05.05.2025 - 13:40
![]() Lise wrote:
Lise wrote:
Jeg har problemer med at afkode 7. og de næste omgange i både diagram A2 og A3. Efter stangmasker og 2luftmasker, hvad så? Det ser ud som om det er 1 fm om en bue, efterfulgt af 4 lm osv. men der er ikke noget at hæfte fm i
13.06.2024 - 17:19DROPS Design answered:
Hei Lise. Jo, du hekler 7. rad i A.2 slik: 1 kjedemaske i 1. stavstav (v), 3 luftmasker, 10 staver, 4 luftmasker, hopp over 1 stav, 1 fastmaske om de 2 luftmaskene fra forrige rad og 4 luftmasker. Deretter hekler du A.3 5 ganger ( = hopp over 1 stav, 11 staver, 4 luftmasker, hopp over 1 stav, 1 fastmaske om de 2 luftmaskene fra forrige rad og 4 luftmasker x 5 ganger), og avslutt omgangen med en 1 kjedemaske i 3. luftmaske på begynnelsen av omgangen. mvh DROPS Design
24.06.2024 - 09:31
![]() Françoise SCHALK wrote:
Françoise SCHALK wrote:
Bonjour, je ne comprends pas comment crocheter les diagrammes A2 et A3. Après les 7 rangs de brides, comment faire la ligne de mailles en l\'air, et où sont placées les mailles serrées? Merci de votre réponse.
07.06.2024 - 17:18DROPS Design answered:
Bonjour Mme Schalk, on commence les tours par le diagramme A.2 et on répète le diagramme A.3 jusqu'à la fin du tour, A.2 montre comment commencer et terminer les tours. Au 7ème tour, vous crochetez après les brides 4 ml, 1 ms dans l'arceau de 2 ml du tour précédent, 4 ml et vous reprenez les brides du motif suivant. Bon crochet!
10.06.2024 - 07:49
![]() Alva wrote:
Alva wrote:
Hej! När jag prövade det här mönstret så blev jag osäker på hur jag ska göra i sluten på varven. I A2 står det att man ska göra tre luftmaskor i början av varvet, hur ska jag sedan fästa ihop det med slutet av varvet? I varv 1 till exempel så ska man sluta med två luftmaskor, ska jag då fästa det med en smygmaska i första stolpen av varvet? Eller ska jag börja direkt med tre nya luftmaskor i nästa varv?
24.03.2024 - 11:46DROPS Design answered:
Hei Alva. Se forklaringen til diagramikonene. I början av varvet (A:2) virkas det 3 luftmaskor, och varvet AVSLUTAS med 1 smygmaska i 3:e luftmaskan från början av varvet. mvh DROPS Design
08.04.2024 - 08:00
![]() Linda Gillikin wrote:
Linda Gillikin wrote:
I’m confused with the pattern in part two it states to chain three and then at the end it says to change two. What do you do with the chains? Are they put up from your work space are they floating over top? Are they extended together? I’m confused if you could clarify I would be totally happy. Thank you.
17.03.2024 - 22:55DROPS Design answered:
Dear Linda, when working A.2 (+A.3), you repeat the 3dc, ch2 pattern the whole round. So, work A.2 (ch3, 3dc, ch2) and now start working A.3 (3dc, ch2) 5 times. So the ch2 will join to the dc in the next "leaf" or 3dc-group. Then finish the round with 1 slip stitch in the 3rd chain stitch. Happy crochetting!
18.03.2024 - 00:53
![]() Tessa wrote:
Tessa wrote:
Hei! Miten virkaan suljettuna neuleena sulkematta kierroksia? Kun tulen kierroksen loppuun mihin kaareen teen kiinteän silmukan, kun itse laittaisin piilosilmukan kierroksen alun viimeisimpään piilosilmukkaan. Tällöin kuitenkin joudun siirtymään joka kerta piilosilmuikoilla kaaren keskelle, jotta voin pitää kuvion tasaisena.
18.02.2024 - 20:56
![]() Agros wrote:
Agros wrote:
C’est compliqué pour moi de suivre en même temps les vidéos qui expliquent les points les explications du modèle et gérer mon crochet
22.06.2023 - 19:34DROPS Design answered:
Bonjour Mme Agros, suivez attentivement les explications écrites et les diagrammes, autrement dit, crochetez le Diagramme A.1 puis crochetez ensuite A.2 (1er motif du tour) et répétez A.3 5fois au total tout le tour, vous avez ainsi.6 pétales pour la fleur: crochetez le 1er rang de A.2 puis répétez 5 fois le 1er rang de A.3; crochetez ensuite le 2ème rang de A.2 et répétez 5 vois le 2ème rang de A.3 et ainsi de suite. Bon crochet!
23.06.2023 - 07:37
![]() Agros wrote:
Agros wrote:
Bonjour J’ai du mal à faire le sac. Existe t il une vidéo pour pouvoir le réaliser ? Merci
22.06.2023 - 14:13DROPS Design answered:
Bonjour Mme Agros, quel type de difficulté avez-vous pour réaliser le sac? Avez-vous vu cette leçon? On y explique comment lire un diagramme. N'hésitez pas à poser votre question précise ici pour que l'on puisse vous aider. Bon crochet!
22.06.2023 - 14:24
|
||||||||||||||||||||||||||||||||||
Sunset Shopper#sunsetshopperbag |
||||||||||||||||||||||||||||||||||
 |
 |
|||||||||||||||||||||||||||||||||
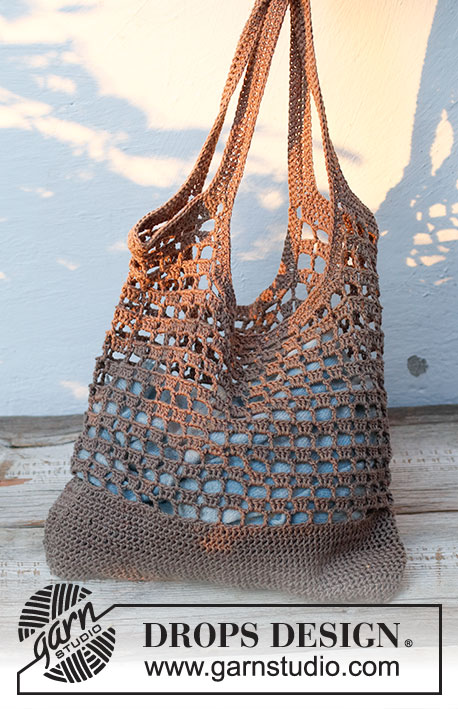
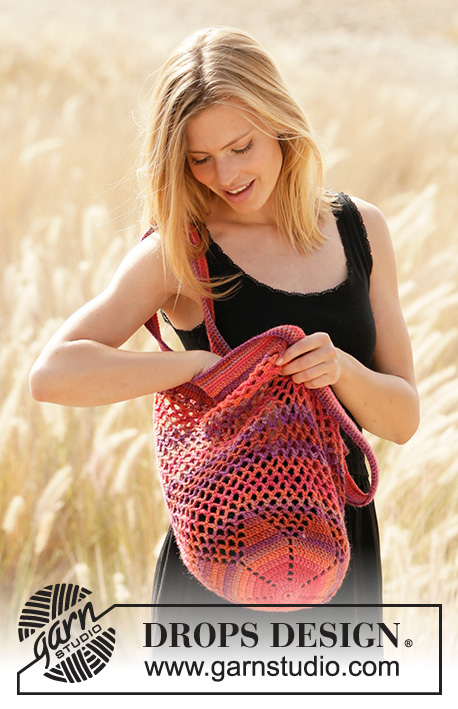
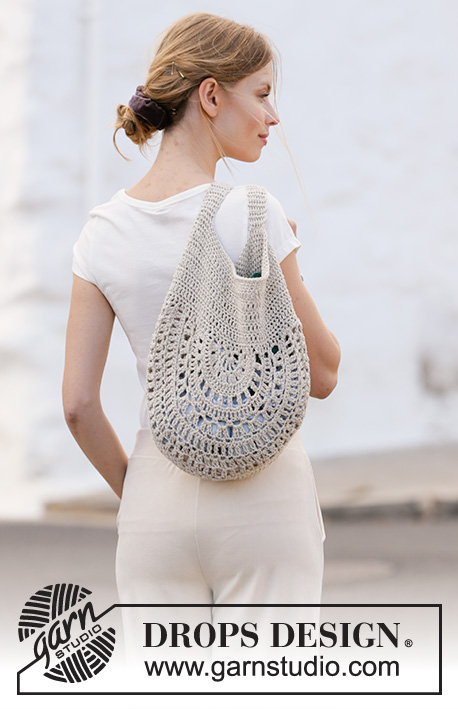
Crocheted bag in DROPS Paris. The piece is worked bottom up with star pattern on the bottom.
DROPS 211-26 |
||||||||||||||||||||||||||||||||||
|
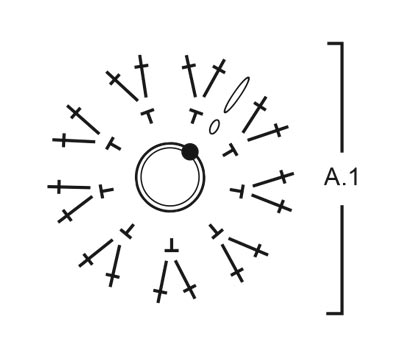
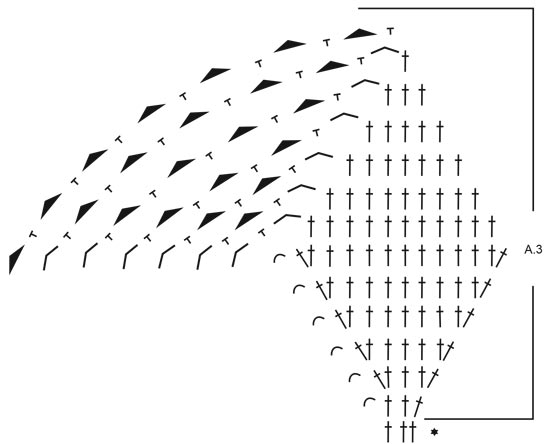
------------------------------------------------------- EXPLANATIONS FOR THE PATTERN: ------------------------------------------------------- PATTERN: See diagrams A.1 to A.3. CROCHET TIP (for chain stitches): 1 chain stitch should equal 1 double crochet in width. Make sure the loop made is pulled up the hook so it is not too tight. If the chain stitch is too tight the pattern will be too tight in the sections with a lot of chain stitches. ------------------------------------------------------- START THE PIECE IS HERE: ------------------------------------------------------- BAG – SHORT OVERVIEW OF THE PIECE: Piece is worked in the round, bottom up. BAG: Work 4 chain stitches with hook size 3.5 mm and Paris and form them into a ring with 1 slip stitch in the first chain stitch worked. Work A.1 in the round. When A.1 has been completed there are 3 chain stitches and 18 treble crochets on the round. The next round is worked as follows: Work A.2 one time (= first repeat also shows the beginning and end of the round), then work A.3 a total of 5 times = 6 leaves on the round. Continue this pattern. REMEMBER THE CROCHET TENSION! When A.2 and A.3 have been completed there are 42 chain-spaces on the round. Insert 1 marker in the last round. The piece will be measured from this marker. Continue working chain-spaces in the round without further increases as follows: Work slip stitches to the middle of the first chain-space, * work 5 chain stitches, 1 double crochet around the next chain-space *, work from *-* round and round without finishing each round. Work until the bag measures 38 cm from the marker and finish approx. above the start of the round at the bottom of the bag. Work slip stitches as far as the beginning of the next chain-space. Then work the edge with straps as described below. EDGE WITH STRAPS: ROUND 1: Work 3 chain stitches (equivalent to 1 treble crochet), 3 treble crochets around the same chain-space, then 4 treble crochets around each chain-space to end of round. Finish with 1 slip stitch in the 3rd chain stitch at the beginning of the round – read CROCHET INFORMATION = 168 treble crochets on the round. ROUND 2: Work 1 treble crochet in each treble crochet. ROUND 3: Work 1 treble crochet in each of the first 28 treble crochets, then 75 loose chain stitches – remember CROCHET TIP, skip the next 28 treble crochets, work 1 treble crochet in each of the next 56 treble crochets, 75 loose chain stitches, skip the next 28 treble crochets and work 1 treble crochet in each of the last 28 treble crochets. ROUND 4: Work 1 double crochet in each of the first 28 treble crochets, 1 double crochet in each of the 75 chain stitches, 1 double crochet in each of the next 56 treble crochets, 1 double crochet in each of the 75 chain stitches and 1 double crochet in each of the last 28 treble crochets. ROUNDS 5-8: Work 1 double crochet in each stitch. Cut and fasten the strand after the last round. To finish, work 1 round on the inside of the bag by starting in the middle of the 28 stitches at the bottom of the strap, work 1 double crochet in each of the 14 double crochets, 1 double crochet in each of the 75 stitches on the strap and 1 double crochet in each of the 14 stitches to the middle. Finish with 1 slip stitch in the first double crochet. Cut and fasten the strand. Repeat on the other strap. |
||||||||||||||||||||||||||||||||||
Diagram explanations |
||||||||||||||||||||||||||||||||||
|
||||||||||||||||||||||||||||||||||
 |
||||||||||||||||||||||||||||||||||
 |
||||||||||||||||||||||||||||||||||
 |
||||||||||||||||||||||||||||||||||
Have you finished this pattern?Tag your pictures with #dropspattern #sunsetshopperbag or submit them to the #dropsfan gallery. Do you need help with this pattern?You'll find 7 tutorial videos, a Comments/Questions area and more by visiting the pattern on garnstudio.com. © 1982-2026 DROPS Design A/S. We reserve all rights. This document, including all its sub-sections, has copyrights. Read more about what you can do with our patterns at the bottom of each pattern on our site. |
||||||||||||||||||||||||||||||||||


With over 40 years in knitting and crochet design, DROPS Design offers one of the most extensive collections of free patterns on the internet - translated to 17 languages. As of today we count 324 catalogues and 12290 patterns translated into English (UK/cm). 12290
We work hard to bring you the best knitting and crochet have to offer, inspiration and advice as well as great quality yarns at incredible prices! Would you like to use our patterns for other than personal use? You can read what you are allowed to do in the Copyright text at the bottom of all our patterns. Happy crafting!
Post a comment to pattern DROPS 211-26
We would love to hear what you have to say about this pattern!
If you want to leave a question, please make sure you select the correct category in the form below, to speed up the answering process. Required fields are marked *.