
Popular categories
Looking for a yarn?


Comments / Questions (55)
![]() Corinne wrote:
Corinne wrote:
C’est quoi 1 jeté entre 2 mailles endroit c’est un jeté normal ? Merci pour votre aide
24.04.2026 - 14:27DROPS Design answered:
Bonjour Corinne, tout à fait, il s'agit d'un jeté normal que l'on fait avant et après 2 mailles endroit (pour les augmentations du raglan par exemple). Bon tricot!
24.04.2026 - 16:37
![]() Debbie wrote:
Debbie wrote:
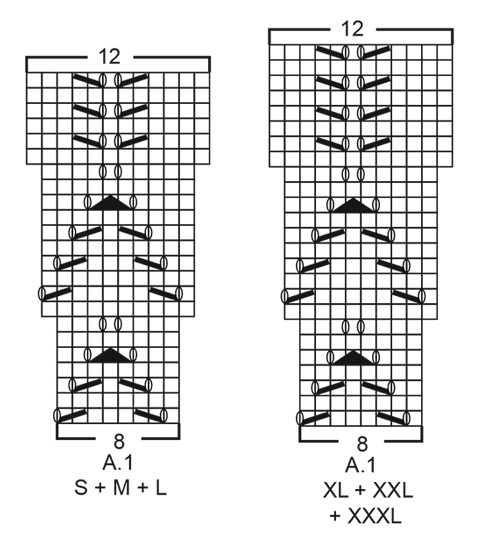
I am working on summer halo. my question is in reference to the chart A.1, row 7. Could you please give me the written instructions for those 8 stitches only? I am having trouble with the yarn overs next to each other, does that mean to make one YO, then another YO? Thank you for your help. Debbie Truesdale
23.03.2026 - 00:44DROPS Design answered:
Hi Debbie, There is a knitted stitch between the 2 yarn overs in row / of A.1. Regards, Drops Team.
23.03.2026 - 06:03
![]() Cindy wrote:
Cindy wrote:
I’m a beginner knitter and would love to view the complete utube video of this pattern. Can you give me the address please? I’m confused on exactly how to do the lace pattern of this pattern.
02.03.2026 - 21:11DROPS Design answered:
Hi Cindy, We do not have a video specifically for this pattern. However, here is a link to a video showing you how to work a lace pattern similar to the one worked here: https://www.garnstudio.com/video.php?id=1208&lang=en Regards, Drops Team.
03.03.2026 - 06:46
![]() Berit wrote:
Berit wrote:
Hej Jag undrar man ser inte toppen bakifrån man undrar då om mönstret går även på ryggen ?
23.02.2026 - 09:44DROPS Design answered:
Hei Berit. Jo, hele mønstret strikkes rundt. Når du skal starttte på oket står det: Sticka A.1 runt (= 17-18-19-19-20-21 rapporter à 8 maskor). mvh DROPS Design
23.02.2026 - 10:09
![]() Váncza Katalin wrote:
Váncza Katalin wrote:
Üdvözlet! Érdeklődnék, hogy hol találok mérettáblázatot arról, hogy milyen méreteket jelent pl. az XXL méret? Köszönöm!
15.01.2026 - 12:50
![]() Schwarz Maria wrote:
Schwarz Maria wrote:
Wie stricken ich erhöhten Rücken?
06.09.2025 - 13:37DROPS Design answered:
Hi, Maria, this pattern does not use short rows on the back piece, but you can find videos explaining how to do this under "Tipps & Hilfe" > "Passe". Happy Knitting!
23.10.2025 - 10:15
![]() Janet wrote:
Janet wrote:
I love your patterns, but I don\'t want to print them out because of all the pictures they take too much ink. Is there a way to get them without all the pictures?
10.08.2025 - 16:44DROPS Design answered:
Dear Janet, you can choose the pages you will print, but don't forget to print the pages with diagrams/chart as they can help. And on first page (below pictures), you will get important informations about tension, so remember these infos too. Happy knitting!
11.08.2025 - 08:15
![]() Agneta wrote:
Agneta wrote:
Hej Jag stickar tröjan i M och ska börja på mönstret A 1. I slutet av varvet får jag inte det att sluta med ett omslag. Varvet slutar med att jag har lyft en maska stickat en rät och dragit den lyfta maskan över den maskan som stickades. Vad gör jag för fel? Vänliga hälsningar Agneta
26.07.2025 - 13:31DROPS Design answered:
Hei Agneta. Har du riktig maskeantall i str. M? Man starter med å legge opp125 masker og etter vrangborden økes det 19 masker = 144 masker. Diagram A.1 består av 8 masker og skal strikkes 18 ganger = 8 x 18 = 144 masker. Da skal det avsluttes med 1 kast. For å holde en god oversikt når man strikker etter diagram, kan man sette maskemarkør/merketråd mellom hvert diagram. Da ser man lett om man har strikket over riktig antall masker. mvh DROPS Design
18.08.2025 - 10:57
![]() Xia wrote:
Xia wrote:
Hej, Jag är intresserad i pattern DROPS 213-8 #summerhalotop DROPS Design: Modell r-767. Hur vet man vilken storlek man ska väljer och hur mycket garn ska behövas till den pattern? Tack. varma hälsningar Xia
07.07.2025 - 12:18DROPS Design answered:
Hej Xia. Det bästa är om du mäter ett plagg du redan har hemma som passar bra och sedan jämför du de måtten med måtten på måttskissen längst ner på mönstret. Välj den storlek som är närmast och sedan ser du i början av mönstret hur mycket garn som går åt till de olika storlekarna (t.ex. 250 g DROPS Muskat till storlek S, vilket är 5 nystan). Mvh DROPS Design
07.07.2025 - 14:31
![]() Cathy wrote:
Cathy wrote:
Pourriez vous me dire quelle type d’augmentation (augmentation barrée, augmentation intercalaire vers la droite, vers la gauche) je dois faire pour les augmentations prévues au rang 8 et au rang 19 du diagramme. Merci
26.06.2025 - 12:12DROPS Design answered:
Bonjour Cathy, les augmentations figurent dans le diagramme: ce sont des jetés faits aux rangs 7 et 17 du diagramme: ils sont au milieu, non compensés par des diminutions; au tour suivant, tricotez les jetés à l'endroit pour qu'ils forment des trous. Bon tricot!
26.06.2025 - 16:05
|
||||||||||||||||
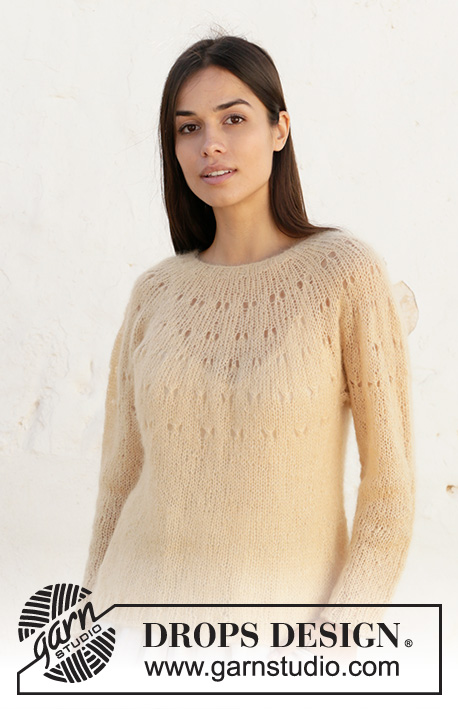
Summer Halo#summerhalotop |
||||||||||||||||
 |
 |
|||||||||||||||
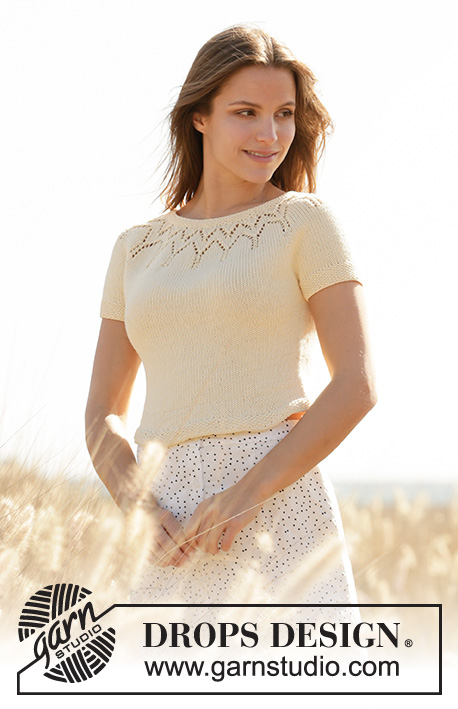
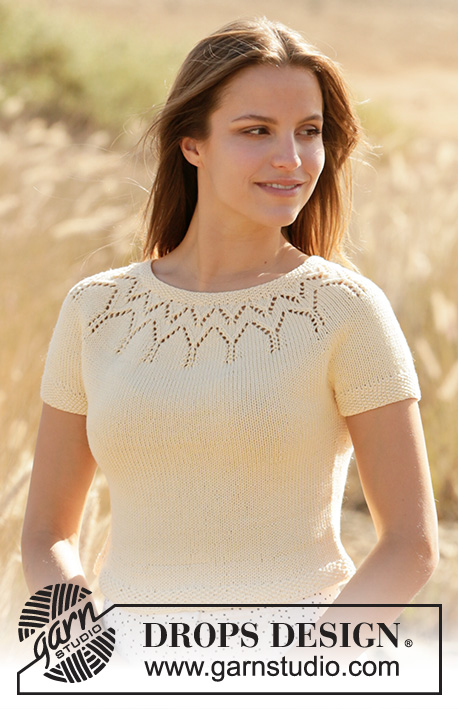
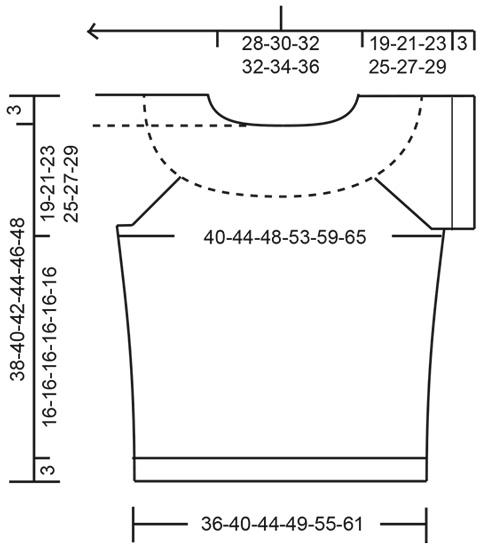
Knitted top with lace pattern in DROPS Muskat. The piece is worked top down with raglan and short sleeves. Sizes S - XXXL.
DROPS 213-8 |
||||||||||||||||
|
------------------------------------------------------- EXPLANATIONS FOR THE PATTERN: ------------------------------------------------------- MOSS STITCH (worked in the round): Round 1: * Knit 1, purl 1 *, work from *-*. Round 2: Knit over purl and purl over knit. Repeat round 2 onwards. INCREASE TIP (evenly spaced): To work out how to increase evenly, count the total number of stitches on the needle (e.g. 121 stitches) and divide by the number of increases to be made (e.g. 15) = 8.1. In this example, increase by making 1 yarn over after approx. each 8th stitch. On the next round knit the yarn overs twisted to avoid holes. PATTERN: See diagram A.1. Choose diagram for your size. RAGLAN: Increase to raglan on each side of the 4 markers, in the transitions between body and sleeves, as follows: Start 1 stitch left before marker, 1 yarn over, knit 2 (marker sits between these 2 stitches), 1 yarn over (= 2 stitches increased). On the next round knit the yarn overs twisted to avoid holes. DECREASE TIP (for body): Start 4 stitches before the marker, knit 2 together, knit 4 (marker thread sits between these 4 stitches) slip 1 stitch as if to knit, knit 1 and pass the slipped stitch over the knitted stitch (= 2 stitches decreased). CASTING-OFF TIP: To avoid the cast-off edge being tight you can cast off with a larger size needle. If the edge is still tight, make 1 yarn over after approx. each 4th stitch at the same time as casting off and the yarn overs are cast off as normal stitches. ------------------------------------------------------- START THE PIECE HERE: ------------------------------------------------------- TOP – SHORT OVERVIEW OF THE PIECE: The neck and yoke are worked in the round with circular needle, top down. The yoke is divided for body and sleeves and the body is continued in the round. The sleeve edges are worked in the round with double pointed needles/short circular needle. NECK: Cast on 121-125-129-135-145-149 stitches with short circular needle size 3.5 mm and Muskat. Knit 1 round then work MOSS STITCH – read description above - for 2 cm. Knit 1 round where you increase 15-19-23-17-15-19 stitches evenly spaced – read INCREASE TIP = 136-144-152-152-160-168 stitches. Change to circular needle size 4 mm and knit 1 round. YOKE: Work A.1 in the round (= 17-18-19-19-20-21 repeats of 8 stitches). REMEMBER THE KNITTING TENSION! When A.1 has been completed there are 204-216-228-228-240-252 stitches on the needle and the piece measures approx. 10-10-10-11-11-11 cm from the cast-on edge. Now insert 4 markers in the piece for the raglan as follows (without working the stitches): The first marker is inserted after the first 31-32-34-36-39-43 stitches (= ½ back piece), 2nd marker is inserted after the next 40-44-46-42-42-40 stitches (= sleeve), 3rd marker is inserted after the next 62-64-68-72-78-86 stitches (= front piece) and the 4th marker is inserted after the next 40-44-46-42-42-40 stitches (= sleeve). There are 31-32-34-36-39-43 stitches after the last marker (= half back piece). Work stocking stitch in the round. AT THE SAME TIME on the first round increase to RAGLAN – see description above (= 8 stitches increased). Increase like this every 2nd round a total of 0-3-5-11-11-12 times and then every 4th round a total of 6-6-6-4-5-6 times. After the final increase to raglan there are 252-288-316-348-368-396 stitches on the needle. Knit 1 round where you increase 4-4-0-0-4-0 stitches evenly spaced = 256-292-316-348-372-396 stitches. Continue working until the piece measures 19-21-23-25-27-29 cm from the cast-on edge. The next round is worked as follows: Work 38-42-45-51-56-61 stitches in stocking stitch (= ½ back piece), place the next 52-62-68-72-74-76 stitches on 1 thread for the sleeve, cast on 8-8-10-10-12-14 new stitches on the needle (= in side under the sleeve), work 76-84-90-102-112-122 stitches in stocking stitch (= front piece), place the next 52-62-68-72-74-76 stitches on 1 thread for the sleeve, cast on 8-8-10-10-12-14 new stitches on the needle (= in side under the sleeve) and work the remaining 38-42-45-51-56-61 stitches in stocking stitch (= ½ back piece). Body and sleeves are finished separately; all markers can now be removed. THE PIECE IS NOW MEASURED FROM HERE! BODY: = 168-184-200-224-248-272 stitches. Insert 1 new marker in the middle of the 8-8-10-10-12-14 stitches cast on under each sleeve = 84-92-100-112-124-136 stitches on each side of the markers. Work stocking stitch in the round. When the piece measures 2 cm from the division decrease 1 stitch on each side of both markers – read DECREASE TIP (= 4 stitches decreased). Decrease like this every 2 cm a total of 4 times on each side = 152-168-184-208-232-256 stitches. Continue with stocking stitch until the piece measures 16 cm from the division. Change to circular needle size 3.5 mm. Work 1 round with moss stitch and decrease at the same time 1 stitch on the round = 151-167-183-207-231-255 stitches. Continue with moss stitch for 3 cm. Cast off with knit over purl and purl over knit – read CASTING-OFF TIP in explanations above. The piece measures approx. 38-40-42-44-46-48 cm from the shoulder down. SLEEVE: Place the 52-62-68-72-74-76 stitches from the thread on the one side of the piece onto double pointed needles size 3.5 mm and knit up 1 stitch in each of the 8-8-10-10-12-14 stitches cast on under the sleeve = 60-70-78-82-86-90 stitches. Knit 1 round and decrease at the same time 1 stitch on this round = 59-69-77-81-85-89 stitches. Work moss stitch in the round for 3 cm. Cast off with knit over purl and purl over knit. Work the other sleeve in the same way. |
||||||||||||||||
Diagram explanations |
||||||||||||||||
|
||||||||||||||||
 |
||||||||||||||||
 |
||||||||||||||||
Have you finished this pattern?Tag your pictures with #dropspattern #summerhalotop or submit them to the #dropsfan gallery. Do you need help with this pattern?You'll find 28 tutorial videos, a Comments/Questions area and more by visiting the pattern on garnstudio.com. © 1982-2026 DROPS Design A/S. We reserve all rights. This document, including all its sub-sections, has copyrights. Read more about what you can do with our patterns at the bottom of each pattern on our site. |
||||||||||||||||


With over 40 years in knitting and crochet design, DROPS Design offers one of the most extensive collections of free patterns on the internet - translated to 17 languages. As of today we count 324 catalogues and 12290 patterns translated into English (UK/cm). 12290
We work hard to bring you the best knitting and crochet have to offer, inspiration and advice as well as great quality yarns at incredible prices! Would you like to use our patterns for other than personal use? You can read what you are allowed to do in the Copyright text at the bottom of all our patterns. Happy crafting!
Post a comment to pattern DROPS 213-8
We would love to hear what you have to say about this pattern!
If you want to leave a question, please make sure you select the correct category in the form below, to speed up the answering process. Required fields are marked *.