
Popular categories
Looking for a yarn?


Comments / Questions (121)
![]() Anne Ruythooren wrote:
Anne Ruythooren wrote:
Ik ben een mouw aan het breien met 4 naalden en zie dat er een soort ladder is in elke hoek( ondanks dat ik de draad goed aanspan bij het begin van elke naald). Hoe kan ik dat vermijden? ( verdwijnt die ladder bij het wassen?)
25.07.2020 - 13:41DROPS Design answered:
Dag Anne,
Als het goed is zou je geen ladder moeten krijgen in de overgang bij het wisselen van naalden, als je in de rondte breit met 4 naalden. In het begin van het werk lijkt dat soms wel een beetje zo, maar als je verder gaat in de hoogte verdwijnt dat vaak wel.
02.08.2020 - 19:15
![]() Anne Ruythooren wrote:
Anne Ruythooren wrote:
Ik begrijp patroon A1 niet zo goed.heb ik het juist als je 1 naald rechts moet breien en 1 naald 1 steek rechts en 1 steek averechts en dit telkens herhalen?.op de foto lijkt het alsof de trui in boordsteek is gebreid. Of moet je elke naald 1 steek rechts en 1 steek averechts breien.maar dan klopt het patroon A1 weer niet?
18.07.2020 - 11:57DROPS Design answered:
Dag Anne,
Vanaf de goede kant gezien brei je steeds 1 naald rechte en dan 1 naald waarbij je steeds 1 steek recht en 1 steek averecht breit. Hierdoor krijg je een soort variant van de boordsteek.
20.07.2020 - 08:49
![]() Moyen Satisfait wrote:
Moyen Satisfait wrote:
Drops design, je vous conseille en tant que cliente de revoir la manière de faire les emmanchures et la longueur des manches. Si je suis les instructions, du patron les manches sont trop courte. C'est le deuxième pull tricoté à partir de votre site à ce que ça arrive.
16.07.2020 - 20:48DROPS Design answered:
Bonjour Moyen Satisfait, n'oubliez pas de toujours vérifier les mesures du schéma pour chaque taille, comparez-les à celles d'un pull similaire que vous aimez et dont vous aimez la forme pour ajuster la longueur et ainsi ajouter les quelques centimètres qui vous manquent. Votre magasin DROPS saura vous conseiller si besoin. Bon tricot!
17.07.2020 - 08:40
![]() Anne Ruythooren wrote:
Anne Ruythooren wrote:
Ik begrijp patroon A1 niet goed. Als men patroon leest van rechts naar links voor eerste naald, betekent dit die naald rechts breien?. De 2 de naald lezen van links naar rechts, betekent dit dus één steek rechts en 1 steek averechts breien? daarna weer naald alleen rechts?
16.07.2020 - 08:02
![]() Debra J Lewallen wrote:
Debra J Lewallen wrote:
I would like to download some of your free patterns, however, I can't find a link Cfc to ssf o so.
02.07.2020 - 03:01DROPS Design answered:
Dear Mrs Lewallen, our patterns can only be printed, but using a virtual printer will allow you to save them as .PDF files. Happy knitting!
02.07.2020 - 08:55
![]() Doris Thompson wrote:
Doris Thompson wrote:
Is the body of the sweater done as a knit a row purl a row or knit 1 purl 1
29.06.2020 - 03:52DROPS Design answered:
Dear Mrs Thompson, the diagram A.1 is worked with alternately 1 stitch in stocking stitch, 1 stitch in garter stitch. Happy knitting!
29.06.2020 - 09:10
![]() Cindy wrote:
Cindy wrote:
I love the sweater but wish it was a flat knitting pattern. I don't like double pointed needles.
18.06.2020 - 12:16DROPS Design answered:
Dear Cindy, you will find how to adapt a pattern for straight needles here. Happy knitting!
18.06.2020 - 16:03
![]() Marjon wrote:
Marjon wrote:
Ik maak de trui in maat L, dus het achterpand meet totaal 66 cm. Is dat inclusief de 8cm boord. Vriendelijke groet, Marjon.
04.06.2020 - 18:04DROPS Design answered:
Dag Marjon,
Ja, dat is inclusief de boord!
05.06.2020 - 12:42
![]() Sonja Christensen wrote:
Sonja Christensen wrote:
Hej ! ER det muligt at der findes en udgave hvor trøjen strikkes på rundpind ?
03.06.2020 - 08:12DROPS Design answered:
Hei Sonja. Det har vi dessverre ikke, ikke den strukturen og i garnet DROPS Air. Men prøv vår søkemotor, skrive inn struktur og velg dame og strikk. Mange modeller kommer opp. God Fornøyelse!
03.06.2020 - 16:02
![]() Anita Justesen wrote:
Anita Justesen wrote:
Hej Kan man strikke ærmerne på rundpinde, i stedet for strømpepinde?
01.06.2020 - 20:27DROPS Design answered:
Hei Anita. Ja, det kan du. Men har du ikke kort nok rundpinne, må du bruke settpinner. God Fornøyelse!
03.06.2020 - 15:48
|
|||||||
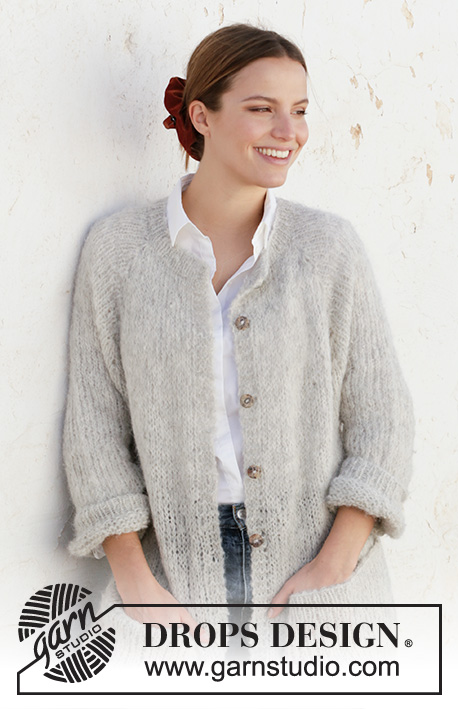
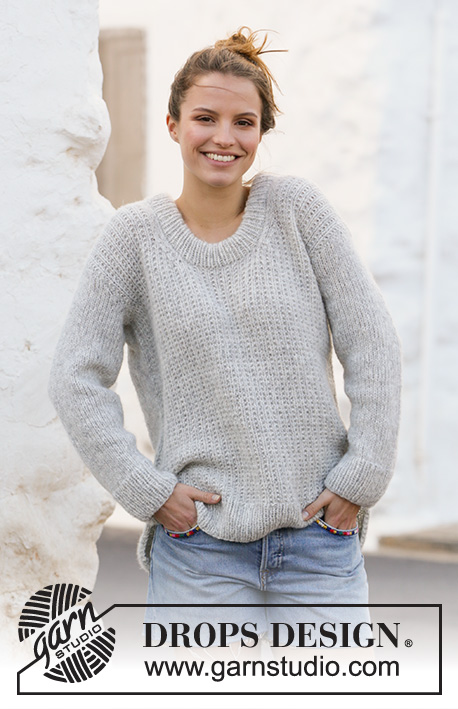
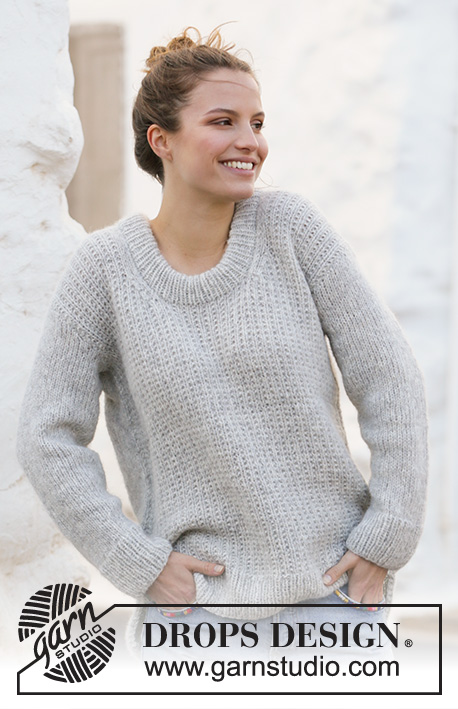
Rainy Day Sweater#rainydaysweater |
|||||||
 |
 |
||||||
Knitted jumper with textured pattern in DROPS Air. Size: S - XXXL
DROPS 210-5 |
|||||||
|
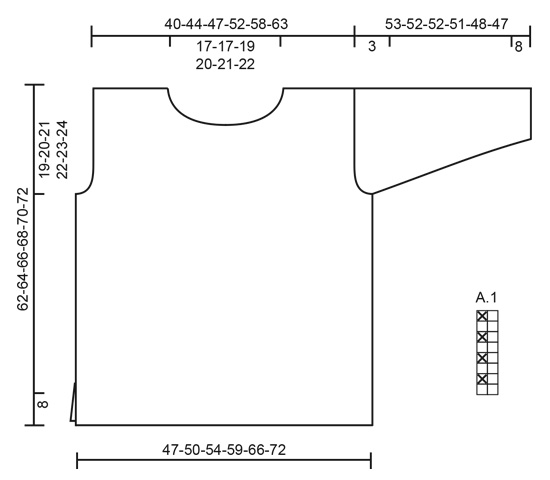
---------------------------------------------------------- EXPLANATION FOR THE PATTERN: ---------------------------------------------------------- GARTER STITCH (back and forth): Knit all rows. 1 ridge vertically = knit 2 rows. PATTERN: See diagram A.1. DECREASE TIP-1 (evenly): To calculate how to decrease evenly, use the total number of stitches on row (e.g. 89 stitches) and divide stitches by number of decreases to be done (e.g. 12) = 7.4. In this example decrease by knitting approx. every 6th and 7th stitch together. DECREASE TIP-2 (applies to neck decrease front piece): Decrease inside 3 stitches, continue these 3 stitches in stocking stitch up along neck edge. All decreases are done from the right side. Decrease as follows before stitches slipped on a stitch holder for neck (left shoulder). Work until 5 stitches on needle (towards stitches slipped on a stitch holder), knit 2 together, work the last 3 stitches on needle in stocking stitch. Decrease as follows after stitches slipped on a stitch holder for neck (right shoulder). Work 3 stitches in stocking stitch, slip next stitch knitwise, knit next stitch, pass slipped stitch over, work the rest of row. INCREASE TIP (applies to sleeves): Begin 1 stitch before marker thread, make 1 yarn over, 2 stitches (marker thread is in the middle of these stitches), make 1 yarn over. On next round knit yarns over twisted to avoid holes. ---------------------------------------------------------- START THE PIECE HERE: ---------------------------------------------------------- JUMPER - SHORT OVERVIEW OF THE PIECE: Work jumper back and forth in 2 parts that are sewn together when finished. Work sleeves in the round on double pointed needles. BACK PIECE: Cast on 89-97-103-113-125-137 stitches on circular needle size 4.5 mm with Air. Purl 1 row from wrong side, then work as follows from right side: 2 edge stitches in in GARTER STITCH – see explanation above, * knit 1/purl 1 *, repeat from *-* until 3 stitches remain, knit 1 and 2 stitches in garter stitch. Continue like this until piece measures 8 cm. Switch to circular needle size 5.5 mm. Knit 1 row from right side while decreasing 12-14-14-16-18-20 stitches evenly - READ DECREASE TIP-1 = 77-83-89-97-107-117 stitches. Work A.1 with 1 edge stitch in garter stitch in each side. When piece measures 43-44-45-46-47-48 cm, cast off for armholes in each side. Cast off stitches at beginning of every row in each side: Cast off 3 stitches 1-1-1-1-1-1 time, 2 stitches 1-1-1-1-1-1 time and 1 stitch 1-1-2-2-2-3 times = 65-71-75-83-93-101 stitches. Continue in A.1 until piece measures 60-62-64-66-68-70 cm. Now cast off the middle 27-27-29-31-33-35 stitches for neck, and finish each shoulder separately. Then decrease on next row from the neck as follows: 1 stitch 1 time = 18-21-22-25-29-32 stitches remain for shoulder. Continue until piece measures 62-64-66-68-70-72 cm, and cast off. Work the other shoulder the same way. FRONT PIECE: Cast on and work as on back piece until piece measures 54-56-58-60-62-64 cm. Now slip the middle 17-17-19-21-23-25 stitches on 1 stitch holder for neck, and finish each shoulder separately. Then decrease every row from the right side as follows: 1 stitch 6 times - READ DECREASE TIP-2 (applies to neck) = 18-21-22-25-29-32 stitches remain for shoulder. Continue until piece measures 62-64-66-68-70-72 cm , and cast off. Work the other shoulder the same way. SLEEVE: Work sleeves in the round on double pointed needles/ circular needle, bottom up. Divide piece when decreasing for sleeve cap and work back and forth on needle. Cast on 46-48-50-52-52-56 stitches on double pointed needles size 4.5 mm with Air. Knit 1 round, then work rib, knit 1/purl 1. When piece measures 8 cm, switch to double pointed needles size 5.5 mm, and work in stocking stitch On first round in in stocking stitch decrease 8-8-8-8-8-10 stitches evenly = 38-40-42-44-44-46 stitches. Insert a marker thread at beginning of round = mid under sleeve. Continue in stocking stitch, AT THE SAME TIME when piece measures 10-10-10-10-12-12 cm, increase 1 stitch on each side of marker thread - READ INCREASE TIP. Work yarn overs twisted on next round to avoid holes. Increase every 3½-3½-3-3-2-2 cm 11-12-13-13-15-15 times in total = 60-64-68-70-74-76 stitches. When piece measures 50-49-49-48-45-44 cm, cast off 3 stitches on each side of marker thread (= 6 stitches cast off mid under sleeve), then work sleeve back and forth. Cast off for sleeve cap at beginning of every row in each side as follows: 2 stitches 1 time, 3 stitches 1 time, then cast off the remaining stitches. Work another sleeve the same way. ASSEMBLY: Sew the shoulder seams. Sew in sleeves. Sew side seams inside 1 edge stitch until 8 cm remain = vent. NECK EDGE: Pick up approx. 92-106 stitches with circular needle size 4,5 mm around the neck (including stitches on stitch holder and adapt so that the number of stitches is divisible by 2). Work rib knit 1/purl 1 for 9 cm. Cast off. Fold rib at the top of neck down on the inside of garment. Fasten rib to form a folding edge. To avoid a tight neck edge and avoiding the edge to tip outwards, it is important to make the seam elastic. |
|||||||
Diagram explanations |
|||||||
|
|||||||
 |
|||||||
Have you finished this pattern?Tag your pictures with #dropspattern #rainydaysweater or submit them to the #dropsfan gallery. Do you need help with this pattern?You'll find 27 tutorial videos, a Comments/Questions area and more by visiting the pattern on garnstudio.com. © 1982-2026 DROPS Design A/S. We reserve all rights. This document, including all its sub-sections, has copyrights. Read more about what you can do with our patterns at the bottom of each pattern on our site. |
|||||||


With over 40 years in knitting and crochet design, DROPS Design offers one of the most extensive collections of free patterns on the internet - translated to 17 languages. As of today we count 324 catalogues and 12290 patterns translated into English (UK/cm). 12290
We work hard to bring you the best knitting and crochet have to offer, inspiration and advice as well as great quality yarns at incredible prices! Would you like to use our patterns for other than personal use? You can read what you are allowed to do in the Copyright text at the bottom of all our patterns. Happy crafting!
Post a comment to pattern DROPS 210-5
We would love to hear what you have to say about this pattern!
If you want to leave a question, please make sure you select the correct category in the form below, to speed up the answering process. Required fields are marked *.