Comments / Questions (13)
![]() Alessandra wrote:
Alessandra wrote:
Buongiorno, mi servirebbe aiuto per la 4º riga del collo. Devo procedere in questo modo: Rovescio, yarn over, passo una maglia, rovescio, rovescio? In questo caso come lavoro lo yarn over della riga precedente? Nella didascalia dice di lavorarlo ritorto… Non devo fare un dritto, giusto? Perché in quel caso non potrei poi fare i due rovesci dello schema. Spero di essermi spiegata. Grazie!☺️
26.01.2025 - 22:15DROPS Design answered:
Buonasera Alessandra, deve lavorarlo a ritorto come indicato. Buon lavoro!
13.02.2025 - 23:21
![]() Simone wrote:
Simone wrote:
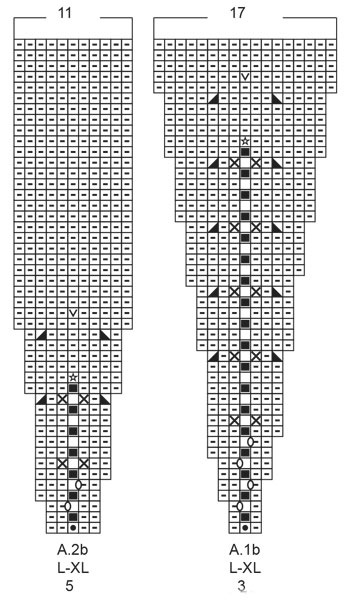
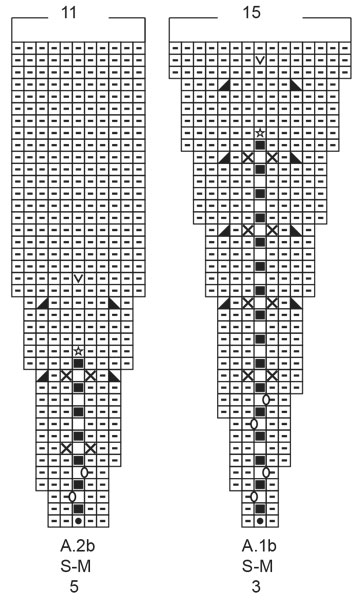
Hello, knitting another of your wonderful patterns.. September story but already I am stuck, Could you please explain the start of the yoke - Work A.1b over A.1a and A.2b over A.2a I don't understand how to proceed ? Work A/1b then A.1a then A.2b then A.2a or something else ? Many thanks again for your guidance
26.03.2023 - 21:54DROPS Design answered:
Hi Simone, The stitches you have worked in A.1a will now be worked according to diagram A.1b and the same applies to the stitches in A.2a, now worked according to diagram A.2b (no longer work A.1a or A.2a). Happy knitting!
27.03.2023 - 06:54
![]() Megan wrote:
Megan wrote:
Third row of A.1b and A.2b: after knitting yarn over and slip stitch together, making one yarn over, am I supposed to purl three times before knitting the next yarn over and slip stitch together? But there are only two stitches from the previous row for me to purl? Thank you,
01.10.2022 - 19:47DROPS Design answered:
Dear Megan, A.1b and A.2b are worked next to each other and repeated the whole row. Between the yarn over in A.1b and the yarn over in A.2b there are 3 purl stitches (1 from A.1b and 2 from A.2b). Happy knitting!
03.10.2022 - 00:57
![]() Megan wrote:
Megan wrote:
Thank you for your answering. If I yarn over once, slip a stitch to the right needle, I will have one more stitch for this row than what is shown in the diagram. Should I purl the next two stitches together then?
28.09.2022 - 16:37DROPS Design answered:
Dear Mega, the yarn over worked over the slipped stitch doesn't count as 1 stitch, both yarn overs + slipped stitch will count as 1 stitch in English rib; on the next round, you will knit the yarn over + the slipped stitch together as 1 stitch in English rib. This video shows how to work a pattern with such stitches, it might help you. Happy knitting!
29.09.2022 - 08:17
![]() Megan wrote:
Megan wrote:
This is a follow up question to my previous question about “make 1 yarn over and slip the stitch onto the right needle as if to purl (= English rib stitch)” in second row of A.1b and A.2b. In the answer to this question, “slip 1 stitch onto the right needle as if to purl, purl 1 and repeat,” what does “slip one stitch” mean? Does it mean a yarn over?
27.09.2022 - 16:24DROPS Design answered:
Hi Megan, Slipping a stitch means transferring it from the left needle to the right without working it. Slipping as if to purl means you insert the right needle from right to left when transferring it. Happy knitting!
28.09.2022 - 07:10
![]() Megan wrote:
Megan wrote:
“make 1 yarn over and slip the stitch onto the right needle as if to purl (= English rib stitch)” in second row of A.1b and A.2b, do you slip the stitch on the left needle onto the right needle and purl the next two stitches together? Thank you.
27.09.2022 - 06:54DROPS Design answered:
Hi Megan, In A.1b row 2 you purl 1, slip 1 stitch onto the right needle as if to purl, purl 1 and repeat. In A.2b you purl 2, slip 1 stitch onto the right needle as if to purl, purl 2 and repeat. Happy knitting!
27.09.2022 - 07:25
![]() Megan wrote:
Megan wrote:
If I use long tail cast on method, which creates both a cast-on and the first row, do I still need to knit one round? "Insert 1 marker at the beginning of the round mid back" What does "mid back" mean? Does it mean this marker will be in the middle of the back? Thank you.
22.09.2022 - 05:43DROPS Design answered:
Dear Megan, this knit row is worked before starting ribbing edge, just decide if you want it or rather start with rib. And correct, the rounds start /the marker is on the middle of back piece. Happy knitting!
22.09.2022 - 09:59
![]() Mary Culbertson wrote:
Mary Culbertson wrote:
I am stuck on how to proceed with yoke. Have been studying videos and charts and am confused. This is my first sweater other than simple baby sweaters. I love the look but haven't worked with charts.
02.01.2022 - 03:01DROPS Design answered:
Dear Mary, can you please tell us, exactly what confuses you? So we might be able to help you better. Thank you. Happy Stitching!
03.01.2022 - 02:05
![]() Kim Stellinga wrote:
Kim Stellinga wrote:
Ik heb de trui gebreid (s) in drops Alaska. Hij is mooi, maar wanneer de pas 20 cm meet ga je over in tricotsteek. Dit maakt dat de overgang ribbel/tricot halverwege de borst valt. Dit vind ik niet zo mooi omdat die rand best dik is. Het zou mooier zijn als je na 25 cm de overgang maakt. Dan valt hij onder de borst. Bij jullie model is zo te zien de overgang ook niet na 20 cm gebreid, want bij haar valt het ook onder de borst. Dit zou naar mijn idee moeten worden aangepast in het patroon.
13.10.2021 - 23:49
![]() Christel Poeter wrote:
Christel Poeter wrote:
Die Anleitung will ich in Groesse M stricken Halsausschnitt 1 Reihe re. stricken u.dann 1a u.2a über alle Maschen strichen das verstehe ich nicht 1a sind 3 Ma. u.2a 5Ma. nur rechte u. linke Ma.?Danke für die Hilfe
08.05.2020 - 22:36DROPS Design answered:
Liebe Frau Poeter, so sollen Sie stricken: *die 3 Maschen von A.1a, die 5 Maschen von A.2a*, diese 8 Maschen wiederholen Sie bis zur Ende der Runde, insgesamt 10 Mal = über alle 80 Maschen. Hier lesen Sie mehr über Diagramme. Viel Spaß beim stricken!
11.05.2020 - 08:37
September Story Sweater#septemberstorysweater |
|||||||||||||||||||||||||||||||
 |
 |
||||||||||||||||||||||||||||||
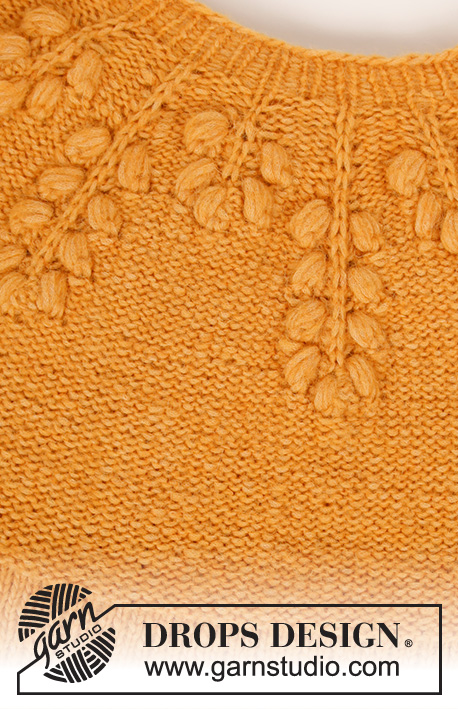
Knitted jumper with round yoke in DROPS Air. The piece is worked top down with bobbles. Sizes S - XXXL.
DROPS 213-25 |
|||||||||||||||||||||||||||||||
|
------------------------------------------------------- EXPLANATIONS FOR THE PATTERN: ------------------------------------------------------- PATTERN: See diagrams A.1 and A.2. Choose diagram for your size. INCREASE TIP (for sides of body): Work until there are 2 stitches left before the marker thread, make 1 yarn over, knit 4 (marker thread sits between these 4 stitches) make 1 yarn over (= 2 stitches increased). On the next round work the yarn overs twisted to avoid holes. The new stitches are knitted onwards. DECREASE TIP (for sleeves): Decrease 1 stitch on each side of the marker thread as follows: Work until there are 3 stitches left before the marker thread, knit 2 together, knit 2 (marker thread sits between these 2 stitches), slip 1 stitch as if to knit, knit 1 and pass the slipped stitch over the knitted stitch (= 2 stitches decreased). CASTING-OFF TIP: To avoid the cast-off edge being tight you can cast off with a larger size needle. If the edge is still tight, make 1 yarn over after approx. each 4th stitch at the same time as casting off and the yarn overs are cast off as normal stitches. ------------------------------------------------------- START THE PIECE HERE: ------------------------------------------------------- JUMPER – SHORT OVERVIEW OF THE PIECE: The piece is worked in the round with circular needle, top down from mid back. The sleeves are worked in the round with double pointed needles, top down. NECK: Cast on 72-80-80-88-88-96 stitches with circular needle size 4.5 mm and Air. Knit 1 round. Then work * A.1a (= 3 stitches), A.2a (= 5 stitches) *, work from *-* over all stitches (= 9-10-10-11-11-12 times in width) When the piece measures 3-3-3-3-4-4 cm change to circular needle size 5.5 mm. Insert 1 marker at the beginning of the round mid back; the yoke will be measured from this marker! YOKE: Work A.1b over A.1a and A.2b over A.2a. REMEMBER THE KNITTING TENSION! When A.1b and A.2b have been completed 1 time in height there are 234-260-280-308-330-360 stitches on the needle. Purl until the piece measures 20-22-23-25-26-28 cm from the marker. The yoke is now divided for the body and sleeves as follows: Knit 34-39-41-45-48-55, place the next 48-52-58-64-68-70 stitches on 1 thread for the sleeve, cast on 6 new stitches on the needle (= in side under the sleeve), knit 69-78-82-90-97-110 (= front piece), place the next 48-52-58-64-68-70 stitches on 1 thread for the sleeve, cast on 6 new stitches on the needle (= in side under the sleeve) and knit the remaining 35-39-41-45-49-55 stitches. Body and sleeves are finished separately. THE PIECE IS NOW MEASURED FROM HERE! BODY: = 150-168-176-192-206-232 stitches. Insert 1 marker thread in the middle of the 6 stitches cast on under each sleeve. There are 75-84-88-96-103-116 stitches on both the back and front piece. Allow the threads to follow your work onwards; they will be used when increasing in the sides. Knit in the round. When the piece measures 6 cm from the division, increase 1 stitch on each side of both marker threads – read INCREASE TIP (= 4 stitches increased). Repeat this increase when the piece measures 16 cm = 158-176-184-200-214-240 stitches. When the piece measures 29-29-30-30-30-30 cm from the division, change to circular needle size 4.5 mm and work rib (= knit 1, purl 1). Cast off with knit when the rib measures 4 cm – read CASTING-OFF TIP. SLEEVE: Place the 48-52-58-64-68-70 stitches from the thread on the one side of the piece on short circular needle size 5.5 mm and knit up 1 stitch in each of the 6 stitches cast on under the sleeve = 54-58-64-70-74-76 stitches. Insert a marker thread in the middle of the 6 stitches under the sleeve. Allow the thread to follow your work onwards; it will be used when decreasing under the sleeve. Start at the marker thread and knit in the round. When the sleeve measures 3 cm from the division, decrease 2 stitches mid under the sleeve – read DECREASE TIP. Decrease like this every 6-3-2½-2-1½-1½ cm a total of 5-7-9-11-12-12 times = 44-44-46-48-50-52 stitches. Continue working until the sleeve measures 32-30-30-28-27-25 cm from the division (there is approx. 7 cm left to finished length; you can try the jumper on and work to desired length). Change to double pointed needles size 4.5 mm and work rib (= knit 1, purl 1). Cast off when the rib measures 7 cm. The sleeve measures approx. 39-37-37-35-34-32 cm from the division. Work the other sleeve in the same way. |
|||||||||||||||||||||||||||||||
Diagram explanations |
|||||||||||||||||||||||||||||||
|
|||||||||||||||||||||||||||||||
 |
|||||||||||||||||||||||||||||||
 |
|||||||||||||||||||||||||||||||
 |
|||||||||||||||||||||||||||||||
 |
|||||||||||||||||||||||||||||||
Have you finished this pattern?Tag your pictures with #dropspattern #septemberstorysweater or submit them to the #dropsfan gallery. Do you need help with this pattern?You'll find 25 tutorial videos, a Comments/Questions area and more by visiting the pattern on garnstudio.com. © 1982-2026 DROPS Design A/S. We reserve all rights. This document, including all its sub-sections, has copyrights. Read more about what you can do with our patterns at the bottom of each pattern on our site. |
|||||||||||||||||||||||||||||||


Post a comment to pattern DROPS 213-25
We would love to hear what you have to say about this pattern!
If you want to leave a question, please make sure you select the correct category in the form below, to speed up the answering process. Required fields are marked *.