Comments / Questions (142)
![]() Minna wrote:
Minna wrote:
Hei, Etukappaleen ohjeessa lukee "neulo kuten takana, kunnes...". Mihin asti takakappaleen ohjeesta siis neulotaan samalla tavalla etukappaleessa?
23.08.2022 - 19:27DROPS Design answered:
Hei, etukappale neulotaan samalla tavalla kuin takana, kunnes kädenteiden silmukat on päätetty. Tämän jälkeen neulotaan sileää neuletta, kunnes työn pituus on 60-62-64-66-68-70 cm. Jatka sitten neulomista etukappaleen ohjeen mukaisesti.
24.08.2022 - 17:17
![]() Diana wrote:
Diana wrote:
Hei! Holder på med forstykket. Legg opp og strikk som bakstykket til arbeidet måler 60-62-64-66-68-70 cm. Nå settes de midterste 20-20-22-24-26-28 maskene på 1 tråd til hals, og hver skulder strikkes ferdig for seg står det. Når man legger de 22 maskene til hals på, et tråd så blir det ujevnt « feil» på skuldrene siden jeg har 103 masker til en en i størrelse L. Da vil jeg plutselig ha 40 masker på en skulder og 41 på den andre … DETTE MÅ JO BLI FEIL. Hjelp !
16.05.2022 - 18:59DROPS Design answered:
Hej Diana, du starter med 103 masker, tager 15 masker ind, lukker af til ærmegab i hver side og har 74 masker når du lukker af til hals :)
17.05.2022 - 08:57
![]() Elfrieda Schouwenburg wrote:
Elfrieda Schouwenburg wrote:
Er staat een schrijffout in het patroon bij de mouwen. Er staat meerderen en dan "meerder zo 3 cm in totaal 13 keer" maar dat moet zijn "meerder zo ELKE ... cm in totaal ... keer"
13.02.2022 - 19:28
![]() Tapsi wrote:
Tapsi wrote:
Hey, ich konnte der Anleitung soweit gut folgen, bin jetzt aber bei der Halsblende auf ein Problem gestoßen. Irgendwie konnte ich nur ca 74 statt 92 Maschen aufnehmen, trotzdem hat sich die Halsblende nach dem Zusammennähen nach außen gewölbt und stand ab wie ein Stehkragen. Sollte ich vielleicht doch noch weniger Maschen aufnehmen? Ich weiß echt nicht was der Fehler war 😅 Über Ihre Hilfe wäre ich sehr dankbar.
30.01.2022 - 01:06DROPS Design answered:
Liebe Tapsi, am besten versuchen Sie etwas mehr Maschen aufzufassen, wenn Sie zu wenig Maschen haben, kan die Halsblende etwas enger sein; vielleicht kann Ihnen dieses Video dann damit helfen? Sonnst zeigen Sie mal Ihrem Laden Ihr Strickstück , so kann man Ihnen besser helfen (auch mit Fotos per E-Mail schicken). Viel Spaß beim stricken!
31.01.2022 - 09:33
![]() Fien V wrote:
Fien V wrote:
Hallo, Waarom gebruik je bij het achterpand geen hulpdraad om de steken van de hals op te zetten (zoals je bij het voorpand wel moet doen)? Is het niet handiger om ipv af te kanten, hier ook een hulpdraad te gebruiken?
22.01.2022 - 09:44DROPS Design answered:
Dag Fien,
Eerlijk gezegd weet ik niet wat hiervan de reden is, maar het kan inderdaad beide, dus je kan de steken aan de achterkant ook op een hulpdraad zetten.
24.01.2022 - 20:33
![]() Ingela Johannesson wrote:
Ingela Johannesson wrote:
Hej! Undrar varför längden på ärmarna ska vara kortare i cm ju större storlek på tröjan?
03.01.2022 - 20:00DROPS Design answered:
Hej Ingela. I de större storlekarna kommer den totala vidden (från handled till handled) att vara större än i de mindre storlekarna, även om själva ärmen är kortare. De större storlekarna har längre ärmkupa samt bredare axelvidd. Detta resulterar i en bra passform i alla storlekar. Mvh DROPS Design
04.01.2022 - 11:03
![]() Natalie wrote:
Natalie wrote:
Well this is disappointing. Only on my third row and already I’m stuck! I have a bad feeling about this. It’s the waistband on this sweater a rib or a seed stitch. I thought it would be a rib but I’m following the pattern for the Large (103 stitches) and it’s knitting up as a seed stitch. Is this right? The picture looks like a rib stitch. Thanks
20.11.2021 - 02:58DROPS Design answered:
Dear Natalie, it's a rib. After the first row, you need to work knit over knit and purl over purl in the next rounds. Happy knitting!
21.11.2021 - 19:54
![]() Amélie Mercier wrote:
Amélie Mercier wrote:
Bonjour, Je ne comprends pas bien la finissions de la manche. Quand l'ouvrage mesure 49 cm (dépend de la grandeur du projet, moi médium), il ne demande de rabattre 3 mailles de chaque côté du fil marqueur et continuer en allers/retours. Mais sur combien de cm dois-je continuer avant de débuter la tête de la manche. En attente de votre réponse. Merci
05.11.2021 - 10:44DROPS Design answered:
Bonjour Mme Mercier, en taille M, vous rabattez 6 m au milieu sous la manche (= les 3 dernières + les 3 premières m du tour), puis vous continuer en rangs (= allers et retours) en rabattant 2 mailles au début des 2 rangs suivants puis 3 mailles au début des 2 rangs suivants et rabattez les mailles restantes - la tête de manche mesure environ 3 cm (cf schéma). Bon tricot!
05.11.2021 - 15:52
![]() Emilia wrote:
Emilia wrote:
Hej! Jag stickar ärmen på strumpstickor och inte rundstickor, när man på slutet ska maska av och sticka fram och tillbaka, ska man då föra över alla maskor på samma sticka eller ha kvar på fyra?
29.10.2021 - 14:06DROPS Design answered:
Hej Emilia, du kan sticka fram och tillbaka på 3 eller 4 strumpstickor :)
01.11.2021 - 10:55
![]() Emilia wrote:
Emilia wrote:
Hej! Jag håller på att sticka ärmen men har en liten fundering. När man på slutet ska sticka fram o tillbaka och maska av, för man över alla stickor på en sticka eller hur gör man? Tack!
27.10.2021 - 20:55DROPS Design answered:
Hej Emilia, du kan let strikke frem og tilbage på rundpinden, se her hvordan man gør: Rundsticka - fra m och tillb i slätst
29.10.2021 - 08:06
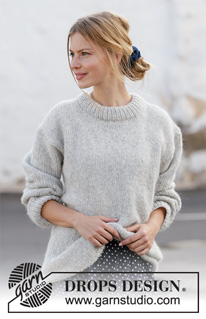
Grey Pearl#greypearlsweater |
|
 |
 |
Knitted jumper in DROPS Air. Sizes S - XXXL.
DROPS 210-36 |
|
|
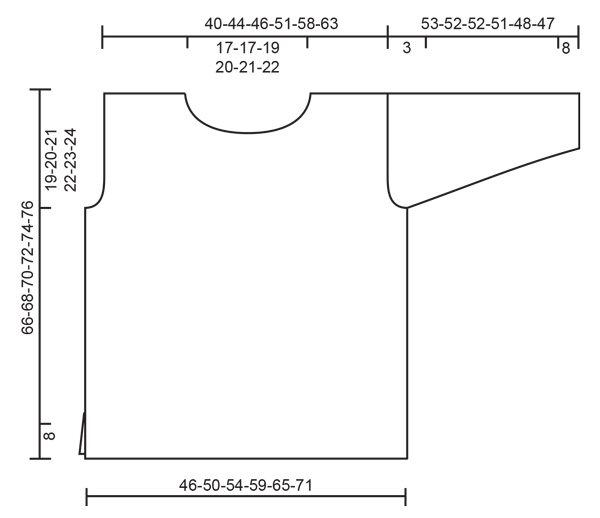
------------------------------------------------------- EXPLANATIONS FOR THE PATTERN: ------------------------------------------------------- RIDGE/GARTER STITCH (worked back and forth): Knit all rows. 1 ridge in height = Knit 2 rows. DECREASE TIP (evenly spaced): To work out how to decrease evenly, count the total number of stitches on needle (e.g. 89 stitches) and divide by number of decreases to be made (e.g. 13) = 6.8. In this example decrease by knitting together alternately each 5th and 6th stitch and each 6th and 7th stitch (approx.). INCREASE TIP (for sleeves): Start 1 stitch before the marker thread, 1 yarn over, work 2 stitches (marker thread sits between these 2 stitches), 1 yarn over. On the next round knit the yarn overs twisted to avoid holes. ------------------------------------------------------- START THE PIECE HERE: ------------------------------------------------------- JUMPER – SHORT OVERVIEW OF THE PIECE: The jumper is worked back and forth in 2 parts which are sewn together to finish. The sleeves are worked in the round with double pointed needles/short circular needle. BACK PIECE: Cast on 89-97-103-113-125-137 stitches with circular needle size 4.5 mm and Air. Purl 1 row from the wrong side then work as follows – from the right side: 2 edge stitches in GARTER STITCH – see description above, *knit 1, purl 1 *, work from *-* until there are 3 stitches left, knit 1 and 2 edge stitches in garter stitch. Continue like this until the piece measures 8 cm. Change to circular needle size 5.5 mm and knit 1 row from the right side where you decrease 13-15-15-17-19-21 stitches evenly spaced – read DECREASE TIP = 76-82-88-96-106-116 stitches. Continue with stocking stitch and 1 edge stitch in garter stitch on each side. When the piece measures 47-48-49-50-51-52 cm, cast off for the armholes on both sides at the beginning of each row as follows: Cast off 3 stitches 1-1-1-1-1-1 time, 2 stitches 1-1-1-1-1-1 time and 1 stitch 1-1-2-2-2-3 times = 64-70-74-82-92-100 stitches. Continue with stocking stitch until the piece measures 64-66-68-70-72-74 cm. Now cast off the middle 26-26-28-30-32-34 stitches for the neck and each shoulder is finished separately. Then cast off at the beginning of next row from the neck as follows: 1 stitch 1 time = 18-21-22-25-29-32 stitches on the shoulder. Continue working until the piece measures 66-68-70-72-74-76 cm and cast off. Work the other shoulder in the same way. FRONT PIECE: Cast on and work as for the back piece until the piece measures 60-62-64-66-68-70 cm. Now place the middle 20-20-22-24-26-28 stitches on 1 thread for the neck and finish each shoulder separately. Then cast off at the beginning of each row from the neck as follows: 2 stitches 1 time and 1 stitch 2 times = 18-21-22-25-29-32 stitches left on the shoulder. Continue working until the piece measures 66-68-70-72-74-76 cm, then cast off. Work the other shoulder in the same way. SLEEVE: The sleeves are worked bottom up, in the round, with double pointed needles/short circular needle. The piece is then divided and worked back and forth for the sleeve cap. Cast on 46-48-50-52-52-56 stitches with double pointed needles size 4.5 mm and Air. Knit 1 round, then work rib (knit 1 / purl 1) for 8 cm. Change to double pointed needles size 5.5 mm and continue with stocking stitch. On the first round decrease 8-8-8-8-8-10 stitches evenly spaced = 38-40-42-44-44-46 stitches. Insert a marker thread at the beginning of the round = mid under sleeve. Continue with stocking stitch, AT THE SAME TIME when the piece measures 10-10-10-10-12-12 cm, increase 1 stitch on each side of the marker thread – read INCREASE TIP. The yarn overs are worked twisted on the next round to avoid holes. Increase like this 3½-3½-3-3-2-2 cm a total of 11-12-13-13-15-15 times = 60-64-68-70-74-76 stitches. When the sleeve measures 50-49-49-48-45-44 cm, cast off 3 stitches on each side of the marker thread (= 6 stitches cast off mid under the sleeve), then continue working back and forth. Cast off for the sleeve cap at the beginning of each row on both sides as follows: 2 stitches 1 time, 3 stitches 1 time, then cast off the remaining stitches. Work the other sleeve in the same way. ASSEMBLY: Sew the shoulder seams. Sew in the sleeves and sew the side seams, inside the 1 edge stitch and until there is 8 cm left at the bottom = split. NECK: Knit up approx. 92-106 stitches with circular needle size 4,5 mm around the neck (including the stitches on the thread and the number divisible by 2). Work rib (knit 1 / purl 1) for 9 cm. Then cast off. Fold the rib at the top to the wrong side and fasten down. To avoid the neck being tight and turning outwards, make sure the seam is elastic. |
|
 |
|
Have you finished this pattern?Tag your pictures with #dropspattern #greypearlsweater or submit them to the #dropsfan gallery. Do you need help with this pattern?You'll find 30 tutorial videos, a Comments/Questions area and more by visiting the pattern on garnstudio.com. © 1982-2025 DROPS Design A/S. We reserve all rights. This document, including all its sub-sections, has copyrights. Read more about what you can do with our patterns at the bottom of each pattern on our site. |
|


Post a comment to pattern DROPS 210-36
We would love to hear what you have to say about this pattern!
If you want to leave a question, please make sure you select the correct category in the form below, to speed up the answering process. Required fields are marked *.