
Popular categories
Looking for a yarn?


Comments / Questions (151)
![]() Lefevre wrote:
Lefevre wrote:
Bonjour \\r\\nLa taille L correspond à 44 ou 46\\r\\net le taille XL 46 ou 48 ?\\r\\nMarie Laurence lefevre
29.08.2025 - 19:40DROPS Design answered:
Bonjour Mme Lefevre, pour trouver quelle taille vous devez tricoter, l'idéal est de mesurer un vêtement que vous avez et dont vous aimez la forme, comparez ces mesures à celles du schéma pour trouver la taille correspondante. Retrouvez plus d'info ici. Bon tricot!
01.09.2025 - 16:06
![]() Els wrote:
Els wrote:
Wat is de kleur van de trui op de foto van Maria uit Norway in de dropsfangallery?
25.08.2025 - 13:45DROPS Design answered:
Dag Els,
Dat zou ik zo niet weten, want het is er niet bij vermeld, maar vermoedelijk is het robijnrood nr 07.
27.08.2025 - 10:26
![]() Esme wrote:
Esme wrote:
When working the sleeve cap and it says 'then continue working back and forth', how many cms is this for? I just went straight from casting off 3 stitches each side of the marker and then onto casting off at beginning of each row and my sleeve now looks very short....
06.06.2025 - 03:37DROPS Design answered:
Dear Esme, after you have worked 3 sts on each side of the marker mid under sleeve, you work now back and forth on needle casting off 2 stitches at the beginning of next 2 rows and then 3 stitches at the beginning of next 2 rows. Cast off all remaining stitches. Sleeve cap should measure approx. 3 cm - see chart (1 row casting off mid under sleeve + 4 rows + 1 cast off row). Happy knitting!
06.06.2025 - 08:21
![]() Esme Dawber wrote:
Esme Dawber wrote:
Hi I have some questions, how do you make the seam elastic? And what does this mean 'Now place the middle 20-20-22-24-26-28 stitches on 1 thread for the neck and finish each shoulder separately.' What thread am I putting the stitches on and how do I come back to them?
21.05.2025 - 02:22DROPS Design answered:
Dear Mrs Dawber, make sure to not tighten the thread when sewing so that the seam will be elastic. In this video we show how to slip stitches on a thread - use another thread any quality/colour this is a scrap yarn just to keep stitches, you could also use a stitch holder if your rather. So these stitches are on middle on front piece for neck, and on each side you get the stitches for shoulders you will now work separately to the finished length (casting off sts for neck). Later, you will pick up stitches around neck and work the stitches from thread back on needle. Happy knitting!
21.05.2025 - 08:51
![]() Lucie wrote:
Lucie wrote:
Bonjour, je ne comprends pas. Les manches, quand l’ouvrage mesure 10 cm, augmenter1 maille de chaque côté du fil marqueur.comment tricoter les jetés torse au tour suivant pour éviter les trous. Augmenter ainsi 11 fois au total 31/2cm. Est-ce que ça fait 22 mailles de plus? Et comment tricoter les jeté torse???? Merci beaucoup de votre patience
19.05.2025 - 19:51DROPS Design answered:
Bonjour Lucie, quand on tricote un jeté torse à l'endroit, on le tricote dans le brin arrière (cf AUGMENTATIONS (manches) et cette vidéo, en taille S, vous tricotez la 1ère augmentation quand la manche mesure 10 cm puis tous les 3,5 cm autrement dit, la 2ème à 13,5 cm, la 3ème à 17, la 4ème à 20,5 cm et ainsi de suite. Vous augmentez ainsi 22 m au total (11 fois 2 mailles), vous aviez 38 mailles + 22 = vous avez 60 mailles quand les augmentations sont faites. Bon tricot!
20.05.2025 - 09:33
![]() Lucie wrote:
Lucie wrote:
Je ne comprends pas, comment augmenter les 12 mailles en 3 cm???? Pour le début des manches
19.05.2025 - 15:45DROPS Design answered:
Bonjour Lucie, de quelles augmentations parlez-vous? Quand la manche mesure 10- cm, vous allez augmenter 2 m sous la manche (1 à la fin du tour + 1 au début du tour suivant, cf AUGMENTATIONS 13 fois tous les 3 cm en taille L et XL - vous aviez 42 m en L / 44 m en XL vous augmentez 13x2 = 26 m au total, vous avez ainsi 68 m en L et 70 m en taille L. Augmentez ainsi à 10, 13, 16, 19, 21... cm. Tricotez ensuite - sans augmenter - jusqu'à ce que la manche mesure 49-48 cm et rabattez 6 m sous la manche. Bon tricot!
19.05.2025 - 16:17
![]() Desiree Leonard wrote:
Desiree Leonard wrote:
I am knitting the drops gray pearl sweater in size small. On the back piece it says to cast off the middle 26 stitches for the neck and then finish each shoulder separately. If I cast off 26 stitches I’m left with 16 on each shoulder yet the instructions say I should have 18 after casting off one more stitch at the beginning of the next row from the neck. By my calculations this would leave 15 stitches on each shoulder. Also, how do I work each slave separately and using a circular needles?
01.05.2025 - 22:45DROPS Design answered:
Dear Mrs Leonard, you have 64 sts on needle before shaping neck, you cast off the middle 26 sts = 38 sts remain/2 shoulders: 19 stitches; then you will cast off 1 stitch at the beginning of each row on shoulder from neck (from RS on left shoulder/from WS on right shoulder) = 18 sts remain. Happy knitting!
02.05.2025 - 08:53
![]() Valérie wrote:
Valérie wrote:
Vielen Dank für die Antwort. Ich möchte aber 1 Faden durch 3 Fäden unterschiedlicher Garne ersetzen. Wie soll ich da vorgehen?
26.03.2025 - 14:55DROPS Design answered:
Liebe Valérie, wenn Sie mit diesen 3 Fäden stricken, dann kann die Maschenprobe nicht stimmen, hier empefehlen wir 2 Fäden der Garngruppe A - wenn Sie diese Maschenprobe troztdem haben, dann kann die Lektion schon helfen; in allen Fälle kann Ihnen Ihr DROPS Händler weiter - auch per Telefon oder per E-Mail gerne weiterhelfen. Viel Spaß beim Stricken!
26.03.2025 - 15:55
![]() Valérie wrote:
Valérie wrote:
Hallo Ich würde gerne diesen Pulli in Grösse L aus der Kombination von 1 x Baby Merino und 2 x Kid-Silk stricken (wie bei den Kombinierten Farben: DROPS Baby Merino 44, puder + DROPS Kid-Silk 13, pink + DROPS Kid-Silk 30, curry). Würden Sie mir bitte mitteilen, wie viele Gramm ich von jedem Garn benötigen werde? Vielen Dank. Ich wünsche einen schönen Tag. Valérie
26.03.2025 - 12:27DROPS Design answered:
Liebe Valérie, hier wird es erklärt, wie man die neue Garnmenge kalkuliert, schauen Sie unter 2 Fäden unterschiedlicher Garne durch 1 Faden ersetzen. Viel Spaß beim Stricken!
26.03.2025 - 12:52
![]() Valérie wrote:
Valérie wrote:
Bonjour, je voudrais savoir s'il est possible de commencer le tricot par le haut et non par le bas pour ainsi mieux ajuster la hauteur? Autre question : ce modèle taille t'il plutôt petit? Quel est l'équivalent d'une taille 40? est ce plutôt une taille L ou XL? Merci
11.02.2025 - 11:07DROPS Design answered:
Bonjour Valérie, vous pouvez probablement, mais il peut être plus simple de choisir un modèle déjà écrit pour être tricoté de haut en bas - retrouvez-en ici. Pour les tailles, mesurez un vêtement similaire que vous avez et dont vous aimez la forme et comparez ces mesures à celles du schéma - retrouvez plus d'infos ici. Bon tricot!
11.02.2025 - 15:53
|
|
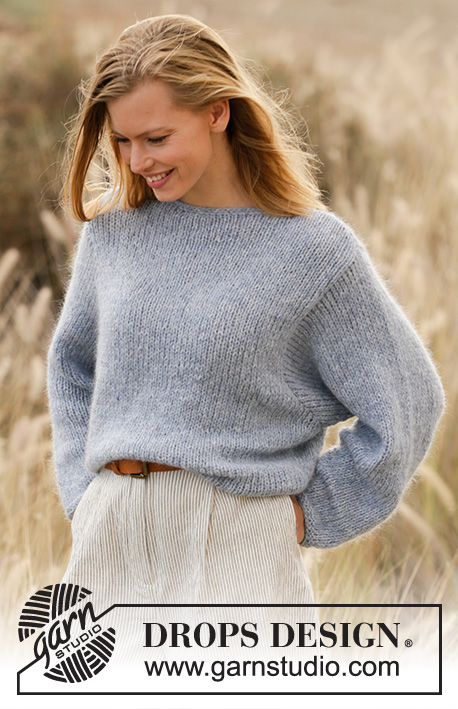
Grey Pearl#greypearlsweater |
|
 |
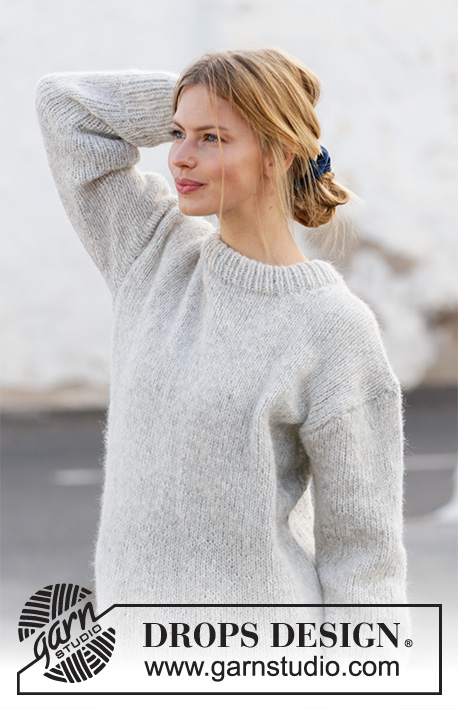 |
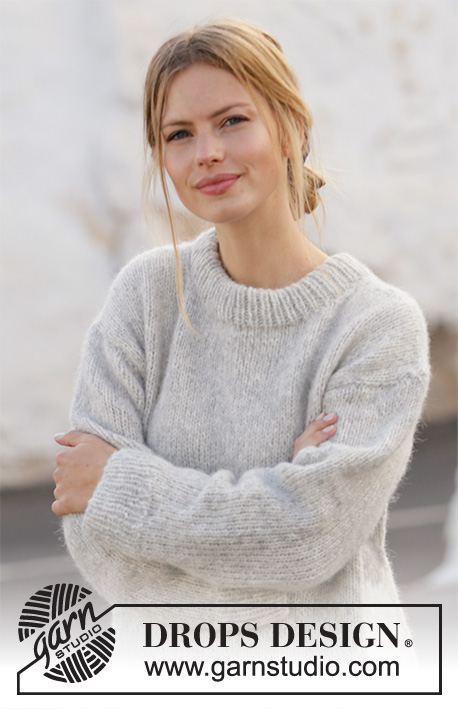
Knitted jumper in DROPS Air. Sizes S - XXXL.
DROPS 210-36 |
|
|
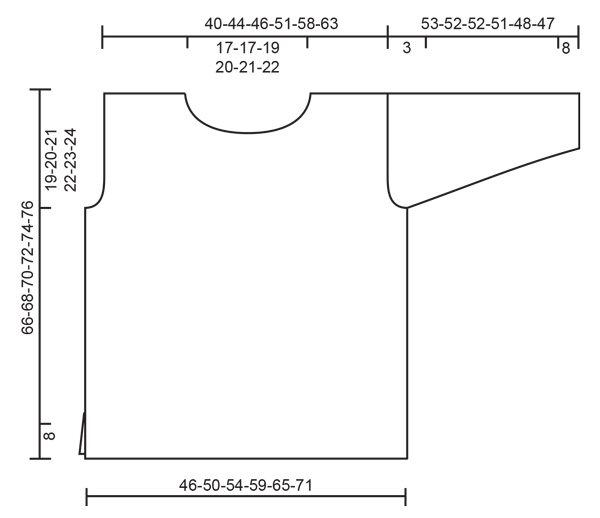
------------------------------------------------------- EXPLANATIONS FOR THE PATTERN: ------------------------------------------------------- RIDGE/GARTER STITCH (worked back and forth): Knit all rows. 1 ridge in height = Knit 2 rows. DECREASE TIP (evenly spaced): To work out how to decrease evenly, count the total number of stitches on needle (e.g. 89 stitches) and divide by number of decreases to be made (e.g. 13) = 6.8. In this example decrease by knitting together alternately each 5th and 6th stitch and each 6th and 7th stitch (approx.). INCREASE TIP (for sleeves): Start 1 stitch before the marker thread, 1 yarn over, work 2 stitches (marker thread sits between these 2 stitches), 1 yarn over. On the next round knit the yarn overs twisted to avoid holes. ------------------------------------------------------- START THE PIECE HERE: ------------------------------------------------------- JUMPER – SHORT OVERVIEW OF THE PIECE: The jumper is worked back and forth in 2 parts which are sewn together to finish. The sleeves are worked in the round with double pointed needles/short circular needle. BACK PIECE: Cast on 89-97-103-113-125-137 stitches with circular needle size 4.5 mm and Air. Purl 1 row from the wrong side then work as follows – from the right side: 2 edge stitches in GARTER STITCH – see description above, *knit 1, purl 1 *, work from *-* until there are 3 stitches left, knit 1 and 2 edge stitches in garter stitch. Continue like this until the piece measures 8 cm. Change to circular needle size 5.5 mm and knit 1 row from the right side where you decrease 13-15-15-17-19-21 stitches evenly spaced – read DECREASE TIP = 76-82-88-96-106-116 stitches. Continue with stocking stitch and 1 edge stitch in garter stitch on each side. When the piece measures 47-48-49-50-51-52 cm, cast off for the armholes on both sides at the beginning of each row as follows: Cast off 3 stitches 1-1-1-1-1-1 time, 2 stitches 1-1-1-1-1-1 time and 1 stitch 1-1-2-2-2-3 times = 64-70-74-82-92-100 stitches. Continue with stocking stitch until the piece measures 64-66-68-70-72-74 cm. Now cast off the middle 26-26-28-30-32-34 stitches for the neck and each shoulder is finished separately. Then cast off at the beginning of next row from the neck as follows: 1 stitch 1 time = 18-21-22-25-29-32 stitches on the shoulder. Continue working until the piece measures 66-68-70-72-74-76 cm and cast off. Work the other shoulder in the same way. FRONT PIECE: Cast on and work as for the back piece until the piece measures 60-62-64-66-68-70 cm. Now place the middle 20-20-22-24-26-28 stitches on 1 thread for the neck and finish each shoulder separately. Then cast off at the beginning of each row from the neck as follows: 2 stitches 1 time and 1 stitch 2 times = 18-21-22-25-29-32 stitches left on the shoulder. Continue working until the piece measures 66-68-70-72-74-76 cm, then cast off. Work the other shoulder in the same way. SLEEVE: The sleeves are worked bottom up, in the round, with double pointed needles/short circular needle. The piece is then divided and worked back and forth for the sleeve cap. Cast on 46-48-50-52-52-56 stitches with double pointed needles size 4.5 mm and Air. Knit 1 round, then work rib (knit 1 / purl 1) for 8 cm. Change to double pointed needles size 5.5 mm and continue with stocking stitch. On the first round decrease 8-8-8-8-8-10 stitches evenly spaced = 38-40-42-44-44-46 stitches. Insert a marker thread at the beginning of the round = mid under sleeve. Continue with stocking stitch, AT THE SAME TIME when the piece measures 10-10-10-10-12-12 cm, increase 1 stitch on each side of the marker thread – read INCREASE TIP. The yarn overs are worked twisted on the next round to avoid holes. Increase like this 3½-3½-3-3-2-2 cm a total of 11-12-13-13-15-15 times = 60-64-68-70-74-76 stitches. When the sleeve measures 50-49-49-48-45-44 cm, cast off 3 stitches on each side of the marker thread (= 6 stitches cast off mid under the sleeve), then continue working back and forth. Cast off for the sleeve cap at the beginning of each row on both sides as follows: 2 stitches 1 time, 3 stitches 1 time, then cast off the remaining stitches. Work the other sleeve in the same way. ASSEMBLY: Sew the shoulder seams. Sew in the sleeves and sew the side seams, inside the 1 edge stitch and until there is 8 cm left at the bottom = split. NECK: Knit up approx. 92-106 stitches with circular needle size 4,5 mm around the neck (including the stitches on the thread and the number divisible by 2). Work rib (knit 1 / purl 1) for 9 cm. Then cast off. Fold the rib at the top to the wrong side and fasten down. To avoid the neck being tight and turning outwards, make sure the seam is elastic. |
|
 |
|
Have you finished this pattern?Tag your pictures with #dropspattern #greypearlsweater or submit them to the #dropsfan gallery. Do you need help with this pattern?You'll find 30 tutorial videos, a Comments/Questions area and more by visiting the pattern on garnstudio.com. © 1982-2026 DROPS Design A/S. We reserve all rights. This document, including all its sub-sections, has copyrights. Read more about what you can do with our patterns at the bottom of each pattern on our site. |
|


With over 40 years in knitting and crochet design, DROPS Design offers one of the most extensive collections of free patterns on the internet - translated to 17 languages. As of today we count 324 catalogues and 12290 patterns translated into English (UK/cm). 12290
We work hard to bring you the best knitting and crochet have to offer, inspiration and advice as well as great quality yarns at incredible prices! Would you like to use our patterns for other than personal use? You can read what you are allowed to do in the Copyright text at the bottom of all our patterns. Happy crafting!
Post a comment to pattern DROPS 210-36
We would love to hear what you have to say about this pattern!
If you want to leave a question, please make sure you select the correct category in the form below, to speed up the answering process. Required fields are marked *.