
Popular categories
Looking for a yarn?


Comments / Questions (18)
![]() Elena wrote:
Elena wrote:
Buongiorno, vorrei chiedere un chiarimento. Il modello Autumn Gold è possibile eseguirlo usando solo il filato drops sky? Suppongo sia necessaria una quantità maggiore di lana ma le proporzioni, secondo voi, rimangono uguali? Grazie
07.12.2025 - 21:01DROPS Design answered:
Buonasera Elena, il filato DROPS Kid-Silk serve ad alleggerire il modello. Usando solo il filato DROPS Sky deve provare a lavorare un campione e verificare che corrisponda a quello indicato. Buon lavoro!
08.12.2025 - 22:35
![]() Helene wrote:
Helene wrote:
The pattern was extremely difficult to read, even for an experienced crocheter. The translation to Danish added on the confusion, and I ended up only using the pattern as an inspiration and did my own thing. An example is the description of how to crochet in the puf masks where the pattern rely on two masks where there really is three masks per puf mask. It took some trials to get it right on my own. Plus the diagram was confusing. The result is beautiful but not because of this pattern.
18.11.2024 - 13:28
![]() Cristina Villada wrote:
Cristina Villada wrote:
Muy confusa las explicaciones, no se entiende bien,qué lástima me encantan sus modelos! Para qué tantos tips.
02.04.2021 - 03:05
![]() Eileen wrote:
Eileen wrote:
Very helpful, thank you.
29.05.2020 - 17:04
![]() Eileen O'Keeffe wrote:
Eileen O'Keeffe wrote:
The person that I am makin the pattern for has a rather large head, the pattern I am making is small but the 61 chain will not go over her head any suggestions would be helpful.
29.05.2020 - 16:39DROPS Design answered:
Dear Mrs O'Keeffe, you can try to crochet more chain stitches to start with and then adjust on first increase row (to 73 sts) but remember also to check your gauge in both width and height - we are unfortunately not able to adjust every pattern to every single request, but your DROPS store will be able to assist you and find you any solution if needed, even per mail or telephone. Happy crocheting!
29.05.2020 - 16:59
![]() Eileen wrote:
Eileen wrote:
Just wondering if this pattern worked in thr round. Its not stated in the pattern. Thank you!
29.05.2020 - 13:54DROPS Design answered:
Dear Eileen, jumper is worked top down and back and forth (i.e. alternately from the right and wrong side) from mid back; it is worked together at the end of each row with a slip stitch - see CROCHET INFORMATION. Happy crocheting!
29.05.2020 - 14:56
![]() Cecilie wrote:
Cecilie wrote:
Hej, Hvor meget garn skal der bruges? Jeg kan ikke se dette oplyst nogle steder?
16.02.2020 - 12:46
![]() Geoffriau wrote:
Geoffriau wrote:
Comment enregistrer ce modèle dans la rubrique>Merci
14.12.2019 - 16:59DROPS Design answered:
Bonjour Mme Geoffriau, pour enregistrer ce modèle dans vos favoris, cliquez sur le petit coeur à côté des boutons "Besoin d'aide?" et "Imprimer" et suivez les indications. Bon crochet!
16.12.2019 - 08:03
![]() Cidalia Vintém wrote:
Cidalia Vintém wrote:
Me encanta el diseño, pero la descripción/instrucciones son un desastre. Parece una ensalada de mandos. Super, super confuso. Es una lastima porque sus diseños son hermosos.
25.11.2019 - 22:58
![]() Eva wrote:
Eva wrote:
I really like this design. I'm going to crochet it next week. But I think there should be just 125-150g Kid-Silk (size S). Is it possible?
27.10.2019 - 16:27DROPS Design answered:
Dear Eva. You seem to be right about the amount (150 gr) We've sent your comment to the Design Department. Happy knitting!
27.10.2019 - 17:52
|
||||||||||||||||||||||||||||
Autumn Gold#autumngoldsweater |
||||||||||||||||||||||||||||
 |
 |
|||||||||||||||||||||||||||
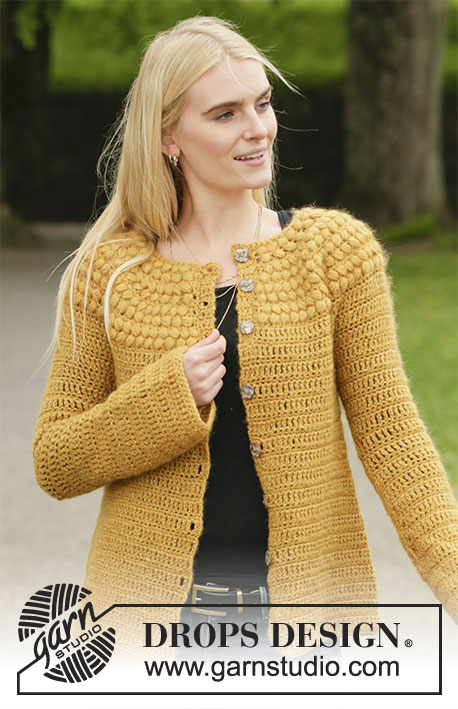
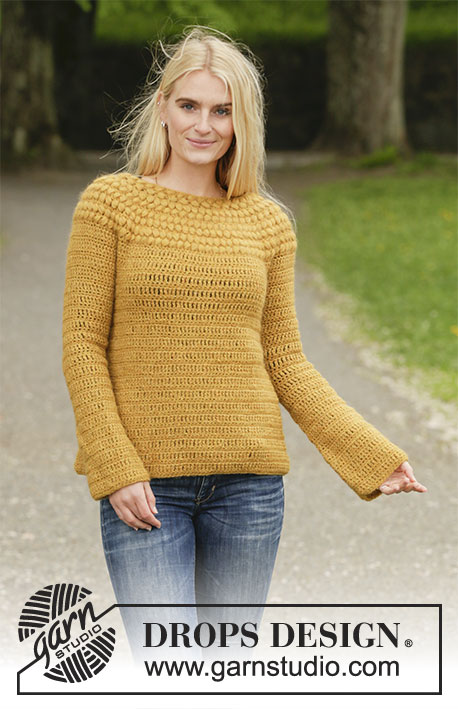
Crocheted jumper in DROPS Sky and DROPS Kid-Silk. The piece is worked with a round yoke, top down and with puff-stitches on the yoke. Sizes S - XXXL.
DROPS 207-19 |
||||||||||||||||||||||||||||
|
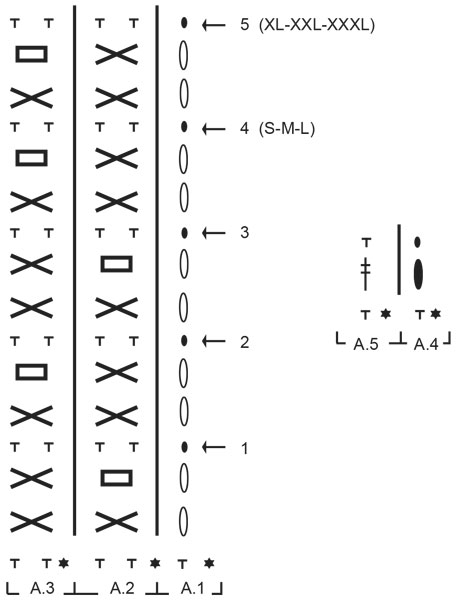
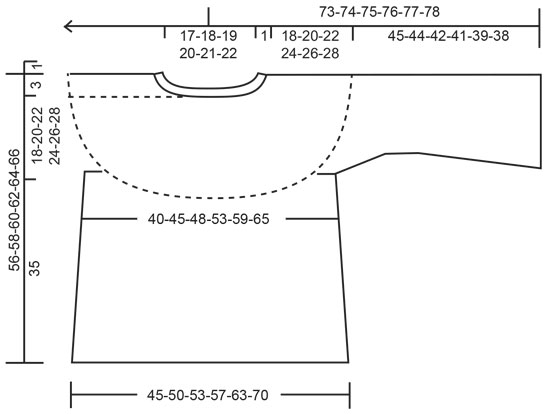
------------------------------------------------------- EXPLANATIONS FOR THE PATTERN: ------------------------------------------------------- CHAIN STITCH: If you work outermost on the hook the chain stitch will often be too tight; 1 chain stitch should be as long as 1 double crochet/treble crochet/double treble crochet is wide. CROCHET INFORMATION: Each row is worked back and forth and then worked together at the end/beginning of each row as follows: Each row of double crochets starts with 1 chain stitch (replace the first double crochet) and finishes with 1 slip stitch in the 1th chain stitch, turn the piece. Each row of puff stitches starts with 3 chain stitches and finishes with 1 slip stitch in the 3rd chain stitch, turn the piece. Each row of double treble crochets starts with 4 chain stitches (replace the first double treble crochet) and finishes with 1 slip stitch in the 4th chain stitch, turn the piece. INCREASE TIP-1 (evenly spaced): To work out how to increase evenly, count the total number of stitches on the row (e.g. 61 stitches) and divide by the number of increases to be made (e.g. 12) = 5.1. In this example, increase by working 2 double crochets in approx. each 5th stitch from the previous row. PATTERN: See diagrams A.1 to A.5. 1 PUFF-STITCH: Work as follows in the same stitch (important to work in the stitch not around the stitch): * Make 1 yarn over, insert the hook through the stitch, make 1 yarn over and pull it through the stitch; make both yarn overs long (to avoid the puff-stitch being small and compact it is important to pull the yarn overs to approx. 2 cm in length) *, work from *-* a total of 5 times, make a yarn over and pull the strand through all loops on the hook. INCREASE TIP-2 (for sides of body): Increase 1 stitch by working 2 stitches in the same stitch. Increase on each side of the marker thread as follows: Work until there are 4 stitches left before the marker thread, increase 1 stitch in the next stitch, work 6 stitches (marker thread sits in the middle of these 6 stitches), increase 1 stitch in the next stitch (= 2 stitches increased at each marker thread and a total of 4 stitches increased on the row). DECREASE TIP (for each side of sleeve): Decrease on a row of double crochets by working the 2 outermost stitches on the row together as follows: Insert the hook through the next-to-outermost stitch, make 1 yarn over and pull the yarn over through the stitch, insert the hook through the next stitch, make 1 yarn over and pull the yarn over through the stitch, make 1 more yarn over and pull it through all 3 loops on the hook (= 1 stitch decreased). ------------------------------------------------------- START THE PIECE HERE: ------------------------------------------------------- JUMPER – SHORT OVERVIEW OF THE PIECE: The yoke is worked top down and back and forth (i.e. alternately from the right and wrong side) from mid back; it is worked together at the end of each row. The yoke is divided for body and sleeves and both are continued separately back and forth in the same way. YOKE: Work 61-63-67-69-71-73 CHAIN STITCHES – read description above, with hook size 5.5 mm and 1 strand Sky + 1 strand Kid-Silk (= 2 strands) and form them into a ring with 1 slip stitch in the first chain stitch. The first row is worked as follows from the wrong side: Work 2 chain stitches – read CROCHET INFORMATION, 1 double crochet in each chain stitch to the end of the row = 61-63-67-69-71-73 double crochets. Work 1 row of double crochets from the right side with 1 double crochet in each double crochet and increase at the same time 12 double crochets evenly spaced on the row – read INCREASE TIP-1 = 73-75-79-81-83-85 double crochets. The next row is worked as follows from the wrong side: Work A.1 over the first stitch (shows how the rows start and finish), work A.3 over 2 stitches and repeat A.2 to the end of the row (= 35-36-38-39-40-41 repeats of 2 stitches). Continue this pattern back and forth. REMEMBER THE CROCHET TENSION! AT THE SAME TIME on each row marked with an arrow in A.1, increase double crochets evenly spaced as described below – remember INCREASE TIP-1: Arrow-1: Increase 36-36-38-40-40-42 double crochets evenly spaced = 109-111-117-121-123-127 stitches (there is now room for 53-54-57-59-60-62 repeats of A.2 in width). Arrow-2: Increase 16-20-24-24-26-30 double crochets evenly spaced = 125-131-141-145-149-157 stitches (there is now room for 61-64-69-71-73-77 repeats of A.2 in width). Arrow-3: Increase 16-20-24-24-26-30 double crochets evenly spaced = 141-151-165-169-175-187 stitches (there is now room for 69-74-81-83-86-92 repeats of A.2 in width). Arrow-4: Increase 16-20-24-22-24-30 double crochets evenly spaced = 157-171-189-191-199-217 stitches (there is now room for 77-84-93-94-98-107 repeats of A.2 in width). Continue working A.1 to A.3 up to and including the row marked for your size; i.e. sizes S-M-L are now finished. Continue in sizes XL-XXL-XXXL and increase on the last row as follows: Arrow-5: NOTE: Do not turn on this row but work the row from the right side so the next row is from the wrong side – increase 12-24-28 double crochets evenly space = 203-223-245 stitches. When A.1 to A.3 have been completed for your size, the piece measures approx. 14-14-14-17-17-17 cm from the cast-on edge mid front. The next row is worked as follows from the wrong side: Work A.4 over the first stitch (shows how the rows start and finish), repeat A.5 (= 1 stitch) to end of row. Continue this pattern; A.4 and A.5 are repeated in height to finished length. When the piece measures approx. 17-18-20-21-22-24 cm from the cast-on edge mid front – adjust so the next row is a row of double crochets (from right side), increase 4-10-12-6-14-12 double crochets evenly spaced = 161-181-201-209-237-257 stitches. Continue working until the piece measures approx. 19-21-23-25-27-29 cm from the cast-on edge mid front – adjust so the next row is a row of double crochets. Now divide the yoke for body and sleeves; i.e. the next row is worked as follows from the right side: Work 1 double crochet in each of the first 24-27-29-31-35-39 stitches (= half back piece), work 6-6-6-8-8-8 loose chain stitches (= in side under sleeve), skip the next 34-38-44-44-50-52 stitches (= sleeve), work 1 double crochet in each of the next 46-52-56-60-68-76 stitches (= front piece), work 6-6-6-8-8-8 loose chain stitches (= in side under sleeve), skip the next 34-38-44-44-50-52 stitches (= sleeve) and work 1 double crochet in each of the last 23-26-28-30-34-38 stitches (= half back piece). Body and sleeves are finished separately. THE PIECE IS NOW MEASURED FROM HERE! BODY: = 105-117-125-137-153-169 stitches (including the 6-6-6-8-8-8 chain stitches under each sleeve). Insert 1 marker thread after the first 27-30-32-35-39-43 stitches (= half back piece) and 1 marker thread after the next 52-58-62-68-76-84 stitches (= front piece), there are 26-29-31-34-38-42 stitches left to the beginning of the row (= half back piece). Allow the marker threads to follow your work onwards; they will be used when increasing in the sides. Continue back and forth with patterns A.4 and A.5 as before. When the body measures 8 cm from the division, increase 2 stitches in each side – read INCREASE TIP-2. Increase like this every 9 cm a total of 3 times in each side = 117-129-137-149-165-181 stitches. Continue working until the body measures 35 cm from the division but finish after a row of double crochets from the right side. Cut and fasten the strands. The jumper measures approx. 56-58-60-62-64-66 cm from the shoulder down. SLEEVE: The sleeve is worked back and forth (i.e. alternately from the right and wrong side) from mid under the sleeve (so the texture matches on the body and sleeve). Start from the wrong side, in the middle of the 6-6-6-8-8-8 stitches under the sleeve and work 1 double treble crochet in each of the 3-3-3-4-4-4 stitches from the middle outwards – remember CROCHET INFORMATION, work 1 double treble crochet in each of the 34-38-44-44-50-52 stitches which were skipped and finish with 1 double treble crochet in each of the last 3-3-3-4-4-4 stitches mid under sleeve = 40-44-50-52-58-60 stitches, turn the piece. Continue back and forth with patterns A.4 and A.5 as before. When the piece measures approx. 3 cm from the division decrease 1 stitch on each side – read DECREASE TIP. Decrease like this every 5-3-2-2-1½-1½ cm a total of 3-4-6-6-8-8 times on each side = 34-36-38-40-42-44 stitches. When the sleeve measures 16-16-16-15-15-15 cm from the division increase 1 stitch on each side by working 2 stitches in the next-to-outermost stitch on each side. Increase like this every 9-9-8-8-6-5½ cm a total of 3-3-3-3-4-4 times on each side = 40-42-44-46-50-52 stitches. Continue working until the sleeve measures 45-44-42-41-39-38 cm from the division but finish after a row of double crochets (you can try the jumper on and continue to desired length). NOTE: Shorter measurements in larger sizes due to wider neck and longer yoke. Cut and fasten the strands. Work the other sleeve in the same way. ASSEMBLY: Sew the seam under the sleeve – sew in the outermost loop of the outermost stitch. |
||||||||||||||||||||||||||||
Diagram explanations |
||||||||||||||||||||||||||||
|
||||||||||||||||||||||||||||
 |
||||||||||||||||||||||||||||
 |
||||||||||||||||||||||||||||
Have you finished this pattern?Tag your pictures with #dropspattern #autumngoldsweater or submit them to the #dropsfan gallery. Do you need help with this pattern?You'll find 12 tutorial videos, a Comments/Questions area and more by visiting the pattern on garnstudio.com. © 1982-2026 DROPS Design A/S. We reserve all rights. This document, including all its sub-sections, has copyrights. Read more about what you can do with our patterns at the bottom of each pattern on our site. |
||||||||||||||||||||||||||||


With over 40 years in knitting and crochet design, DROPS Design offers one of the most extensive collections of free patterns on the internet - translated to 17 languages. As of today we count 324 catalogues and 12290 patterns translated into English (UK/cm). 12290
We work hard to bring you the best knitting and crochet have to offer, inspiration and advice as well as great quality yarns at incredible prices! Would you like to use our patterns for other than personal use? You can read what you are allowed to do in the Copyright text at the bottom of all our patterns. Happy crafting!
Post a comment to pattern DROPS 207-19
We would love to hear what you have to say about this pattern!
If you want to leave a question, please make sure you select the correct category in the form below, to speed up the answering process. Required fields are marked *.