
Popular categories
Looking for a yarn?


Comments / Questions (3)
![]() Kim wrote:
Kim wrote:
Liebes Team, was bedeutet "betont" abnehmen? Vielen Dank für Eure Antwort. Viele Grüße Kim
03.10.2024 - 10:21DROPS Design answered:
Liebe Kim, hier ist "geneigt" gemeint, entweder nach rechts geneight (2 M rechts zusammen) oder nach links geneight (1 M abheben, 1 M stricken, die abgehobene Masche über die gestrickte Masche ziehen). Viel Spaß beim Stricken!
03.10.2024 - 16:08
![]() Kim wrote:
Kim wrote:
Liebes Team, was bedeutet "betont" abnehmen? Vielen Dank für Eure Antwort. Viele Grüße Kim
03.10.2024 - 10:02
![]() Savenville wrote:
Savenville wrote:
Wearing/carrying purchased wool fabric berets for recent capricious weather - rain and wind with sunny intervals, hairstyle demolished so hat must remain all day. This is perfect to stay in place and knit in cotton or cotton polyester, one colour if preferred. I can usually rely on you and drops.tks.
12.08.2019 - 23:48
|
|
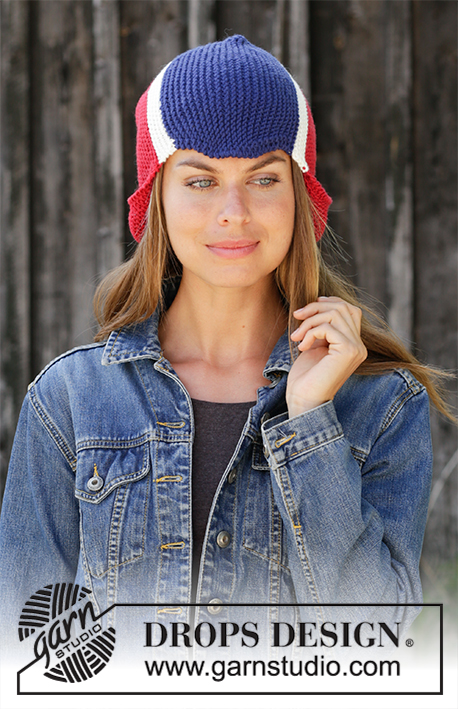
Ready to Cheer#readytocheerhat |
|
 |
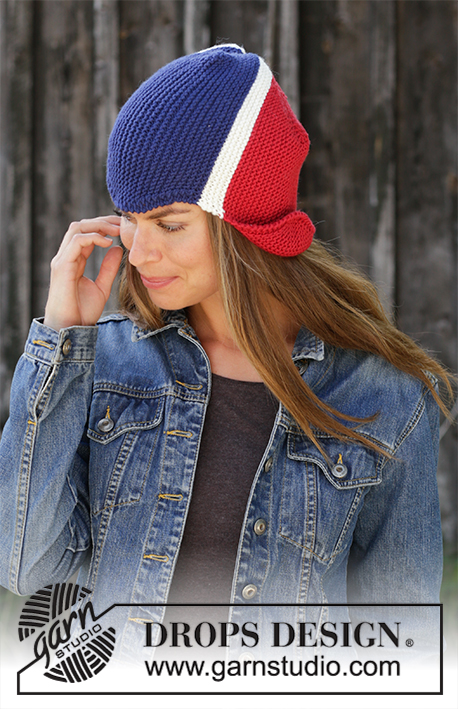 |
Knitted hat with flag in DROPS Merino Extra Fine. The piece is worked sideways with garter stitch and stripes.
DROPS 194-40 |
|
|
------------------------------------------------------- EXPLANATIONS FOR THE PATTERN: ------------------------------------------------------- RIDGE/GARTER STITCH (worked back and forth): Knit 2 rows = 1 ridge. DECREASE TIP: Decrease 1 stitch in 2 different ways: Decrease 1 stitch towards the right side of the piece: Knit 2 together. Decrease 1 stitch towards the left side of the piece: Slip 1 stitch as if to knit, knit 1 and pass the slipped stitch over the knitted stitch. INCREASE TIP: Increase 1 stitch by making 1 yarn over; on the next row knit the yarn over twisted to avoid a hole. INCREASE AND DECREASE ROWS: ROW 1 (= right side): Knit 2, increase 1 stitch – read INCREASE TIP!, knit until there are 4 stitches left on row, decrease 1 stitch towards the right – read DECREASE TIP! and knit 2. Remember each row from the wrong side is knitted. ROW 2 (=right side): Knit until there are 4 stitches left, decrease 1 stitch towards the right and knit 2. ROW 3 (=right side): Knit 2, decrease 1 stitch towards the left – read DECREASE TIP, knit until there are 2 stitches left, increase 1 stitch, knit 2. ROW 4 (=right side): Knit until there are 2 stitches left, increase 1 stitch and knit 2. COLOUR ALTERNATIVES: The hat on the picture is worked in the colour alternative for NORWAY as described here; if you wish you can use one of the colour alternatives described below. NORWAY: Colour 1 = red, colour 2 = off white and colour 3 = dark blue. ICELAND: Colour 1 = dark blue, colour 2 = off white and colour 3 = red. SWEDEN: Colours 1 and 3 = blue and colour 2 = yellow. DENMARK: Colours 1 and 3 = red and colour 2 = off white. FINLAND: Colours 1 and 3 = off white and colour 2 = blue. ------------------------------------------------------- START THE PIECE HERE: ------------------------------------------------------- SKATING HAT - SHORT OVERVIEW OF THE PIECE: The hat is worked sideways in one piece. All rows are knitted (= garter stitch). SKATING HAT: PART 1: Use colour 1 – read COLOUR ALTERNATIVES. Cast on 38-40-42 stitches with needle size 4 mm and Merino Extra Fine. Work 1 RIDGE – see description above. Then continue with garter stitch – AT THE SAME TIME as you increase/decrease on each row from the right side – read INCREASE AND DECREASE ROWS. All rows from the wrong side are knitted and are not described in the text. You can insert a marker on the right side if you wish, so that you can see which side to increase/decrease from. Work the first row from the right side as follows: Work ROW 1 – see description above, a total of 12-13-14 times. You should still have the same number of stitches on the needle and have worked a total of 13-14-15 ridges from the start. REMEMBER THE KNITTING TENSION! Work ROW 2 – see description above, a total of 4-4-4 times. Now there are 34-36-38 stitches on the needle and you have worked a total of 17-18-19 ridges from the start. Work ROW 3 – see description above, a total of 12-13-14 times. You should still have the same number of stitches on the needle and have worked a total of 29-31-33 ridges from the start. PART 2: Use colour 2. Work ROW 4 – see description above, a total of 4-4-4 times. Now there are 38-40-42 stitches on the needle. You have worked a total of 33-35-37 ridges from the start. PART 3: Use colour 3. Work ROW 1 a total of 6-8-8 times. You should still have the same number of stitches on the needle. Work ROW 2 a total of 4-4-4 times. Now there are 34-36-38 stitches on the needle and a total of 43-47-49 ridges from the start. The piece measures approx. 21-22-23 cm (= mid front of hat). Work ROW 4 a total of 4-4-4 times. Now there are 38-40-42 stitches on the needle. You have worked a total of 47-51-53 ridges from the start. Work ROW 3 a total of 6-8-8 times. You should still have the same number of stitches on the needle. PART 4: Use colour 2. Work ROW 2 a total of 4-4-4 times. There are now 34-36-38 stitches on the needle and you have worked a total of 57-63-65 ridges from the start. PART 5: Use colour 1. Work ROW 1 a total of 12-13-14 times. You should still have the same number of stitches on the needle and have worked a total of 69-76-79 ridges from the start. Work ROW 4 a total of 4-4-4 times. Now there are 38-40-42 stitches on the needle and a total of 73-80-83 ridges from the start. Work ROW 3 a total of 12-13-14 times. You should still have the same number of stitches on the needle and have worked a total of 85-93-97 ridges from the start. Finish by working 1 ridge and cast off with knit on next row. You have worked a total of 86-94-98 ridges from the start and the piece measures approx. 42-44-46 cm. ASSEMBLY: Top of hat = the side which has 2 whole points and 2 half points. Opening = the side which has 3 whole points (the middle point goes down the forehead). Sew the hat together edge to edge with small stitches as follows: Sew top of hat by sewing the first half point together with the first half of the first whole point. Then sew the second part of the first whole point together with the first half of the next whole point. Then sew the second half of the second whole point together with the last half point. To finish, sew the seam mid back (= cast-off and cast-on edges). |
|
Have you finished this pattern?Tag your pictures with #dropspattern #readytocheerhat or submit them to the #dropsfan gallery. Do you need help with this pattern?You'll find 14 tutorial videos, a Comments/Questions area and more by visiting the pattern on garnstudio.com. © 1982-2026 DROPS Design A/S. We reserve all rights. This document, including all its sub-sections, has copyrights. Read more about what you can do with our patterns at the bottom of each pattern on our site. |
|


With over 40 years in knitting and crochet design, DROPS Design offers one of the most extensive collections of free patterns on the internet - translated to 17 languages. As of today we count 324 catalogues and 12290 patterns translated into English (UK/cm). 12290
We work hard to bring you the best knitting and crochet have to offer, inspiration and advice as well as great quality yarns at incredible prices! Would you like to use our patterns for other than personal use? You can read what you are allowed to do in the Copyright text at the bottom of all our patterns. Happy crafting!
Post a comment to pattern DROPS 194-40
We would love to hear what you have to say about this pattern!
If you want to leave a question, please make sure you select the correct category in the form below, to speed up the answering process. Required fields are marked *.