
Popular categories
Looking for a yarn?


Comments / Questions (32)
![]() Astrid De Jong wrote:
Astrid De Jong wrote:
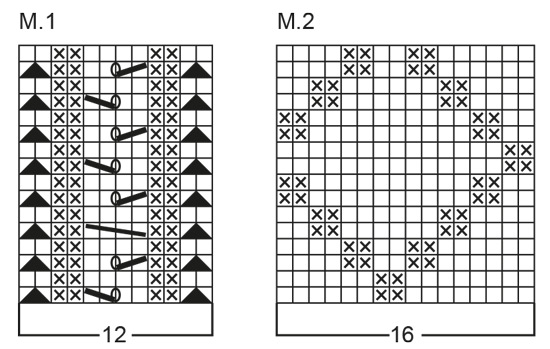
Het telpatroon van model 60-3 snap ik niet, met name het driehoekje wat je breit van patroon M.1 Heeft u daar een video van.
19.06.2024 - 11:42DROPS Design answered:
Dag Astrid,
De vertaling van dat symbool was niet goed en het is nu aangepast. Hopelijk is het nu duidelijk. Bij een van de video's die bij het patroon staat vind je een video met de titel 'Hoe breit u een kabel zonder kabelnaald', hierin wordt uitgelegd hoe je dit symbool breit.
24.06.2024 - 22:09
![]() Johanna wrote:
Johanna wrote:
Hi, I bought the yarn for this cardigan and some others last year but never got around to knitting them. Can the pattern be downloaded and printed because I only have my mobile phone and wouldn't be able to follow the pattern on that. Thank you Johanna
10.04.2024 - 10:52DROPS Design answered:
Dear Johanna, please click on the printer icon, just above the "Pattern Instructions" line, that will give you the PDF which can be downloaded and/or printed. Happy Knitting!
10.04.2024 - 11:19
![]() Sylvia wrote:
Sylvia wrote:
Name: Pearls on Strings
22.03.2024 - 01:27
![]() Christel Hagemeier wrote:
Christel Hagemeier wrote:
= 2 M. auf eine Hilfsnadel vor die Arbeit legen, 2 re., 1 re. von der Hilfsnadel = Umschlag . ?? Das verstehe ich nicht ganz, was passiert mit der 2.M von der Hilfsnadel , oder ist hier ein Schreibfehler, denn beim kreuzen heißt es immer 2 recht vor die Arbeit, zwei rechts und dann die 2M von der Hilfsnadel rechts. Vielen Dank
22.07.2022 - 12:40DROPS Design answered:
Liebe Christel, Sie haben Recht, hier stimmte etwas nicht - es muss wie auch von Ihnen beschrieben heißen: "2 M. auf eine Hilfsnadel vor die Arbeit legen, 2 re., 2 re. von der Hilfsnadel" - der Fehler wurde korrigiert. Gutes Gelingen weiterhin!
25.07.2022 - 19:38
![]() Rossy wrote:
Rossy wrote:
Bonjour je vais commencer les manches. Aiguilles doubles pointes est ce la même chose que les circulaires ? En faite les manches se font sans couture c'est bien ça ?
22.05.2022 - 09:34DROPS Design answered:
Bonjour Mme Rossy, les manches se tricotent d'abord en rond, soit sur aiguilles doubles pointes, soit sur aiguille circulaire (en rond ou bien en magic loop), puis vous les terminerez en allers et retours (à partir du milieu sous la manche/des débuts des tours) pour former le haut de la manche (la tête de manche). Bon tricot!
23.05.2022 - 08:25
![]() Josiane Rossy wrote:
Josiane Rossy wrote:
Merci pour votre réponse. J'ai bien compris qu'il faut continuer avec M2 mais alors ça change le nombre de mailles du diagramme et ça ne joue plus, avec les autres motifs... je ne sais pas comment faire. Je suis débutante
22.03.2022 - 15:51DROPS Design answered:
Bonjour Mme Rossy, avez-vous bien tricoté le 2ème devant en sens inverse pour que les motifs se rejoignent bien quand les 2 parties sont réunies? Autrement dit, le devant gauche se tricote ainsi: 4 m point mousse, les 5-13 dernières mailles de M.2, répétez 6 fois M.2, tricotez les 2 premières m de M.2, M.1, 6 m point mousse. Ainsi le motif M.2 est symétrique côté bordure devant/M.1 et vous pouvez compléter un M.2 entre les 2 devants. Bon tricot!
22.03.2022 - 16:38
![]() Rossy Josiane wrote:
Rossy Josiane wrote:
Quand je rejoins les 2 devants au milieu je dois continuer M2, il y a 4 mailles (celles du point mousse)de trop pour faire le dessin. Ou je dois continuer à tricoter ces 4 mailles au point mousse ? Merci d'avance.
12.03.2022 - 13:59DROPS Design answered:
Bonjour Mme Rossy, lorsque vous tricotez le dos et les deux devants ensemble, vous tricotez les 4 mailles point mousse du devant gauche (au milieu dos) en suivant le point fantaisie M.2 . Bon tricot!
14.03.2022 - 10:29
![]() Josiane Rossy wrote:
Josiane Rossy wrote:
Bonjour, pour les diagrammes comment faire sur le rang envers car il n'est pas présenté dessus. Merci
02.03.2022 - 19:55DROPS Design answered:
Bonjour Mme Rossy, tous les rangs des motifs sont représentés dans les diagrammes, autrement dit, tricotez les mailles comme indiqué dans la légende (ajustements faits pour plus de clarté) et, sur l'envers, lisez les diagrammes de gauche à droite. Voir aussi ici. Bon tricot!
03.03.2022 - 10:09
![]() Rossy Jo wrote:
Rossy Jo wrote:
Bonjour, pour les diagrammes comment faire sur le rang envers car il n'est pas présenté dessus.
02.03.2022 - 19:42
![]() Currier Dorothy wrote:
Currier Dorothy wrote:
In the body when work measures 44 call me, i don’t understand the instructions after the phrase “at the same time…”. Is it decreased in the first m2 pattern or in each m2 pattern across the row? I don’t understand the decreasing after that.
04.02.2022 - 05:14DROPS Design answered:
Dear Mrs Currier, you will decrease 1 stitch on every other row a total of 4 times (= the 6 front band sts are decreased to 4 sts) - and at the same time, you decrease for neck inside M.1, ie decrease on right front piece after M.1 and on left front piece before M.1, this means you will decrease the number of sts worked in M.2 (this will shape V-neck). Happy knitting!
04.02.2022 - 09:22
|
||||||||||||||||||||||
DROPS 60-3 |
||||||||||||||||||||||
 |
 |
|||||||||||||||||||||
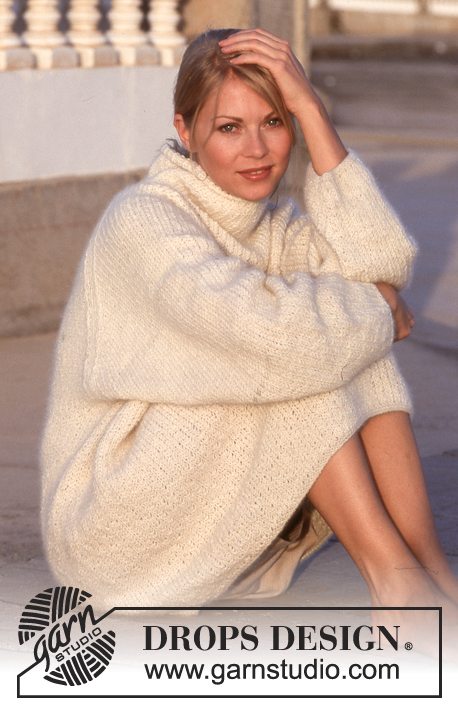
DROPS Cardigan in Bomull-Lin
DROPS 60-3 |
||||||||||||||||||||||
|
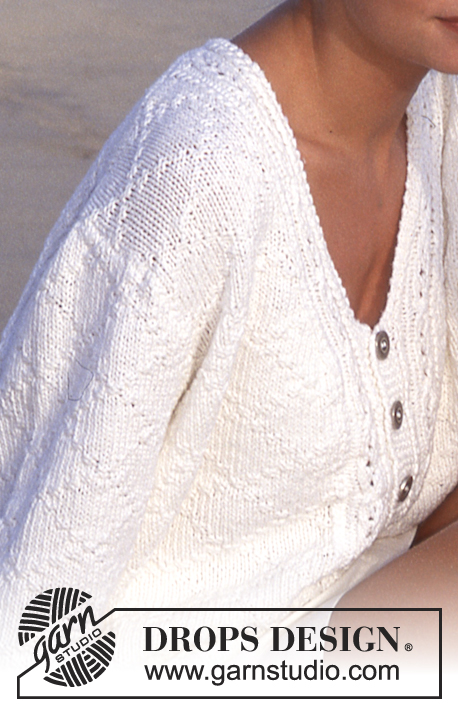
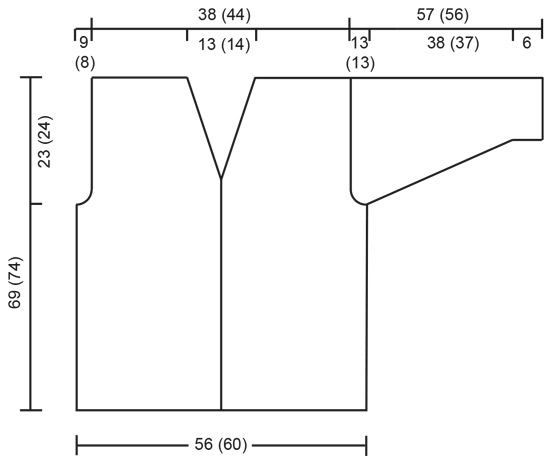
Gauge: 21 sts x 28 rows on larger needles in stockinette st = 10 x 10 cm. Pattern: See charts (1 chart = 1 repeat). The pattern is seen from the right side. Buttonholes: Make buttonholes on the right front as follows: bind off the 4th and 5th sts and cast on 2 new sts over the bound-off sts on the next row when the work measures: 1 cm 7 (8) cm 13.5 (14.5) cm 19.5 (21.5) cm 25.5 (28.5) cm 31.5 (35.5) cm 38 (42) cm and 44 (49) cm Garter st, when knitting flat: Knit all sts, all rows. Garter st, when knitting in the round: *Rnd 1, knit. Rnd 2, purl.* Repeat from * - *. Right side piece: There is a split at the center back; because of this, knit the cardigan in two parts for the first 12 (14) cm. Cast on 125 (133) sts on smaller needles and knit 4 rows garter st. Change to larger needles and knit the next row as follows beginning at the center front: 6 sts garter st (for the button band, knit these sts in garter st throughout), Pattern 1, 103 (111) sts of Pattern 2, 4 sts garter st (for the split placket). Continue with pattern as established. Make buttonholes as instructed above. When the work measures 12 (14) cm bind off the 4 garter sts at the center back and put the work aside. Left side piece: Cast on and work like right side piece, but reversed and without button holes, and do not bind off the 4 sts in garter st mid back. Body: Put both side pieces on the same circular needle with the two sides of the split placket meeting in the center of the row = 246 (262) sts. Attach a marker for each side, fronts = 65 (69) sts each, back = 116 (124) sts. Continue with the pattern as established, but now knit the 4 placket sts from the left side piece into Pattern 2. When the work measures 44 (49) cm bind off 1 st at each center front edge every other row 4 times, and at the same time decrease for the neck inside Pattern 1 (make decreases in Pattern 2 sts) as follows: 1 st 11 (12) times every other row, 1 st 4 times every 4th row, then 1 st 2 times every 6th row. Make decreases as follows: on the right front: slip 1, K 1, psso; and on the left front: K 2 tog. At the same time, when the work measures 46 (50) cm, bind off 2 sts each side of each marker for armholes (4 sts bound off for each armhole), and knit the rest of the front and back separately. Front: Bind off for armholes every other row: 3 sts 2 times, 2 sts 3 (2) times, 1 st 4 times. When all sts have been bound off for the neck and the armholes 26 (31) sts remain on the needles. Bind off when the work measures 69 (74) cm. Back: = 112 (120) sts. Bind off for armholes as on the front = 80 (92) sts. When the work measures 66 (71) cm knit 4 rows garter st over the center 28 (30) sts (keep the rest of the row in pattern st), then bind off the center 24 (26) sts for the neck on the next row. Bind off 1 st 2 times at each neck edge every row inside the 2 edge sts which are knit in garter st throughout. Bind off when the work measures 69 (74) cm. Sleeves: Cast on 48 (48) sts on smaller double pointed needles; join and place a marker at the join. Knit 4 rows garter st. Change to larger double pointed needles and knit Pattern 2, centering the pattern on the sleeve. When the work measures 6 cm, inc 1 st each side of marker 22 (23) times every 4th row = 92 (94) sts. When the work measures 44 (43) cm bind off 2 sts each side of marker, and knit the rest back and forth on the needles. Bind off at each side for sleeve caps every other row: 3 sts 2 times, 2 sts 4 (5) times, 1 st 5 (4) times, 2 sts 5 times, 3 sts 2 times, bind off. The work measures 57 (56) cm. Assembly: Sew shoulder seams. Sew in the sleeves and the buttons. Lay the bound-off placket sts underneath and sew together at the top. You can crochet a row of single crochets around the neck to make a firmer edge. |
||||||||||||||||||||||
Diagram explanations |
||||||||||||||||||||||
|
||||||||||||||||||||||
 |
||||||||||||||||||||||
 |
||||||||||||||||||||||
Have you finished this pattern?Tag your pictures with #dropspattern or submit them to the #dropsfan gallery. Do you need help with this pattern?You'll find 23 tutorial videos, a Comments/Questions area and more by visiting the pattern on garnstudio.com. © 1982-2026 DROPS Design A/S. We reserve all rights. This document, including all its sub-sections, has copyrights. Read more about what you can do with our patterns at the bottom of each pattern on our site. |
||||||||||||||||||||||


With over 40 years in knitting and crochet design, DROPS Design offers one of the most extensive collections of free patterns on the internet - translated to 17 languages. As of today we count 324 catalogues and 12290 patterns translated into English (UK/cm). 12290
We work hard to bring you the best knitting and crochet have to offer, inspiration and advice as well as great quality yarns at incredible prices! Would you like to use our patterns for other than personal use? You can read what you are allowed to do in the Copyright text at the bottom of all our patterns. Happy crafting!
Post a comment to pattern DROPS 60-3
We would love to hear what you have to say about this pattern!
If you want to leave a question, please make sure you select the correct category in the form below, to speed up the answering process. Required fields are marked *.